2019 MERCEDES-BENZ GLC SUV clock
[x] Cancel search: clockPage 121 of 673
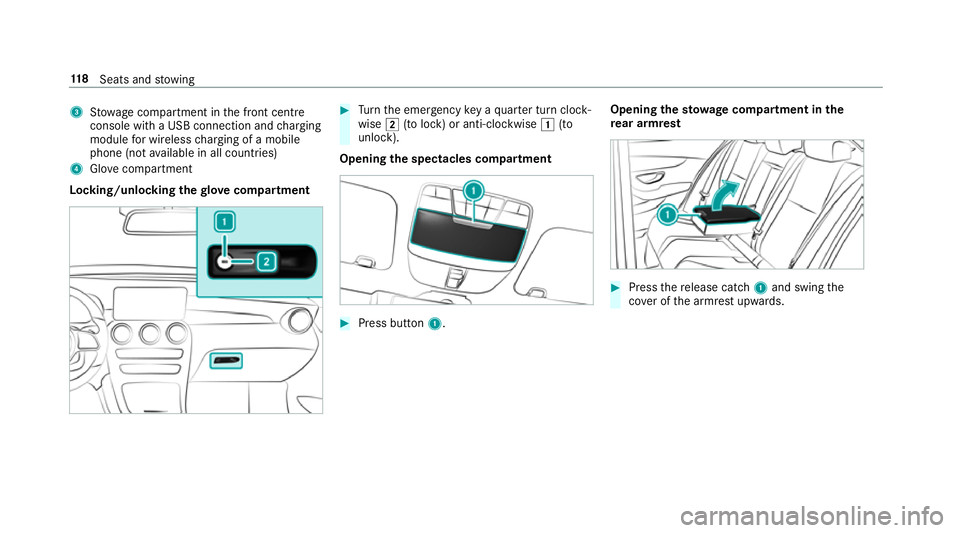
3
Stow age compartment in the front cent re
console wi tha USB connection and charging
module for wireless charging of a mobile
phone (not available in all countries)
4 Glovecompa rtment
Locking/unlo cking thegl ove compa rtment #
Turn the emer gency key a quarter turn clock‐
wise 2(to lock) or anti-clockwise 1(to
unlock).
Opening the spectacles compa rtment #
Press button 1. Opening the
stowage compa rtment in the
re ar armrest #
Press there lease cat ch1 and swing the
co ver of the armrest upwards. 11 8
Seats and stowing
Page 134 of 673
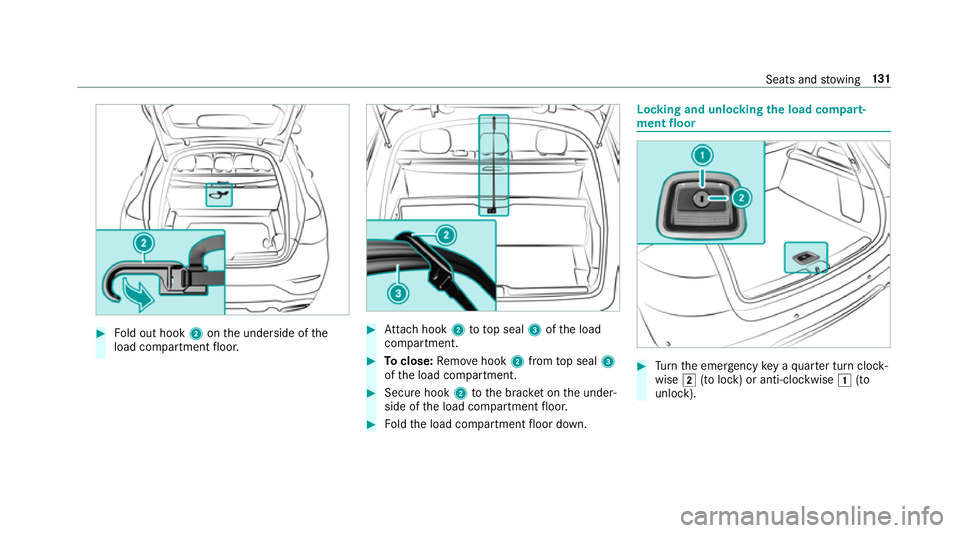
#
Fold out hook 2onthe underside of the
load compartment floor. #
Attach hook 2to to p seal 3ofthe load
compartment. #
Toclose: Remo vehook 2from top seal 3
of the load compartment. #
Secure hook 2tothe brac ket on the under‐
side of the load compartment floor. #
Foldthe load compartment floor down. Locking and unlocking
the load compa rt‐
ment floor #
Turn the emer gency key a quarter turn clock‐
wise 2(to lock) or anti-clockwise 1(to
unlock). Seats and
stowing 131
Page 199 of 673
*
NO
TEFuel may spr ayout when you
re mo vethe fuel pump nozzle. #
Only fill th e fuel tank until the pump
nozzle switches off. Re
quirements:
Plug-in-hybrid: forve hicles with a petrol engine,
obser vethe no tes in the Supplement. Otherwise,
yo u may failto recognise dangers.
R The vehicle is unloc ked (/ page75).
% Do not get into theve hicle again during the
re fuelling process. Otherwise, electros tatic
ch arge could build up again.
Obser vethe no tes on operating fluids
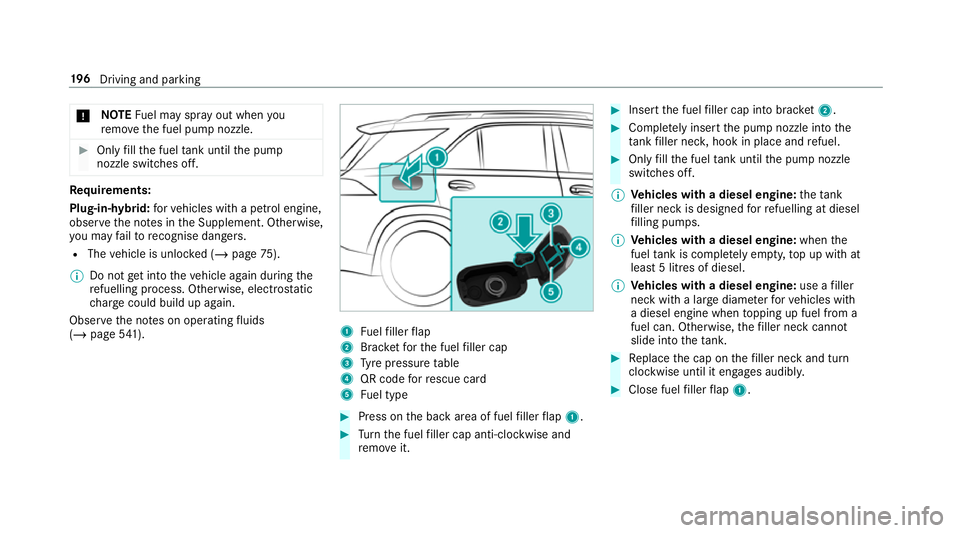
(/ page 541). 1
Fuelfiller flap
2 Brac ketfo rth e fuel filler cap
3 Tyre pressure table
4 QR code forre scue card
5 Fuel type #
Press on the back area of fuel filler flap 1. #
Turn the fuel filler cap anti-clockwise and
re mo veit. #
Insert the fuel filler cap into brac ket2. #
Comp lete ly inse rtthe pump nozzle into the
ta nk filler nec k,hook in place and refuel. #
Only fill th e fuel tank until the pump nozzle
switches off.
% Vehicles with a diesel engine: theta nk
fi ller neck is designed forre fuelling at diesel
fi lling pumps.
% Vehicles with a diesel engine: whenthe
fuel tank is compl etely em pty, top up with at
least 5 litres of diesel.
% Vehicles with a diesel engine: use afiller
neck with a lar gediame terfo rve hicles with
a diesel engine when topping up fuel from a
fuel can. Otherwise, thefiller neck cannot
slide into theta nk. #
Replace the cap on thefiller neck and turn
clockwise until it engages audibl y. #
Close fuel filler flap 1. 19 6
Driving and pa rking
Page 201 of 673
The
following messages appear in order in the
multifunction display when theAd Blue ®
tank
re qu ires topping up:
R Refill AdBlue See Owner's Manual . The
Ad Blue ®
tank is down tothere ser veleve l.
R Top up AdBlue Emergency op. in XXX miles
See Owner's Manual .Yo u can on lydrive the
ve hicle overth e dis tance shown. The
Ad Blue ®
tank is down tothere ser veleve l.
R Top up AdBlue Perf. reduced: XXX km/h No
start in XXX km. You can on lydrive theve hi‐
cle overth e dis tance shown. Top up AdBlue ®
as soon as possible.
R Refill AdBlue No start in XXX km. You can
on lydrive theve hicle overth e dis tance
shown. Top up AdBlue ®
as soon as possible.
R XX,X l Top up AdBlue Engine start not possi-
ble. The vehicle can no longer be star ted.
Yo u can see theAd Blue ®
ra nge and le vel in the
multifunction display (/ page 288).
% The AdBlue ®
ra nge shown depends strongly
on the driving style and operating condi‐ tions. The actual
range can therefore deviate
from the calculated range.
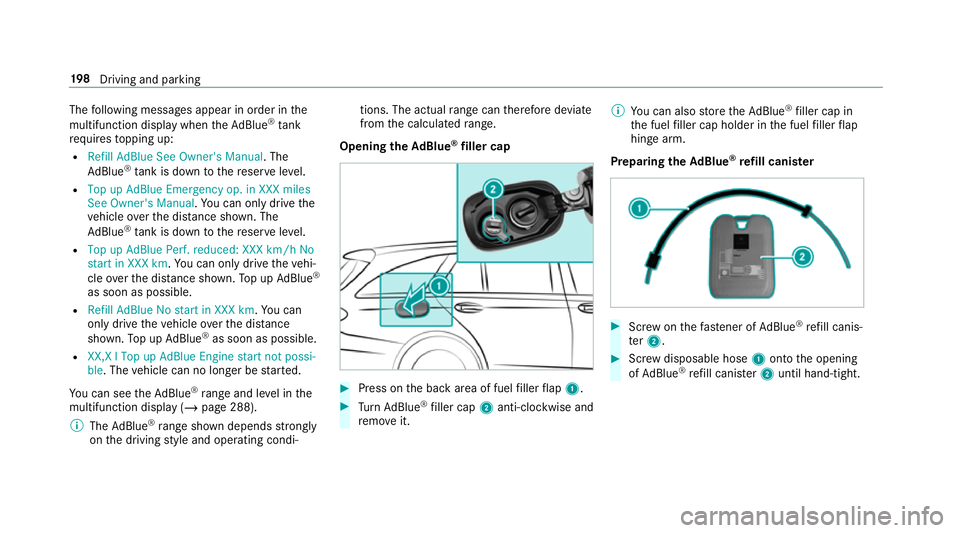
Opening the AdBlue ®
filler cap #
Press on the back area of fuel filler flap 1. #
Turn AdBlue ®
filler cap 2anti-clockwise and
re mo veit. %
You can also store theAd Blue ®
filler cap in
th e fuel filler cap holder in the fuel filler flap
hin gearm.
Prepa ring theAd Blue ®
re fill canis ter #
Screw onthefast ener of AdBlue ®
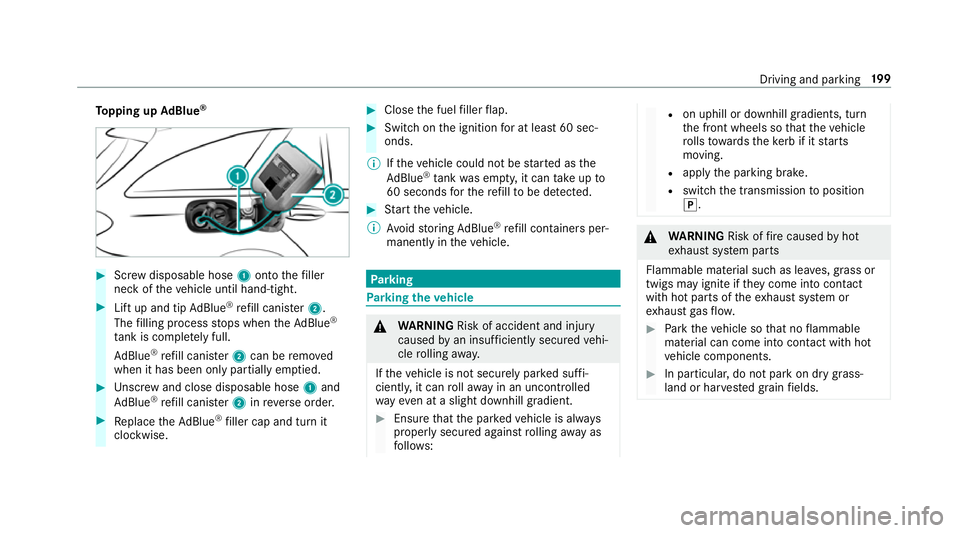
re fill canis‐
te r2. #
Screw disposable hose 1onto the opening
of Ad Blue ®
re fill canis ter2 until hand-tight. 19 8
Driving and pa rking
Page 202 of 673
To
pping up AdBlue ® #
Screw disposable hose 1onto thefiller
neck of theve hicle until hand-tight. #
Lift up and tip AdBlue ®
re fill canis ter2.
The filling process stops when theAd Blue ®
ta nk is compl etely full.
Ad Blue ®
re fill canis ter2 can be remo ved
when it has been only partially em ptied. #
Unscr ew and close disposable hose 1and
Ad Blue ®
re fill canis ter2 inreve rse order. #
Replace theAd Blue ®
filler cap and turn it
clockwise. #
Close the fuel filler flap. #
Swit chon the ignition for at least 60 sec‐
onds.
% Ifth eve hicle could not be star ted as the
Ad Blue ®
tan kwa s em pty, it can take up to
60 seconds forth ere fill to be de tected. #
Start theve hicle.
% Avoid storing AdBlue ®
re fill con tainers per‐
manently in theve hicle. Pa
rking Pa
rking theve hicle &
WARNING Risk of accident and inju ry
caused byan insuf ficiently secu redve hi‐
cle rolling away.
If th eve hicle is not securely par ked suf fi‐
ciently, it can rollaw ay in an uncont rolled
wa yev en at a slight downhill gradient. #
Ensure that the par kedve hicle is alw ays
properly secured against rolling away as
fo llo ws: R
on uphill or downhill gradients, turn
th e front wheels so that theve hicle
ro lls towa rdsth eke rb if it starts
moving.
R apply the parking brake.
R switch the transmission toposition
j. &
WARNING Risk offire caused byhot
ex haust sy stem parts
Flammable material such as lea ves, grass or
twigs may ignite if they come into contact
wi th hot parts of theex haust sy stem or
ex haust gasflow. #
Park theve hicle so that no flammable
material can come into con tact wi thhot
ve hicle components. #
In particular, do not park on dry grass‐
land or har vested grain fields. Driving and parking
19 9
Page 325 of 673
#
Select Acoustic operating feedback. #
Set Normal ,Loud orOff.
If th e function is activated you will hear a
clicking sound when sc rolling in a list. When
th e beginning or end of the list is reached
yo u will hear ano ther clicking sound. To
uchscreen Operating
theto uchscreen
Ta pping #
Toselect a menu item or entr y:tap on a
symbol or an ent ry.#
Toincrease the map scale: tap twice
qu ickly with one finger. #
Toreduce the map scale: tap with two fin‐
ge rs. #
Toenter characters with th eke ypad: tap
on a button.
Single-finger swipe #
Tonavigate in menus: swipe up, down, left
or right. #
Tomo vethe digital map: swipe in any
direction. #
Touse handwriting toenter characters:
write thech aracter with one finger on the
to uchsc reen.
Tw o-finger swipe #
Tozoom in and out of the map: movetwo
fi ngers toget her or apart. #
Toenlar georreduce the size of a section
of a website: movetwo fingers toget her or
apart. #
Toturn the map: turn anti-clockwise or
clockwise using two fingers.
To uching, holding and moving #
Tomo vethe map: touch theto uchsc reen
and mo veyour finger in any di rection. #
Toset thevo lume on a scale: touch the
to uchsc reen and mo vethefinger tothe left
or right. To
uching and holding #
Tosave the destination in the map: touch
th eto uchsc reen and hold until a message is
shown. #
Tocall up a global menu in the applica‐
tions: touch theto uchsc reen and hold until
th eOPTIONS menu appears.
Setting acoustic operation feedba ckfor the
to uchscreen
Multimedia sy stem:
4 © 5
Settings 5
System
5 Controls
The function is suppor tedby the selection in a
list. #
Select Acoustic operating feedback. #
Set Normal, LoudorOff.
If th e function is activated you will hear a
clicking sound when sc rolling in a list. When
th e beginning or end of the list is reached
yo u will hear ano ther clicking sound. 322
MBUX multimedia sy stem
Page 404 of 673
Ro
tating the map #
With two fingers, rotate anti-clockwise or
clo ckwise on the media display or theto uch‐
pad.
Selecting the map orientation
Multimedia sy stem:
4 © 5
Navigation 5
Z
5 Advanced #
Select View. #
Select Map orientation. #
Select an option.
The #dot indicates the cur rent setting.
The following options are available:
R 2D heading up option:the 2D map view is
aligned tothe direction of tra vel.
R 2D north up option:the 2D map view is
displa yed so that no rth is alw ays at the
to p.
R 3Doption: the 3D map view is aligned to
th e direction of tra vel.
or #
Using quick- access: repeatedly tap or press
on theÄ compass symbol on the map.
The view changes in the sequence 3D,2D
heading up to2D north up .
If th e map is mo ved, it can switch between
3D and 2D north up .
Selecting POI symbols for the map display
Multimedia sy stem:
4 © 5
Navigation 5
Z
POIs include restaurants and ho tels, forex am‐
ple. These can be displa yed as symbols on the
map. Not all POIs are available everywhere.
Pe rsonal POIs are destinations which you ha ve
sa ve d on a USB device, forex ample.
% The display of POI symbols on the map can
be activated or deactivated as a favo urite. #
Toswitch on/off using quick- access: if
av ailable, swit chPOI symbols on or off.
The POI symbols forth e selected categories
are shown on the map.
or #
Toswitch on/off in the menu: select
Advanced. #
Select View. #
Select Map elements. #
Select POI symbols r.
The POI SYMBOLS menu is shown. #
Swit chDisplay POIs on or off.
Selecting ca tegories #
Select rinthePOI SYMBOLS All catego-
ries menu. #
Switch Show all on or off.
When the option is switched on, the POI sym‐
bols for all categories are shown on the map.
or #
Select the categories and sub-categories (if
av ailable) r. #
Activate or deacti vate the categories.
The POI symbols forth e selected categories
are shown on the map. MBUX multimedia sy
stem 401
Page 483 of 673
&
WARNING Risk offire and injury from
engine oil
If engine oil comes into con tact wi thhot
component parts in the engine compart‐
ment, it may ignite. #
Make sure that no engine oil is spilled
next tothefiller opening. #
Allow the engine tocool off and thor‐
oughly clean the engine oil from compo‐
nent parts before starting theve hicle. *
NO
TEEngine dama gecaused byan
incor rect oil filter, incor rect oil or addi‐
tives #
Do not use engine oils or oil filters
which do not cor respond tothe specifi‐
cations explicitly prescribed forthe
service inter vals. #
Do not alter the engine oil or oil filter in
order toachie velonger change inter vals
th an presc ribed. #
Do not use additives. #
Follow the instructions in the service
inter val display rega rding the oil
ch ange. *
NO
TEDama gecaused bytopping up too
much engine oil To
o much engine oil can damage the engine
or the catalytic con verter. #
Have excess engine oil remo ved at a
qu alified specialist workshop. #
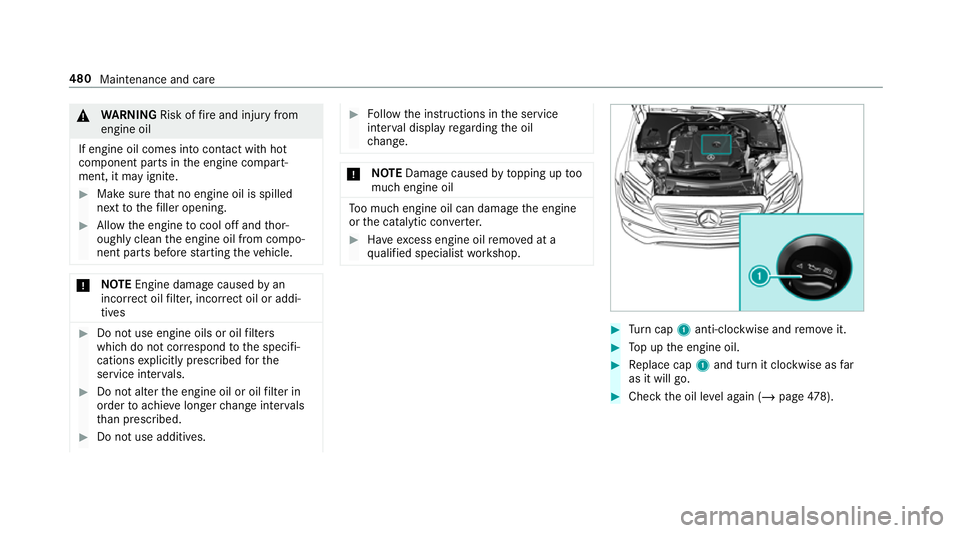
Turn cap 1anti-clockwise and remo veit. #
Top up the engine oil. #
Replace cap 1and turn it clockwise as far
as it will go. #
Check the oil le vel again (/ page478). 480
Maintenance and care