2019 MERCEDES-BENZ GLB SUV reset
[x] Cancel search: resetPage 175 of 689
&
WARNING Risk of accident due tomis‐
judgement of dis tances when using the
outside mir ror
The outside mir rors reflect objects on a
smaller scale. The objects in view are in fact
closer than they appear.
As a result, you may misjud gethe dis tance
between you and thero ad user driving
behind you, e.g. when changing lanes. #
Therefore, alw ays look over your shoul‐
der in order toensure that you are
aw are of the actual dis tance between
yo u and thero ad users driving behind
yo u. #
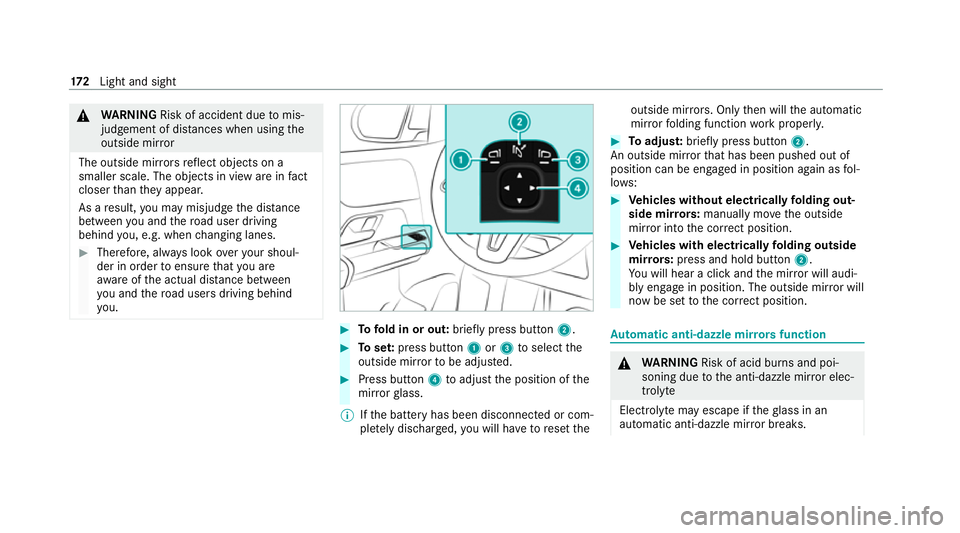
Tofold in or out: brieflypress button 2. #
Toset:press button 1or3 toselect the
outside mir rorto be adjus ted. #
Press button 4toadjust the position of the
mir rorgl ass.
% Ifth e battery has been disconnected or com‐
ple tely discharged, you will ha vetoreset the outside mir
rors. Only then will the automatic
mir rorfo lding function workproperly. #
Toadjus t:briefly press button 2.
An outside mir rorth at has been pushed out of
position can be engaged in position again as fol‐
lo ws: #
Vehicles without electrical lyfolding out‐
side mir rors: manually mo vethe outside
mir ror into the cor rect position. #
Vehicles with electrical lyfolding outside
mir rors: press and hold button 2.
Yo u will hear a click and the mir ror will audi‐
bly engage in position. The outside mir ror will
now be set tothe cor rect position. Au
tomatic anti-dazzle mir rors function &
WARNING Risk of acid bu rns and poi‐
soning due tothe anti-dazzle mir ror elec‐
trolyte
Electrolyte may escape if theglass in an
automatic anti-dazzle mir ror breaks. 17 2
Light and sight
Page 301 of 689
R
Sport
R Progressive
R Understated
R Standard displays Showing display content on the in
stru ment
clus ter
Ve hicles with an instrument display in the
widescreen cockpit: additional display content
can be shown on the instrument clus ter.
% The display content on the instrument clus‐
te r adapt sto theto pic selected on the multi‐
media sy stem. #
Toselect display content: swipetothe
ri ght or left on the left-hand Touch Control. #
Swipe upwards or down wards on the left-
hand Touch Control toselect there qu ired
display con tent.
When the display conte nt is selected, it will
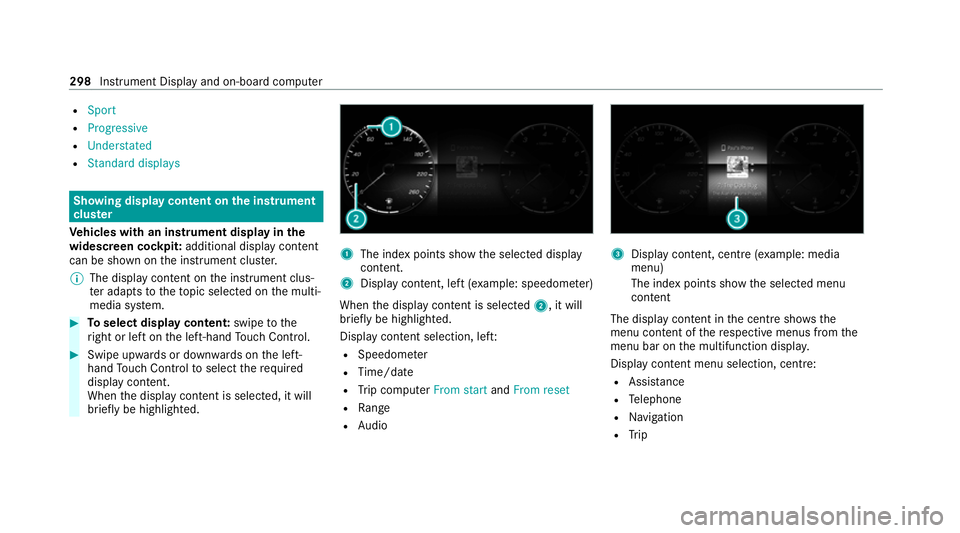
brie fly be highligh ted. 1
The index points show the selected display
conte nt.
2 Display content, le ft(exa mp le: speedom eter)
When the display conte nt is selected2, it will
brie fly be highligh ted.
Display con tent selection, le ft:
R Speedom eter
R Time/date
R Trip computer From startandFrom reset
R Range
R Audio 3
Display con tent, centre (e xamp le: media
menu)
The index points show the selected menu
conte nt
The displ aycontent in the cent resho wsthe
menu content of there spective menus from the
menu bar on the multifunction displa y.
Displ aycontent menu selection, centre:
R Assi stance
R Telephone
R Navigation
R Trip 298
Instrument Display and on-board computer
Page 304 of 689
R
Engine oil level: engine oil le vel
R Consumption info: fuel life cycle consump‐
tion Calling up displa
yson the Assistance menu On-board computer:
4 Assistance
The following displa ysare available on the Assis‐
ta nce menu:
R Assi stance
R Attention le vel (/ page 277)
R Vehicles with an instrument display in
th e widescreen cockpit: full screen#
Toswitch between the displa ys:swipe
upwards or down wards on the left-hand
To uch Control. %
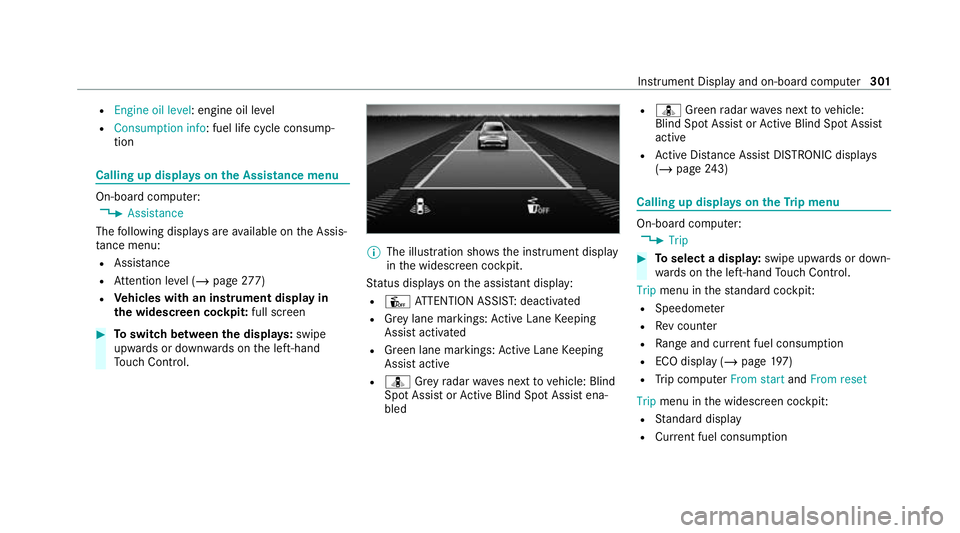
The illustration sho wsthe instrument display
in the widescreen cockpit.
St atus displa yson the assis tant displ ay:
R Û ATTENTION ASSIS T:deactivated
R Grey lane markings: Active Lane Keeping
Assist activated
R Green lane markings: Active Lane Keeping
Assist active
R ¸ Grey radar waves next tovehicle: Blind
Spot Assist or Active Blind Spot Assi stena‐
bled R
¸ Green radar waves next tovehicle:
Blind Spot Assist or Active Blind Spot Assi st
active
R Active Dis tance Assi stDISTRONIC displa ys
( / page 243) Calling up
displays on theTr ip menu On-board computer:
4 Trip #
Toselect a displa y:swipe upwards or down‐
wa rds on the left-hand Touch Control.
Trip menu in thest andard cockpi t:
R Speedom eter
R Rev counter
R Range and cur rent fuel consu mption
R ECO display (/ page 197)
R Trip computer From startandFrom reset
Trip menu in the widescreen cockpit:
R Standard display
R Cur rent fuel consu mption Instrument Displ
ayand on-board computer 301
Page 305 of 689
R
ECO display (/ page 197)
R Trip computer From startandFrom reset
R Full screen St
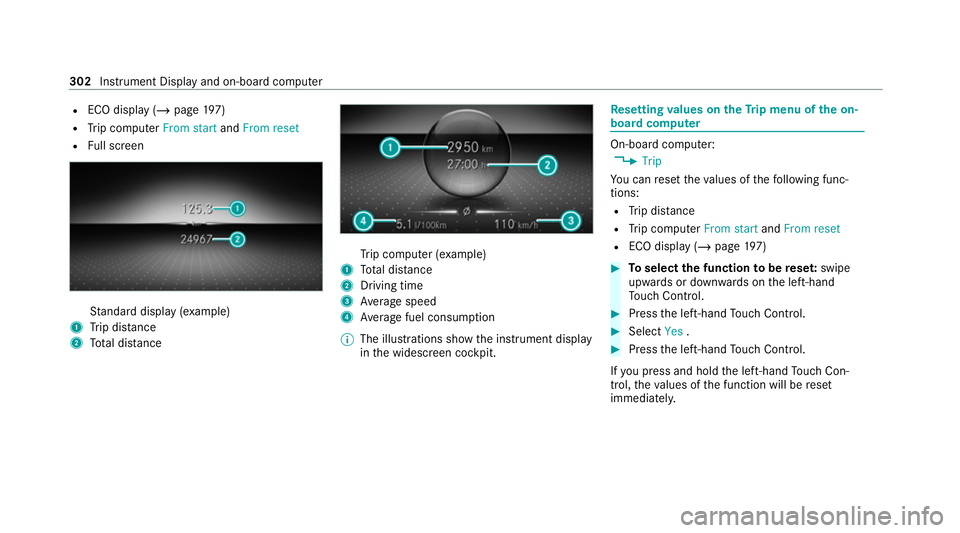
andard display (e xamp le)
1 Trip dis tance
2 Total dis tance Tr
ip computer (e xamp le)
1 Total dis tance
2 Driving time
3 Average speed
4 Average fuel consum ption
% The illustrations show the instrument display
in the widescreen cockpit. Re
setting values on theTr ip menu of the on-
board compu ter On-board computer:
4 Trip
Yo u can reset theva lues of thefo llowing func‐
tions:
R Trip dis tance
R Trip computer From startandFrom reset
R ECO display (/ page197) #
Toselect the function tobe rese t:swipe
upwards or down wards on the left-hand
To uch Control. #
Press the left-hand Touch Control. #
Select Yes. #
Press the left-hand Touch Control.
If yo u press and hold the left-hand Touch Con‐
trol, theva lues of the function will be reset
immediatel y. 302
Instrument Display and on-board computer
Page 307 of 689
Ve
hicles with the MBUX multimedia sy stem:
Yo u can also start navigation toone of the
re cent destinations on theNavigation menu: #
Press the left-hand Touch Control. #
Toselect a destination: swipe upwards or
down wards on the left-hand Touch Control. #
Press the left-hand Touch Control.
Ro ute guidance will start.
If ro ute guidance has already been activated,
a qu ery will appear asking whe ther you wish
to end the cur rent route guidance. #
Select Yes. #
Press the left-hand Touch Control.
Ro ute guidance will start. Selecting
radio stations using the on-boa rd
compu ter On-board computer:
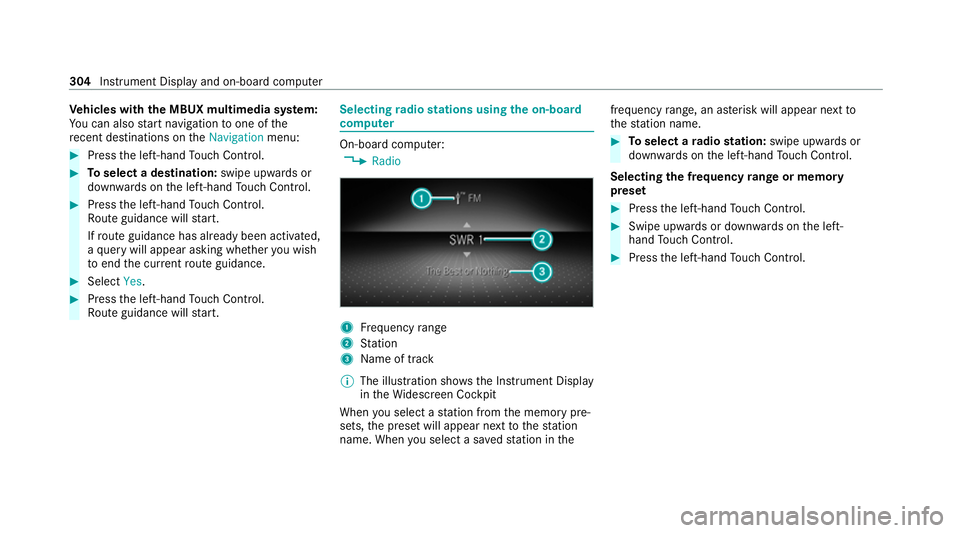
4 Radio 1
Frequency range
2 Station
3 Name of track
% The illustration sho wsthe Instrument Display
in theWi descreen Cockpit
When you select a station from the memory pre‐
sets, the preset will appear next tothest ation
name. When you select a sa vedstation in the frequency
range, an as terisk will appear next to
th est ation name. #
Toselect a radio station: swipe upwards or
down wards on the left-hand Touch Control.
Selecting the frequency range or memory
preset #
Press the left-hand Touch Control. #
Swipe upwards or down wards on the left-
hand Touch Control. #
Press the left-hand Touch Control. 304
Instru ment Display and on-board computer
Page 348 of 689
Selecting profile options
Multimedia sy
stem:
4 © 5
f Profiles #
Select Äfor a profile. #
Toedit a profile: selectEdit profile . #
Select an avatar. #
Chan gethe name, if necessar y.#
Select Save. #
Toconfigure suggestions: selectSugges-
tions settings (/page 349). #
Toreset favo urites or themes: select
Reset favourites to factory settings orReset
themes to factory settings. #
Select Yes. #
Toreset a profile: selectReset profile to
factory settings. #
Select Yes. #
Todel ete a profile: selectDelete profile . #
Select Yes.
% The guest profile cannot be dele ted. Pr
otecting profile content
To protect your profile content and settings you
can crea tea PIN in the Mercedes me por talfor
yo ur profile. When PIN pr otection is active, you
ha ve toenter the PIN toselect your profile. #
Select Protect content . #
Select Mercedes me portal.
The br owser opens and you are trans ferred
to the Mercedes me por tal.
Selecting a profile
Multimedia sy stem:
4 © 5
f Profiles
% You can cancel the setting process with the
fo llowing actions:
R Tap on thePositioning seat and steering
wheel. Please tap to cancel. warning on
th e media displa y.
R Press one of the seat operating buttons
in the driver's door. #
Select a profile. #
Press thea button toconfirm the mes‐
sage.
The profile is loaded and activated. %
Alternatively, the profile can already be
selected when theve hicle is entered
(/ page 346).
Synchronising a profile
Re quirements:
R You ha vea Mercedes me user account.
R The vehicle is connected with your Mercedes
me user account.
R The personalisation service is activated on
Mercedes me connect.
Multimedia sy stem:
4 © 5
f Profiles
5 General settings
Synchronisation enables thefo llowing:
R You can configure theve hicle settings using
th e Mercedes me app.
R The profile on Mercedes me connect and the
profile in theve hicle are aligned (profile man‐
agement). #
Activate Synchronise profiles automatically.
The profiles in theve hicle are automatically
synchronised with the profiles on Mercedes MBUX multimedia sy
stem 345
Page 352 of 689
R
From the beginning of usage, the multimedia
sy stem must analyse the user habits. When
suf ficient da tais collec tedth en the sugges‐
tions are available.
If th erequ irements mentioned are not fulfilled, a
pr ev iew with a desc ript ion of the function
appears in theSUGGESTIONS menu.
Yo u can configure data recording (/ page 349)
or del eteth e suggestions recorded
(/ page 350).
Calling up suggestions
Re quirements:
R A profile has been created and is selected
(/ page 345). #
Tap on © inthe media displa y.
The home screen is shown. #
Swipe up until theSUGGESTIONS menu is
shown. #
Select a navigation destination, a media
source, a radio station or a con tact.
If ro ute guidance is already active, you can‐
not start a new route guidance or set an intermediate destination
forth eex isting
ro ute.
Configuring sug gestions
Re quirements:
R Toprotect settings using a PIN: your pro‐
fi le is connec ted with Mercedes me and your
Mercedes me account is PIN pr otected.
Multimedia sy stem:
4 © 5
f Profiles #
Select ufor a profile. #
Select Suggestions settings . #
Toswitch suggestions display on/off:
switch Allow destination suggestions ,Allow
music suggestions andAllow contact sugges-
tions on or off.
If an option is switched on, suggestions for
navigation de stinations, media sources, radio
st ations or con tacts are shown.
If th e option is switched off, no suggestions
are shown. #
Todeactivate the learn function for one
da y:activate Deact. learn. for 24h .
Fo r24 hours no new actions will be trained
and no data recorded forth e active profile.
Suggestions will continue tobe shown. The
re maining time is shown next toDeact.
learn. for 24h .
Before the time runs out, a messa geis
shown that the multimedia sy stem will con‐
tinue the learn function shortl y.
Example: if the option is switched on and a
ro ute toa new destination has been calcula‐
te d, this destination would not be take n into
account forth e learn function. #
Toreset the suggestion his tory:select
Reset suggestion history.
% This process cannot be reve rsed. #
Select Yes. #
Toprotect settings with a PIN: switchon
PIN protection.
If PIN pr otection is switched on, you must
en terth e Mercedes me PIN toset the sug‐
ge stions. This PIN will be set in the Mercedes MBUX multimedia sy
stem 349
Page 373 of 689
originates from ano
ther vehicle, this is recog‐
nised du ring da tareading. #
Con firm the prom pt.
The files are impor ted. The multimedia sy stem is
re star ted once the data has been impor ted.
% Current vehicle settings can be edited af ter
th e import.
Exporting
If PIN pr otection is activated, your PIN is reques‐
te d. #
Ente rth efo ur-digit PIN. #
Select a data storage medium.
A prom ptappears asking whe ther youre ally
wish tocar ryout theex port. #
Confirm the prom pt.
The data is expor ted. The data export may
ta ke several minutes.
% After successful export, the data is sa ved in
th e "MyMercedesBac kup" directory which
can be found on thestorage medium. Ac
tivating/deactivating PIN pr otection Re
quirements:
R Tounlo ckthe PIN: there is an Internet con‐
nection.
R A Mercedes me account exists at http://
www.me rcedes.me.
R An individual user profile is active
(/ page 345).
Multimedia sy stem:
4 © 5
Settings 5
System
5 PIN protection
Setting the PIN #
Select Set PIN. #
Enter a four-digit PIN. #
Enterth efo ur-digit PIN again.
If bo thPINs match, PIN pr otection is active.
Changing the PIN #
Select Change settings. #
Enterth e cur rent PIN. #
Select Change PIN . #
Set a new PIN.
Ac tivating PIN pr otection for data export #
Select Protect data export .
Ac tivate or deacti vate the function.
Un blocking the PIN via the Mercedes me por‐
tal
If th e PIN has been entered incor rectly three
times, the PIN will be bloc ked. You can ha ve a
single-use password sent to you via the
Mercedes me connect online por talto reset the
PIN pr otection. #
Select Unblock PIN. #
Ente rth e single-use password.
PIN pr otection is reset, and you can set a
new PIN. Software upda
te Information on software upda
tes
A software upda teconsi sts of thre esteps:
R Downloading or copying of the data requ ired
fo r ins tallation
R Installation of the update 37 0
MBUX multimedia sy stem