2019 MERCEDES-BENZ CLA sensor
[x] Cancel search: sensorPage 9 of 330

Roof lining ...................................... 272
Seat belt ........................................ 271
Seat cover .....................................271
Sensors ......................................... 269
Steering wheel ............................... 271
Trim pieces ....................................271
Washing by hand ........................... 266
Wheels ...........................................268
Windows ........................................ 268
Wiper blades .................................. 269
Wooden trim .................................. 271
Cargo compartment enlargement... 242
Cargo tie down rings......................... 243
CD
see also Digital Operator's Man-
ual ..................................................231
CD player (on-board computer)........185
Center console
Lower section .................................. 36
Upper section .................................. 35
Central locking
Automatic locking (on-board com-
puter) ............................................. 189
Locking/unlocking (SmartKey) ........70
Change of address.............................. 26
Change of ownership.......................... 26
Changing a wheel
Wheels and tires ............................ 311
Child
Restraint system .............................. 56
Child seat
Forward-facing restraint system ...... 59
LATCH-type (ISOFIX) child seat
anchors ............................................ 57
On the front-passenger seat ............ 58
Rearward-facing restraint system .... 59
Top Tether .......................................57
Child-proof locks
Important safety notes .................... 59
Rear doors .......................................60
Children
Special seat belt retractor ...............55
Children in the vehicle
Important safety notes .................... 54
Cigarette lighter................................ 247
Cleaning
Mirror turn signal ...........................269
Climate control
Air-conditioning system ................. 112
Automatic climate control (dual-
zone) .............................................. 114
Controlling automatically ...............117
Cooling with air dehumidification .. 116
Defrosting the windows ................. 119
Defrosting the windshield .............. 118
General notes ................................ 111
Indicator lamp ................................ 117
Information about using auto-
matic climate control ..................... 115
Maximum cooling .......................... 119
Notes on using the air-condition-
ing system ..................................... 113
Overview of systems ......................111
Problem with the rear window
defroster ........................................ 120
Problems with cooling with air
dehumidification ............................ 117
Refrigerant ..................................... 324
Refrigerant filling capacity ............. 324
Setting the air distribution ............. 117
Setting the air vents ......................121
Setting the airflow ......................... 118
Setting the temperature ................ 117
Switching air-recirculation mode
on/off ............................................ 120
Switching on/off ........................... 116
Switching residual heat on/off ...... 120
Switching the rear window
defroster on/off ............................ 119
Switching the ZONE function
on/off ............................................ 118
Cockpit
Overview .......................................... 32
see Instrument cluster
COMAND display
Cleaning ......................................... 270
Combination switch.......................... 102
Compass
Calibrating ..................................... 258
Calling up ....................................... 258
Magnetic field zone maps .............. 258
Setting ...........................................258
Connecting a USB device
see also Digital Operator's Man-
ual ..................................................231
Index7
Page 14 of 330
Home address
see also Digital Operator's Man-
ual .................................................. 231
Hood
Closing ........................................... 261
Display message ............................ 217
Important safety notes .................. 260
Opening .........................................260
Horn...................................................... 32
Hydroplaning..................................... 149
I
Ignition lock
see Key positions
Immobilizer.......................................... 68
Indicator lamp
Replacing bulbs (rear) .................... 107
Indicator lamps
see Warning and indicator lamps
Indicators
see Turn signals
Instrument cluster
Overview .......................................... 33
Settings ......................................... 188
Warning and indicator lamps ........... 33
Instrument cluster lighting.............. 178
Interior lighting
Control ...........................................105
Overview ........................................ 104
Reading lamp ................................. 104
iPod®
see also Digital Operator's Man-
ual ..................................................231
J
Jack
Storage location ............................ 274
Using ............................................. 312
Jump starting (engine)......................282
K
Key positions
Start/Stop button .......................... 123
KEYLESS-GO
Convenience closing feature ............ 84
Deactivation ..................................... 71
Locking ............................................ 71
Unlocking ......................................... 71
Kickdown
Driving tips ....................................135
Manual gearshifting ....................... 139
Knee bag.............................................. 46
L
Lamps
see Warning and indicator lamps
Lane Keeping Assist
Activating/deactivating (on-
board computer) ............................ 188
Display message ............................ 210
Function/information.................... 176
Lane Tracking package..................... 174
Lap time (RACETIMER)...................... 191
LATCH-type (ISOFIX) child seat
anchors................................................ 57
License plate lamp (display mes-
sage)................................................... 205
Light sensor (display message)....... 206
Lights
Adaptive Highbeam Assist ............. 103
Automatic headlamp mode ............ 101
Fogged up headlamps.................... 104
Hazard warning lamps ................... 103
High beam flasher .......................... 102
High-beam headlamps................... 102
Light switch ................................... 101
Low-beam headlamps.................... 102
Parking lamps ................................ 102
Rear fog lamp ................................ 102
Setting exterior lighting ................. 101
Standing lamps .............................. 102
Switching the daytime running
lamps on/off (on-board com-
puter) ............................................. 189
Turn signals ................................... 102
Loading guidelines............................ 239
Locking
see Central locking
Locking (doors)
Automatic ........................................ 77
Emergency locking ........................... 77
From inside (central locking but-
ton) .................................................. 76
12Index
Page 17 of 330
Parking aid
see Exterior mirrors
see Rear view camera
Parking Assist PARKTRONIC
Deactivating/activating ................. 164
Driving system ...............................162
Function/notes .............................162
Important safety notes .................. 162
Problems (malfunctions) ................ 165
Sensor range ................................. 163
Warning display............................. 164
Parking assistance
see Parking Assist PARKTRONIC
Parking brake
Applying automatically................... 144
Applying or releasing manually ...... 144
Display message ............................ 196
Electric parking brake .................... 143
Emergency braking ........................ 145
General notes ................................ 143
Releasing automatically................. 145
Warning lamp ................................. 226
Parking lamps
Switching on/off........................... 102
PASSENGER AIR BAG
Display message ............................ 202
Indicator lamps ................................ 41
Problem (malfunction) ................... 202
Pets in the vehicle............................... 60
Phone book
see also Digital Operator's Man-
ual .................................................. 231
Plastic trim (cleaning instruc-
tions).................................................. 270
Power washers.................................. 266
Power windows
see Side windows
Protection against theft
ATA (Anti-Theft Alarm system) ......... 68
Immobilizer ...................................... 68
Protection of the environment
General notes .................................. 24
Pulling away
Automatic transmission ................. 126
General notes ................................ 126
Hill start assist ............................... 126
Q
QR code
Mercedes-Benz Guide App ................. 1
Rescue card ..................................... 29
Qualified specialist workshop........... 28
R
RACE START
Important safety notes .................. 160
RACE START (Mercedes-AMG vehi-
cles).................................................... 160
RACE TIMER (on-board computer,
Mercedes-AMG vehicles).................. 191
Radio
Selecting a station ......................... 184
see Digital Operator's Manual
Radio mode
see also Digital Operator's Man-
ual .................................................. 231
Radio-wave reception/transmis-
sion in the vehicle
Declaration of conformity ................ 27
Rain closing feature (panorama
roof with power tilt/sliding panel).... 88
Reading lamp..................................... 104
Rear compartment
Setting the air vents ...................... 121
Rear fog lamp
Display message ............................ 205
Replacing bulbs............................. 107
Switching on/off........................... 102
Rear lamps
see Lights
Rear seats
Folding the backrest forwards/
back ............................................... 242
Rear view camera
"Reverse parking" function ............ 171
Cleaning instructions ..................... 269
Display in the multimedia system .. 170
Function/notes............................. 169
General notes ................................ 169
Switching on/off........................... 170
Rear window defroster
Problem (malfunction) ................... 120
Switching on/off........................... 120
Index15
Page 19 of 330
Folding the backrest (rear com-
partment) forwards/back .............. 242
Important safety notes .................... 91
Seat heating problem ...................... 96
Storing settings (memory func-
tion) ............................................... 100
Switching seat heating on/off ......... 95
Section
Trunk ............................................... 78
Securing cargo.................................. 243
Selector lever
Cleaning ......................................... 271
Sensors (cleaning instructions)....... 269
Service center
see Qualified specialist workshop
Service Center
see Qualified specialist workshop
Service menu (on-board com-
puter).................................................. 188
Service message
see ASSYST PLUS
Service products
Brake fluid ..................................... 322
Coolant (engine) ............................ 323
Engine oil ....................................... 322
Fuel ................................................ 319
Important safety notes .................. 319
Refrigerant (air-conditioning sys-
tem) ............................................... 324
Washer fluid ................................... 323
Setting the air distribution............... 117
Setting the airflow............................ 118
Setting the date/time format
see also Digital Operator's Man-
ual .................................................. 231
Setting the language
see also Digital Operator's Man-
ual .................................................. 231
Setting the time
see also Digital Operator's Man-
ual .................................................. 231
Settings
Factory (on-board computer) ......... 190
On-board computer ....................... 188
SETUP (on-board computer,
Mercedes-AMG vehicles).................. 191
Side impact air bag............................. 47
Side marker lamp (display mes-
sage)................................................... 206
Side windows
Cleaning ......................................... 268
Convenience closing feature ............ 84
Convenience opening feature .......... 83
Important safety information ........... 82
Opening/closing .............................. 83
Problem (malfunction) ..................... 85
Resetting ......................................... 85
Reversing feature ............................. 83
SIRIUS services
see also Digital Operator's Man-
ual .................................................. 231
Sliding sunroof
see Panorama roof with power
tilt/sliding panel
SmartKey
Changing the battery ....................... 73
Changing the programming ............. 72
Checking the battery ....................... 73
Convenience closing feature ............ 84
Convenience opening feature .......... 83
Display message............................ 218
Door central locking/unlocking ....... 70
Important safety notes .................... 70
KEYLESS-GO start function .............. 71
Loss ................................................. 74
Mechanical key ................................ 72
Positions (ignition lock) ................. 123
Problem (malfunction) ..................... 74
Starting the engine ........................ 125
SmartKey positions (ignition lock).. 123
Smartphone
Starting the engine ........................ 125
SMS
see also Digital Operator's Man-
ual .................................................. 231
Snow chains...................................... 293
Sockets
Center console .............................. 247
General notes ................................ 247
Rear compartment ......................... 248
Trunk ............................................. 248
Sound
Switching on/off........................... 232
Special seat belt retractor.................. 55
Index17
Page 48 of 330
Objects in the vehicle interior may preventan air bag from functioning correctly.Beforestarting your journey and to avoid risks resultingfrom the speed of the air bag as it deploys, makesure that:
Rthere are no people, animals or objectsbetween the vehicle occupants and an air bag
Rthere are no objects between the seat, doorand B-pillar
Rthere are no hard objects, e.g. coat hangers,hanging on the grab handles or coat hooks
Rno accessories, such as cup holders, areattached to the vehicle within the deploymentarea of an air bag, e.g. to doors, side windows,rear side trim or side walls
Rno heavy, sharp-edged or fragile objects are inthe pockets of your clothing. Store suchobjects in a suitable place
GWARNING
If you modify the air bag cover or affix objects
such as stickers to it, the air bag can no longer
function correctly. There is an increased risk
of injury.
Never modify an air bag cover or affix objects
to it.
GWARNING
Sensors to control the air bags are located in
the doors. Modifications or work not per-
formed correctly to the doors or door panel-
ing, as well as damaged doors, can lead to the
function of the sensors being impaired. The air
bags might therefore not function properly
anymore. Consequently, the air bags cannot
protect vehicle occupants as they are
designed to do. There is an increased risk of
injury.
Never modify the doors or parts of the doors.
Always have work on the doors or door pan-
eling carried out at a qualified specialist work-
shop.
Front air bags
!Do not place heavy objects on the front-passenger seat. This could cause the systemto identify the seat as being occupied. In theevent of an accident, the restraint systems on
the front-passenger side may be triggeredand have to be replaced.
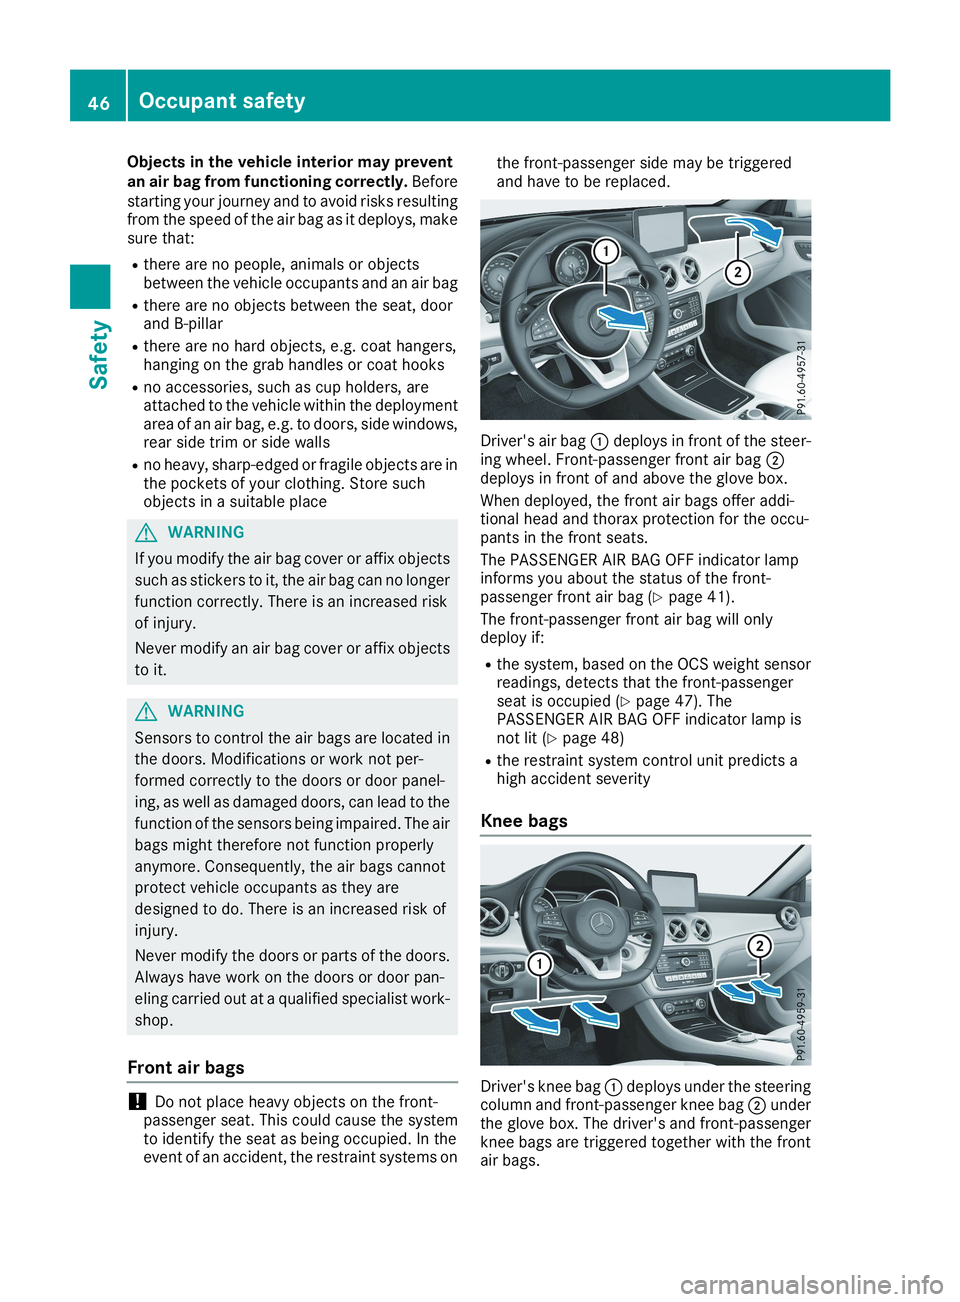
Driver's air bag�Cdeploys in front of the steer-ing wheel. Front-passenger front air bag�Ddeploys in front of and above the glove box.
When deployed, the front air bags offer addi-tional head and thorax protection for the occu-pants in the front seats.
The PASSENGER AIR BAG OFF indicator lampinforms you about the status of the front-passenger front air bag (Ypage 41).
The front-passenger front air bag will onlydeploy if:
Rthe system, based on the OCS weight sensorreadings, detects that the front-passengerseat is occupied (Ypage 47). ThePASSENGER AIR BAG OFF indicator lamp isnot lit (Ypage 48)
Rthe restraint system control unit predicts ahigh accident severity
Knee bags
Driver's knee bag�Cdeploys under the steeringcolumn and front-passenger knee bag�Dunderthe glove box. The driver's and front-passengerknee bags are triggered together with the frontair bags.
46Occupant safety
Safety
Page 64 of 330
Important safety notes
iObserve the "Important safety notes" sec-tion (Ypage 61).
GWARNING
If BAS is malfunctioning, the braking distance
in an emergency braking situation is
increased. There is a risk of an accident.
In an emergency braking situation, depress
the brake pedal with full force. ABS prevents
the wheels from locking.
Braking
XKeep the brake pedal firmly depressed untilthe emergency braking situation is over.ABS prevents the wheels from locking.
The brakes will function as usual once yourelease the brake pedal. BAS is deactivated.
Active Brake Assist
General information
iObserve the "Important safety notes" sec-tion (Ypage 61).
Active Brake Assist consists of a distance warn-ing function with an autonomous braking func-tion and a situation-dependent brake boostingeffect.
Active Brake Assist can help you to minimize therisk of a collision with the vehicle traveling infront or reduce the effects of such a collision.
If Active Brake Assist detects that there is a riskof collision, you will be warned visually andacoustically. If you do not react to the visualcollision warning or the warning tone, autono-mous braking can be initiated in critical situa-tions. If you apply the brake yourself in a criticalsituation, Active Brake Assist supports you witha situation-dependent brake boosting effect.
Important safety notes
Detection of hazardous situations can be par-ticularly impaired if:
RThere is dirt on the sensors or anything elsecovering the sensors
RThere is snow or heavy rain
RThere is interference by other radar sources
RThere are strong radar reflections, for exam-ple in parking garages
RA narrow vehicle is traveling in front, e.g. amotorcycle
RA vehicle is traveling in front on a different line
RYou are driving a new vehicle or servicing onthe Active Brake Assist system has just beencarried out
Observe the important safety notes in the"Breaking-in notes" section (Ypage 122).
Following damage to the front end of the vehicle,have the configuration and operation of theradar sensor checked at a qualified specialistworkshop. This also applies to collisions at lowspeeds where no visible damage to the front ofthe vehicle is apparent.
Activating/deactivating
Active Brake Assist is active after every ignitioncycle.
You can activate or deactivate Active BrakeAssist (Ypage 187) in the on-board computer.When deactivated, the distance warning func-tion and the autonomous braking function arealso deactivated.
If Active Brake Assist is deactivated, the�
Page 66 of 330
Situation-dependent braking assistance is capa-ble of reacting to moving objects that havealready been detected as such at least onceover the period of observation, up to vehiclespeeds of around 155 mph (250 km/h).
Situation-dependent braking assistance canalso detect stationary objects, up to vehiclespeeds of around 44 mph (70 km/h).
XKeep the brake pedal depressed until theemergency braking situation is over.ABS prevents the wheels from locking.
The brakes will work normally again if:
Ryou release the brake pedal
Rthere is no longer any danger of a collision
Rno obstacle is detected in front of your vehicle
Situation-dependent braking assistance is thendeactivated.
Important safety notes
iObserve the "Important safety notes" sec-tion for driving safety systems (Ypage 61).
GWARNING
Active Brake Assist does not react:
Rto persons, bicycles, motorcycles or ani-
mals
Rto approaching vehicles
Rto cross traffic
Ron bends
As a result, Active Brake Assist cannot inter-
vene in all critical situations. There is a risk of
an accident.
Always pay careful attention to the traffic sit-
uation and be prepared to brake.
GWARNING
Adaptive Brake Assist cannot always clearly
identify objects and complex traffic situa-
tions.
In such cases, Adaptive Brake Assist might:
Rintervene unnecessarily
Rnot intervene
There is a risk of an accident.
Always pay careful attention to the traffic sit-
uation and be ready to brake. Terminate the
intervention in a non-critical driving situation.
Due to the nature of the system, complex butnon-critical driving conditions may also causeActive Brake Assist to intervene.
Even if Active Brake Assist is not available due toa malfunction in the radar sensor system, thebrake system is still available with full brakeboosting effect and BAS.
ESP®(Electronic Stability Program)
General notes
iObserve the "Important safety notes" sec-tion (Ypage 61).
ESP®monitors driving stability and traction, i.e.power transmission between the tires and theroad surface.
If ESP®detects that the vehicle is deviating fromthe direction desired by the driver, one or morewheels are braked to stabilize the vehicle. Theengine output is also modified to keep the vehi-cle on the desired course within physical limits.
ESP®assists the driver when pulling away on
wet or slippery roads. ESP®can also stabilizethe vehicle during braking.
ETS/4ETS (Electronic Traction System)
iObserve the "Important safety notes" sec-tion (Ypage 61).
ETS traction control is part of ESP®. On vehicles
with 4MATIC, 4ETS is part of ESP®.
Traction control brakes the drive wheels indi-vidually if they spin. This enables you to pullaway and accelerate on slippery surfaces, forexample if the road surface is slippery on oneside. In addition, more drive torque is transfer-red to the wheel or wheels with traction.
Traction control remains active, even if you
deactivate ESP®.
Important safety notes
iObserve the "Important safety notes" sec-tion (Ypage 61).
GWARNING
If ESP®is malfunctioning, ESP®is unable to
stabilize the vehicle. Additionally, further driv-
ing safety systems are deactivated. This
increases the risk of skidding and an accident.
64Driving safety systems
Safety
Page 73 of 330

KEYLESS-GO
General notes
Bear in mind that the engine can be started byany of the vehicle occupants if there is a Smart-Key in the vehicle.
Locking and unlocking
You can start, lock or unlock the vehicle usingKEYLESS-GO. To do this, you only need carry theSmartKey with you. You can combine the func-tions of KEYLESS-GO with those of a conven-tional SmartKey. Unlock the vehicle by usingKEYLESS-GO, for instance, and lock it using the�7button on the SmartKey.
The driver's door and the door at which the han-dle is used, must both be closed. The SmartKeymust be outside the vehicle. When locking orunlocking with KEYLESS-GO, the distancebetween the SmartKey and the correspondingdoor handle must not be greater than three feet(one meter).
A check which periodically establishes a radioconnection between the vehicle and the Smart-Key determines whether a valid SmartKey is inthe vehicle. This occurs, for example:
Rwhen starting the engine
Rwhile driving
Rwhen using HANDS-FREE ACCESS
Rwhen the external door handles are touched
Rduring convenience closing
XTo unlock the vehicle:touch the inner sur-face of the door handle.
XTo lock the vehicle:touch sensor surface�Cor�D.
Make sure that you do not touch the innersurface of the door handle.
XConvenience closing feature:touchrecessed sensor surface�Dfor an extendedperiod.
Further information on the convenience clos-ing feature (Ypage 84).
XTo unlock the trunk lid:pull trunk lid han-dle�C.
Deactivating and activating
If you do not intend to use the vehicle for a lon-ger period of time, you can deactivate KEYLESS-GO. The SmartKey will then use very little power,thereby conserving battery power. For the pur-poses of activation/deactivation, the vehiclemust not be nearby.
XTo deactivate:press the�7button on theSmartKey twice in rapid succession.The indicator light on the SmartKey flashestwice briefly then one long flash, then KEY-LESS-GO is deactivated (Ypage 73).
XTo activate:press any button on the Smart-Key.
or
XInsert the SmartKey into the ignition lock.KEYLESS-GO and all of its associated featuresare available again.
KEYLESS-GO start function
General notes
Bear in mind that the engine can be started byany of the vehicle occupants if there is a Smart-Key in the vehicle.
SmartKey71
Opening and closing
Z