2019 MERCEDES-BENZ CLA buttons
[x] Cancel search: buttonsPage 8 of 330

Automatic transmission emer-
gency mode.......................................139
B
Back button....................................... 232
Backup lamp
Display message ............................ 205
BAS (Brake Assist System)................. 61
Battery (SmartKey)
Checking .......................................... 73
Important safety notes .................... 73
Replacing ......................................... 73
Battery (vehicle)
Charging ........................................ 281
Display message ............................ 208
Important safety notes .................. 279
Jump starting ................................. 282
Replacing ....................................... 281
Belt
see Seat belts
Belt warning......................................... 44
Blind Spot Assist
Activating/deactivating (on-
board computer) ............................ 188
Display message ............................ 210
Notes/function .............................. 174
Bluetooth®
Searching for a mobile phone ........235
Searching for a mobile phone
(device manager) ........................... 236
see also Digital Operator's Man-
ual ..................................................231
Telephony ...................................... 235
Brake Assist System
see BAS (Brake Assist System)
Brake fluid
Display message ............................ 199
Notes ............................................. 322
Brake force distribution
see EBD (electronic brake force
distribution)
Brake lamp
Replacing bulbs .............................107
Brake lamps
Display message ............................ 204
Brakes
ABS ..................................................61
BAS .................................................. 61
Brake fluid (notes) ......................... 322
Braking assistance appropriate to
the situation ..................................... 63
Display message............................ 194
EBD .................................................. 67
Hill start assist ............................... 126
HOLD function ............................... 158
Important safety notes .................. 147
Maintenance .................................. 148
Parking brake ................................ 143
Riding tips ...................................... 147
Warning lamp ................................. 221
Braking assistance appropriate to
the situation
Function/notes................................ 63
Breakdown assistance
Where will I find...? ........................ 273
see Flat tire
see Tow-starting
see Towing away
Brightness control (instrument
cluster lighting)................................... 33
Buttons on the steering wheel......... 179
C
California
Important notice for retail cus-
tomers and lessees .......................... 25
Calling up a malfunction
see Display messages
Car
see Vehicle
Care
Car wash ........................................ 265
Carpets .......................................... 272
Display ........................................... 270
Exhaust pipe .................................. 270
Exterior lights ................................ 269
Gear or selector lever .................... 271
Interior ........................................... 270
Matte finish ................................... 267
Notes ............................................. 265
Paint .............................................. 267
Plastic trim .................................... 270
Power washer................................ 266
Rear view camera .......................... 269
6Index
Page 20 of 330
Specialist workshop............................28
Speed, controlling
see Cruise control
Speedometer
Activating/deactivating the addi-
tional speedometer ........................ 189
Digital ............................................ 183
In the Instrument cluster ................. 33
Segments ...................................... 178
Selecting the display unit ............... 188
SPORT handling mode
Deactivating/activating
(Mercedes-AMG vehicles) ................66
Warning lamp ................................. 224
Standing lamps
Display message ............................205
Switching on/off ........................... 102
Start-off assist
Activating ....................................... 160
Important safety notes .................. 159
Start/Stop button
Removing ....................................... 124
Starting the engine ........................ 125
Start/stop function
see ECO start/stop function
Starting (engine)................................ 124
STEER CONTROL.................................. 68
Steering
Display message ............................ 218
Steering assistant STEER CON-
TROL
see STEER CONTROL
Steering wheel
Adjusting (manually)........................ 96
Button overview ............................... 34
Buttons (on-board computer) ......... 179
Cleaning ......................................... 271
Important safety notes .................... 96
Paddle shifters ............................... 137
Steering wheel paddle shifters........ 137
Stopwatch (RACETIMER)................... 191
Stowage compartments
Armrest (front) ............................... 240
Armrest (under) ............................. 241
Center console .............................. 240
Center console (rear) ..................... 241
Cup holders ................................... 244
Eyeglasses compartment ............... 240
Glove box ....................................... 240
Important safety information ......... 239
Map pockets .................................. 241
Stowage net ................................... 241
Stowage net....................................... 241
Stowage well beneath the trunk
floor.................................................... 243
Summer tires..................................... 292
Sun visor............................................ 246
Suspension setting
AMG adaptive sport suspension
system ........................................... 161
Switching air-recirculation mode
on/off................................................. 120
Switching on media mode
Via the device list .......................... 237
T
Tachometer........................................ 178
Tail lamps
Display message ............................ 205
see Lights
Tailgate
Limiting the opening angle ............... 81
Obstruction detection...................... 78
Opening dimensions ...................... 325
Opening/closing automatically
from outside .................................... 79
Tank
see Fuel tank
Tank content
Fuel gauge ....................................... 33
Technical data
Capacities ...................................... 319
Information .................................... 317
Tires/wheels ................................. 315
Vehicle data ................................... 325
Telephone
Accepting a call (multifunction
steering wheel) .............................. 186
Authorizing a mobile phone (con-
necting) ......................................... 235
Authorizing a mobile phone via the
device manager (connecting) ......... 236
Connecting a mobile phone
(device manager) ........................... 236
18Index
Page 62 of 330
GWARNING
If the child restraint system is subjected to
direct sunlight, parts may get very hot. Chil-
dren may burn themselves on these parts,
particularly on the metal parts of the child
restraint system. There is a risk of injury.
If you leave the vehicle, taking the child with
you, always ensure that the child restraint
system is not exposed to direct sunlight. Pro-
tect it with a blanket, for example. If the child
restraint system has been exposed to direct
sunlight, let it cool down before securing the
child in it. Never leave children unattended in
the vehicle.
Child-proof locks for the rear doors
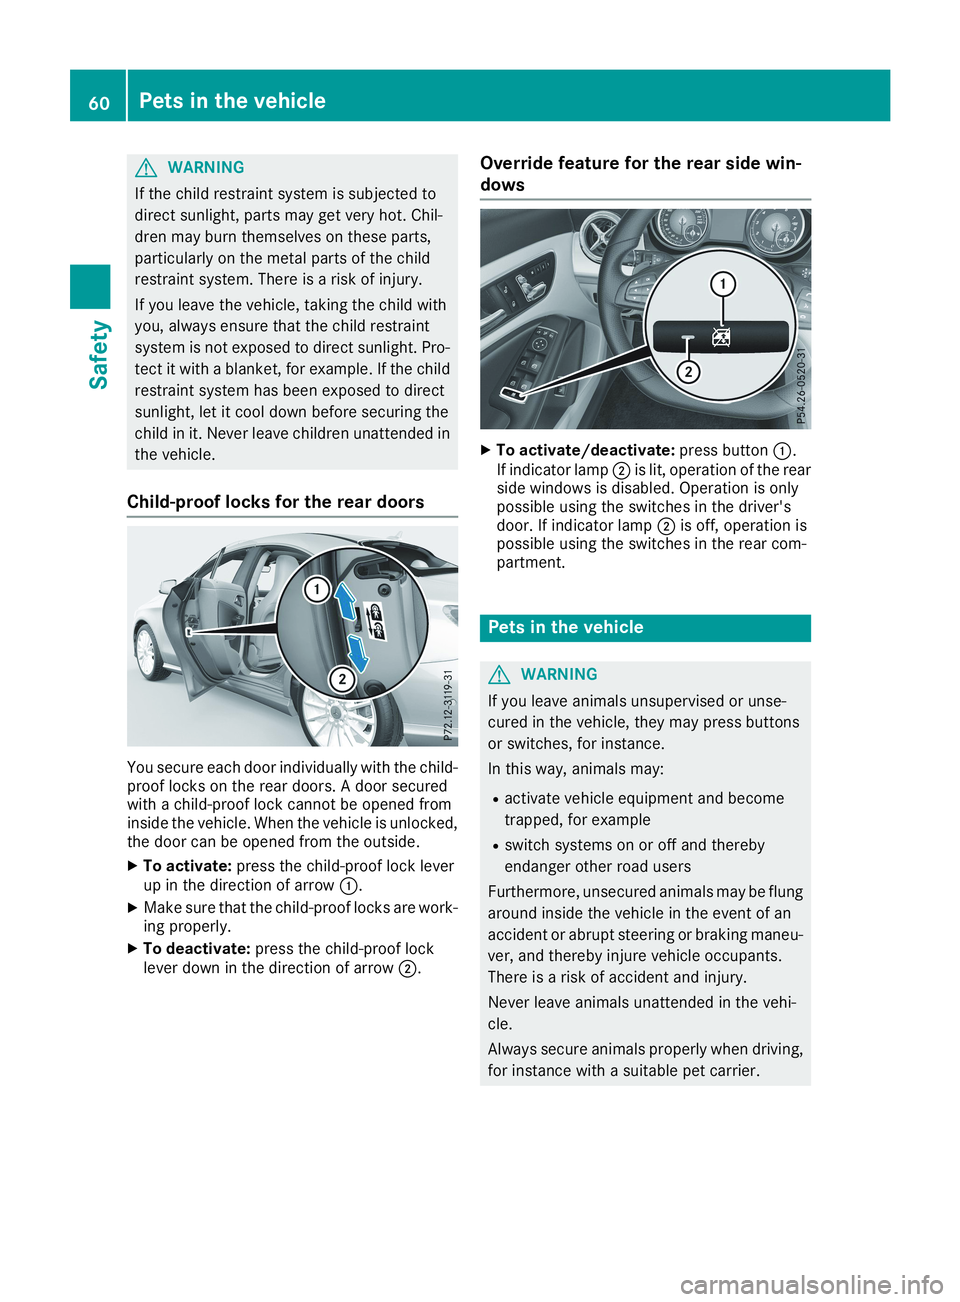
You secure each door individually with the child-proof locks on the rear doors. A door securedwith a child-proof lock cannot be opened frominside the vehicle. When the vehicle is unlocked,the door can be opened from the outside.
XTo activate:press the child-proof lock leverup in the direction of arrow�C.
XMake sure that the child-proof locks are work-ing properly.
XTo deactivate:press the child-proof locklever down in the direction of arrow�D.
Override feature for the rear side win-
dows
XTo activate/deactivate:press button�C.If indicator lamp�Dis lit, operation of the rearside windows is disabled. Operation is onlypossible using the switches in the driver'sdoor. If indicator lamp�Dis off, operation ispossible using the switches in the rear com-partment.
Pets in the vehicle
GWARNING
If you leave animals unsupervised or unse-
cured in the vehicle, they may press buttons
or switches, for instance.
In this way, animals may:
Ractivate vehicle equipment and become
trapped, for example
Rswitch systems on or off and thereby
endanger other road users
Furthermore, unsecured animals may be flung
around inside the vehicle in the event of an
accident or abrupt steering or braking maneu-
ver, and thereby injure vehicle occupants.
There is a risk of accident and injury.
Never leave animals unattended in the vehi-
cle.
Always secure animals properly when driving,
for instance with a suitable pet carrier.
60Pets in the vehicle
Safety
Page 74 of 330
Changing the settings of the locking
system
You can change the settings of the locking sys-tem. This means that only the driver's door andthe fuel filler flap are unlocked when the vehicleis unlocked. This is useful if you frequently travelon your own.
XTo change the setting:press and hold the�6and�7buttons simultaneously forapproximately six seconds until the batteryindicator lamp flashes twice (Ypage 73).
If the setting of the locking system is changedwithin the signal range of the vehicle, pressingthe�7or�6button:
Rlocks or
Runlocks the vehicle
The SmartKey now functions as follows:
XTo unlock:press the�6button once.
XTo unlock centrally:press the�6buttontwice.
XTo lock centrally:press the�7button.
The KEYLESS-GO function is changed as fol-lows:
XTo unlock the driver's door:touch the innersurface of the door handle on the driver'sdoor.
XTo unlock centrally:touch the inner surfaceof the door handle on the front-passengerdoor or the rear door.
XTo lock centrally:touch the outer sensorsurface on one of the door handles.
XTo restore the factory settings:press andhold the�6and�7buttons simultane-ously for approximately six seconds until thebattery check lamp flashes twice(Ypage 73).
Mechanical key
General notes
If the vehicle can no longer be locked orunlocked with the SmartKey or KEYLESS-GO,use the mechanical key.
If you use the mechanical key to unlock andopen the driver's door or the trunk lid, the anti-theft alarm system will be triggered (Ypage 68).
There are several ways to turn off the alarm:
XTo deactivate the alarm with the key:pressthe�6or�7button on the key.
or
XInsert the SmartKey into the ignition lock.
or
XTo deactivate the alarm with KEYLESS-GO:press the Start/Stop button in the ignitionlock. The SmartKey must be in the vehicle.
or
XLock or unlock the vehicle using KEYLESS-GO. The SmartKey must be outside the vehi-cle.
If you unlock the vehicle using the mechanicalkey, the fuel filler flap will not be unlocked auto-matically.
XTo unlock the fuel filler flap:insert theSmartKey into the ignition lock.
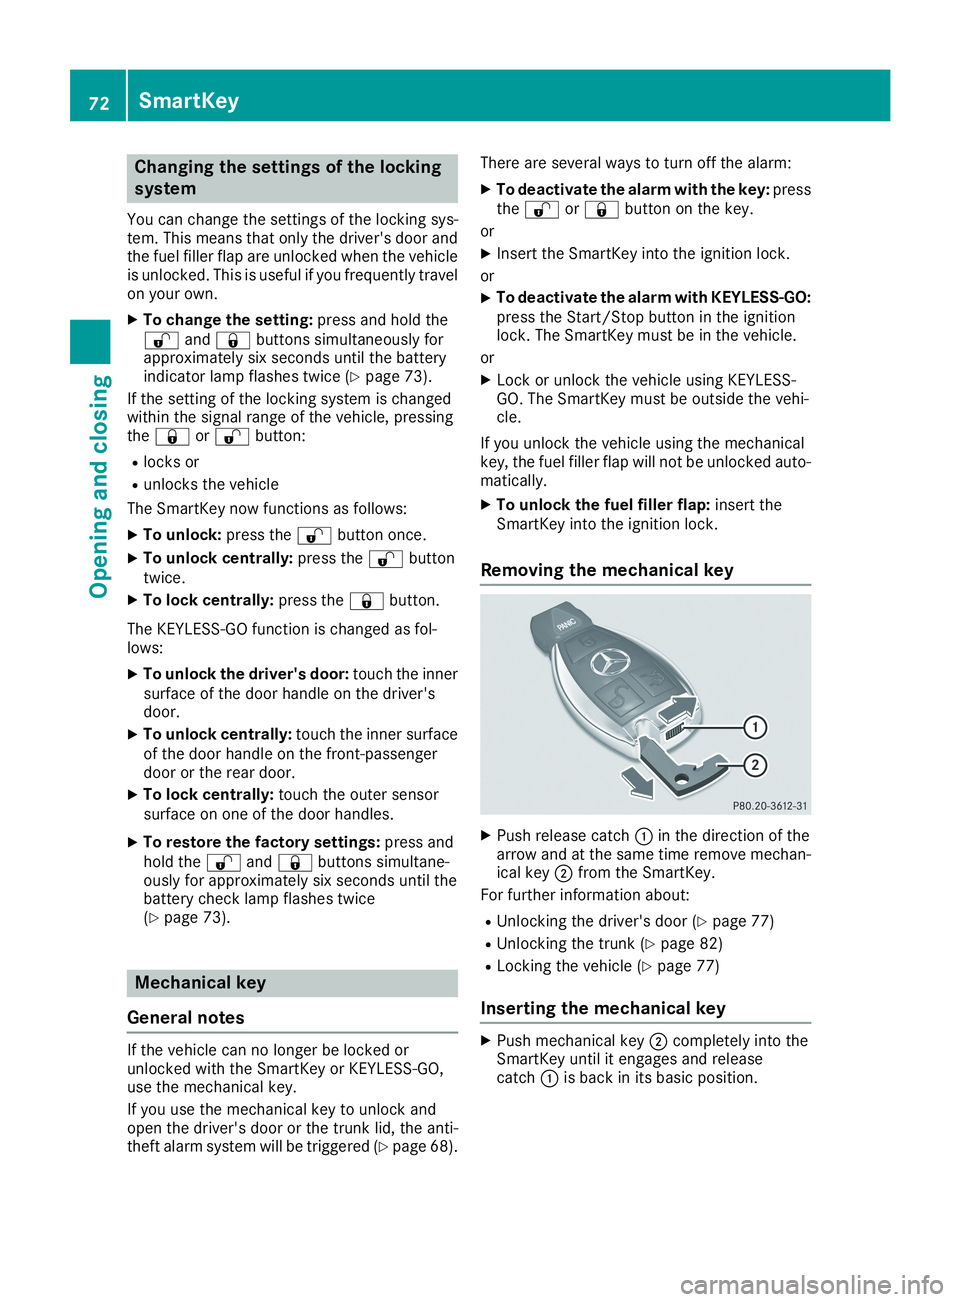
Removing the mechanical key
XPush release catch�Cin the direction of thearrow and at the same time remove mechan-ical key�Dfrom the SmartKey.
For further information about:
RUnlocking the driver's door (Ypage 77)
RUnlocking the trunk (Ypage 82)
RLocking the vehicle (Ypage 77)
Inserting the mechanical key
XPush mechanical key�Dcompletely into theSmartKey until it engages and releasecatch�Cis back in its basic position.
72SmartKey
Opening and closing
Page 79 of 330
Meanwhile, the fuel filler flap will not be lockedor unlocked.
You cannot unlock the vehicle centrally from theinside if the vehicle has been locked with theSmartKey or KEYLESS-GO.
You can open a door from inside the vehicleeven if it has been locked. You can open the reardoors from inside the vehicle unless they aresecured by the child-proof lock (Ypage 60).
If the vehicle has previously been locked withthe SmartKey from the outside, opening a doorfrom the inside will trigger the anti-theft alarmsystem. Switch off the alarm (Ypage 68).
If a locked door is opened from the inside, theprevious unlock status of the vehicle will betaken into consideration if:
Rthe vehicle was locked using the locking but-ton for the central locking, or
Rif the vehicle was locked automatically
The vehicle will be fully unlocked if it had previ-ously been fully unlocked. If only the driver'sdoor had been previously unlocked, only thedoor which has been opened from the inside isunlocked.
Automatic locking feature
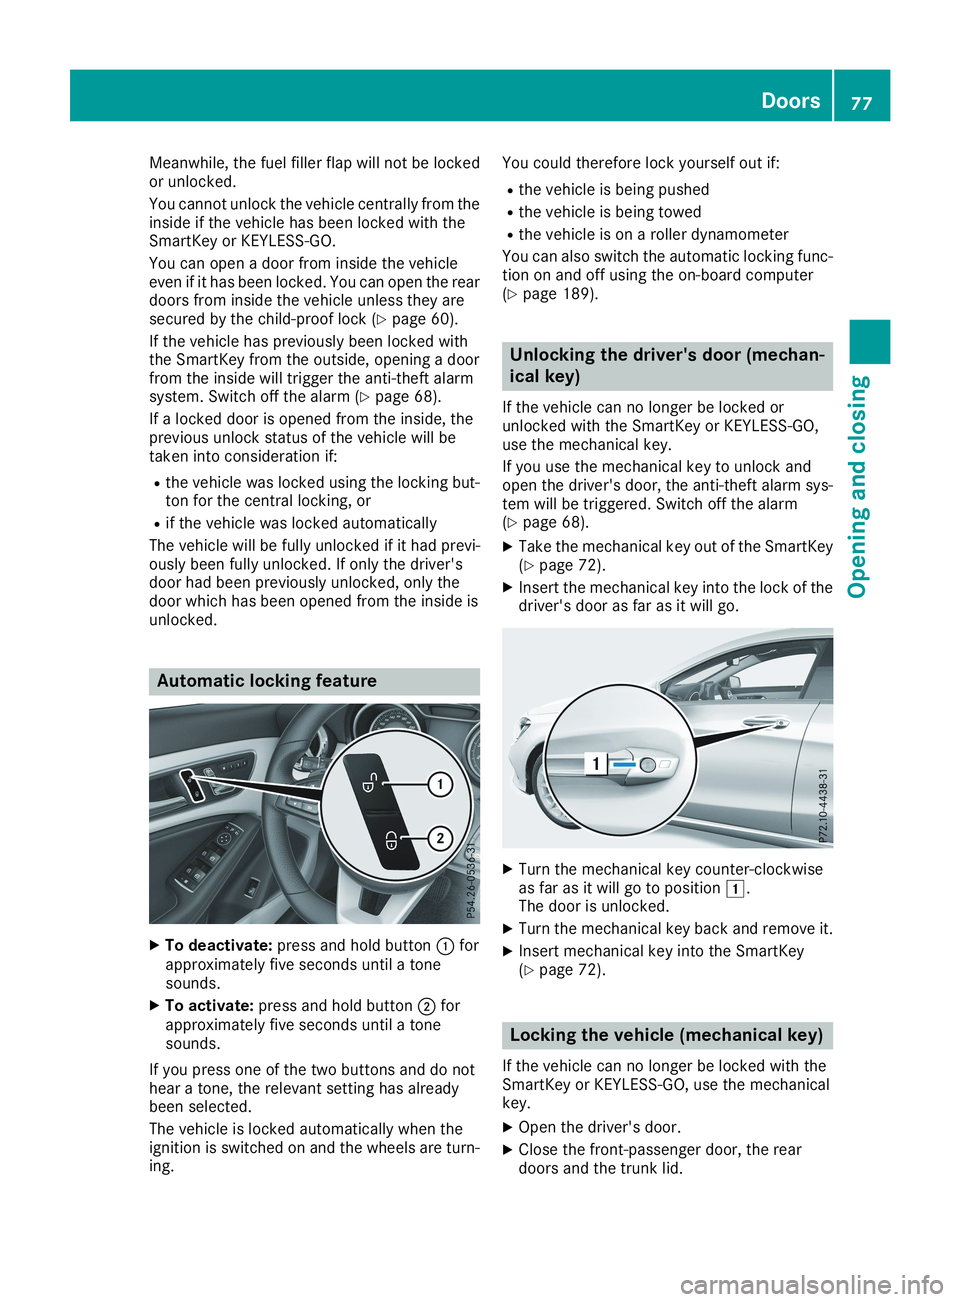
XTo deactivate:press and hold button�Cforapproximately five seconds until a tonesounds.
XTo activate:press and hold button�Dforapproximately five seconds until a tonesounds.
If you press one of the two buttons and do nothear a tone, the relevant setting has alreadybeen selected.
The vehicle is locked automatically when theignition is switched on and the wheels are turn-ing.
You could therefore lock yourself out if:
Rthe vehicle is being pushed
Rthe vehicle is being towed
Rthe vehicle is on a roller dynamometer
You can also switch the automatic locking func-tion on and off using the on-board computer(Ypage 189).
Unlocking the driver's door (mechan-
ical key)
If the vehicle can no longer be locked orunlocked with the SmartKey or KEYLESS-GO,use the mechanical key.
If you use the mechanical key to unlock andopen the driver's door, the anti-theft alarm sys-tem will be triggered. Switch off the alarm(Ypage 68).
XTake the mechanical key out of the SmartKey(Ypage 72).
XInsert the mechanical key into the lock of thedriver's door as far as it will go.
XTurn the mechanical key counter-clockwiseas far as it will go to position�G.The door is unlocked.
XTurn the mechanical key back and remove it.
XInsert mechanical key into the SmartKey(Ypage 72).
Locking the vehicle (mechanical key)
If the vehicle can no longer be locked with theSmartKey or KEYLESS-GO, use the mechanicalkey.
XOpen the driver's door.
XClose the front-passenger door, the reardoors and the trunk lid.
Doors77
Opening and closing
Z
Page 94 of 330
GWARNING
If the driver's seat is not engaged, it could
move forwards as far as the next catch during
movement such as braking or abrupt changes
of direction. As a result, you would be pushed
against your seat belt by the unsecured driv-
er's seat.
This could cause you to lose control of the
vehicle. The seat belt cannot protect as inten-
ded and could result in additional injury.
There is a risk of an accident and injury.
Before every journey, make sure that the driv-
er's seat is fully engaged.
Observe the safety notes on "Air bags"(Ypage 45) and "Children in the vehicle"(Ypage 54).
GWARNING
If the driver's seat is not engaged, it could
move unexpectedly while the vehicle is in
motion. This could cause you to lose control of
the vehicle. There is a risk of an accident.
Always make sure that the driver's seat is
engaged before starting the vehicle.
GWARNING
You could lose control of your vehicle if you do
the following while driving:
Radjust the driver's seat, head restraint,
steering wheel or mirrors
Rfasten the seat belt
There is a risk of an accident.
Adjust the driver's seat, head restraint, steer-
ing wheel and mirror and fasten your seat belt
before starting the engine.
GWARNING
If you adjust the seat height carelessly, you or
other vehicle occupants could be trapped and
thereby injured. Children in particular could
accidentally press the electrical seat adjust-
ment buttons and become trapped. There is a
risk of injury.
While moving the seats, make sure that your
hands or other body parts do not get under the
lever assembly of the seat adjustment sys-
tem.
!To prevent damage to the seats and the seatheating, observe the following notes:
RDo not spill liquids onto the seats. Dry theseats as soon as possible if liquid does getspilled on the seats.
RIf the seat covers are damp or wet, do notswitch on the seat heating. Also, do not usethe seat heating to dry the seats.
RClean the seat covers as recommended;see the "Interior care" section.
RDo not transport heavy loads on the seats.Do not place pointed objects on the seatcushions such as knives, nails or tools.Where possible, use the seats only for car-rying passengers.
RWhen operating the seat heating, do notcover the seats with insulating materials,e.g. blankets, coats, bags, protective cov-ers, child seats or booster seats.
RWhen the seat heating is switched on, theseat surface can be damaged as a result ofobjects being placed on the seats, forexample, seat cushions, child seats andprotective covers not approved byMercedes-Benz.
!Make sure that there are no objects in thefootwell under or behind the seats when mov-ing the seats back. There is a risk that theseats and/or the objects could be damaged.
iFurther related subjects:
RCargo compartment enlargement (foldingdown the rear seats) (Ypage 242)
92Seats
Seats, steering wheel and mirrors
Page 120 of 330
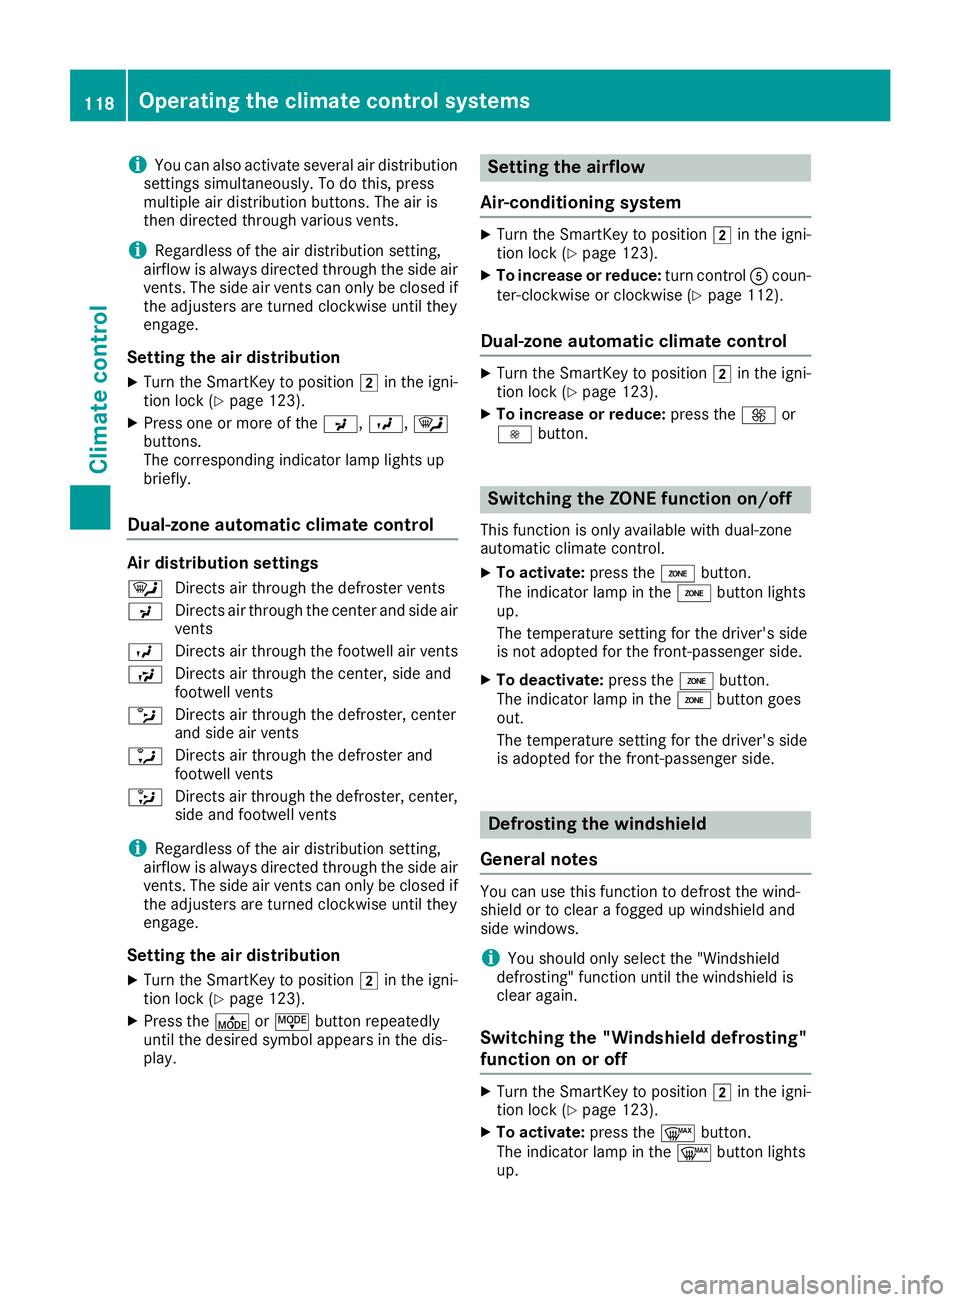
iYou can also activate several air distributionsettings simultaneously. To do this, pressmultiple air distribution buttons. The air isthen directed through various vents.
iRegardless of the air distribution setting,airflow is always directed through the side airvents. The side air vents can only be closed ifthe adjusters are turned clockwise until theyengage.
Setting the air distribution
XTurn the SmartKey to position�Hin the igni-tion lock (Ypage 123).
XPress one or more of the�
Page 257 of 330
Currently inactive areas can be activated by textmessage.
Triggering the vehicle alarm
With this function, you can trigger the vehicle'spanic alarm via text message. An alarm soundsand the exterior lighting flashes. Depending onthe setting, the panic alarm lasts five or ten sec-onds. Afterwards, the alarm switches off.
Garage door opener
General notes
The HomeLink®garage door opener integratedin the rear-view mirror allows you to operate upto three different door and gate systems.
Use the integrated garage door opener only ongarage doors that:
Rhave safety stop and reverse features and
Rmeet current U.S. federal safety standards
Once programed, the integrated garage dooropener in the rear-view mirror will assume thefunction of the garage door system's remotecontrol. Please also read the operating instruc-tions for the garage door system.
When programming a garage door opener, parkthe vehicle outside the garage. Do not leave theengine running while programming.
Certain garage door drives are incompatiblewith the integrated garage door opener. If youhave difficulty programing the integrated garagedoor opener, contact a Mercedes-Benz ServiceCenter.
Alternatively, you can call the following tele-phone assistance services:
RUSA:Mercedes-Benz Customer AssistanceCenter at 1-800-FOR-MERCedes
RCanada:Customer Service at1-800-387-0100
RHomeLink®hotline 1-800-355-3515 (free ofcharge)
More information on HomeLink®and/or com-patible products is also available online athttp://www.homelink.com.
Notes on the declaration of conformity(Ypage 27).
USA: FCC ID: CB2HMIHL4
Canada: IC: 279B-HMIHL4
Important safety notes
GWARNING
When you operate or program the door with
the integrated garage door opener, persons in
the range of movement of the door may
become trapped or be struck by the door.
There is a risk of injury.
When using the integrated garage door
opener, always make sure that nobody is
within the range of movement of the door.
GDANGER
Combustion engines emit poisonous exhaust
gases such as carbon monoxide. Inhaling
these exhaust gases is hazardous to health
and can result in poisoning. There is a risk of
fatal injury. Therefore, never leave the engine
running in an enclosed space without ade-
quate ventilation.
Programming
Programming the buttons
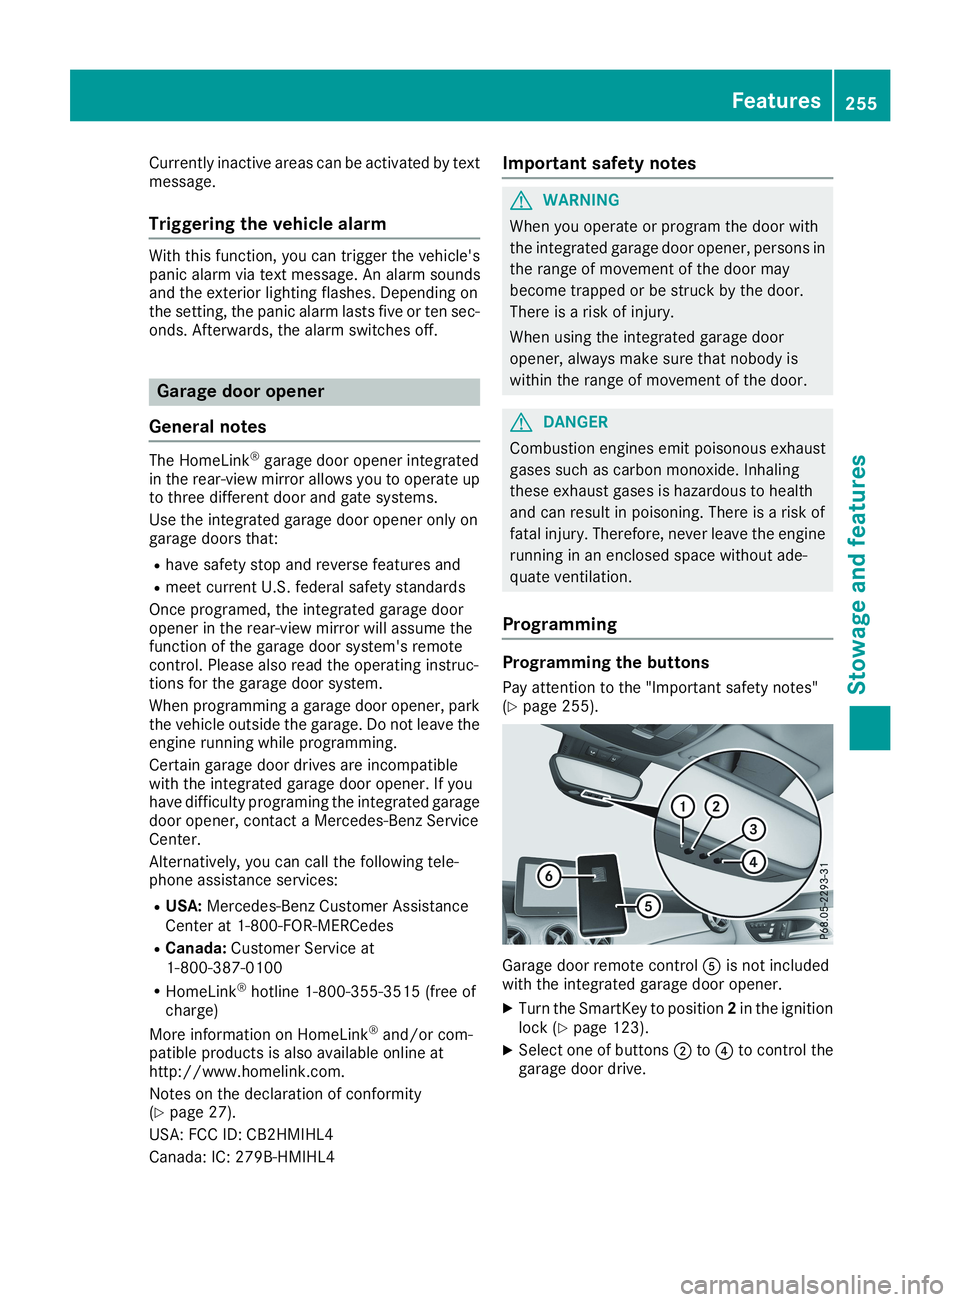
Pay attention to the "Important safety notes"(Ypage 255).
Garage door remote control�