2019 MERCEDES-BENZ CLA oil type
[x] Cancel search: oil typePage 21 of 330

Connecting a mobile phone (gen-
eral information) ............................ 235
Display message ............................ 218
Introduction ...................................185
Menu (on-board computer) ............ 185
Number from the phone book ........186
Redialing ........................................ 186
Rejecting/ending a call ................. 186
see also Digital Operator's Man-
ual ..................................................231
Temperature
Coolant .......................................... 179
Coolant (on-board computer,
Mercedes-AMG vehicles) ...............190
Engine oil (on-board computer,
Mercedes-AMG vehicles) ...............190
Outside temperature ......................178
Setting (climate control) ................ 117
Transmission oil (on-board com-
puter, Mercedes-AMG vehicles) ..... 190
Through-loading feature................... 241
Timing (RACETIMER)......................... 191
Tire pressure
Calling up (on-board computer) ..... 297
Checking manually ........................ 296
Display message ............................ 213
Maximum ....................................... 296
Not reached (TIREFIT) .................... 277
Notes ............................................. 295
Reached (TIREFIT) .......................... 278
Recommended ............................... 293
Tire pressure loss warning system
General notes ................................ 296
Important safety notes .................. 297
Restarting ...................................... 297
Tire pressure monitor
Checking the tire pressure elec-
tronically ........................................ 299
Function/notes .............................297
General notes ................................ 297
Important safety notes .................. 298
Radio type approval for the tire
pressure monitor ........................... 300
Restarting ...................................... 300
Warning lamp ................................. 230
Warning message .......................... 299
TIREFIT kit.......................................... 276
Important safety notes .................. 276
Storage location ............................ 274
Tire pressure not reached .............. 277
Tire pressure reached .................... 278
Tires
Aspect ratio (definition) ................. 310
Average weight of the vehicle
occupants (definition) .................... 308
Bar (definition) ............................... 308
Changing a wheel .......................... 310
Characteristics .............................. 308
Checking ........................................ 290
Curb weight (definition) ................. 309
Definition of terms ......................... 308
Direction of rotation...................... 311
Display message ............................ 213
Distribution of the vehicle occu-
pants (definition) ............................ 310
DOT (Department of Transporta-
tion) (definition) ............................. 308
DOT, Tire Identification Number
(TIN) ............................................... 308
GAWR (Gross Axle Weight Rating)
(definition) ..................................... 309
General notes ................................ 315
GVW (Gross Vehicle Weight) (def-
inition) ........................................... 309
GVWR (Gross Vehicle Weight Rat-
ing) (definition) .............................. 309
Important safety notes .................. 290
Increased vehicle weight due to
optional equipment (definition) ...... 309
Information on driving .................... 290
Kilopascal (kPa) (definition) ........... 309
Labeling (overview) ........................ 305
Load bearing index (definition) ...... 310
Load index ..................................... 307
Load index (definition) ................... 309
M+S tires ....................................... 292
Maximum load on a tire (defini-
tion) ............................................... 309
Maximum loaded vehicle weight
(definition) ..................................... 309
Maximum permissible tire pres-
sure (definition) ............................. 309
Maximum tire load ......................... 307
Maximum tire load (definition) ....... 309
MOExtended tires.......................... 292
Index19
Page 266 of 330

GWARNING
Windshield washer concentrate could ignite if
it comes into contact with hot engine compo-
nents or the exhaust system. There is a risk of
fire and injury.
Make sure that no windshield washer con-
centrate is spilled next to the filler neck.
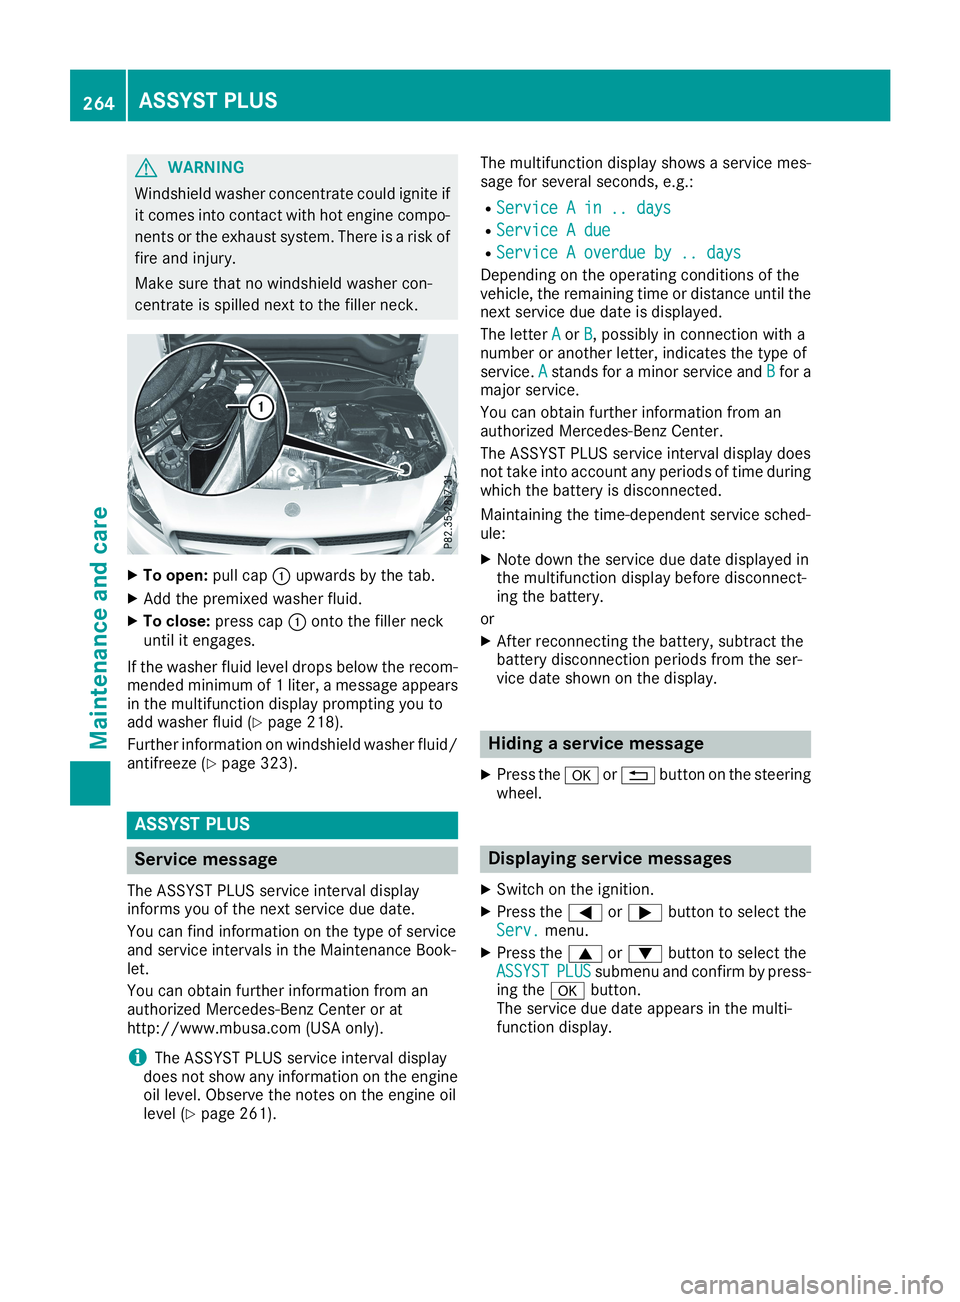
XTo open:pull cap�Cupwards by the tab.
XAdd the premixed washer fluid.
XTo close:press cap�Conto the filler neckuntil it engages.
If the washer fluid level drops below the recom-mended minimum of 1 liter, a message appearsin the multifunction display prompting you toadd washer fluid (Ypage 218).
Further information on windshield washer fluid/antifreeze (Ypage 323).
ASSYST PLUS
Service message
The ASSYST PLUS service interval displayinforms you of the next service due date.
You can find information on the type of serviceand service intervals in the Maintenance Book-let.
You can obtain further information from anauthorized Mercedes-Benz Center or athttp://www.mbusa.com (USA only).
iThe ASSYST PLUS service interval displaydoes not show any information on the engineoil level. Observe the notes on the engine oillevel (Ypage 261).
The multifunction display shows a service mes-sage for several seconds, e.g.:
RService A in .. daysService A in .. days
RService A dueService A due
RService A overdue by .. daysService A overdue by .. days
Depending on the operating conditions of thevehicle, the remaining time or distance until thenext service due date is displayed.
The letterAAorBB, possibly in connection with anumber or another letter, indicates the type ofservice.AAstands for a minor service andBBfor amajor service.
You can obtain further information from anauthorized Mercedes-Benz Center.
The ASSYST PLUS service interval display doesnot take into account any periods of time duringwhich the battery is disconnected.
Maintaining the time-dependent service sched-ule:
XNote down the service due date displayed inthe multifunction display before disconnect-ing the battery.
or
XAfter reconnecting the battery, subtract thebattery disconnection periods from the ser-vice date shown on the display.
Hiding a service message
XPress the�vor�8button on the steeringwheel.
Displaying service messages
XSwitch on the ignition.
XPress the�Yor�ebutton to select theServ.Serv.menu.
XPress the�cor�dbutton to select theASSYSTASSYSTPLUSPLUSsubmenu and confirm by press-ing the�vbutton.The service due date appears in the multi-function display.
264ASSYST PLUS
Maintenance and care
Page 269 of 330

RPlug-type couplings
RLight bulbs
RSeals
RTrim elements
RVentilation slots
Damaged seals or electrical components canlead to leaks or failures.
Cleaning the paintwork
!Do not affix:
Rstickers
Rfilms
Rmagnetic plates or similar items
to painted surfaces. You could otherwisedamage the paintwork.
Scratches, corrosive deposits, areas affected bycorrosion and damage caused by inadequatecare cannot always be completely repaired. Insuch cases, visit a qualified specialist workshop.
XRemove dirt immediately, where possible,while avoiding rubbing too hard.
XSoak insect remains with insect remover andrinse off the treated areas afterwards.
XSoak bird droppings with water and rinse offthe treated areas afterwards.
XRemove tree resin, oils, fuels and greases byrubbing gently with a cloth soaked in petro-leum ether or lighter fluid
XRemove coolant and brake fluid with a moistcloth and clear water.
XUse tar remover to remove tar stains.
XUse silicone remover to remove wax.
If water no longer forms "beads" on the paintsurface, use the paint care products recommen-ded and approved by Mercedes-Benz. This is thecase approximately every three to five months,depending on the climate conditions and thecare product used.
If dirt has penetrated the paint surface or if thepaint has become dull, the paint cleaner recom-mended and approved by Mercedes-Benzshould be used.
Do not use these care products in the sun or onthe hood while the hood is hot.
XUse a suitable touch-up stick, e.g. MB Touch-Up Stick, to repair slight damage to the paint-work quickly and provisionally.
Matte finish care
!Never polish the vehicle or the light alloywheels. Polishing causes the finish to shine.
!The following can give the paint a glossyappearance and thus reduce the matt effect:
RRubbing hard with unsuitable agents
RWashing the vehicle in direct sunlight
!Never use paint cleaner, buffing or polishingproducts, or gloss preserver, e.g. wax, for thepurpose of paintwork care. These productsare only suitable for high-gloss surfaces. Theiruse on vehicles with matte paintwork leads toconsiderable surface damage or, more spe-cifically, to shiny, spotted areas.
Always have paintwork repairs carried out at aqualified specialist workshop.
!Only use automatic car washes which cor-respond to the latest technological stand-ards. Never use wash programs which finishby treating the vehicle with hot wax.
Observe these notes if your vehicle has a clearmatte finish. This will help you to avoid damageto the paintwork due to incorrect treatment.
These notes also apply to light alloy wheels witha clear matte finish.
Use only insect remover and car shampoo fromthe range of care products approved byMercedes-Benz.
Cleaning the decorative film
!The following may have an effect on the ser-vice life and color of decorative film:
Rsunlight
Rtemperature, e.g. hot-air fan
Rweather conditions
Rstone impacts and dirt
Rchemical cleaning agents
Rgreasy substances
!Do not use any types of polish on matt dec-orative film. Polishing surfaces covered withfilm gives it a shiny finish.
!Do not treat matt or structured decorativefilm with wax. This may lead to marks thatcannot be removed.
Observe the notes in the section on the care andtreatment of matte paintwork (Ypage 267),these notes also apply to matte decorative film.
Care267
Maintenance and care
Z
Page 273 of 330

Cleaning the steering wheel and gear or
selector lever
XThoroughly wipe with a damp cloth or useleather care agents that have been recom-mended and approved by Mercedes-Benz.
Cleaning genuine wood and trim ele-
ments
!Do not use solvent-based cleaning agentssuch as tar remover, wheel cleaners, polishesor waxes. There is otherwise a risk of damag-ing the surface.
!Do not use chrome polish on trim pieces.The trim pieces have a chrome look but aremostly made of anodized aluminum and canlose their shine if chrome polish is used. Usea damp, lint-free cloth instead when cleaningthe trim pieces.
If the chrome-plated trim pieces are verydirty, you can use a chrome polish. If you areunsure as to whether the trim pieces arechrome-plated or not, consult an authorizedMercedes-Benz Center.
XWipe the wooden trim and trim pieces with adamp, lint-free cloth, e.g. a microfiber cloth.
XHeavy soiling:use care and cleaning prod-ucts recommended and approved byMercedes-Benz.
Cleaning the seat covers
General notes
!Do not use a microfiber cloth to clean coversmade out of real leather, artificial leather orDINAMICA. If used often, these can damagethe cover.
Note that regular care is essential to ensure thatthe appearance and comfort of the covers isretained over time.
Genuine leather seat covers
!To retain the natural appearance of theleather, observe the following cleaninginstructions:
RClean genuine leather covers carefully witha damp cloth and then wipe the coversdown with a dry cloth.
RMake sure that the leather does notbecome soaked. It may otherwise becomerough and cracked.
ROnly use leather care agents that havebeen tested and approved by Mercedes-Benz. You can obtain these from a qualifiedspecialist workshop.
Leather is a natural product.
It exhibits natural surface characteristics, forexample:
Rdifferences in the texture
Rmarks caused by growth and injury
Rslight nuances of color
These are characteristics of leather and notmaterial defects.
Seat covers of other materials
!Observe the following when cleaning:
Rclean artificial leather covers with a clothmoistened with a solution containing 1%detergent (e.g. dish washing liquid).
Rclean cloth covers with a microfiber clothmoistened with a solution containing 1%detergent (e.g. dish washing liquid). Rubcarefully and always wipe entire seat sec-tions to avoid leaving visible lines. Leavethe seat to dry afterwards. Cleaning resultsdepend on the type of dirt and how long ithas been there.
Rclean DINAMICA covers with a damp cloth.Make sure that you wipe entire seat sec-tions to avoid leaving visible lines.
Cleaning the seat belts
GWARNING
Seat belts can become severely weakened if
bleached or dyed. This could cause the seat
belts to tear or fail, for instance, in the event of
an accident. This poses an increased risk of
injury or fatal injury.
Never bleach or dye the seat belts.
Care271
Maintenance and care
Z
Page 326 of 330

When handling washer fluid, observe the impor-tant safety notes on service products(Ypage 319).
At temperatures above freezing:
XFill the washer fluid reservoir with a mixture ofwater and windshield washer fluid, e.g. MBSummerFit.
Add 1 part MB SummerFit to 100 parts water.
At temperatures below freezing:
XFill the washer fluid reservoir with a mixture ofwater and washer fluid, e.g. MB WinterFit.
For the correct mixing ratio refer to the infor-mation on the antifreeze reservoir.
iAdd windshield washer fluid, e.g. MB Sum-merFit or MB WinterFit, to the washer fluid allyear round.
Climate control system refrigerant
Important safety notes
The climate control system of your vehicle is fil-led with refrigerant R‑134a.
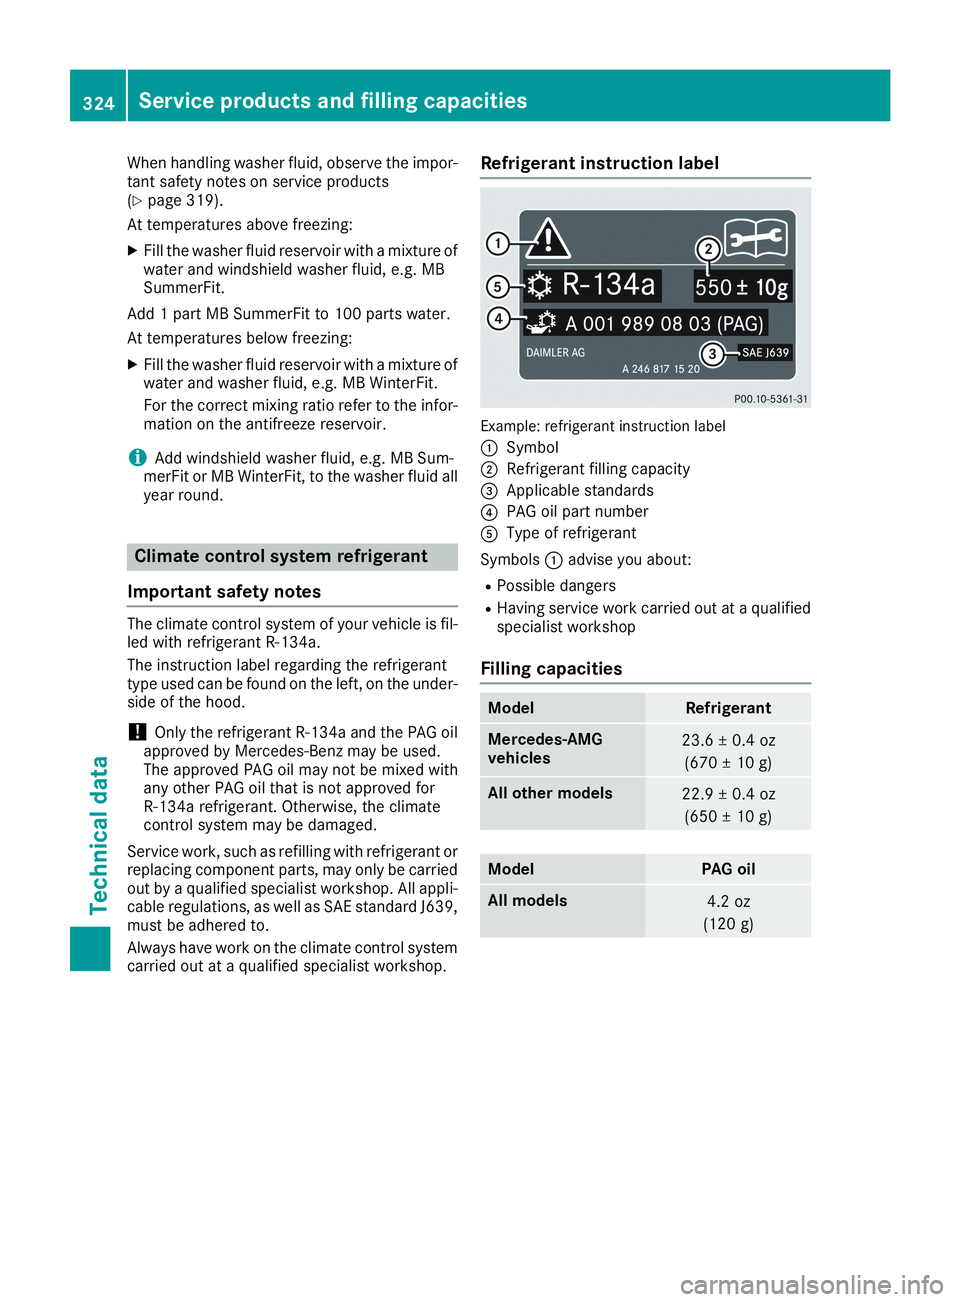
The instruction label regarding the refrigeranttype used can be found on the left, on the under-side of the hood.
!Only the refrigerant R‑134a and the PAG oilapproved by Mercedes-Benz may be used.The approved PAG oil may not be mixed withany other PAG oil that is not approved forR-134a refrigerant. Otherwise, the climatecontrol system may be damaged.
Service work, such as refilling with refrigerant orreplacing component parts, may only be carriedout by a qualified specialist workshop. All appli-cable regulations, as well as SAE standard J639,must be adhered to.
Always have work on the climate control systemcarried out at a qualified specialist workshop.
Refrigerant instruction label
Example: refrigerant instruction label
�CSymbol
�DRefrigerant filling capacity
�