2019 MERCEDES-BENZ CLA wiper blades
[x] Cancel search: wiper bladesPage 9 of 330

Roof lining ...................................... 272
Seat belt ........................................ 271
Seat cover .....................................271
Sensors ......................................... 269
Steering wheel ............................... 271
Trim pieces ....................................271
Washing by hand ........................... 266
Wheels ...........................................268
Windows ........................................ 268
Wiper blades .................................. 269
Wooden trim .................................. 271
Cargo compartment enlargement... 242
Cargo tie down rings......................... 243
CD
see also Digital Operator's Man-
ual ..................................................231
CD player (on-board computer)........185
Center console
Lower section .................................. 36
Upper section .................................. 35
Central locking
Automatic locking (on-board com-
puter) ............................................. 189
Locking/unlocking (SmartKey) ........70
Change of address.............................. 26
Change of ownership.......................... 26
Changing a wheel
Wheels and tires ............................ 311
Child
Restraint system .............................. 56
Child seat
Forward-facing restraint system ...... 59
LATCH-type (ISOFIX) child seat
anchors ............................................ 57
On the front-passenger seat ............ 58
Rearward-facing restraint system .... 59
Top Tether .......................................57
Child-proof locks
Important safety notes .................... 59
Rear doors .......................................60
Children
Special seat belt retractor ...............55
Children in the vehicle
Important safety notes .................... 54
Cigarette lighter................................ 247
Cleaning
Mirror turn signal ...........................269
Climate control
Air-conditioning system ................. 112
Automatic climate control (dual-
zone) .............................................. 114
Controlling automatically ...............117
Cooling with air dehumidification .. 116
Defrosting the windows ................. 119
Defrosting the windshield .............. 118
General notes ................................ 111
Indicator lamp ................................ 117
Information about using auto-
matic climate control ..................... 115
Maximum cooling .......................... 119
Notes on using the air-condition-
ing system ..................................... 113
Overview of systems ......................111
Problem with the rear window
defroster ........................................ 120
Problems with cooling with air
dehumidification ............................ 117
Refrigerant ..................................... 324
Refrigerant filling capacity ............. 324
Setting the air distribution ............. 117
Setting the air vents ......................121
Setting the airflow ......................... 118
Setting the temperature ................ 117
Switching air-recirculation mode
on/off ............................................ 120
Switching on/off ........................... 116
Switching residual heat on/off ...... 120
Switching the rear window
defroster on/off ............................ 119
Switching the ZONE function
on/off ............................................ 118
Cockpit
Overview .......................................... 32
see Instrument cluster
COMAND display
Cleaning ......................................... 270
Combination switch.......................... 102
Compass
Calibrating ..................................... 258
Calling up ....................................... 258
Magnetic field zone maps .............. 258
Setting ...........................................258
Connecting a USB device
see also Digital Operator's Man-
ual ..................................................231
Index7
Page 24 of 330
Wheels and tires
Changing a wheel .......................... 311
Window curtain air bag
Display message ............................ 201
Operation ......................................... 47
Windows
see Side windows
Windshield
Defrosting ...................................... 118
Windshield washer system
Adding washer fluid....................... 263
Important safety notes .................. 323
Windshield wipers
Display message ............................ 218
Problem (malfunction) ................... 110
Replacing the wiper blades ............ 109
Switching on/off........................... 108
Winter driving
Slippery road surfaces ................... 150
Snow chains .................................. 293
Winter operation
General notes ................................ 292
Winter tires
M+S tires....................................... 292
Wiper blades
Cleaning ......................................... 269
Important safety notes .................. 109
Wooden trim (cleaning instruc-
tions).................................................. 271
Workshop
see Qualified specialist workshop
Z
ZONE function
Switching on/off........................... 118
22Index
Page 111 of 330
Replacing the wiper blades
Important safety notes
GWARNING
If the windshield wipers begin to move while
you are changing the wiper blades, you could
be trapped by the wiper arm. There is a risk of
injury.
Always switch off the windshield wipers and
ignition before changing the wiper blades.
!To avoid damaging the wiper blades, makesure that you touch only the wiper arm of thewiper.
!Never open the hood if a windshield wiperarm has been folded away from the wind-shield.
Never fold a windshield wiper arm without awiper blade back onto the windshield.
Hold the windshield wiper arm firmly whenyou change the wiper blade. If you release thewindshield wiper arm without a wiper bladeand it falls onto the windshield, the windshieldmay be damaged by the force of the impact.
Mercedes-Benz recommends that you havethe wiper blades changed at a qualified spe-cialist workshop.
Changing the windshield wiper blades
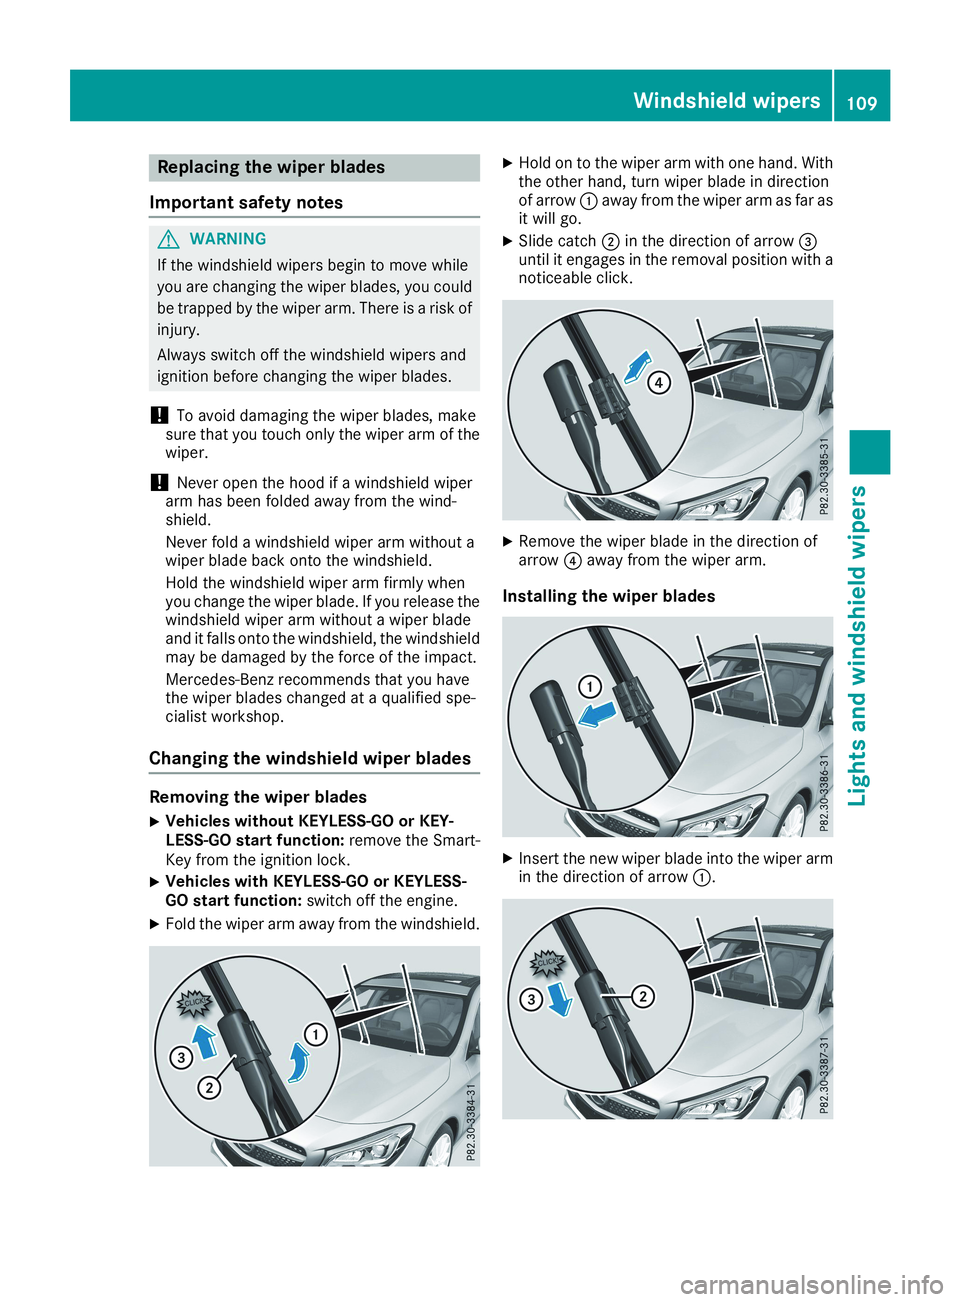
Removing the wiper blades
XVehicles without KEYLESS-GO or KEY-LESS-GO start function:remove the Smart-Key from the ignition lock.
XVehicles with KEYLESS-GO or KEYLESS-GO start function:switch off the engine.
XFold the wiper arm away from the windshield.
XHold on to the wiper arm with one hand. Withthe other hand, turn wiper blade in directionof arrowCaway from the wiper arm as far asit will go.
XSlide catchDin the direction of arrow
Page 270 of 330
To clean, use plenty of water and a mild cleaningagent without additional or abrasive products,e.g. use a car shampoo approved for Mercedes-Benz.
XDry vehicles covered with film using a soft,absorbent cloth after every wash.Water marks could otherwise form.
Scratches, corrosive deposits, areas affected bycorrosion and damage caused by inadequatecare cannot always be completely repaired. Insuch cases, visit a qualified specialist workshop.
XRemove dirt immediately, where possible,while avoiding rubbing too hard.The decorative film may be irreparably dam-aged.
XSoak insect remains with insect remover andrinse off the treated areas afterwards.
XSoak bird droppings with water and rinse offthe treated areas afterwards.
The Paint Cleaner cleaning product, which hasbeen approved and recommended byMercedes-Benz, should be used when dirt haspenetrated the decorative film surface or thedecorative film has become dull.
The manufacturer can provide you with infor-mation on special care and cleaning products.
Laminated surfaces may exhibit optical differ-ences to surfaces which were not protected by adecorative film when the decorative film isremoved.
iHave work or repairs on decorative film car-ried out at a qualified specialist workshop.Mercedes-Benz recommends that you use anauthorized Mercedes-Benz Center for thispurpose.
Cleaning the vehicle parts
Cleaning the wheels
GWARNING
The water jet from a circular jet nozzle (dirt
blasters) can cause invisible exterior damage
to the tires or chassis components. Compo-
nents damaged in this way may fail unexpect-
edly. There is a risk of an accident.
Do not use power washers with circular jet
nozzles to clean the vehicle. Have damaged
tires or chassis components replaced imme-
diately.
!Do not use acidic wheel cleaning productsto remove brake dust. This could damagewheel bolts and brake components.
!Do not park your vehicle for a long period oftime directly after cleaning, particularly aftercleaning the wheel rim with wheel cleaner.Wheel cleaner can lead to the increased cor-rosion of the brake discs and pads. Therefore,drive for a few minutes after cleaning. Byheating up the brakes, the brake discs andpads dry. The vehicle can then be parked for along period of time.
Cleaning the windows
GWARNING
You could become trapped by the windshield
wipers if they start moving while cleaning the
windshield or wiper blades. There is a risk of
injury.
Always switch off the windshield wipers and
the ignition before cleaning the windshield or
wiper blades.
!Only fold the windshield wipers away fromthe windshield when vertical. Otherwise, youwill damage the hood.
!Do not use dry cloths, abrasive products,solvents or cleaning agents containing sol-vents to clean the inside of the windows. Donot touch the insides of the windows withhard objects, e.g. an ice scraper or ring. Thereis otherwise a risk of damaging the windows.
!Clean the water drainage channels of thewindshield and the rear window at regularintervals. Deposits such as leaves, petals andpollen may under certain circumstances pre-vent water from draining away. This can leadto corrosion damage and damage to elec-tronic components.
XClean the inside and outside of the windowswith a damp cloth and a cleaning product thatis recommended and approved by Mercedes-Benz.
268Care
Maintenance and care
Page 271 of 330
Cleaning wiper blades
GWARNING
You could become trapped by the windshield
wipers if they start moving while cleaning the
windshield or wiper blades. There is a risk of
injury.
Always switch off the windshield wipers and
the ignition before cleaning the windshield or
wiper blades.
!Only fold the windshield wipers away fromthe windshield when vertical. Otherwise, youwill damage the hood.
!Do not pull the wiper blade. Otherwise, thewiper blade could be damaged.
!Do not clean wiper blades too often and donot rub them too hard. Otherwise, the graph-ite coating could be damaged. This couldcause wiper noise.
!Hold the wiper arm securely when foldingback. The windshield could be damaged if thewiper arm smacks against it suddenly.
XFold the windshield wiper arms away from thewindshield.
XCarefully clean the wiper blades with a dampcloth.
XFold the windshield wiper arms back againbefore switching on the ignition.
Cleaning the exterior lighting
!Only use cleaning agents or cleaning clothswhich are suitable for plastic light lenses.Unsuitable cleaning agents or cleaning clothscould scratch or damage the plastic light len-ses.
XClean the plastic lenses of the exterior lightswith a wet sponge and a mild cleaning agent,e.g. Mercedes-Benz car shampoo or cleaningcloths.
Cleaning the mirror turn signals
!Only use cleaning agents or cleaning clothsthat are suitable for plastic lenses. Unsuitablecleaning agents or cleaning cloths couldscratch or damage the plastic lenses of themirror turn signals.
XClean the plastic lenses of the mirror turn sig-nals in the exterior mirror housing using a wetsponge and mild cleaning agent, e.g.Mercedes-Benz car shampoo or cleaningcloths.
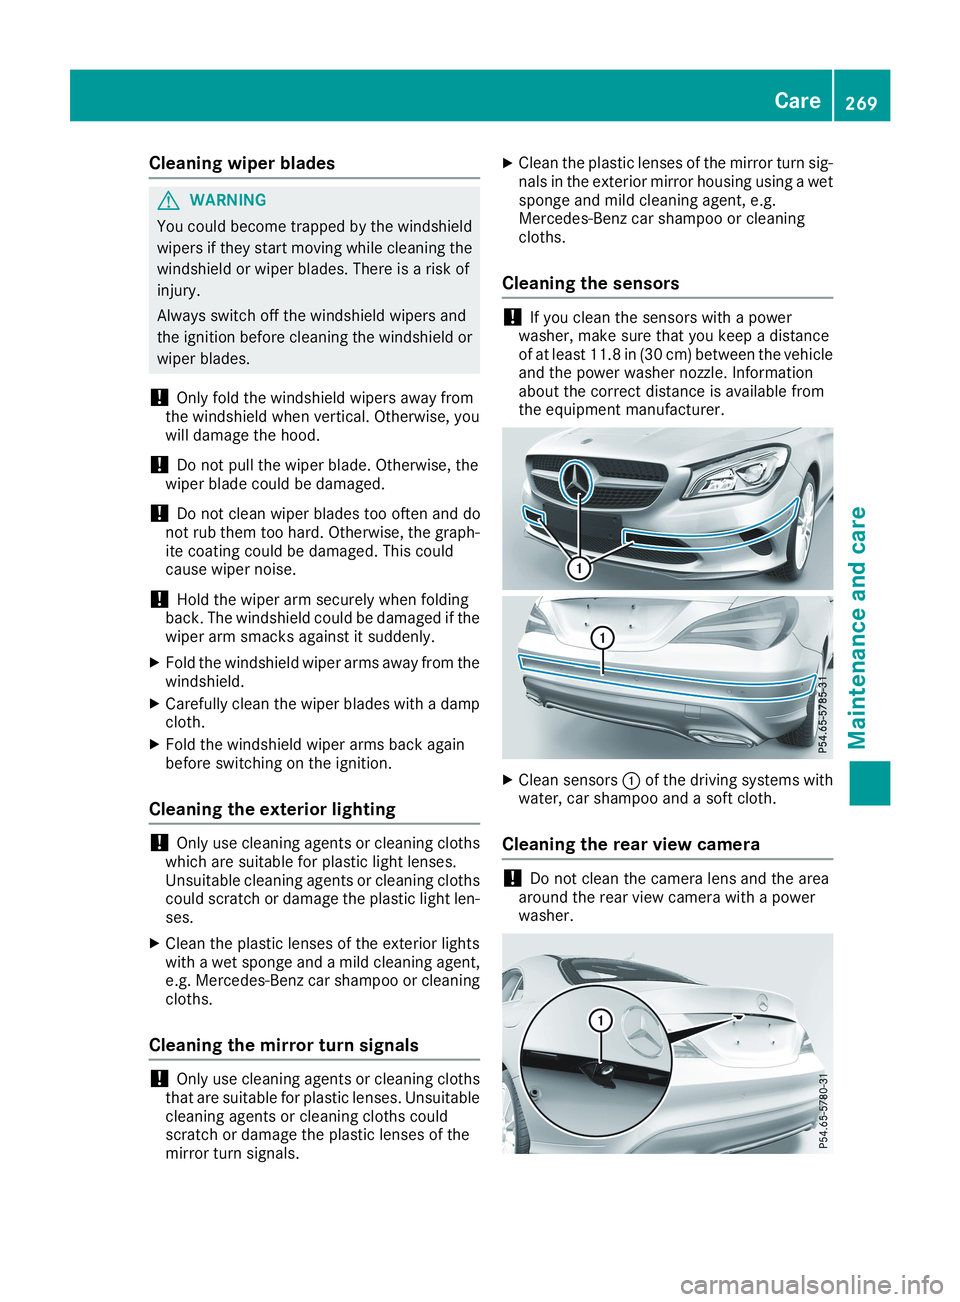
Cleaning the sensors
!If you clean the sensors with a powerwasher, make sure that you keep a distanceof at least 11.8 in(30 cm) between the vehicleand the power washer nozzle. Informationabout the correct distance is available fromthe equipment manufacturer.
XClean sensorsCof the driving systems withwater, car shampoo and a soft cloth.
Cleaning the rear view camera
!Do not clean the camera lens and the areaaround the rear view camera with a powerwasher.
Care269
Maintenance and care
Z