2019 MERCEDES-BENZ CLA warning
[x] Cancel search: warningPage 239 of 330
XAuthorization using Secure Simple Pair-ing:
A code is displayed in the multimedia systemand on the mobile phone.
XConfirm code on the mobile phone. Depend-ing on the mobile phone used, confirm theconnection to the multimedia system and for
the PBAP and MAP Bluetooth®profiles. Theprompt to confirm may take up to twominutes to be displayed (see the manufactur-er's operating instructions).
XIf the codes are different: selectNoNoon themultimedia system.The process is canceled.
Repeat authorization.
or
XAuthorization by entering a passkey(passcode):enter any one- to sixteen-digitnumber sequence which you have chosenyourself into the passkey input menu.
XPress�Tto confirm.
XEnter and confirm the passkey on the mobilephone. Depending on the mobile phone used,confirm the connection to the multimedia sys-
tem and for the PBAP and MAP Bluetooth®
profiles. The prompt to confirm may take upto two minutes to be displayed (see the man-ufacturer's operating instructions).
Symbols in the device manager
The symbols are shown in color depending ontheir use.
SymbolExplanation
Mobile phone connected to themultimedia system
Main telephone with full range offunctions
Additional telephone for incomingcalls in two telephone mode
Media mode
General notes
If you wish to play external media sources, theappropriate media mode must already be turnedon. Further information on media mode (see theDigital Operator's Manual).
The following external media sources can beused:
RApple®devices (e.g. iPhone®)
RUSB devices (e.g. USB stick, MP3 player)(Ypage 238)
RCD
RDVD (COMAND)
RSD cards
RVia devices connected by Bluetooth®
iInformation on single CD/DVD drive or DVDchanger (see the Digital Operator's Manual).
Selecting using the device list
Multimedia system:
XSelectMediaMedia�{DevicesDevices.The available media sources will be shown.The�;dot indicates the current setting.
XSelect the media source.Playable files are played.
Inserting/removing an SD card
Important safety notes
GWARNING
SD cards are small parts. They can be swal-
lowed and cause choking. This poses an
increased risk of injury or even fatal injury.
Keep the SD card out of the reach of children.
If a SD card is swallowed, seek medical atten-
tion immediately.
!If the SD card is no longer in use, you shouldtake it out and remove it from the vehicle.High temperatures can damage the card.
Inserting an SD card
The SD card slot is located on the control panel.
XInsert the SD card into the SD card slot untilthe SD card engages. The side with the con-tacts must face down.
Removing an SD card
XPress the SD card.The SD card is ejected.
XRemove the SD card.
Operating system237
Multimedia system
Z
Page 241 of 330
Loading guidelines
GWARNING
If objects, luggage or loads are not secured or
not secured sufficiently, they could slip, tip
over or be flung around and thereby hit vehicle
occupants. There is a risk of injury, particu-
larly in the event of sudden braking or a sud-
den change in direction.
Always store objects so that they cannot be
flung around. Secure objects, luggage or
loads against slipping or tipping before the
journey.
GWARNING
Combustion engines emit poisonous exhaust
gases such as carbon monoxide. Exhaust
gases can enter the vehicle interior if the
trunk lid is open when the engine is running,
especially if the vehicle is in motion. There is a
risk of poisoning.
Always switch off the engine before opening
the trunk lid. Never drive with the trunk lid
open.
GWARNING
The exhaust tail pipe and tail pipe trim can
become very hot. If you come into contact
with these parts of the vehicle, you could burn
yourself. There is a risk of injury.
Always be particularly careful around the
exhaust tail pipe and the tail pipe trim. Allow
these components to cool down before touch-
ing them.
The handling characteristics of a laden vehicleare dependent on the distribution of the loadwithin the vehicle.
Observe the following notes when loading andtransporting a load:
RNever exceed the maximum permissiblegross vehicle mass or the gross axle weightrating for the vehicle (including occupants).The values are specified on the vehicle iden-
tification plate on the B-pillar of the driver'sdoor.
RThe trunk is the preferred place to carryobjects.
RPosition heavy loads as far forwards as pos-sible and as low down in the trunk as possible.
RThe load must not protrude above the upperedge of the seat backrests.
RAlways place the load against the rear or frontseat backrests. Make sure that the seatbackrests are securely locked into place.
RAlways place the load behind unoccupiedseats if possible.
RUse the cargo tie-down rings and the parcelnets to transport loads and luggage.
RUse cargo tie-down rings and fastening mate-rials appropriate for the weight and size of theload.
RSecure the load with sufficiently strong andwear-resistant tie-downs. Pad sharp edges forprotection.
Stowage areas
Stowage spaces
Important safety notes
GWARNING
If objects in the passenger compartment are
stowed incorrectly, they can slide or be
thrown around and hit vehicle occupants. In
addition, cup holders, open stowage spaces
and mobile phone brackets cannot always
retain all objects they contain. There is a risk
of injury, particularly in the event of sudden
braking or a sudden change in direction.
RAlways stow objects so that they cannot be
thrown around in such situations.
RAlways make sure that objects do not pro-
trude from stowage spaces, parcel nets or
stowage nets.
RClose the lockable stowage spaces before
starting a journey.
RAlways stow and secure heavy, hard, poin-
ted, sharp-edged, fragile or bulky objects in
the trunk.
Observe the loading guidelines (Ypage 239).
Stowage areas239
Stowage and features
Z
Page 244 of 330
Observe the loading guidelines (Ypage 239).
Cargo compartment enlargement
Important safety notes
GWARNING
If the rear bench seat/rear seat and seat
backrest are not engaged they could fold for-
wards, e.g. when braking suddenly or in the
event of an accident.
RThe vehicle occupant would thereby be
pushed into the seat belt by the rear bench
seat/rear seat or by the seat backrest. The
seat belt can no longer offer the intended
level of protection and could even cause
injuries.
RObjects or loads in the trunk cannot be
restrained by the seat backrest.
There is an increased risk of injury.
Before every trip, make sure that the seat
backrests and the rear bench seat/rear seat
are engaged.
!Before folding the backrest in the rear com-partment forwards, make sure that the rearcompartment armrest and the cup holder arefolded in. They may otherwise be damaged.
Observe the loading guidelines (Ypage 239).
The left-hand and right-hand rear seat backrestscan be folded forwards separately to increasethe trunk capacity.
Folding the rear seat backrest forward
and back
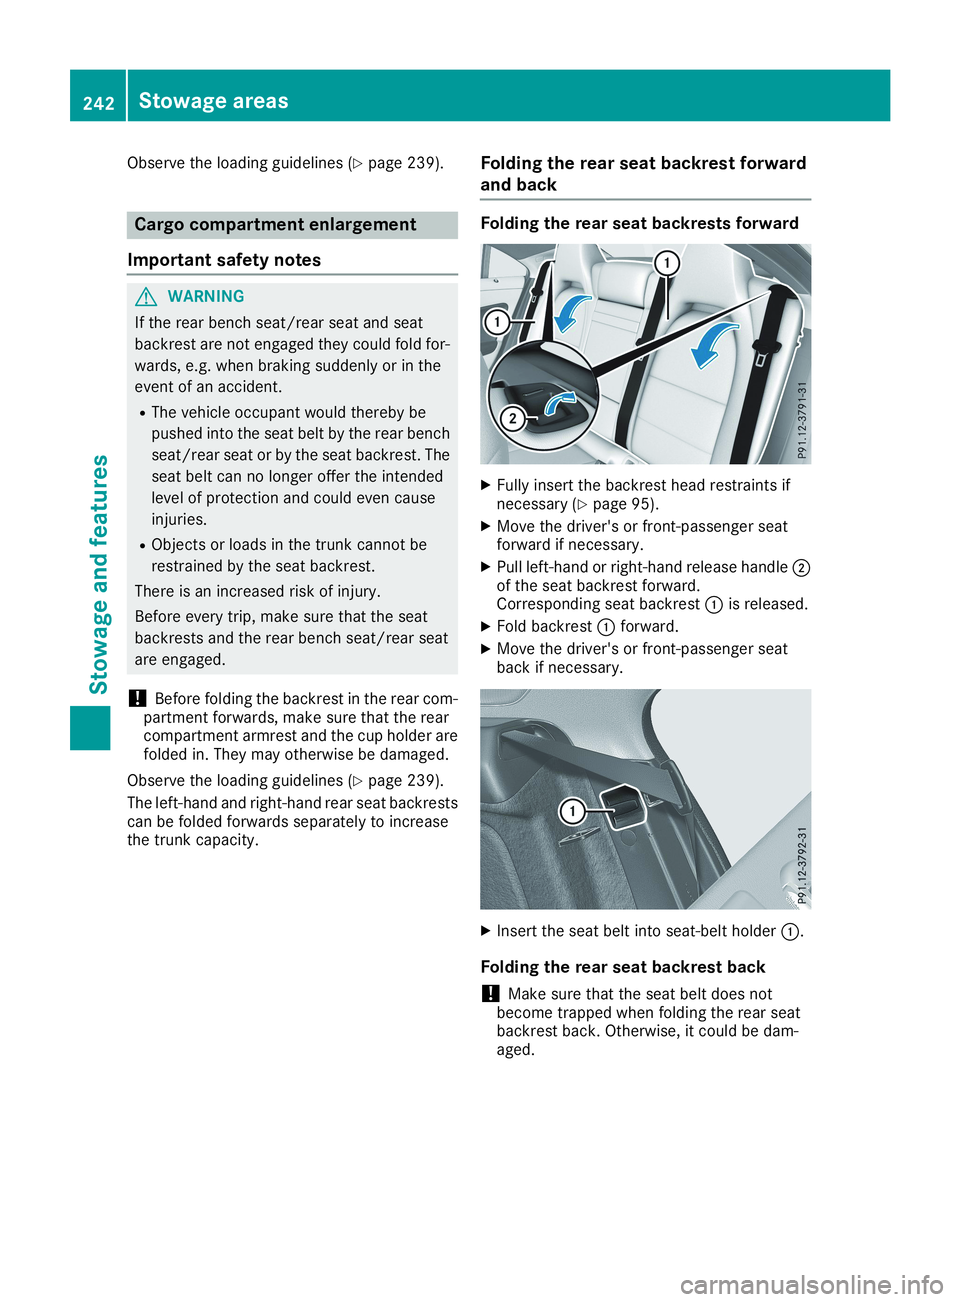
Folding the rear seat backrests forward
XFully insert the backrest head restraints ifnecessary (Ypage 95).
XMove the driver's or front-passenger seatforward if necessary.
XPull left-hand or right-hand release handle�Dof the seat backrest forward.Corresponding seat backrest�Cis released.
XFold backrest�Cforward.
XMove the driver's or front-passenger seatback if necessary.
XInsert the seat belt into seat-belt holder�C.
Folding the rear seat backrest back
!Make sure that the seat belt does notbecome trapped when folding the rear seatbackrest back. Otherwise, it could be dam-aged.
242Stowage areas
Stowage and features
Page 247 of 330
Do not touch the hot heating elements of the
cup holder. Always make sure that children
cannot access the hot heating elements of the
cup holder. Never leave children unsuper-
vised in the vehicle.
GWARNING
If objects in the passenger compartment are
stowed incorrectly, they can slide or be
thrown around and hit vehicle occupants. In
addition, cup holders, open stowage spaces
and mobile phone brackets cannot always
retain all objects they contain. There is a risk
of injury, particularly in the event of sudden
braking or a sudden change in direction.
RAlways stow objects so that they cannot be
thrown around in such situations.
RAlways make sure that objects do not pro-
trude from stowage spaces, parcel nets or
stowage nets.
RClose the lockable stowage spaces before
starting a journey.
RAlways stow and secure heavy, hard, poin-
ted, sharp-edged, fragile or bulky objects in
the trunk.
!Only use the cup holders for containers ofthe right size and which have lids. The drinkscould otherwise spill.
Observe the loading guidelines (Ypage 239).
The stowage compartments in the doors providespace for bottles:
Rfront: capacity up to 34 fl. oz. (1.0l)
Rrear: capacity up to 17 fl. oz. (0.5 l)
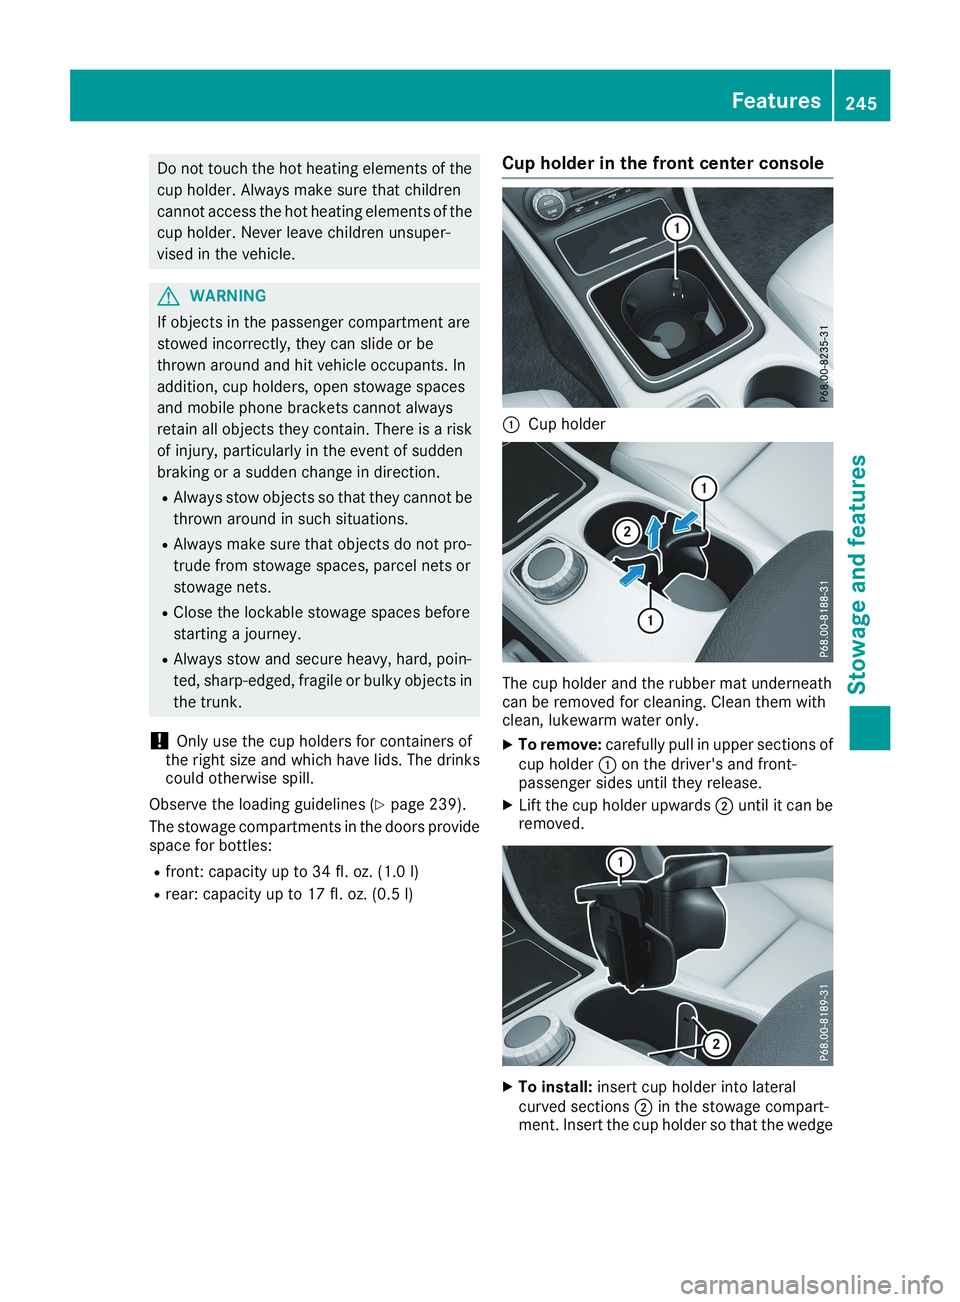
Cup holder in the front center console
�CCup holder
The cup holder and the rubber mat underneathcan be removed for cleaning. Clean them withclean, lukewarm water only.
XTo remove:carefully pull in upper sections ofcup holder�Con the driver's and front-passenger sides until they release.
XLift the cup holder upwards�Duntil it can beremoved.
XTo install:insert cup holder into lateralcurved sections�Din the stowage compart-ment. Insert the cup holder so that the wedge
Features245
Stowage and features
Z
Page 248 of 330
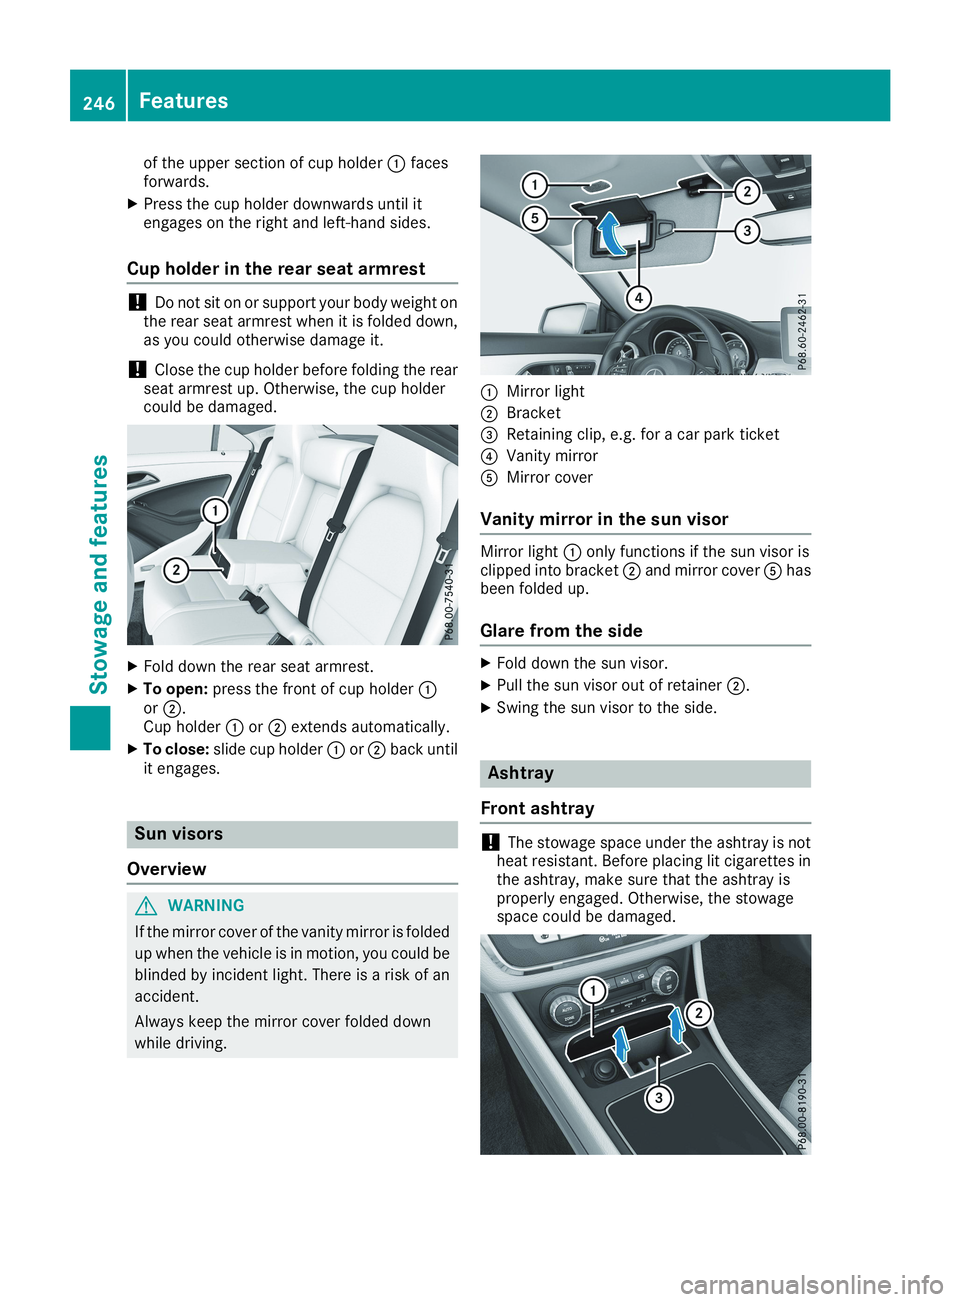
of the upper section of cup holder�Cfacesforwards.
XPress the cup holder downwards until itengages on the right and left-hand sides.
Cup holder in the rear seat armrest
!Do not sit on or support your body weight onthe rear seat armrest when it is folded down,as you could otherwise damage it.
!Close the cup holder before folding the rearseat armrest up. Otherwise, the cup holdercould be damaged.
XFold down the rear seat armrest.
XTo open:press the front of cup holder�Cor�D.Cup holder�Cor�Dextends automatically.
XTo close:slide cup holder�Cor�Dback untilit engages.
Sun visors
Overview
GWARNING
If the mirror cover of the vanity mirror is folded
up when the vehicle is in motion, you could be
blinded by incident light. There is a risk of an
accident.
Always keep the mirror cover folded down
while driving.
�CMirror light
�DBracket
�
Page 251 of 330
Have the system checked at the nearestMercedes-Benz Service Center or contact thefollowing service hotlines:
Mercedes-Benz Customer Assistance Center at1-800-FOR-MERCedes (1-800-367-6372) or1-866-990-9007
Emergency call
Important safety notes
GWARNING
It can be dangerous to remain in the vehicle,
even if you have pressed the SOS button in an
emergency if:
Ryou see smoke inside or outside of the vehi-
cle, e.g. if there is a fire after an accident
Rthe vehicle is on a dangerous section of
road
Rthe vehicle is not visible or cannot easily be
seen by other road users, particularly when
dark or in poor visibility conditions
There is a risk of an accident and injury.
Leave the vehicle immediately in this or simi-
lar situations as soon as it is safe to do so.
Move to a safe location along with other vehi-
cle occupants. In such situations, secure the
vehicle in accordance with national regula-
tions, e. g. with a warning triangle.
General notes
Observe the notes on system activation(Ypage 248).
An emergency call is dialed automatically if anair bag or Emergency Tensioning Device is trig-gered. You cannot end an automatically trig-gered emergency call yourself.
An emergency call can also be initiated man-ually.
As soon as the emergency call has been initi-ated, the indicator lamp in the SOS buttonflashes. TheConnecting CallConnecting Callmessageappears in the multifunction display.
The audio output is muted.
Once the connection has been made, theCallCallConnectedConnectedmessage appears in the multifunc-tion display.
All important information on the emergency istransmitted, for example:
RCurrent location of the vehicle (as determinedby the GPS system)
RVehicle identification number
RInformation on the severity of the accident
Shortly after the emergency call has been initi-ated, a voice connection is automatically estab-lished between the Customer Assistance Centerand the vehicle occupants.
RIf the vehicle occupants are responsive, theMercedes-Benz Customer Assistance Centerattempts to get more information on theemergency.
RIf there is no response from the vehicle occu-pants, an ambulance is immediately sent tothe vehicle
If no voice connection can be established to theMercedes-Benz Customer Assistance Center,the system has been unable to initiate an emer-gency call.
This can occur, for example, if the relevantmobile phone network is not available. The indi-cator lamp in the SOS button flashes continu-ously.
TheCall FailedCall Failedmessage appears in the mul-tifunction display and must be confirmed.
In this case, summon assistance by othermeans.
Making an emergency call
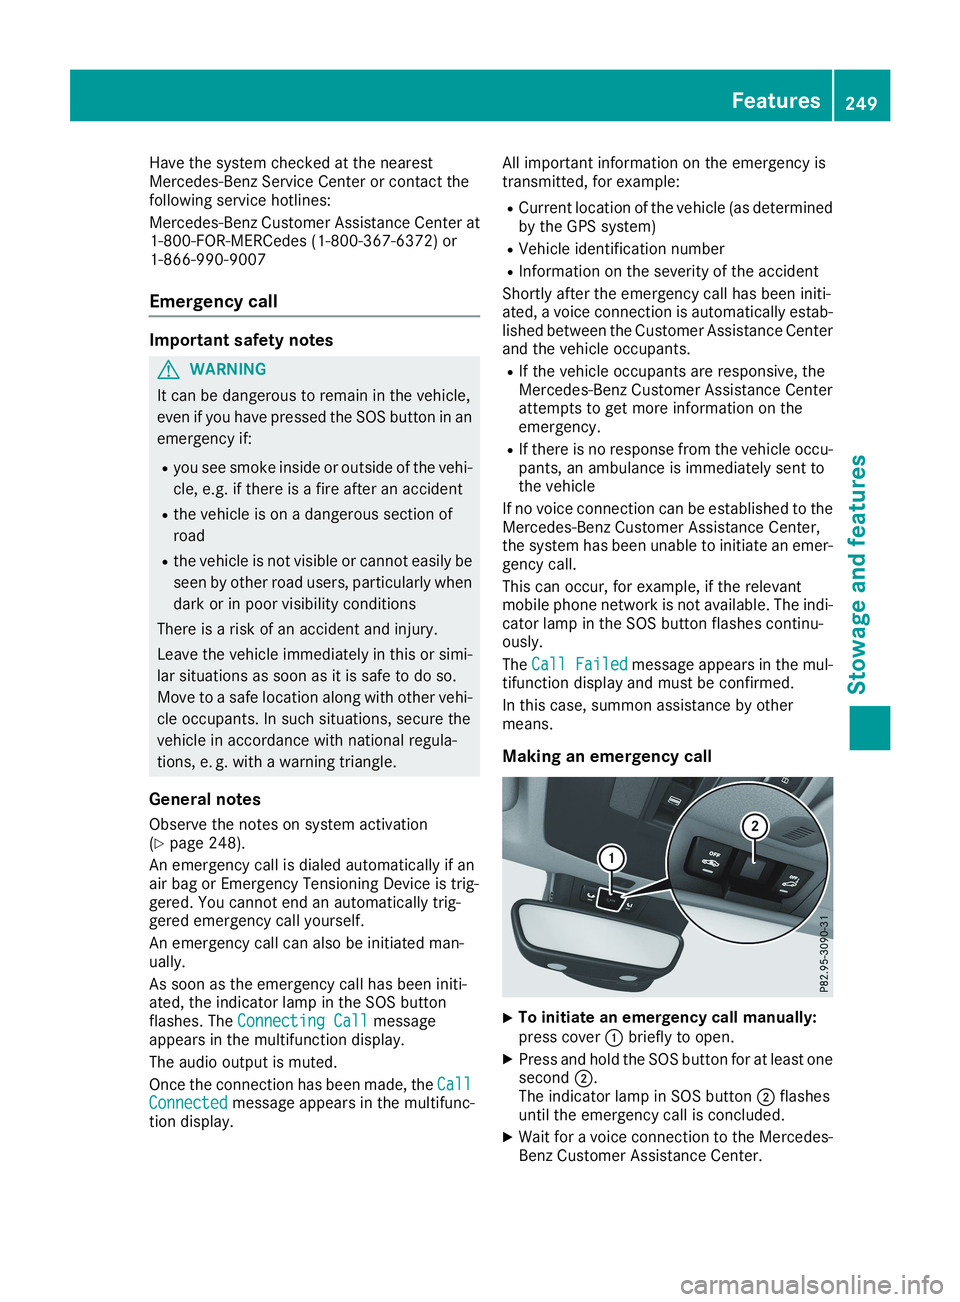
XTo initiate an emergency call manually:press cover�Cbriefly to open.
XPress and hold the SOS button for at least onesecond�D.The indicator lamp in SOS button�Dflashesuntil the emergency call is concluded.
XWait for a voice connection to the Mercedes-Benz Customer Assistance Center.
Features249
Sto wage an d features
Z
Page 257 of 330
Currently inactive areas can be activated by textmessage.
Triggering the vehicle alarm
With this function, you can trigger the vehicle'spanic alarm via text message. An alarm soundsand the exterior lighting flashes. Depending onthe setting, the panic alarm lasts five or ten sec-onds. Afterwards, the alarm switches off.
Garage door opener
General notes
The HomeLink®garage door opener integratedin the rear-view mirror allows you to operate upto three different door and gate systems.
Use the integrated garage door opener only ongarage doors that:
Rhave safety stop and reverse features and
Rmeet current U.S. federal safety standards
Once programed, the integrated garage dooropener in the rear-view mirror will assume thefunction of the garage door system's remotecontrol. Please also read the operating instruc-tions for the garage door system.
When programming a garage door opener, parkthe vehicle outside the garage. Do not leave theengine running while programming.
Certain garage door drives are incompatiblewith the integrated garage door opener. If youhave difficulty programing the integrated garagedoor opener, contact a Mercedes-Benz ServiceCenter.
Alternatively, you can call the following tele-phone assistance services:
RUSA:Mercedes-Benz Customer AssistanceCenter at 1-800-FOR-MERCedes
RCanada:Customer Service at1-800-387-0100
RHomeLink®hotline 1-800-355-3515 (free ofcharge)
More information on HomeLink®and/or com-patible products is also available online athttp://www.homelink.com.
Notes on the declaration of conformity(Ypage 27).
USA: FCC ID: CB2HMIHL4
Canada: IC: 279B-HMIHL4
Important safety notes
GWARNING
When you operate or program the door with
the integrated garage door opener, persons in
the range of movement of the door may
become trapped or be struck by the door.
There is a risk of injury.
When using the integrated garage door
opener, always make sure that nobody is
within the range of movement of the door.
GDANGER
Combustion engines emit poisonous exhaust
gases such as carbon monoxide. Inhaling
these exhaust gases is hazardous to health
and can result in poisoning. There is a risk of
fatal injury. Therefore, never leave the engine
running in an enclosed space without ade-
quate ventilation.
Programming
Programming the buttons
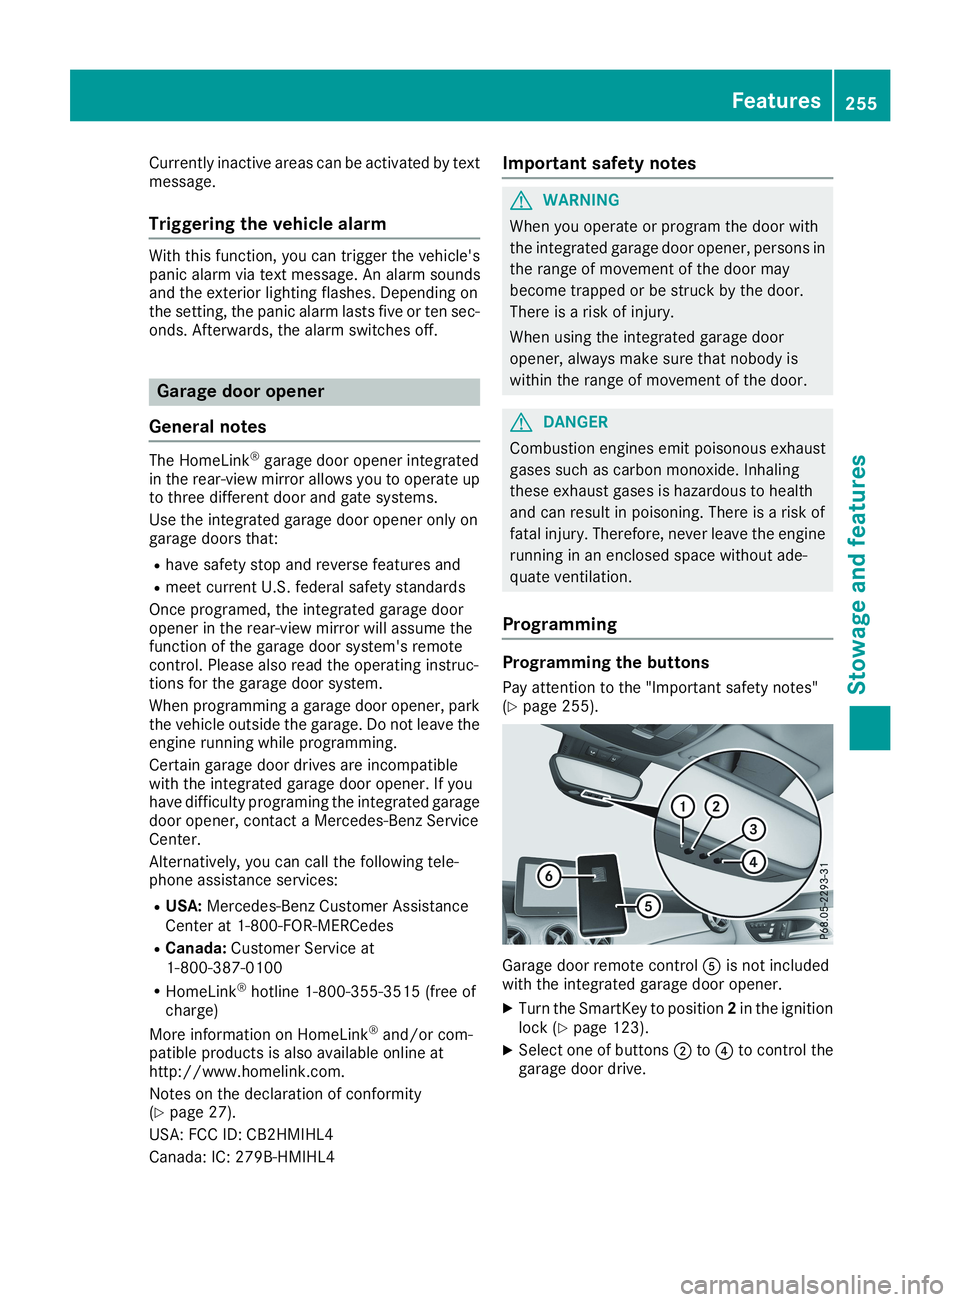
Pay attention to the "Important safety notes"(Ypage 255).
Garage door remote control�
Page 261 of 330
South America
Floormats
GWARNING
Objects in the driver's footwell can restrict the
pedal travel or obstruct a depressed pedal.
The operating and road safety of the vehicle is
jeopardized. There is a risk of an accident.
Make sure that all objects in the vehicle are
stowed correctly, and that they cannot enter
the driver's footwell. Install the floormats
securely and as specified in order to ensure
sufficient clearance for the pedals. Do not use
loose floormats and do not place floormats on
top of one another.
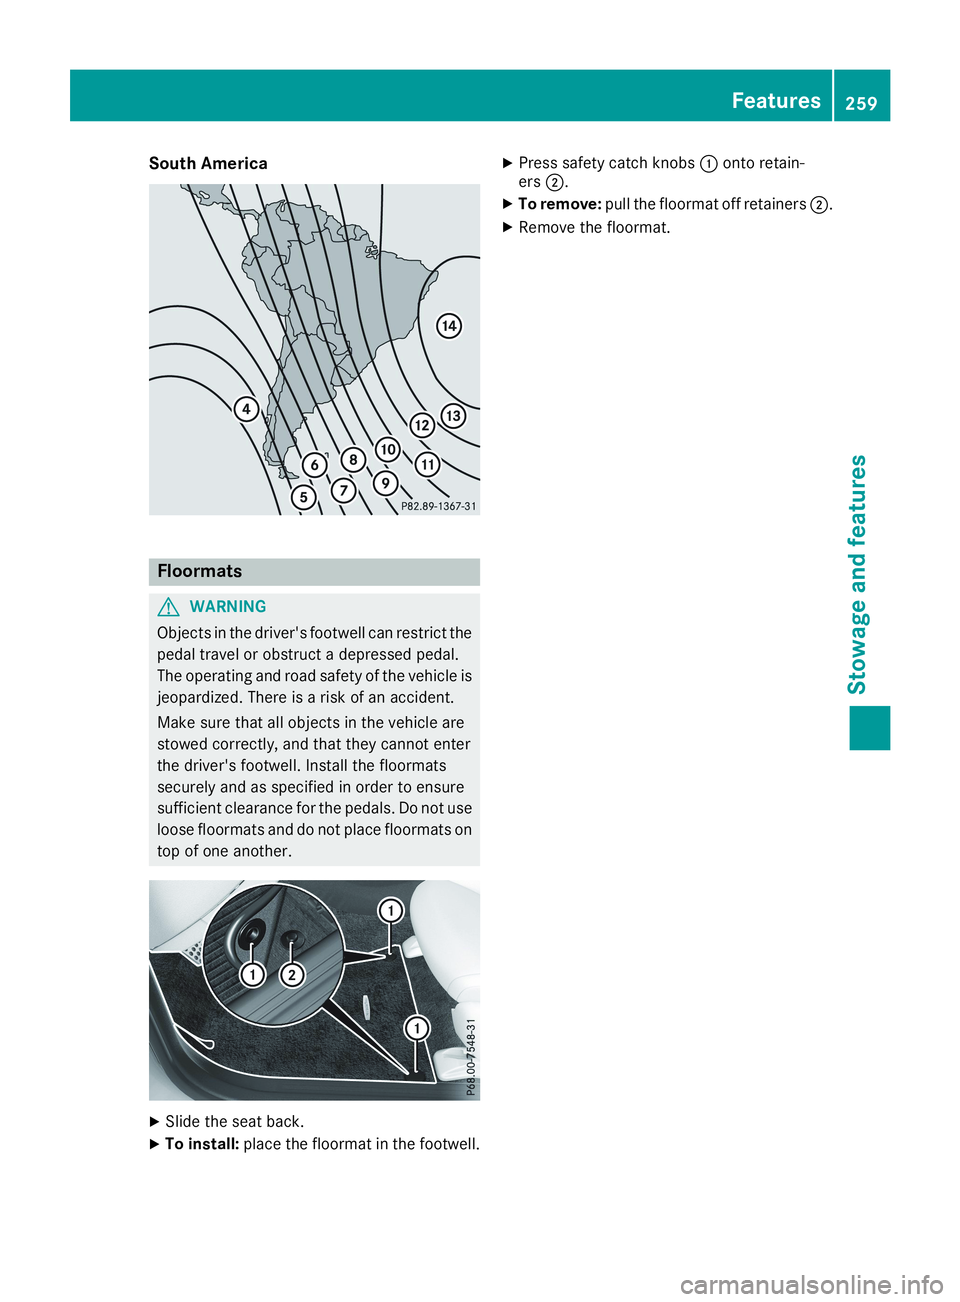
XSlide the seat back.
XTo install:place the floormat in the footwell.
XPress safety catch knobs�Conto retain-ers�D.
XTo remove:pull the floormat off retainers�D.
XRemove the floormat.
Features259
Stowage and features
Z