2019 MERCEDES-BENZ CLA warning
[x] Cancel search: warningPage 273 of 330
Cleaning the steering wheel and gear or
selector lever
XThoroughly wipe with a damp cloth or useleather care agents that have been recom-mended and approved by Mercedes-Benz.
Cleaning genuine wood and trim ele-
ments
!Do not use solvent-based cleaning agentssuch as tar remover, wheel cleaners, polishesor waxes. There is otherwise a risk of damag-ing the surface.
!Do not use chrome polish on trim pieces.The trim pieces have a chrome look but aremostly made of anodized aluminum and canlose their shine if chrome polish is used. Usea damp, lint-free cloth instead when cleaningthe trim pieces.
If the chrome-plated trim pieces are verydirty, you can use a chrome polish. If you areunsure as to whether the trim pieces arechrome-plated or not, consult an authorizedMercedes-Benz Center.
XWipe the wooden trim and trim pieces with adamp, lint-free cloth, e.g. a microfiber cloth.
XHeavy soiling:use care and cleaning prod-ucts recommended and approved byMercedes-Benz.
Cleaning the seat covers
General notes
!Do not use a microfiber cloth to clean coversmade out of real leather, artificial leather orDINAMICA. If used often, these can damagethe cover.
Note that regular care is essential to ensure thatthe appearance and comfort of the covers isretained over time.
Genuine leather seat covers
!To retain the natural appearance of theleather, observe the following cleaninginstructions:
RClean genuine leather covers carefully witha damp cloth and then wipe the coversdown with a dry cloth.
RMake sure that the leather does notbecome soaked. It may otherwise becomerough and cracked.
ROnly use leather care agents that havebeen tested and approved by Mercedes-Benz. You can obtain these from a qualifiedspecialist workshop.
Leather is a natural product.
It exhibits natural surface characteristics, forexample:
Rdifferences in the texture
Rmarks caused by growth and injury
Rslight nuances of color
These are characteristics of leather and notmaterial defects.
Seat covers of other materials
!Observe the following when cleaning:
Rclean artificial leather covers with a clothmoistened with a solution containing 1%detergent (e.g. dish washing liquid).
Rclean cloth covers with a microfiber clothmoistened with a solution containing 1%detergent (e.g. dish washing liquid). Rubcarefully and always wipe entire seat sec-tions to avoid leaving visible lines. Leavethe seat to dry afterwards. Cleaning resultsdepend on the type of dirt and how long ithas been there.
Rclean DINAMICA covers with a damp cloth.Make sure that you wipe entire seat sec-tions to avoid leaving visible lines.
Cleaning the seat belts
GWARNING
Seat belts can become severely weakened if
bleached or dyed. This could cause the seat
belts to tear or fail, for instance, in the event of
an accident. This poses an increased risk of
injury or fatal injury.
Never bleach or dye the seat belts.
Care271
Maintenance and care
Z
Page 277 of 330
XMake sure that the engine cannot be startedvia your smartphone (Ypage 124).
XMake sure that the passengers are not endan-gered as they do so. Make sure that no one isnear the danger area while a wheel is beingchanged. Anyone who is not directly assistingin the wheel change should, for example,stand behind the barrier.
XGet out of the vehicle. Pay attention to trafficconditions when doing so.
XClose the driver's door.
MOExtended tires (tires with run-flat
properties)
General notes
With MOExtended tires (tires with run flat char-acteristics), you can continue to drive your vehi-cle even if there is a total loss of pressure in oneor more tires. The affected tire must not showany clearly visible damage.
You can recognize a MOExtended tire by theMOExtended marking which appears on thesidewall of the tire. You will find this markingnext to the tire size designation, the load-bear-ing capacity and the speed index (Ypage 305).
MOExtended tires may be used only in conjunc-tion with an activated tire pressure loss warningsystem (Canada only) or tire pressure monitor(USA only).
If a pressure loss warning message appearsin the multifunction display:
Robserve the instructions in the display mes-sages (Ypage 213).
Rcheck the tire for damage
Rif driving on, observe the following notes
The driving distance possible in run-flat mode isapproximately 50 miles (80 km) when the vehi-cle is partially laden. When the vehicle is fullyladen it is approximately 19 miles (30 km).
In addition to the vehicle load, the driving dis-tance possible depends upon:
Rvehicle speed
Rroad condition
Routside temperature
The driving distance possible in run-flat modemay be reduced by extreme driving conditionsor maneuvers, or it can be increased through amoderate style of driving.
The driving distance possible in run-flat mode iscounted from the moment the tire pressure losswarning appears in the multifunction display.
You must not exceed a maximum speed of50 mph (80 km/h).
When replacing one or all tires, please observethe following specifications for your vehicle'stires:
Rsize
Rtype and
Rthe "MOExtended" marking
If a tire has gone flat and cannot be replacedwith a MOExtended tire, a standard tire may beused as a temporary measure. Make sure thatyou use the proper size and type (summer orwinter tire).
Vehicles equipped with MOExtended tires arenot equipped with a TIREFIT kit at the factory. Itis therefore recommended that you additionallyequip your vehicle with a TIREFIT kit if you mounttires that do not feature run-flat properties, e.g.winter tires. A TIREFIT kit may be obtained froma qualified specialist workshop.
Important safety notes
GWARNING
When driving in emergency mode, the driving
characteristics deteriorate, e.g. when corner-
ing, accelerating quickly and when braking.
There is a risk of an accident.
Do not exceed the stated maximum speed.
Avoid abrupt steering and driving maneuvers,
and driving over obstacles (curbs, potholes,
off-road). This applies in particular to a laden
vehicle.
Stop driving in emergency mode if:
Ryou hear banging noises.
Rthe vehicle starts to shake.
Ryou see smoke and smell rubber.
RESP®is intervening constantly.
Rthere are tears in the sidewalls of the tire.
After driving in emergency mode, have the
wheel rims checked at a qualified specialist
workshop with regard to their further use. The
defective tire must be replaced in every case.
Flat tire275
Breakdown assistance
Z
Page 280 of 330
Tire pressure reached
GWARNING
A tire temporarily sealed with tire sealant
impairs the driving characteristics and is not
suitable for higher speeds. There is a risk of
accident.
You should therefore adapt your driving style
accordingly and drive carefully. Do not exceed
the specified maximum speed with a tire that
has been repaired using tire sealant.
USA only:The maximum permissible speed fora tire sealed with tire sealant is 50 mph(80 km/h). The upper part of the TIREFIT stickermust be affixed to the instrument cluster in thedriver's field of vision.
If a tire pressure of 200 kPa (2.0 bar/29 psi) hasbeen attained after ten minutes:
XSwitch off the tire inflation compressor.
XUnscrew the filler hose from the valve of thefaulty tire.Note that tire sealant may escape when youunscrew the filler hose.
XUSA only:Stow the tire sealant bottle and thetire inflation compressor.
XPull away immediately.
XStop after driving for approximately tenminutes and check the tire pressure with thetire inflation compressor.The tire pressure must now be at least130 kPa (1.3 bar/19 psi).
GWARNING
If the required tire pressure is not reached
after driving for a short period, the tire is too
badly damaged. The tire sealant cannot repair
the tire in this instance. Damaged tires and a
tire pressure that is too low can significantly
impair the vehicle's braking and driving char-
acteristics. There is a risk of accident.
Do not continue driving. Contact a qualified
specialist workshop.
iUSA only:In cases such as the one men-tioned above, contact an authorizedMercedes-Benz Center. Or call1-800-FOR-MERCedes (in the USA) or1-800-387-0100 (in Canada).
XUSA only:Correct the tire pressure if it is stillat least 130 kPa (1.3 bar/19 psi). See the Tireand Loading Information placard on the driv-er's side B-pillar or the tire pressure table inthe fuel filler flap for values.
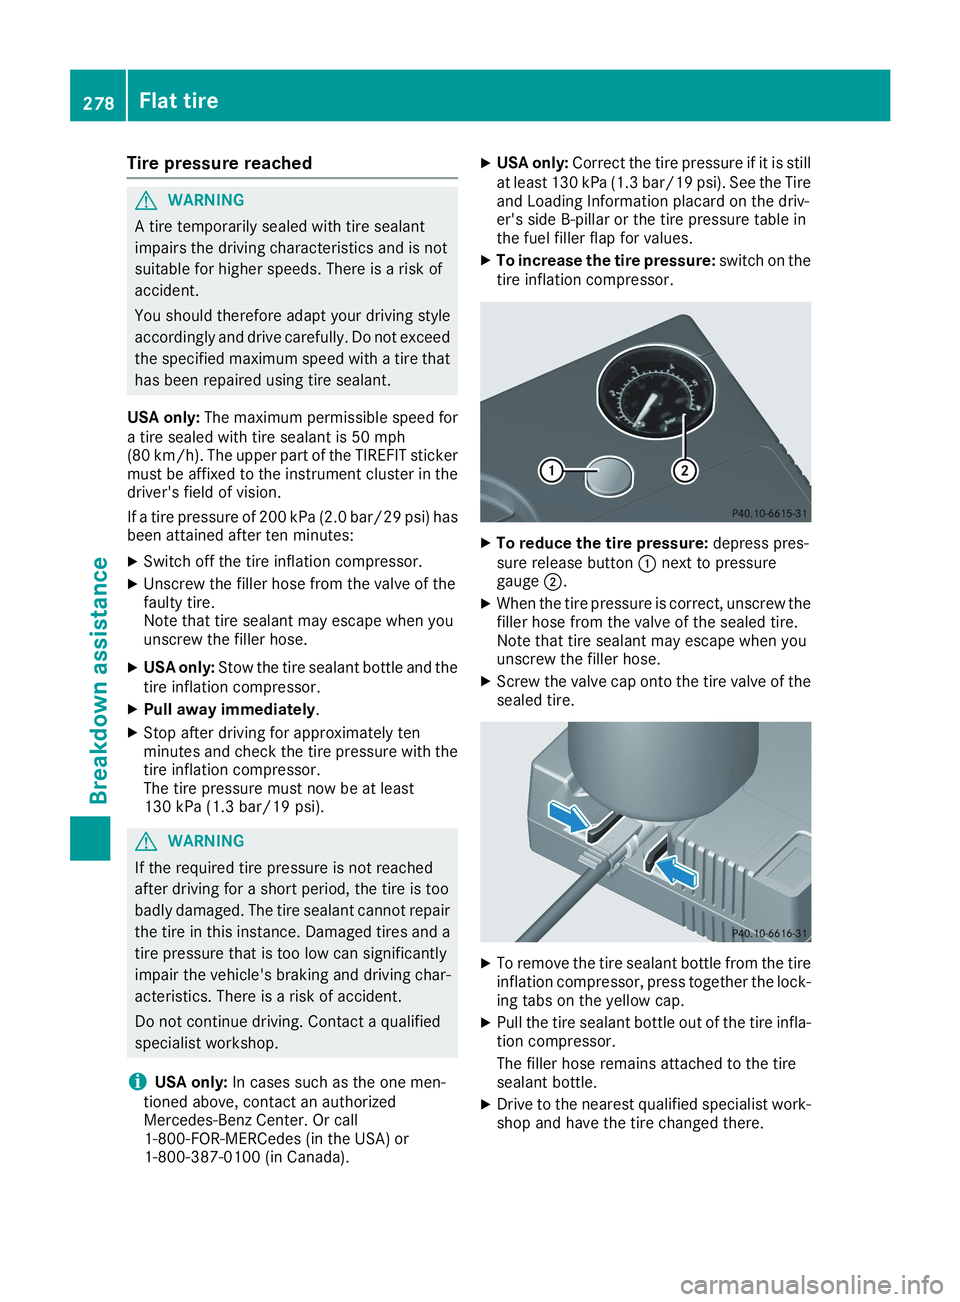
XTo increase the tire pressure:switch on thetire inflation compressor.
XTo reduce the tire pressure:depress pres-sure release button�Cnext to pressuregauge�D.
XWhen the tire pressure is correct, unscrew thefiller hose from the valve of the sealed tire.Note that tire sealant may escape when youunscrew the filler hose.
XScrew the valve cap onto the tire valve of thesealed tire.
XTo remove the tire sealant bottle from the tireinflation compressor, press together the lock-ing tabs on the yellow cap.
XPull the tire sealant bottle out of the tire infla-tion compressor.
The filler hose remains attached to the tiresealant bottle.
XDrive to the nearest qualified specialist work-shop and have the tire changed there.
278Flat tire
Breakdown assistance
Page 281 of 330
XHave the tire sealant bottle and the filler hosereplaced as soon as possible at a qualifiedspecialist workshop.
XHave the tire sealant bottle replaced everyfour years at a qualified specialist workshop.
Battery (vehicle)
Important safety notes
Special tools and expert knowledge are requiredwhen working on the battery, e.g. removal andinstallation. You should therefore have all workinvolving the battery carried out at a qualifiedspecialist workshop.
GWARNING
Work carried out incorrectly on the battery
can lead, for example, to a short circuit and
thus damage the vehicle electronics. This can
lead to function restrictions applying to
safety-relevant systems, e.g. the lighting sys-
tem, the ABS (anti-lock braking system) or the
ESP®(Electronic Stability Program). The oper-
ating safety of your vehicle may be restricted.
You could lose control of the vehicle, for
example:
Rwhen braking
Rin the event of abrupt steering maneuvers
and/or when the vehicle's speed is not
adapted to the road conditions
There is a risk of an accident.
In the event of a short circuit or a similar inci-
dent, contact a qualified specialist workshop
immediately. Do not drive any further. You
should have all work involving the battery car-
ried out at a qualified specialist workshop.
For further information about ABS and ESP®,see (Ypage 61) and (Ypage 64).
GWARNING
Electrostatic build-up can lead to the creation
of sparks, which could ignite the highly explo-
sive gases of a battery. There is a risk of an
explosion.
Before handling the battery, touch the vehicle
body to remove any existing electrostatic
build-up.
The highly flammable gas mixture forms whencharging the battery as well as when jump-start-ing.
Always make sure that neither you nor the bat-tery is electrostatically charged. A build-up ofelectrostatic charge can be caused, for exam-ple:
Rby wearing clothing made from syntheticfibers
Rdue to friction between clothing and seats
Rif you push or pull the battery across the car-pet or other synthetic materials
Rif you rub the battery with a cloth
GWARNING
During the charging process, a battery produ-
ces hydrogen gas. If a short circuit occurs or
sparks are created, the hydrogen gas can
ignite. There is a risk of an explosion.
RMake sure that the positive terminal of a
connected battery does not come into con-
tact with vehicle parts.
RNever place metal objects or tools on a bat-
tery.
RIt is important that you observe the descri-
bed order of the battery terminals when
connecting and disconnecting a battery.
RWhen jump-starting, make sure that the
battery poles with identical polarity are
connected.
RIt is particularly important to observe the
described order when connecting and dis-
connecting the jumper cables.
RNever connect or disconnect the battery
terminals while the engine is running.
GWARNING
Battery acid is caustic. There is a risk of injury.
Avoid contact with skin, eyes or clothing. Do
not inhale any battery gases. Do not lean over
the battery. Keep children away from batter-
ies. Wash away battery acid immediately with
Battery (vehicle)279
Breakdown assistance
Z
Page 283 of 330
Only replace a battery with a battery that hasbeen recommended by Mercedes-Benz.
Remove the SmartKey if you park the vehicleand do not require any electrical consumers.The vehicle will then use very little energy, thusconserving battery power.
If the power supply has been interrupted, e.g. ifyou reconnect the battery, you will have to:
Rset the clock using the multimedia system(see the Digital Operator's Manual)
Rreset the function for folding the exterior mir-rors in/out automatically, by folding the mir-rors out once (Ypage 98)
Charging the battery
GWARNING
During charging and jump-starting, explosive
gases can escape from the battery. There is a
risk of an explosion.
Particularly avoid fire, open flames, creating
sparks and smoking. Ensure there is sufficient
ventilation while charging and jump-starting.
Do not lean over a battery.
GWARNING
Battery acid is caustic. There is a risk of injury.
Avoid contact with skin, eyes or clothing. Do
not inhale any battery gases. Do not lean over
the battery. Keep children away from batter-
ies. Wash away battery acid immediately with
plenty of clean water and seek medical atten-
tion.
GWARNING
A discharged battery can freeze at tempera-
tures below freezing point. When jump-start-
ing the vehicle or charging the battery, gases
can escape from the battery. There is a risk of
an explosion.
Allow the frozen battery to thaw out before
charging it or jump-starting.
!Only use battery chargers with a maximumcharging voltage of 14.8 V.
!Only charge the battery using the jump-starting connection point.
The jump-starting connection point is in theengine compartment (Ypage 282).
XOpen the hood.
XConnect the battery charger to the positiveterminal and ground point in the same orderas when connecting the donor battery in thejump-starting procedure (Ypage 282).
If the indicator/warning lamps do not light up inthe instrument cluster at low temperatures, it isvery likely that the discharged battery has fro-zen. In this case you may neither jump-start thevehicle nor charge the battery. The service life ofa thawed-out battery may be shorter. The start-ing characteristics can be impaired, particularlyat low temperatures. Have the thawed-out bat-tery checked at a qualified specialist workshop.
Only charge the installed battery with a batterycharger which has been tested and approved byMercedes-Benz. A battery charger unit speciallyadapted for Mercedes-Benz vehicles and testedand approved by Mercedes-Benz is available asan accessory. It permits the charging of the bat-tery in its installed position. Contact an author-ized Mercedes-Benz Center for further informa-tion and availability. Read the battery charger'soperating instructions before charging the bat-tery.
Replacing the 12 V battery
Observe the notes on the 12 V battery(Ypage 279).
Mercedes-Benz recommends that you have the12 V battery replaced at a qualified specialistworkshop, e.g. at an authorized Mercedes-BenzCenter.
If you want to replace the battery yourself,observe the following notes:
RAlways replace a defective battery with a bat-tery which meets the specific requirements ofthe vehicle.
The vehicle is equipped with a battery usingAGM (absorbent glass mat) technology or abattery using EFB (enhanced flooded battery)technology. Full vehicle functionality is guar-anteed only with an AGM or EFB battery. Ifreplacement is necessary, always use the bat-tery technology originally installed. Switchingbetween the battery technologies is not per-mitted. For safety reasons, Mercedes-Benzrecommends that you only use batteries
Battery (vehicle)281
Breakdown assistance
Z
Page 284 of 330
which have been tested and approved for yourvehicle by Mercedes-Benz.
RUse detachable parts such as breather hoses,angled connecting pieces or terminal coversfrom the battery which is to be replaced.
RMake sure that the vent hose is always con-nected to the original opening on the batteryside.
RInstall existing or supplied cell caps; other-wise gases or battery acid could escape.
RMake sure that the detachable parts are con-nected again in the same way.
Jump-starting
For the jump-starting procedure, use only the jump-starting connection point, consisting of a pos-itive terminal and a ground point, in the engine compartment.
GWARNING
Battery acid is caustic. There is a risk of injury.
Avoid contact with skin, eyes or clothing. Do not inhale any battery gases. Do not lean over the
battery. Keep children away from batteries. Wash away battery acid immediately with plenty of
clean water and seek medical attention.
GWARNING
During charging and jump-starting, explosive gases can escape from the battery. There is a risk
of an explosion.
Particularly avoid fire, open flames, creating sparks and smoking. Ensure there is sufficient ven-
tilation while charging and jump-starting. Do not lean over a battery.
GWARNING
During the charging process, a battery produces hydrogen gas. If a short circuit occurs or sparks
are created, the hydrogen gas can ignite. There is a risk of an explosion.
RMake sure that the positive terminal of a connected battery does not come into contact with
vehicle parts.
RNever place metal objects or tools on a battery.
RIt is important that you observe the described order of the battery terminals when connecting
and disconnecting a battery.
RWhen jump-starting, make sure that the battery poles with identical polarity are connected.
RIt is particularly important to observe the described order when connecting and disconnecting
the jumper cables.
RNever connect or disconnect the battery terminals while the engine is running.
GWARNING
A discharged battery can freeze at temperatures below freezing point. When jump-starting the
vehicle or charging the battery, gases can escape from the battery. There is a risk of an explosion.
Allow the frozen battery to thaw out before charging it or jump-starting.
!Avoid repeated and lengthy starting attempts. Otherwise, the catalytic converter could bedamaged by the non-combusted fuel.
282Jump-starting
Breakdown assistance
Page 285 of 330
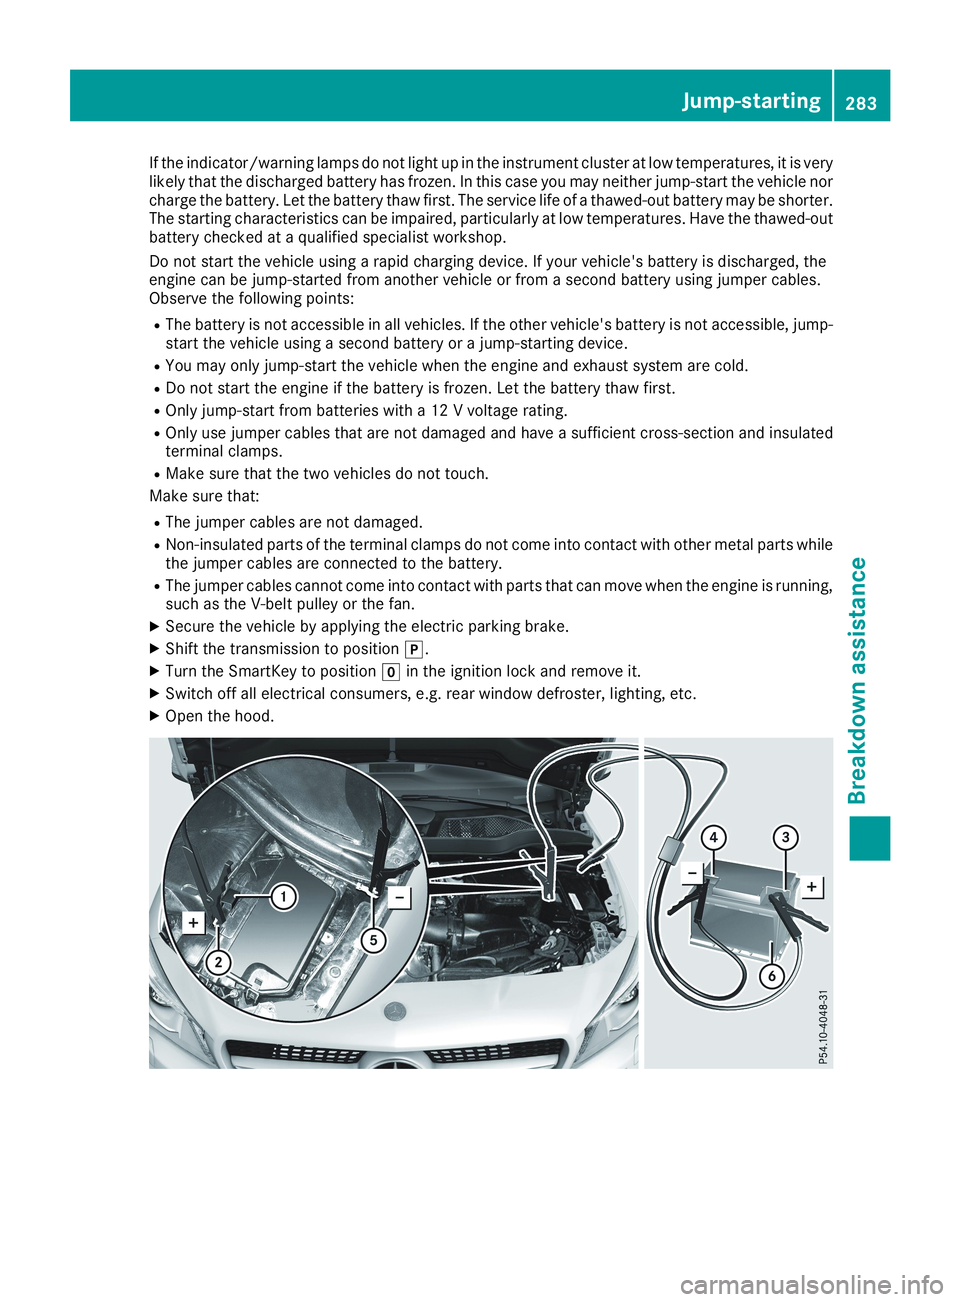
If the indicator/warning lamps do not light up in the instrument cluster at low temperatures, it is verylikely that the discharged battery has frozen. In this case you may neither jump-start the vehicle norcharge the battery. Let the battery thaw first. The service life of a thawed-out battery may be shorter.The starting characteristics can be impaired, particularly at low temperatures. Have the thawed-outbattery checked at a qualified specialist workshop.
Do not start the vehicle using a rapid charging device. If your vehicle's battery is discharged, theengine can be jump-started from another vehicle or from a second battery using jumper cables.Observe the following points:
RThe battery is not accessible in all vehicles. If the other vehicle's battery is not accessible, jump-start the vehicle using a second battery or a jump-starting device.
RYou may only jump-start the vehicle when the engine and exhaust system are cold.
RDo not start the engine if the battery is frozen. Let the battery thaw first.
ROnly jump-start from batteries with a 12 V voltage rating.
ROnly use jumper cables that are not damaged and have a sufficient cross-section and insulatedterminal clamps.
RMake sure that the two vehicles do not touch.
Make sure that:
RThe jumper cables are not damaged.
RNon-insulated parts of the terminal clamps do not come into contact with other metal parts whilethe jumper cables are connected to the battery.
RThe jumper cables cannot come into contact with parts that can move when the engine is running,such as the V-belt pulley or the fan.
XSecure the vehicle by applying the electric parking brake.
XShift the transmission to position�].
XTurn the SmartKey to position�Zin the ignition lock and remove it.
XSwitch off all electrical consumers, e.g. rear window defroster, lighting, etc.
XOpen the hood.
Jump-starting283
Breakdown assistance
Z
Page 288 of 330
The towing eye is located with the vehicle toolkit under the cargo compartment floor(Ypage 274).
Vehicles with the TIREFIT kit: the towing eye isbeneath the tire inflation compressor(Ypage 274).
XPress the mark on cover�Cinwards in thedirection of the arrow.
XTake cover�Coff the opening.
XScrew in the towing eye clockwise to the stop.
Removing the towing eye
XUnscrew and remove the towing eye.
XAttach cover�Cto the bumper and press untilit engages.
XPlace the towing eye in the stowage wellbeneath the cargo compartment floor in thecargo compartment (Ypage 274).
XVehicles with the TIREFIT kit: put back the tireinflation compressor (Ypage 274).
Towing the vehicle with the front axle
raised
Observe the important safety notes when tow-ing your vehicle with the front axle raised(Ypage 284).
Only vehicles without 4MATIC can be towedwith the front axle raised.
!Vehicles with 4MATIC must not be towedwith either the front or the rear axle raised, asdoing so will damage the transmission.
Vehicles with 4MATIC may either be towed awaywith both axles on the ground or be loaded upand transported.
!The ignition must be switched off if the vehi-cle is being towed with the front axle raised.
Otherwise, ESP®may intervene and damagethe brake system.
XOn vehicles with KEYLESS-GO or the KEY-LESS-GO start function:you must use theSmartKey instead of the Start/Stop button(Ypage 124).
XMake sure that the vehicle is stationary.
XTurn the SmartKey to position�Hin the igni-tion lock.
XWhen the vehicle is stationary, depress thebrake pedal and keep it depressed.
XShift the automatic transmission to position�].
XRelease the brake pedal.
XRelease the electric parking brake.
XSwitch off the automatic locking(Ypage 189).
XSwitch on the hazard warning lamps(Ypage 103).
XTurn the SmartKey in the ignition lock to posi-tion�Zand leave the SmartKey in the ignitionlock.
Towing a vehicle with both axles on
the ground
It is important that you observe the safetyinstructions when towing away your vehicle(Ypage 284).
XOn vehicles with KEYLESS-GO or the KEY-LESS-GO start function:you must use theSmartKey instead of the Start/Stop button(Ypage 124).
The automatic transmission automatically shiftsto position�]when you open the driver's orfront-passenger door or when you remove theSmartKey from the ignition lock. In order toensure that the automatic transmission stays inposition�\\when towing away the vehicle, youmust observe the following points:
XMake sure that the vehicle is stationary.
XTurn the SmartKey to position�Hin the igni-tion lock.
XDepress and hold the brake pedal.
XShift the automatic transmission to position�\\.
XLeave the SmartKey in position�Hin the igni-tion lock.
XRelease the brake pedal.
XRelease the electric parking brake.
XSwitch on the hazard warning lamps(Ypage 103).
iIn order to signal a change of direction whentowing the vehicle with the hazard warninglamps switched on, use the combinationswitch as usual. In this case, only the indicatorlamps for the direction of travel flash. Afterresetting the combination switch, the hazardwarning lamp starts flashing again.
286Towing and tow-starting
Breakdown assistance