2019 MERCEDES-BENZ CLA ESP
[x] Cancel search: ESPPage 277 of 330
XMake sure that the engine cannot be startedvia your smartphone (Ypage 124).
XMake sure that the passengers are not endan-gered as they do so. Make sure that no one isnear the danger area while a wheel is beingchanged. Anyone who is not directly assistingin the wheel change should, for example,stand behind the barrier.
XGet out of the vehicle. Pay attention to trafficconditions when doing so.
XClose the driver's door.
MOExtended tires (tires with run-flat
properties)
General notes
With MOExtended tires (tires with run flat char-acteristics), you can continue to drive your vehi-cle even if there is a total loss of pressure in oneor more tires. The affected tire must not showany clearly visible damage.
You can recognize a MOExtended tire by theMOExtended marking which appears on thesidewall of the tire. You will find this markingnext to the tire size designation, the load-bear-ing capacity and the speed index (Ypage 305).
MOExtended tires may be used only in conjunc-tion with an activated tire pressure loss warningsystem (Canada only) or tire pressure monitor(USA only).
If a pressure loss warning message appearsin the multifunction display:
Robserve the instructions in the display mes-sages (Ypage 213).
Rcheck the tire for damage
Rif driving on, observe the following notes
The driving distance possible in run-flat mode isapproximately 50 miles (80 km) when the vehi-cle is partially laden. When the vehicle is fullyladen it is approximately 19 miles (30 km).
In addition to the vehicle load, the driving dis-tance possible depends upon:
Rvehicle speed
Rroad condition
Routside temperature
The driving distance possible in run-flat modemay be reduced by extreme driving conditionsor maneuvers, or it can be increased through amoderate style of driving.
The driving distance possible in run-flat mode iscounted from the moment the tire pressure losswarning appears in the multifunction display.
You must not exceed a maximum speed of50 mph (80 km/h).
When replacing one or all tires, please observethe following specifications for your vehicle'stires:
Rsize
Rtype and
Rthe "MOExtended" marking
If a tire has gone flat and cannot be replacedwith a MOExtended tire, a standard tire may beused as a temporary measure. Make sure thatyou use the proper size and type (summer orwinter tire).
Vehicles equipped with MOExtended tires arenot equipped with a TIREFIT kit at the factory. Itis therefore recommended that you additionallyequip your vehicle with a TIREFIT kit if you mounttires that do not feature run-flat properties, e.g.winter tires. A TIREFIT kit may be obtained froma qualified specialist workshop.
Important safety notes
GWARNING
When driving in emergency mode, the driving
characteristics deteriorate, e.g. when corner-
ing, accelerating quickly and when braking.
There is a risk of an accident.
Do not exceed the stated maximum speed.
Avoid abrupt steering and driving maneuvers,
and driving over obstacles (curbs, potholes,
off-road). This applies in particular to a laden
vehicle.
Stop driving in emergency mode if:
Ryou hear banging noises.
Rthe vehicle starts to shake.
Ryou see smoke and smell rubber.
RESP®is intervening constantly.
Rthere are tears in the sidewalls of the tire.
After driving in emergency mode, have the
wheel rims checked at a qualified specialist
workshop with regard to their further use. The
defective tire must be replaced in every case.
Flat tire275
Breakdown assistance
Z
Page 281 of 330
XHave the tire sealant bottle and the filler hosereplaced as soon as possible at a qualifiedspecialist workshop.
XHave the tire sealant bottle replaced everyfour years at a qualified specialist workshop.
Battery (vehicle)
Important safety notes
Special tools and expert knowledge are requiredwhen working on the battery, e.g. removal andinstallation. You should therefore have all workinvolving the battery carried out at a qualifiedspecialist workshop.
GWARNING
Work carried out incorrectly on the battery
can lead, for example, to a short circuit and
thus damage the vehicle electronics. This can
lead to function restrictions applying to
safety-relevant systems, e.g. the lighting sys-
tem, the ABS (anti-lock braking system) or the
ESP®(Electronic Stability Program). The oper-
ating safety of your vehicle may be restricted.
You could lose control of the vehicle, for
example:
Rwhen braking
Rin the event of abrupt steering maneuvers
and/or when the vehicle's speed is not
adapted to the road conditions
There is a risk of an accident.
In the event of a short circuit or a similar inci-
dent, contact a qualified specialist workshop
immediately. Do not drive any further. You
should have all work involving the battery car-
ried out at a qualified specialist workshop.
For further information about ABS and ESP®,see (Ypage 61) and (Ypage 64).
GWARNING
Electrostatic build-up can lead to the creation
of sparks, which could ignite the highly explo-
sive gases of a battery. There is a risk of an
explosion.
Before handling the battery, touch the vehicle
body to remove any existing electrostatic
build-up.
The highly flammable gas mixture forms whencharging the battery as well as when jump-start-ing.
Always make sure that neither you nor the bat-tery is electrostatically charged. A build-up ofelectrostatic charge can be caused, for exam-ple:
Rby wearing clothing made from syntheticfibers
Rdue to friction between clothing and seats
Rif you push or pull the battery across the car-pet or other synthetic materials
Rif you rub the battery with a cloth
GWARNING
During the charging process, a battery produ-
ces hydrogen gas. If a short circuit occurs or
sparks are created, the hydrogen gas can
ignite. There is a risk of an explosion.
RMake sure that the positive terminal of a
connected battery does not come into con-
tact with vehicle parts.
RNever place metal objects or tools on a bat-
tery.
RIt is important that you observe the descri-
bed order of the battery terminals when
connecting and disconnecting a battery.
RWhen jump-starting, make sure that the
battery poles with identical polarity are
connected.
RIt is particularly important to observe the
described order when connecting and dis-
connecting the jumper cables.
RNever connect or disconnect the battery
terminals while the engine is running.
GWARNING
Battery acid is caustic. There is a risk of injury.
Avoid contact with skin, eyes or clothing. Do
not inhale any battery gases. Do not lean over
the battery. Keep children away from batter-
ies. Wash away battery acid immediately with
Battery (vehicle)279
Breakdown assistance
Z
Page 282 of 330
plenty of clean water and seek medical atten-
tion.
HEnvironmental note
Batteries contain pollutants.
It is illegal to dispose of them
with the household rubbish.
They must be collected sep-
arately and disposed of in an
environmentally responsible
recycling system.
Dispose of batteries in an
environmentally responsible
manner. Take discharged
batteries to a qualified spe-
cialist workshop or to a col-
lection point for used batter-
ies.
!Have the battery regularly checked at aqualified specialist workshop.
Comply with the service intervals in the Main-tenance Booklet, or contact a qualified spe-cialist workshop for more information.
!You should have all work involving the bat-tery carried out at a qualified specialist work-shop. In the exceptional case that it is neces-sary for you to disconnect the battery your-self, make sure that:
Rswitch off the engine and remove theSmartKey. On vehicles with KEYLESS-GO,make sure that the ignition is switched off.Check that all the indicator lamps in theinstrument cluster are off. Otherwise, elec-tronic components, such as the alternator,may be damaged.
Ryou first remove the negative terminalclamp and then the positive terminalclamp. Never swap the terminal clamps.Otherwise, the vehicle's electronic systemmay be damaged.
Rin vehicles with automatic transmission,the transmission is locked in position�]after the battery is disconnected. The vehi-cle is secured against rolling away. You canthen no longer move the vehicle.
The battery and the cover of the positive ter-minal clamp must be installed securely duringoperation.
Comply with safety precautions and take pro-tective measures when handling batteries.
Risk of explosion.
Fire, open flames and smoking areprohibited when handling the bat-tery. Avoid creating sparks.
Battery acid is caustic. Avoid contactwith skin, eyes or clothing.
Wear suitable protective clothing,especially gloves, apron and face-guard.
Rinse any acid spills immediatelywith clear water. Contact a physicianif necessary.
Wear eye protection.
Keep children away.
Observe this Operator's Manual.
For safety reasons, Mercedes-Benz recom-mends that you only use batteries which havebeen tested and approved for your vehicle byMercedes-Benz. These batteries provideincreased impact protection to prevent vehicleoccupants from suffering acid burns should thebattery be damaged in the event of an accident.
In order for the battery to achieve the maximumpossible service life, it must always be suffi-ciently charged.
Like other batteries, the vehicle battery maydischarge over time if you do not use the vehicle.In this case, have the battery disconnected at aqualified specialist workshop. You can alsocharge the battery with a charger recommendedby Mercedes-Benz. Contact a qualified special-ist workshop for further information.
Have the battery condition of charge checkedmore frequently if you use the vehicle mainly forshort trips or if you leave it standing idle for alengthy period. Consult a qualified specialistworkshop if you wish to leave your vehicleparked for a long period of time.
280Battery (vehicle)
Breakdown assistance
Page 287 of 330
!When Active Brake Assist, Active DistanceAssist DISTRONIC or the HOLD function isactivated, the vehicle brakes automatically incertain situations.
To avoid damage to the vehicle, deactivatethese systems in the following or similar sit-uations:
Rwhen towing the vehicle
Rin the car wash
!Make sure that the electric parking brake isreleased. If the electric parking brake is faulty,visit a qualified specialist workshop.
!Only secure the tow rope or tow bar at thetowing eyes. Otherwise, the vehicle could bedamaged.
!Do not use the towing eyes for recovery pur-poses as this could damage the vehicle. If indoubt, recover the vehicle with a crane.
!When towing, pull away slowly andsmoothly. If the tractive power is too high, thevehicles could be damaged.
!The vehicle can be towed a maximum of30 miles (50km). The towing speed of 30 mph(50km/h) must not be exceeded.
If the vehicle has to be towed more than30 miles (50km), the front axle must be raisedor the entire vehicle raised and transported.
!Do not tow with sling-type equipment. Thiscould damage the vehicle.
!When towing away vehicles with KEYLESS-GO, use the key instead of the Start/Stopbutton. The automatic transmission may oth-erwise shift to position�]when you open thedriver's or front-passenger door, which coulddamage the transmission.
!Vehicles with automatic transmission mustnot be started by tow-starting. This could oth-erwise damage the transmission.
It is better to have the vehicle transported thanto have it towed away.
If the vehicle can no longer be driven because ofan accident or breakdown, you have the follow-ing options:
RTransporting the vehicle.
As a rule, you should have the vehicle trans-ported.
RTowing the vehicle with a tow rope or tow bar.
Only tow the vehicle in exceptional cases.
The battery must be connected and charged.Otherwise, you:
Rcannot turn the SmartKey to position�Hinthe ignition lock.
Rcannot release the electric parking brake.
Rcannot shift the transmission to position�\\.
The function of the electric parking brake andthe parking lock is dependent on the on-boardvoltage.
If the on-board voltage is low or if there is a sys-tem malfunction:
Rthe electric parking brake may not be appliedin certain circumstances, or
Rit may no longer be possible to shift the trans-mission to position�]
Switch off non-essential consumers, e.g. theradio.
Deactivate the automatic locking feature beforethe vehicle is towed (Ypage 189). You couldotherwise be locked out when pushing or towingthe vehicle.
Installing/removing the towing eye
Installing the towing eye
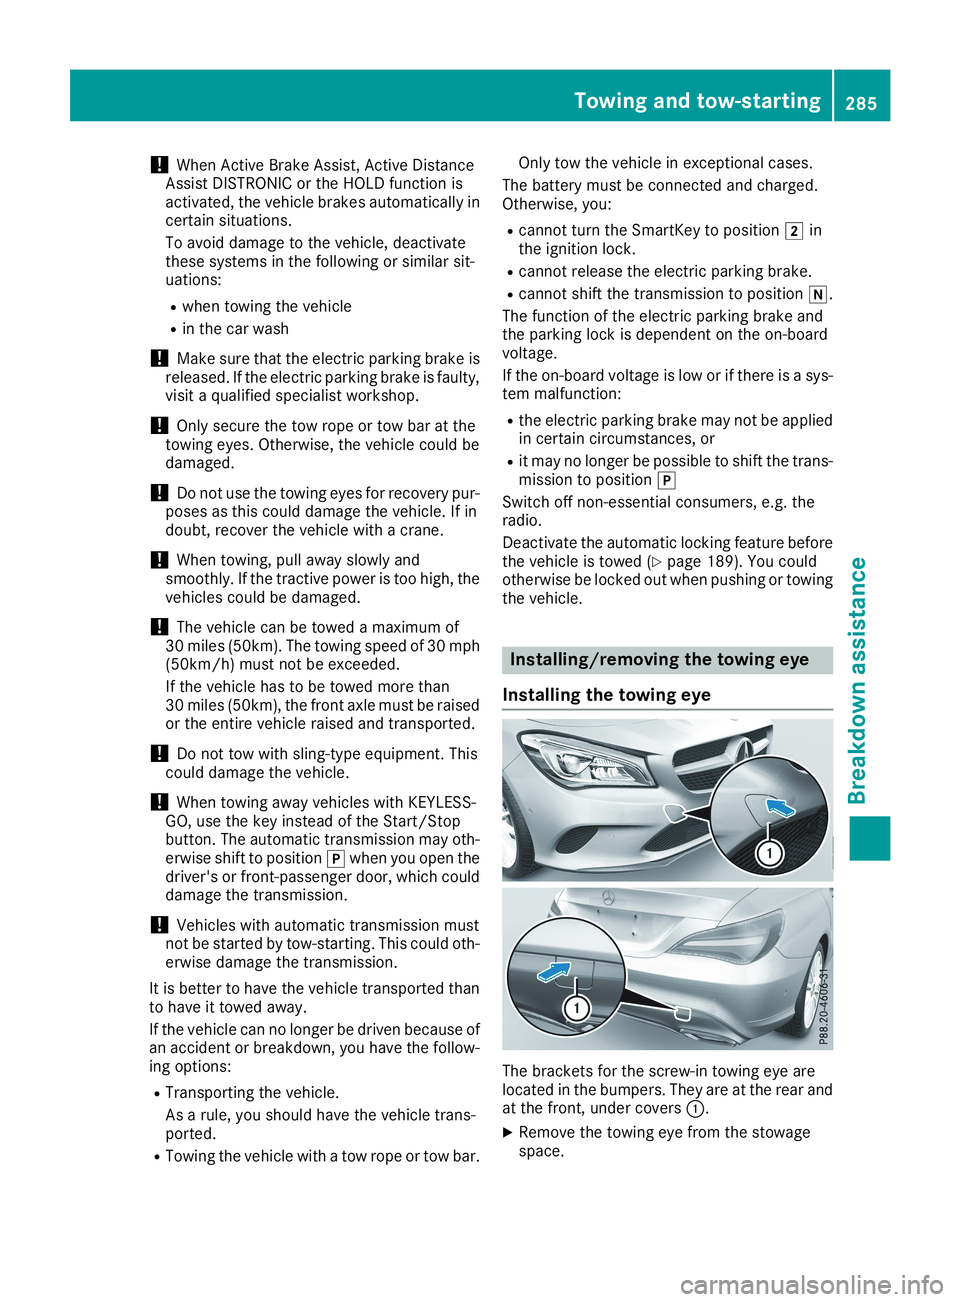
The brackets for the screw-in towing eye arelocated in the bumpers. They are at the rear andat the front, under covers�C.
XRemove the towing eye from the stowagespace.
Towing and tow-starting285
Breakdown assistance
Z
Page 288 of 330
The towing eye is located with the vehicle toolkit under the cargo compartment floor(Ypage 274).
Vehicles with the TIREFIT kit: the towing eye isbeneath the tire inflation compressor(Ypage 274).
XPress the mark on cover�Cinwards in thedirection of the arrow.
XTake cover�Coff the opening.
XScrew in the towing eye clockwise to the stop.
Removing the towing eye
XUnscrew and remove the towing eye.
XAttach cover�Cto the bumper and press untilit engages.
XPlace the towing eye in the stowage wellbeneath the cargo compartment floor in thecargo compartment (Ypage 274).
XVehicles with the TIREFIT kit: put back the tireinflation compressor (Ypage 274).
Towing the vehicle with the front axle
raised
Observe the important safety notes when tow-ing your vehicle with the front axle raised(Ypage 284).
Only vehicles without 4MATIC can be towedwith the front axle raised.
!Vehicles with 4MATIC must not be towedwith either the front or the rear axle raised, asdoing so will damage the transmission.
Vehicles with 4MATIC may either be towed awaywith both axles on the ground or be loaded upand transported.
!The ignition must be switched off if the vehi-cle is being towed with the front axle raised.
Otherwise, ESP®may intervene and damagethe brake system.
XOn vehicles with KEYLESS-GO or the KEY-LESS-GO start function:you must use theSmartKey instead of the Start/Stop button(Ypage 124).
XMake sure that the vehicle is stationary.
XTurn the SmartKey to position�Hin the igni-tion lock.
XWhen the vehicle is stationary, depress thebrake pedal and keep it depressed.
XShift the automatic transmission to position�].
XRelease the brake pedal.
XRelease the electric parking brake.
XSwitch off the automatic locking(Ypage 189).
XSwitch on the hazard warning lamps(Ypage 103).
XTurn the SmartKey in the ignition lock to posi-tion�Zand leave the SmartKey in the ignitionlock.
Towing a vehicle with both axles on
the ground
It is important that you observe the safetyinstructions when towing away your vehicle(Ypage 284).
XOn vehicles with KEYLESS-GO or the KEY-LESS-GO start function:you must use theSmartKey instead of the Start/Stop button(Ypage 124).
The automatic transmission automatically shiftsto position�]when you open the driver's orfront-passenger door or when you remove theSmartKey from the ignition lock. In order toensure that the automatic transmission stays inposition�\\when towing away the vehicle, youmust observe the following points:
XMake sure that the vehicle is stationary.
XTurn the SmartKey to position�Hin the igni-tion lock.
XDepress and hold the brake pedal.
XShift the automatic transmission to position�\\.
XLeave the SmartKey in position�Hin the igni-tion lock.
XRelease the brake pedal.
XRelease the electric parking brake.
XSwitch on the hazard warning lamps(Ypage 103).
iIn order to signal a change of direction whentowing the vehicle with the hazard warninglamps switched on, use the combinationswitch as usual. In this case, only the indicatorlamps for the direction of travel flash. Afterresetting the combination switch, the hazardwarning lamp starts flashing again.
286Towing and tow-starting
Breakdown assistance
Page 290 of 330
wise, components or systems could be dam-aged.
!Make sure that no moisture can enter thefuse box when the cover is open.
!When closing the cover, make sure that it islying correctly on the fuse box. Moisture seep-ing in or dirt could otherwise impair the oper-ation of the fuses.
The fuses in your vehicle serve to close downfaulty circuits. If a fuse blows, all the compo-nents on the circuit and their functions stopoperating.
Blown fuses must be replaced with fuses of thesame rating, which you can recognize by thecolor and value. The fuse ratings are listed in thefuse allocation chart.
The fuse allocation chart is in the fuse box in thefront-passenger footwell (Ypage 289).
If a newly inserted fuse also blows, have thecause traced and rectified at a qualified special-ist workshop, e.g. an authorized Mercedes-BenzCenter.
Before changing a fuse
XSecure the vehicle against rolling away(Ypage 142).
XSwitch off all electrical consumers.
XVehicles without KEYLESS-GO:remove theSmartKey from the ignition lock.
XVehicles with KEYLESS-GO start-functionor KEYLESS-GO:open the driver's door.The vehicle electronics are now in position�Z. This corresponds to the SmartKey beingremoved from the ignition.
The fuses are located in various fuse boxes:
RFuse box in the engine compartment on theleft-hand side of the vehicle, when viewed inthe direction of travel
RFuse box in the front-passenger footwell
The fuse allocation chart is on the fuse box in thefront-passenger footwell (Ypage 289).
Fuse box in the engine compartment
GWARNING
When the hood is open and the windshield
wipers are set in motion, you can be injured by
the wiper linkage. There is a risk of injury.
Always switch off the windshield wipers and
the ignition before opening the hood.
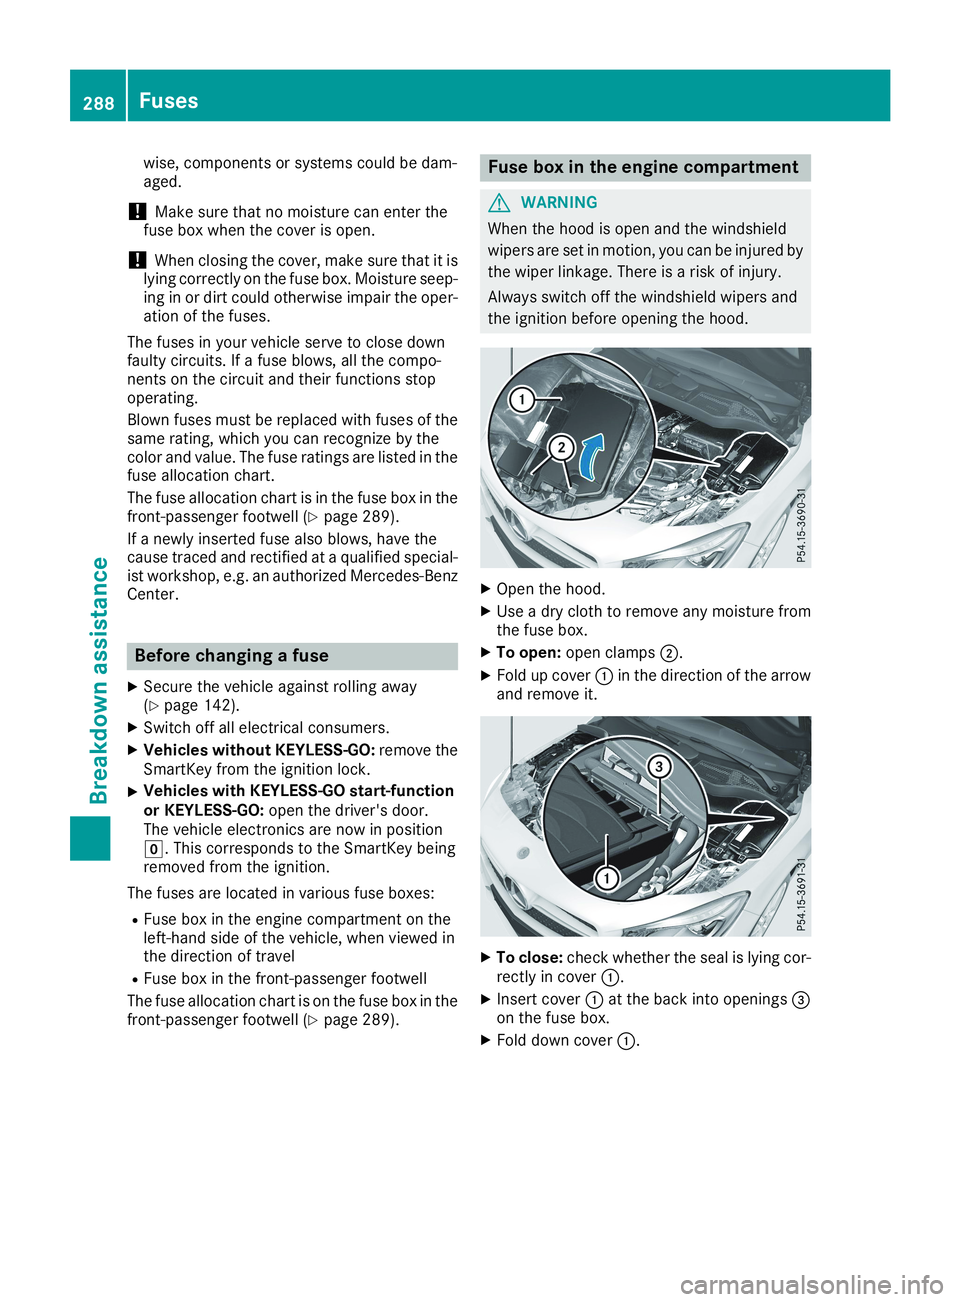
XOpen the hood.
XUse a dry cloth to remove any moisture fromthe fuse box.
XTo open:open clamps�D.
XFold up cover�Cin the direction of the arrowand remove it.
XTo close:check whether the seal is lying cor-rectly in cover�C.
XInsert cover�Cat the back into openings�
Page 294 of 330
with run-flat characteristics)" section(Ypage 275).
ROnly mount tires of the correct size onto thewheels.
RBreak in new tires at moderate speeds for thefirst 60 miles(100 km). The new tires onlyreach their full performance after this dis-tance.
RDo not drive with tires which have too littletread depth, as this significantly reduces thetraction on wet roads (hydroplaning).
RReplace the tires after six years at the latest,regardless of wear.
Observe the notes on the emergency sparewheel (Ypage 315).
MOExtended tires (tires with run-flat
properties)
With MOExtended tires (tires with run flat char-acteristics), you can continue to drive your vehi-cle even if there is a total loss of pressure in oneor more tires.
MOExtended tires may only be used in conjunc-tion with an activated tire pressure loss warningsystem (Canada only) or tire pressure monitor(USA only) and only on wheels specifically tes-ted by Mercedes-Benz.
Notes on driving with MOExtended tires with aflat tire (Ypage 275).
Vehicles equipped with MOExtended tires arenot equipped with a TIREFIT kit at the factory. Itis therefore recommended that you additionallyequip your vehicle with a TIREFIT kit if you mounttires that do not feature run-flat properties, e.g.winter tires. A TIREFIT kit may be obtained froma qualified specialist workshop.
Winter operation
General notes
Have your vehicle winter-proofed at a qualifiedspecialist workshop at the onset of winter.
Observe the notes in the "Changing a wheel"section (Ypage 310).
Driving with summer tires
At temperatures below 45 ‡(+7 †), summertires lose elasticity and therefore traction andbraking power. Change the tires on your vehicleto M+S tires. Using summer tires at very coldtemperatures could cause cracks to form,thereby damaging the tires permanently.Mercedes-Benz cannot accept responsibility forthis type of damage.
GWARNING
Damaged tires can cause tire inflation pres-
sure loss. As a result, you could lose control of
your vehicle. There is a risk of accident.
Check the tires regularly for signs of damage
and replace any damaged tires immediately.
M+S tires
GWARNING
M+S tires with a tire tread depth of less than
�
Page 295 of 330
When you have mounted the M+S tires:
XCheck the tire pressures (Ypage 293).
XRestart the tire pressure monitor (USA only)(Ypage 300).
XRestart the tire pressure loss warning system(Canada) (Ypage 297)
Snow chains
GWARNING
If snow chains are mounted on the rear
wheels, the snow chains could cause abrasion
to the vehicle body or to chassis components.
This could cause damage to the vehicle or the
tires. There is a risk of an accident.
To avoid hazardous situations:
Rnever mount snow chains on the rear
wheels
Ronly mount snow chains in pairs on the
front wheels.
!On some tire sizes there is not enough spacefor snow chains. To avoid damage to the vehi-cle or tires, observe the "Wheel and tire com-binations" section under "Tires and wheels".
For safety reasons, Mercedes-Benz recom-mends that you only use snow chains that havebeen specially approved for your vehicle byMercedes-Benz, or are of a correspondingstandard of quality. For more information,please contact a qualified specialist workshop.
If you intend to mount snow chains, please bearthe following points in mind:
RSnow chains may not be mounted on allwheel/tire combinations. Permissible wheel-tire combinations (Ypage 315).
ROnly use snow chains when driving on roadscompletely covered by snow. Remove thesnow chains as soon as possible when youcome to a road that is not snow-covered.
RLocal regulations may restrict the use of snowchains. Observe the appropriate regulations ifyou wish to mount snow chains.
RDo not exceed the maximum permissiblespeed of 30mph (50 km/h).
RIf snow chains are installed, you cannot useActive Parking Assist (Ypage 167).
You may wish to deactivate ESP®when pullingaway with snow chains installed . This allows thewheels to spin in a controlled manner, achievingincreased propulsive force (cutting action).
RDeactivate ESP®(all vehicles exceptMercedes-AMG vehicles) (Ypage 65)
RDeactivate ESP®(Mercedes-AMG vehicles)(Ypage 66)
Information about driving with an emergencyspare wheel (Ypage 315).
Tire pressure
Tire pressure specifications
Important safety notes
GWARNING
Underinflated or overinflated tires pose the
following risks:
Rthe tires may burst, especially as the load
and vehicle speed increase.
Rthe tires may wear excessively and/or
unevenly, which may greatly impair tire
traction.
Rthe driving characteristics, as well as steer-
ing and braking, may be greatly impaired.
There is a risk of an accident.
Follow recommended tire inflation pressures
and check the pressure of all the tires includ-
ing the spare wheel:
Rmonthly, at least
Rif the load changes
Rbefore beginning a long journey
Runder different operating conditions, e.g.
off-road driving
If necessary, correct the tire pressure.
iThe data on the Tire and Loading Informa-tion placard and tire pressure table shownhere are examples. Tire pressure specifica-tions are vehicle-specific and may deviatefrom the data shown here. The tire pressurespecifications that are valid for your vehiclecan be found on the Tire and Loading Infor-mation placard and tire pressure table on thevehicle.
Tire pressure293
Wheels and tires
Z