2019 MERCEDES-BENZ CLA COUPE engine oil
[x] Cancel search: engine oilPage 263 of 330
X
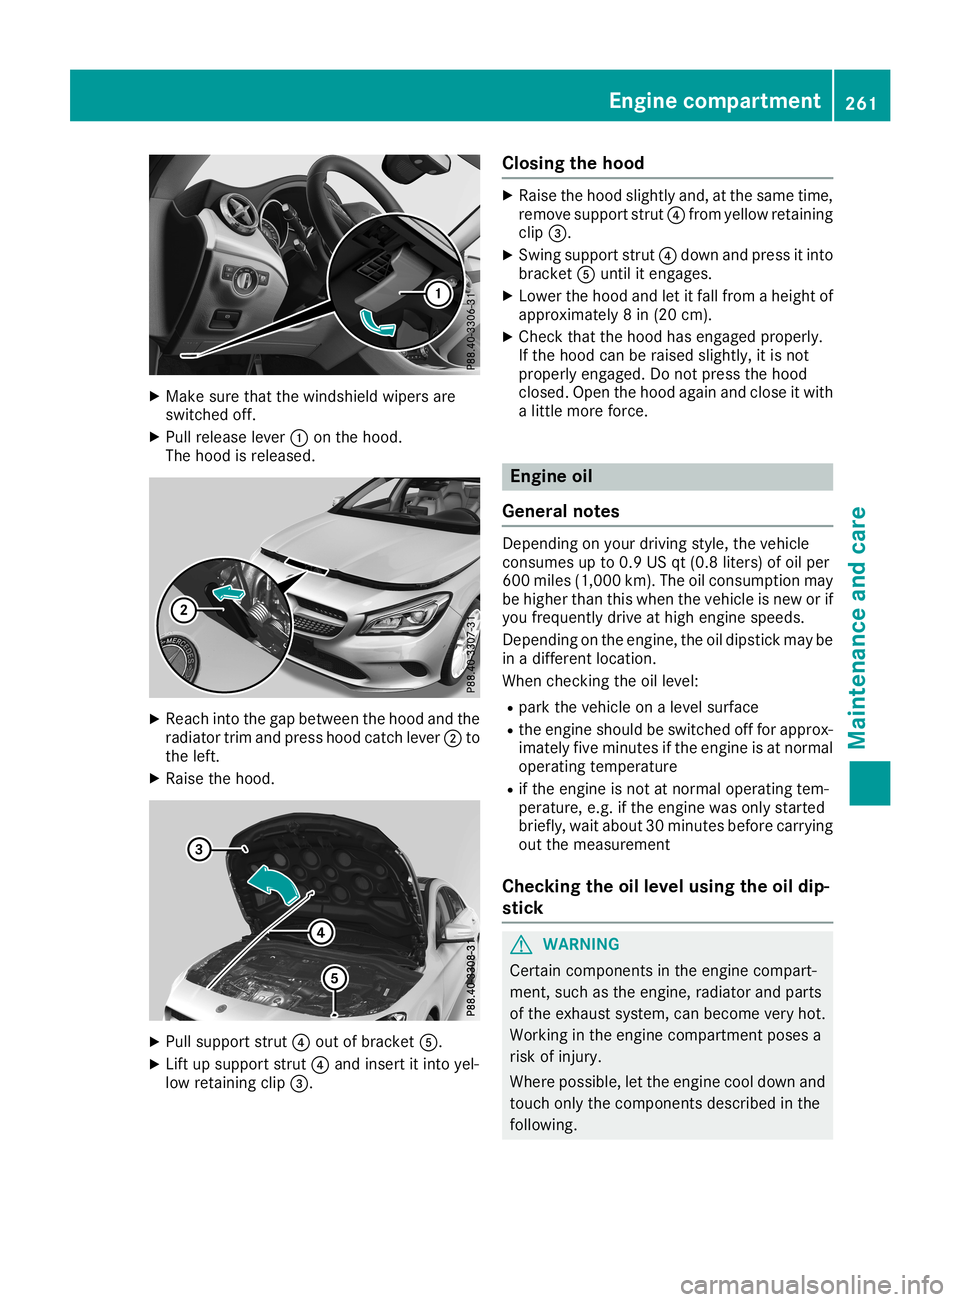
Make surethatthewindshield wipersare
switched off.
X Pull release lever0043onthe hood.
The hood isreleased. X
Reach intothegap between thehood andthe
radiator trimandpress hoodcatch lever0044to
the left.
X Raise thehood. X
Pull support strut0085out ofbracket 0083.
X Lift upsupport strut0085and insert itinto yel-
low retaining clip0087. Closi
ngthe hood X
Raise thehood slightly and,atthe same time,
remove support strut0085from yellow retaining
clip 0087.
X Swing support strut0085down andpress itinto
bracket 0083until itengages.
X Lower thehood andletitfall from aheight of
approximately 8in (20 cm).
X Check thatthehood hasengaged properly.
If the hood canberaised slightly, itis not
properly engaged. Donot press thehood
closed. Openthehood again andclose itwith
a little more force. Engine
oil
General notes Depending
onyour driving style,thevehicle
consumes upto0.9 USqt(0.8 liters) ofoil per
600 miles (1,000 km).Theoilconsumption may
be higher thanthiswhen thevehicle isnew orif
you frequently driveathigh engine speeds.
Depending onthe engine, theoildipstick maybe
in adifferent location.
When checkingthe oillevel:
R park thevehicle onalevel surface
R the engine shouldbeswitched offfor approx-
imately fiveminutes ifthe engine isat normal
operating temperature
R ifthe engine isnot atnormal operating tem-
perature, e.g.ifthe engine wasonly started
briefly, waitabout 30minutes beforecarrying
out themeasurement
Checking theoillevel using theoildip-
stick G
WARNING
Certain componen tsinthe engine compart-
ment, suchasthe engine, radiator andparts
of the exhaust system,canbecome veryhot.
Working inthe engine compartmen tposes a
risk ofinjury.
Where possible, letthe engine cooldown and
touch onlythecomponen tsdescribed inthe
following. Engi
necompar tment
261Maintenance andcare Z
Page 264 of 330
G
WARNING
Functions relevant tosafety arerestricted or
no longer available if:
R the engine isnot running
R the brake system orthe pow ersteering is
malfu nctioning
R there isamalfu nction inthe pow ersup ply
or the vehicl e'selectrica lsystem
When yourvehicl eis towed awayor towed
started, youmay requireconside rablymore
effort tosteer andbrake. Thereisarisk ofan
accide nt.
In such cases, useatow bar. Before being
towed awayor tow started, makesurethe
steering movesfreely. X
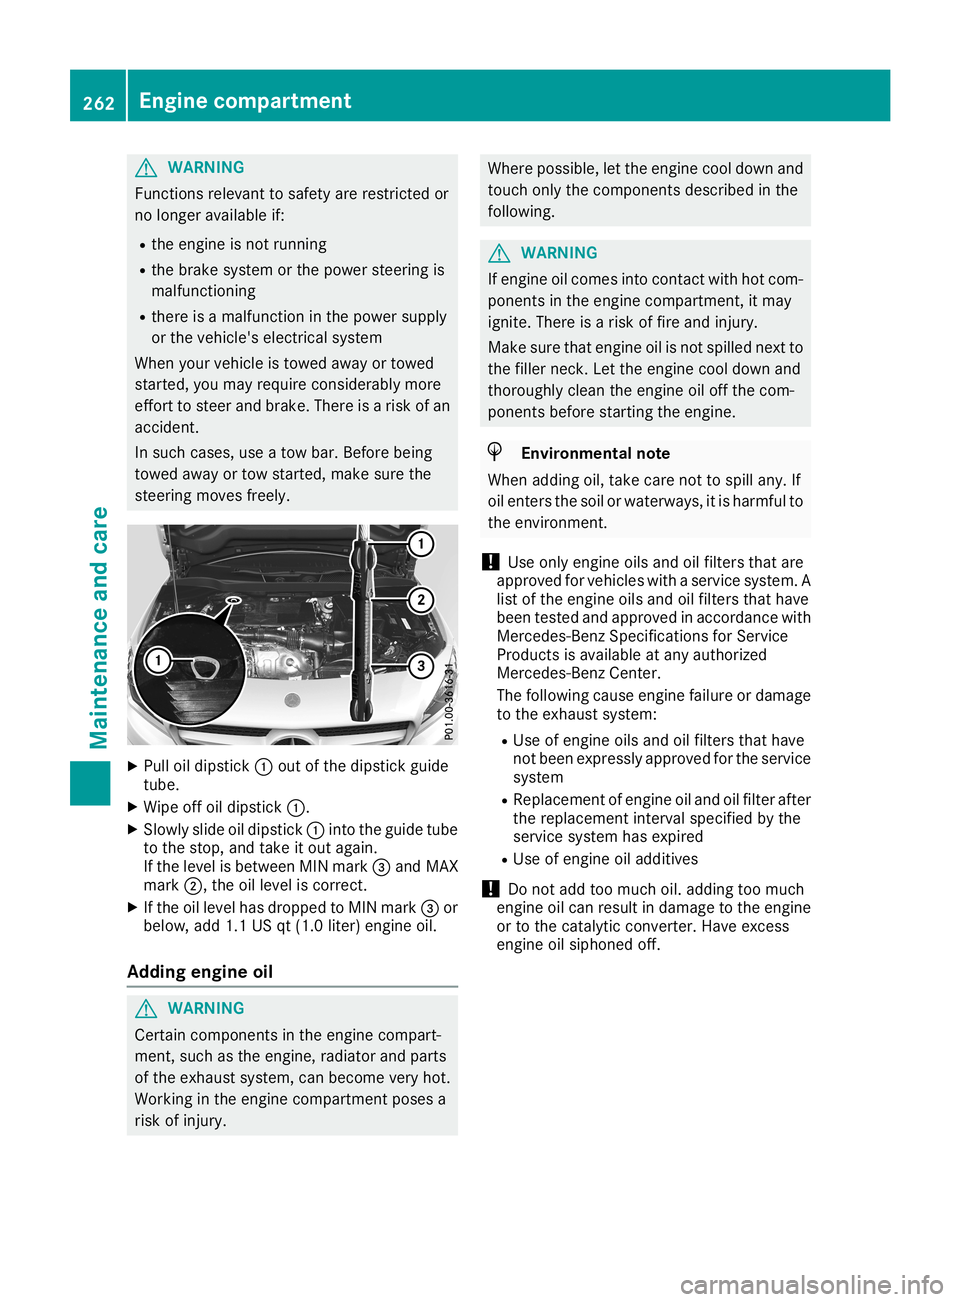
Pul loil dip stick 0043out ofthe dipstick guide
tube.
X Wip eoff oildip stick 0043.
X Slowl yslid eoil dip stick 0043into theguidetube
to the stop, andtake itout again.
If the leve lis betwe enMIN mark 0087and MAX
mark 0044,theoilleve lis correct.
X Ifthe oilleve lhas dropp edtoMIN mark 0087or
bel ow, add 1.1USqt(1.0 liter)engine oil.
Adding engineoil G
WARNING
Certa incomponents inthe engine compart-
ment, suchasthe engine, radiator andparts
of the exhau stsystem, canbecome veryhot.
Working inthe engine compartment posesa
risk ofinjury . Where
possible,let the engine cooldownand
touch onlythecomponents describedinthe
foll owi ng. G
WARNING
If engine oilcomes intocontact withhotcom-
ponents inthe engine compartment, itmay
ignite. Thereisarisk offire and injury .
Make surethatengine oilisnot spilled next to
the filler neck. Letthe engine cooldownand
thoroug hlyclea nthe engine oiloff the com-
ponents beforestarting theengine. H
Envi
ronmental note
When addingoil,take carenottospil lany. If
oil enters thesoil orwater ways,itis harmfu lto
the environment.
! Use
only engine oilsand oilfilters thatare
app roved forvehicl eswith aservice system. A
list ofthe engine oilsand oilfilters thathave
been tested andapproved inaccorda ncewith
Mercede s-BenzSpecifications forService
Produ ctsisava ilable atany authorized
Mercede s-BenzCenter.
The followi ngcaus eengine failure ordama ge
to the exhau stsystem:
R Use ofengine oilsand oilfilters thathave
not been express lyapp roved forthe service
system
R Rep lace ment ofengine oiland oilfilter after
the replacement intervalspecifiedbythe
service system hasexpire d
R Use ofengine oiladd itives
! Do
not add toomuch oil.add ingtoo much
engine oilcan resu ltin dama getothe engine
or tothe catal yticconverter. Haveexcess
engine oilsiph oned off. 262
Eng
inecompar tmentMainten anceandcare
Page 265 of 330
Exam
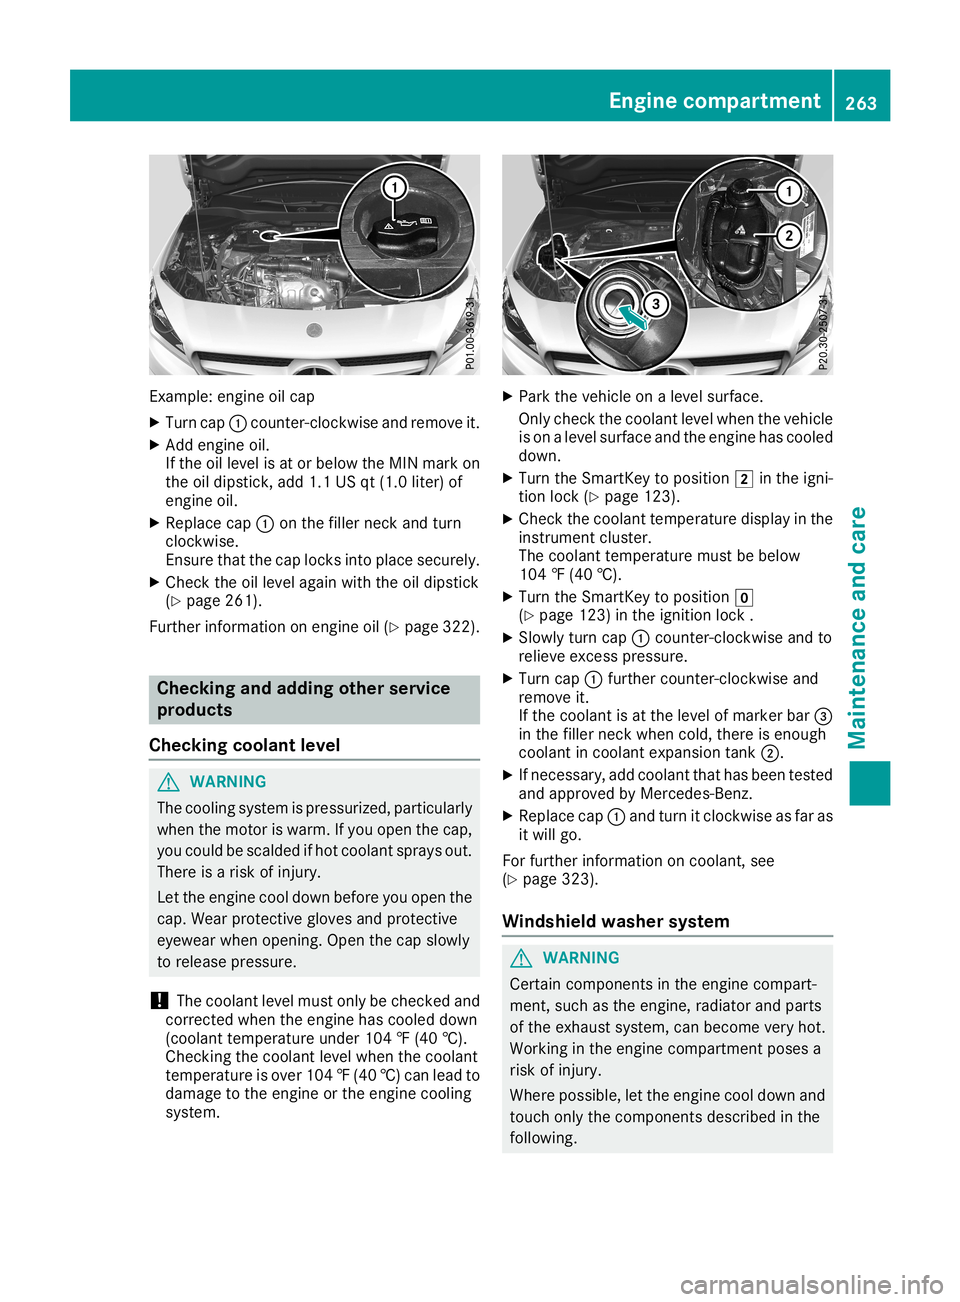
ple: eng ineoilcap
X Tu rn cap 0043cou nter-c lockwi seand remove it.
X Add engineoil.
If the oille vel isat or below the MIN markon
the oildi ps tick, add1.1 USqt(1.0 liter) of
eng ineoil.
X Re place cap 0043onthe fillerneck andturn
clo ckwi se.
Ensu retha tthe cap locks into place securely.
X Ch eck theoille vel again wi th the oildi ps tick
(Y page 261 ).
Fur therinfo rma tionon eng ineoil(Y page 322 ). Ch
eckin gand addi ngoth erservi ce
produ cts
Ch eckin gco olant leve l G
WA
RNING
The cooling system ispre ssu rize d,pa rtic ular ly
wh en the moto ris wa rm. Ifyo uop en the cap,
yo ucou ldbe sca lded ifhot coolant sprays out.
The reisaris kof inju ry.
Let the enginecoo ldo wn befor eyo uop en the
cap .We arpro tecti veglove sand protecti ve
ey ew earwh en openi ng. Open the cap slow ly
to release pre ssu re.
! The
coolant level mustonl ybe che cked and
corr ecte dwh en the enginehascoo led do wn
(co olant temp eratureund er104 ‡(40 †).
Ch ecki ngthe coolant level when the coolant
temp eratureis ove r104 ‡(40 †) can leadto
dama getothe engine orthe engine cooling
sys tem. X
Park thevehi cleonaleve lsurfa ce.
Only check thecoola ntleve lwhe nthe vehi cle
is on aleve lsurfa ceand theengine hascoole d
dow n.
X Turn theSmartKey toposi tion 0048inthe igni-
tion lock (Ypag e123).
X Che ckthe coola nttempera turedisplayin the
instrume ntclus ter.
The coola nttempera turemust bebelow
104 ‡(40 †).
X Turn theSmartKey toposi tion 005A
(Y pag e123) inthe igniti onlock .
X Slow lyturn cap0043counter-clo ckwiseandto
reli eve excess pressure.
X Turn cap0043further counter-clo ckwiseand
remove it.
If the coola ntisat the leve lof marker bar0087
in the filler neck whencold, there isenoug h
coola ntincoola ntexpa nsion tank0044.
X Ifnecessa ry,add coola ntthat hasbeentested
and approved byMerced es-Benz.
X Rep lace cap 0043and turn itclockwi seasfar as
it wil lgo.
For further informa tiononcoola nt,see
(Y pag e323) .
Windshi eldwashe rsyste m G
WARNING
Certa incomponents inthe engine compart-
ment, suchasthe engine, radiator andparts
of the exhau stsys tem, canbecome veryhot.
Working inthe engine compartment posesa
risk ofinjury .
Where possible,let the engine cooldownand
touch onlythecomponents describedinthe
foll owi ng. Eng
inecompar tment
263Maintenanceand care Z
Page 266 of 330
G
WARNING
Windsh ieldwas herconcentrate couldignite if
it comes intocontact withhotengine compo-
nents orthe exhau stsystem. Thereisarisk of
fire and injury .
Make surethatnowinds hieldwas hercon-
centrate isspil led next tothe filler neck. X
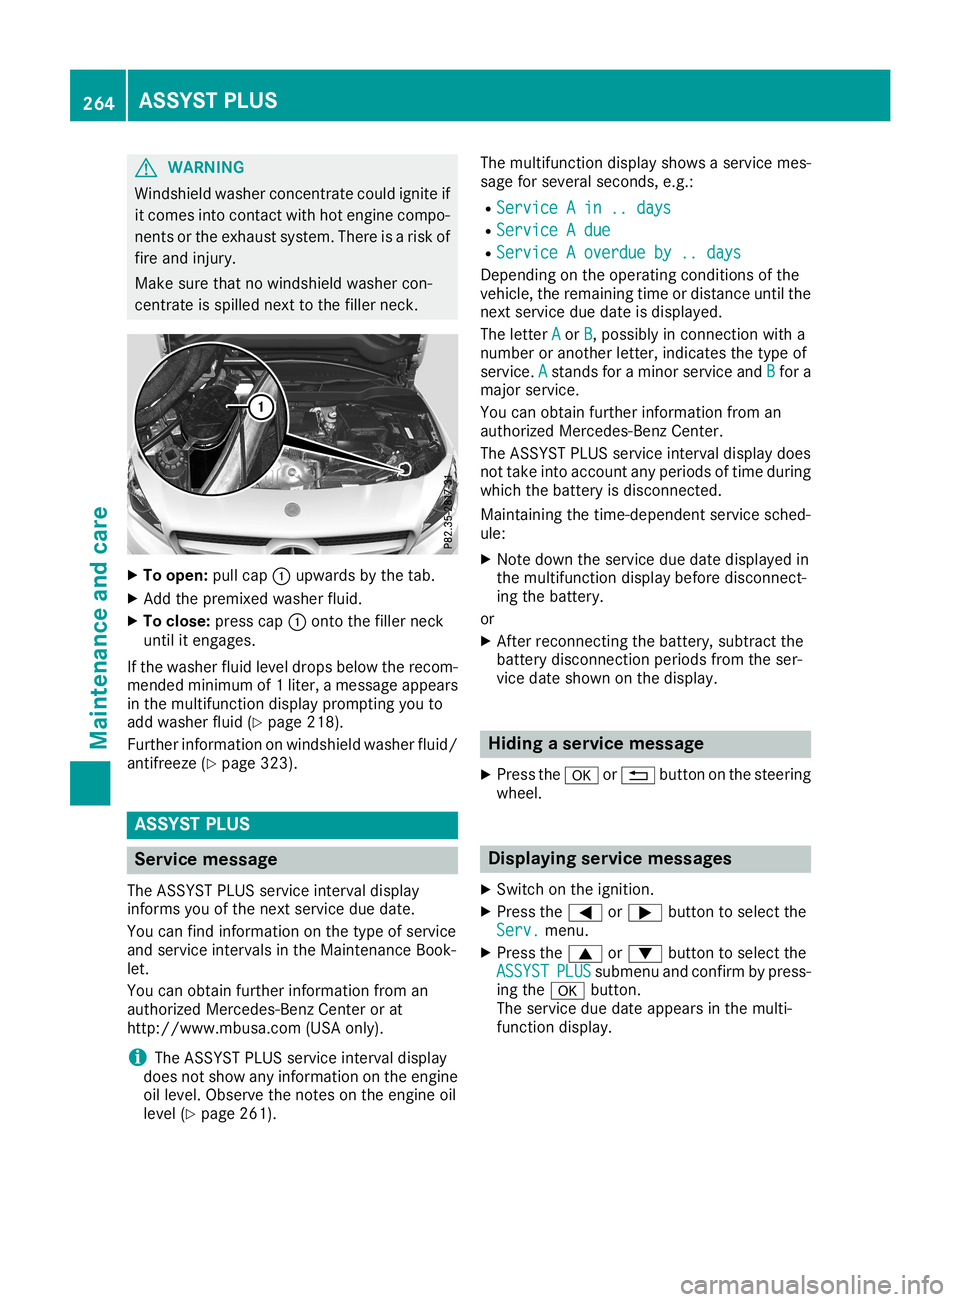
To open :pul lcap 0043upw ards bythe tab.
X Add thepremi xedwasherfluid.
X To clo se: press cap0043onto thefiller neck
until itengag es.
If the was herfluidleve ldrops below the recom-
mended minimumof 1liter, amessa geapp ears
in the multi function displayprompti ngyou to
add washerfluid(Y pag e218) .
Further informati ononwinds hieldwas herfluid/
antifree ze(Y pag e323) . ASSY
STPLU S Servic
emessag e
The ASSYST PLUSservice interval display
informs youofthe next service duedate.
You canfind informati onon the type ofservice
and service intervalsin the Maintenance Book-
let.
You canobtai nfurther informati onfrom an
au thorized Mercede s-BenzCenter orat
http://www.mb usa.com (USA only).
i The
ASSYST PLUSservice interval display
does notshow anyinformati ononthe engine
oil leve l.Observe thenotes onthe engine oil
leve l(Y pag e261) . The
multi function displayshow sa service mes-
sage forsevera lseconds, e.g.:
R Service Ain ..days Service
Ain ..days
R Service Adue Service
Adue
R Service Aoverdue by..days Service
Aoverdue by..days
Dependi ngon the opera tingconditions ofthe
vehicl e,the remai ningtime ordista nceuntil the
next service duedate isdisp layed.
The letter A A
or B B,
possi blyinconnection witha
number oranother letter,indicatesthe type of
service .A A
stands foraminor service andB B
for a
major service .
You canobtai nfurther informati onfrom an
au thorized Mercede s-BenzCenter.
The ASSYST PLUSservice interval displaydoes
not take intoaccount anyperiods oftime during
whi chthe battery isdisconnected.
Mai ntaining thetime-dep endentservice sched-
ule :
X Note downthe service duedate displayed in
the multi function displaybefore disconnect-
ing the battery .
or X After reconnecting thebattery ,sub tract the
battery disconnectio nperi ods from theser-
vice date show non the disp lay. Hiding
aservi cemessag e
X Press the0076 or0038 button onthe steering
whee l. Di
splayin gservi cemessag es
X Switch onthe ignitio n.
X Press the0059 or0065 button tosele ctthe
Serv. Serv.
menu.
X Press the0063 or0064 button tosele ctthe
ASSYST ASSYST
PLUS PLUS
submenu andconfirm bypress-
ing the 0076 button.
The service duedate appears inthe multi -
function display. 264
ASS
YST PLUSMainten anceandcare
Page 272 of 330
X
Make surethatthevehicle isat astandstill
and theSmartK eyisin position 0048inthe igni-
tion lock.
X Open thecamera coverforcleaning viathe
multimedia system(seeDigital Operator's
Manual).
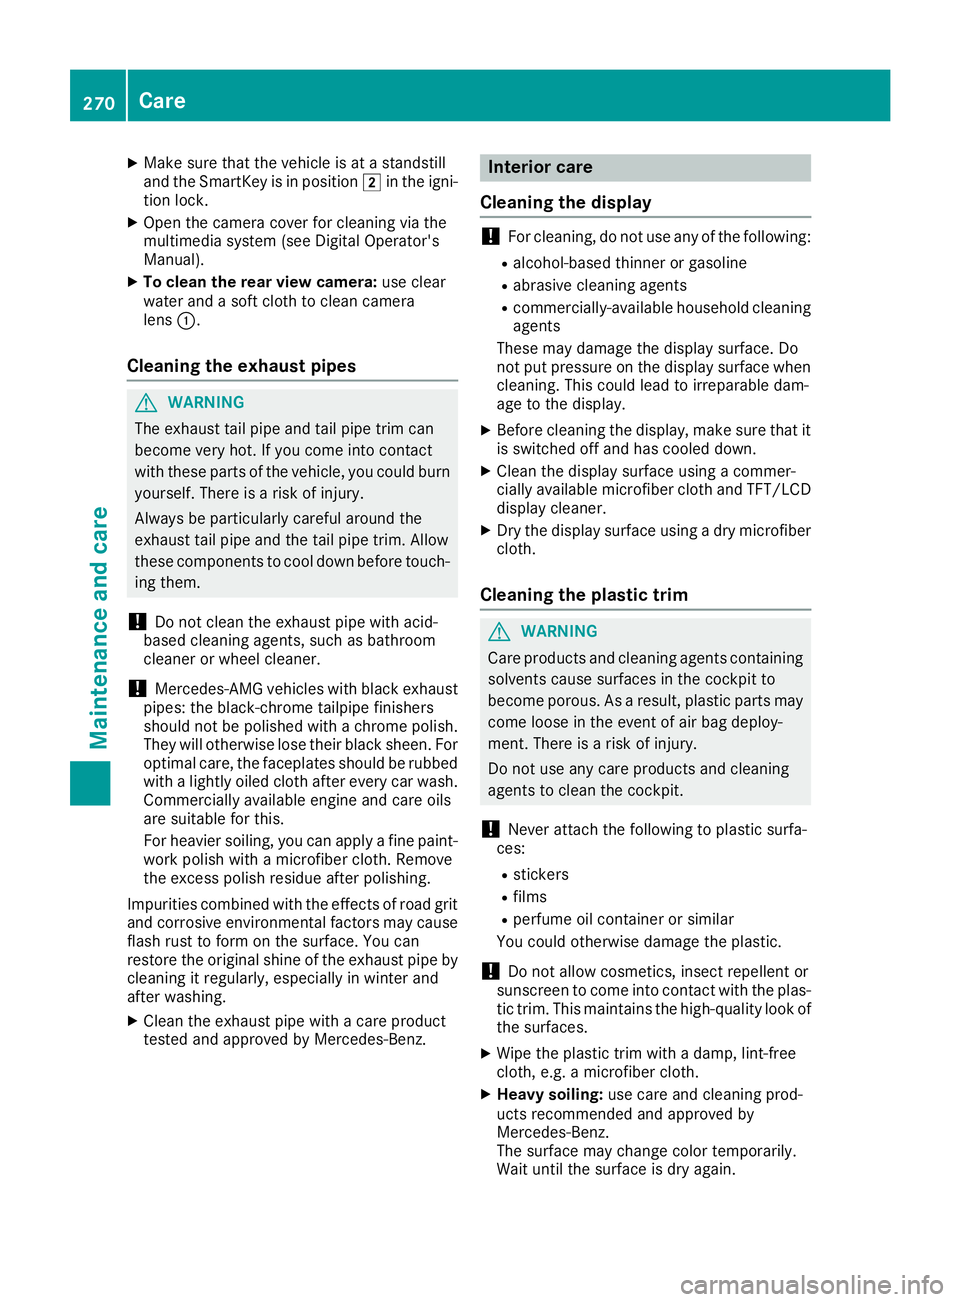
X To clean therear view camera: useclear
water andasoft cloth toclean camera
lens 0043.
Cleanin gthe exhaust pipes G
WARNING
The exhaust tailpipe andtailpipe trimcan
become veryhot.Ifyou come intocontact
with these partsofthe vehicle, youcould burn
yourself. Thereisarisk ofinjury.
Always beparticularly carefularound the
exhaust tailpipe andthetailpipe trim. Allow
these componen tsto cool down before touch-
ing them.
! Do
not clean theexhaust pipewithacid-
based cleaning agents,suchasbathroom
cleaner orwheel cleaner.
! Mercedes-AMG
vehicleswithblack exhaust
pipes: theblack-chr ometailpipe finishers
should notbepolished withachrome polish.
They willotherwise losetheir black sheen. For
optimal care,thefaceplates shouldberubbed
with alightly oiledcloth afterevery carwash.
Commercially availableengine andcare oils
are suitable forthis.
For heavier soiling,youcan apply afine paint-
work polish withamicrofiber cloth.Remove
the excess polishresidue afterpolishing.
Impurities combinedwiththeeffect sof road grit
and corrosive environmentalfactors maycause
flash rusttoform onthe surface. Youcan
restore theoriginal shineofthe exhaust pipeby
cleaning itregularly ,especially inwinter and
after washing.
X Clean theexhaust pipewithacare product
tested andapproved byMercedes-Ben z. Interior
care
Cleanin gthe display !
For
cleaning, donot use anyofthe following:
R alcohol-based thinneror gasoline
R abrasive cleaningagents
R commerc ially-availabl ehousehold cleaning
agents
These maydamage thedisplay surface. Do
not putpressure onthe display surface when
cleaning. Thiscould leadtoirreparable dam-
age tothe display .
X Before cleaning thedisplay ,make surethatit
is switched offand hascooled down.
X Clean thedisplay surface usingacommer-
cially availa blemicrofiber clothandTFT/LCD
display cleaner.
X Dry thedisplay surface usingadry microfiber
cloth.
Cleanin gthe plastic trim G
WARNING
Care products andcleaning agentscontaining
solvents causesurfaces inthe cock pitto
become porous.Asaresult, plastic partsmay
come looseinthe event ofair bag deploy -
ment. Thereisarisk ofinjury.
Do not use anycare products andcleaning
agents toclean thecock pit.
! Never
attach thefollowing toplastic surfa-
ces:
R stick ers
R films
R perfume oilcont ainer orsimilar
You could otherwise damagetheplastic.
! Do
not allow cosmetic s,insect repellent or
sunscreen tocome intocont actwith theplas-
tic trim. Thismaintains thehigh-quali tylook of
the surfaces.
X Wipe theplastic trimwith adamp, lint-free
cloth, e.g.amicrofiber cloth.
X Heavy soiling:use care andcleaning prod-
ucts recommen dedandapproved by
Mercedes-Ben z.
The surface maychange colortemporarily.
Wait untilthesurface isdry again. 270
CareMaintenance
andcare
Page 313 of 330

Tire-mount
ingtools should notbeused near
the valve. Thiscould damage theelectron ic
compon ents.
Only have tireschanged ataqualified spe-
cialist workshop.
Observe theinstr uctions andsafety notesinthe
"Changing awheel" section (Ypage 310).
The wear pattern son the front andrear tires
differ, depending onthe operating conditions.
Rotate thewheels beforeaclear wearpattern
has formed onthe tires. Fronttires typically
wear more onthe shoulders andtherear tires in
the cent er.
On vehicles thathave thesame sizefront and
rear wheels, youcan rotat ethe wheels accord-
ing tothe inter valsinthe tire manufact urer's
warranty bookinyour vehicle document s.Ifno
warranty bookisavailabl e,the tires should be
rotat edevery 3,000 to6,000 miles(5,000 to
10,00 0km ).Dependin gon tire wear, thismay
be required earlier.Donot change thedirection
of wheel rotation.
Clean thecont actsurfaces ofthe wheel andthe
brake discthoroughly everytimeawheel isrota-
ted. Check thetire pressure and,ifnecessary,
restart thetire pressure losswarning system
(Canada only)orthe tire pressure monitor(USA
only). Direction
ofrota tion
Tires withaspecified directionofrotat ionhave
additional benefits,e.g. ifthere isarisk ofhydro-
planing. Theseadvantages canonly begained if
the tires areinstalled correspon dingtothe
direction ofrotat ion.
An arrow onthe sidewall ofthe tire indicates its
correc tdirection ofrotat ion. Storing
wheels
Stor ewheels thatarenot being usedinacool,
dry and preferably darkplace. Protectthe tires
from oil,grease, gasoline anddiesel. Mounting
awheel
Prepa ringthevehicle X
Stop thevehicle onsolid, non-slippery and
level ground.
X Apply theelectric parking brakemanually.
X Bring thefront wheels intothestraight- ahead
position.
X Shift thetrans mission toposition 005D.
X Switch offthe engine.
X Vehicles withoutKEYLESS-GO: removethe
Smart Keyfrom theignition lock.
X Vehicles
withKEYL ESS-GO start-function
or KEYL ESS-GO: openthedriver's door.
The vehicle electron icsare now inposition
0092. This isthe same as“key removed”.
X Vehicles
withKEYL ESS-GO start-function
or KEYL ESS-GO: removetheStart /Stopbut-
ton from theignition lock(Ypage 123).
X Make surethattheengine cannotbe start ed
via your smartphon e(Y page 83).
X Ifincluded inthe vehicle equipment, remove
the tire- change toolkitfrom thevehicle.
X Safeguard thevehicle against rollingaway
(Y page 142).
i Apart
fromcertaincount ry-specific varia-
tions, thevehicles arenot equipped witha
tire- change toolkit.Some toolsforchanging a
wheel arespecific tothe vehicle. Formore
inform ationonwhich toolsarerequired to
perform awheel change onyour vehicle, con-
sult aqualified specialist workshop.
Necessary tire-changing toolscaninclude, for
example:
R Jack
R Wheel chock
R Lug wrench Changing
awheel
311Wheels andtires Z
Page 321 of 330

differen
tfor every vehicle andcandeviate
from thedata shown here.Youcanfind the
data applicable toyour vehicle onthe vehicle
ident ification plate. Vehicle
identification number(VIN) X
Slide theright -handfron tseat toits rearmost
position .
X Fold floor cover ing0043upwards.
You willsee VIN 0044.
The VINcanalso befound onthe vehicle iden-
tific ation plate(Ypage 318).
The VINcanalso befound atthe lower edgeof
the windshield (Ypage 319). Engine
number 0043
Emiss ioncontrol infor mation plate,includ-
ing the cert ification ofboth federal andCali-
forn ianemission sstan dards
0044 VIN (onthe lower edgeofthe windshield)
0087 Engine number (stamped intothe cran k-
case) Service
product sand filling capaci-
ties Impor
tantsafet ynotes G
WARN
ING
Serv iceproduct smay bepoisonous andhaz-
ardous tohealth. Thereisarisk ofinjury.
Comply withinstruct ions onthe use, storage
and disposal ofservic eproduct son the labels
of the respect iveoriginal container s.Always
stor eservic eproduct ssealed intheir original
con tainer s.Always keepservic eproduct sout
of the reach ofchildren . H
Environm
entalnote
Dispose ofservic eproduct sin an envir on-
ment allyrespon siblemann er.
Serv iceproduct sinclude thefollowing:
R Fuels
R Lubrican ts(e.g. engin eoil, tran smission oil)
R Coolant
R Brak efluid
R Windshield washerfluid
R Climate control system refrigerant
Componen tsand servic eproduct smust match.
Only useproduct srecom mended byMercedes -
Ben z.Damage whichiscaused bythe use of
product swhich havenotbeen recom mended is
not cover edbythe Mercedes -Benzwarrant yor
goodwill gestures.Product sapproved by
Mercedes -Benzare listed inthis Operator 's
Manual inthe appropriate section.
Inf ormat ionontest edand approved products
can beobtained ataMercedes -BenzServ ice
Center oron the Internet at
htt p:// bevo.m ercedes- benz.com.
You canrecogniz eserv iceproduc tsapprove dby
Merc edes- Benzby the followin ginsc ription on
the contain ers:
R MB- Freigabe (e.g.MB-Freigabe 229.51)
R MB- Appr oval(e.g. MB-Appr oval229.51)
Oth erdesign ationsor rec omme ndations indi-
cat ealevel ofquality oraspecif ication in
acco rdanc ewith anMB Shee tNumber (e.g.MB
229 .5).They have notnecessarily been
approve dby Merc edes- Benz. Serv
iceproduct sand filling capacities
319Technical data Z
Page 324 of 330

Engine
oil
Gener alnot es !
Do
notuse engineoiloran oilfilter with
spec ificatio nsdevi atingfrom those expressly
requi redforthepres cribed serviceint erv als.
Do notch ang eth eeng ineoiloroil filter in
ord erto set repl acem entinterv als longer than
th ose pres cribed. Thiscouldot her wise cause
damag eto theeng ineorexh aust gasafter-
tr eat men t.
Fol low theins truct ionson theser viceint erv al
displ ayfor chang ingtheeng ineoil.This could
ot her wise causedamag eto theeng ineor
exh aust gasaftert reat men t.
When handlingeng ineoil,obse rveth eimpo rtant
safe tyno teson servicepro duct s(Y page 319).
The engineoils aremat ched totheperf ormance
of Mer cedes-Ben zeng inesand serviceint erv als.
You shouldtheref oreonlyuse engineoils and oil
filt ers that are appro vedforveh icleswith main -
te nan cesyst ems .
For alist ofappro vedengineoils and oilfilters ,
con sult anauth orizedMer cedes-Ben zCent er.
Or visi tth ewebsit e
ht tp :/ /be vo.mer cedes-ben z.com .
The tablesho wswhic heng ineoils have been
appro vedforyour vehicle. Mod
el MB
-Freigab eor
MB -Ap proval All
mod els 22
9.5 Use
onlySA E0W- 40orSA E5W- 40eng ineoils
for Mer cedes-AM Gveh icles.
i MB
appro valisind icat edon theoil con tain -
ers . Filling
capacit ies The
followin gvalues referto an eng ineoil
ch ang e,inc ludin gth eoil filter. Mod
el Cap
acity Mer
cedes ‑AMG vehicles 5.
8US qt(5.5l) All
oth ermod els 5.
9US qt(5.6l) Add
itives !
Do
notuse anyaddit ivesintheeng ineoil.
This coulddamag eth eeng ine. Br
ak eflu id G
WAR
NING
The brak efluid constant lyabsor bsmois ture
fr om theair. This lower sth eboilin gpoin tof
th ebrak efluid. Ifth eboilin gpoin tof thebrak e
fluid istoolow, vapo rpoc ketsmay forminthe
brak esyst emwhen thebrak esare applied
hard .This would impair brakingefficie ncy.
Ther eis arisk ofan acc iden t.
You shoul dhave thebrak efluid renewed at
th espec ified interv als.
When handlingbrak efluid, observeth eimpo r-
tan tsafe tyno teson servicepro duct s
(Y page 319).
The brak efluid chang eint erv als can befoun din
th eMain tenan ceBoo klet.
On lyuse brak efluid appro vedbyMer cedes-
Ben zin acc ordanc ewith MB-Freigabe orMB-
App roval33 1.0.
In for mat ionabout approvedbrak efluid canbe
obt aine dat any qualifi edspec ialist workshop or
on theIn te rn et at
ht tp :/ /be vo.mer cedes-ben z.com .
i Hav
eth ebrak efluid regularly replaced ata
qualifi edspec ialist workshop andtherepl ace-
men tcon firmed intheMain tenan ceBoo klet. 322
Ser
vice produ ctsand fillin gcap acit iesTech nical data