2019 MASERATI LEVANTE Operation
[x] Cancel search: OperationPage 58 of 436

Apart from activating indicators
blinking when power liftgate is
operated, it is also possible to activate
a sound warning by selecting the
relevant function within MTC+ user
settings (see “MTC+ Settings” in
section “Dashboard Instruments and
Controls”).
When power liftgate edge reaches the
car body, the motor locking the latch is
activated automatically.
If necessary, the power liftgate can
also be opened or closed manually
using the handles indicated in the
picture. This operation could be
required when the liftgate remains
open for a long period of time. NOTE:
Frequent activations of the anti-pinch
protection function may disable the
automatic movement of the power
liftgate. To reactivate this function,
perform a reset cycle by carrying out a
complete opening/closing sequence,
after manually closing the power
liftgate.
WARNING!
• Activate power liftgate only when
vehicle is at a standstill.
• Always pay utmost attention when
opening and closing the tailgate. If
for any reason the protection system
might fail to respond, it could cause
injury to anyone within the
operating area.
• After the closing command, always
make sure that power liftgate is
completely closed.
CAUTION!
• Under extreme weather conditions,
liftgate seal could freeze and
compromise power liftgate
automatic opening and closing. • Before opening power liftgate, make
sure that no objects or snow are set
on liftgate or might jam or prevent
its opening.
Hands Free Power Liftgate Release
and Closing
This mode is
controlled by the “Passive
Entry” system (see paragraph “Passive
Entry System” in this section), which
automatically releases and closes the
power liftgate when you place your
foot in the area under the rear
bumper.
The system will only operate if the
system acknowledges the presence of
the key fob RKE transmitter within 3.3
ft (1 m) of the power liftgate.
The range of the sensors that detect
your foot movement extends along
and underneath the central portion of
the rear bumper.
To activate the power liftgate, stand
behind the vehicle, near the liftgate,
and move your foot under the bumper
as if to kick something. Do not place
your foot too close to the bumper or
touch the underbody.
WARNING!
• Pay careful attention to the exhaustBefore Starting
2
54
Page 59 of 436

tailpipes as they can reach high
temperatures and, in case of contact,
they can cause severe burns.
• When it is not necessary to open the
power liftgate with the Hands free
mode, make sure the key fob is
outside the range of use (3.3 ft/1 m).
Otherwise, the power liftgate can
be opened accidentally by an
unintentional movement of the
foot.
In order for the sensors to detect your
foot
movement, move your foot
towards the vehicle rather than
sideways and immediately pull it back:
from this moment, the power liftgate
will activate within two seconds.
If closed, with the foot movement the
power liftgate will:
• unlock and completely open;
• after another kick, will stop; • after another kick, will reverse its
movement and completely close
unless stopped again.
If open, with the foot movement the
power liftgate will:
• completely close but not lock;
• another kick before the completed
closing can stop the movement;
• if the movement was stopped
another kick operation will invert a
complete opening.
NOTE:
• If your foot movement fails to
activate the power liftgate
movement, wiggling your foot
under the bumper will not help.
Repeat the whole kick movement.
• In particular situations, external
factors affecting the sensor area may
trigger the Hands free power
liftgate release feature. For example,
when washing the vehicle, a water
jet aimed at the sensor area may
trigger the Hands free power
liftgate release feature. Keep the
key fob RKE transmitter away from
the sensing range of the sensors (10
ft/3 m) or disable the Hands free
feature from the MTC+ menu (see
“MTC+ Settings” in section
“Dashboard Instruments and Controls”). A key fob RKE
transmitter located in the front seat
passenger area is considered out of
range of the Hands free liftgate
release sensor.
• If somebody or something knocks
against the power liftgate while it is
moving, the safety system might
stop lid opening or closing
movement.
Power Liftgate Emergency
Release If the power release control operated
by pressing the button on the dome
console fails, the battery could be in a
low condition. In this case, it is
possible to temporarily power the
system by using the battery remote
poles located inside the engine
compartment (see “Auxiliary
Jump-Start Procedure” in section “In
an Emergency”). Then it is possible to
normally open the power liftgate by
using the key fob RKE transmitter.
Have the vehicle serviced by an
Authorized Maserati Dealer .Before Starting
2
55
Page 60 of 436
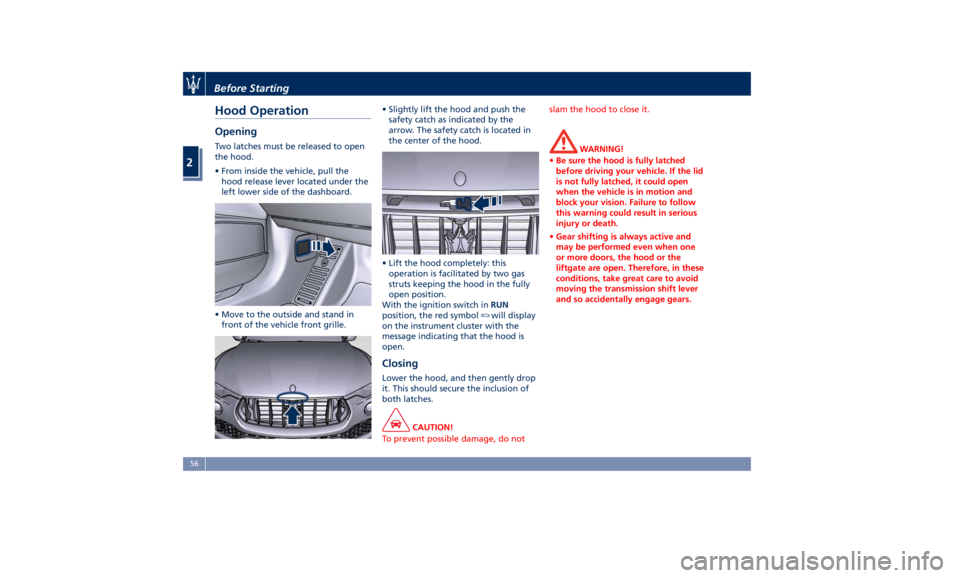
Hood Operation Opening Two latches must be released to open
the hood.
• From inside the vehicle, pull the
hood release lever located under the
left lower side of the dashboard.
• Move to the outside and stand in
front of the vehicle front grille. • Slightly lift the hood and push the
safety catch as indicated by the
arrow. The safety catch is located in
the center of the hood.
• Lift the hood completely: this
operation is facilitated by two gas
struts keeping the hood in the fully
open position.
With the ignition switch in RUN
position, the red symbol
will display
on the instrument cluster with the
message indicating that the hood is
open.
Closing Lower the hood, and then gently drop
it. This should secure the inclusion of
both latches.
CAUTION!
To prevent possible damage, do not slam the hood to close it.
WARNING!
• Be sure the hood is fully latched
before driving your vehicle. If the lid
is not fully latched, it could open
when the vehicle is in motion and
block your vision. Failure to follow
this warning could result in serious
injury or death.
• Gear shifting is always active and
may be performed even when one
or more doors, the hood or the
liftgate are open. Therefore, in these
conditions, take great care to avoid
moving the transmission shift lever
and so accidentally engage gears.Before Starting
2
56
Page 68 of 436

Pretensioners work for all size
occupant restraint systems, including
the child restraint systems.
NOTE:
To obtain the highest degree of
protection from the action of the
pretensioning device, wear the seat
belt tight to the chest and pelvis.
Pretensioners are triggered by the
Occupant Restraint Controller (ORC). A
pretensioner may be used only once
because it is a pyrotechnic device.
Pretensioners do not require any
maintenance or lubrication: any
changes to its original conditions will
invalidate its efficiency. If, due to
unusual natural events (floods, sea
storms, etc.), the device has been
affected by water and mud, it must be
replaced. WARNING!
It is strictly forbidden to remove or
tamper with the pretensioner
components. Any service intervention
must be carried out only by qualified
and authorized personnel. Always
contact an Authorized Maserati
Dealer.
CAUTION!
Operations which lead to impacts,
vibrations or localized heating (over
212°F/100°C for a maximum of 6 hours
max.) in the area around the
pretensioners may damage or deploy
them erroneously. These devices are
not affected by vibrations caused by
uneven road surfaces or low obstacles.
Contact the Authorized Maserati
Dealer for any intervention that may
be required.
Enhanced Seat Belt Use
Reminder System (BeltAlert ®
)BeltAlert ®
is a feature intended to
remind the driver and front passenger
to fasten their seat belts.
The feature activates with engine
running. If the driver or front seat passenger is unbelted, the seat belt
reminder light
and the related
message will turn on in the instrument
cluster. Message remains on for 5
seconds.
The BeltAlert ®
warning sequence
begins after the vehicle speed is over 5
mph (8 km/h) for more than 19
seconds, by blinking the seat belt
reminder light
and message and by
sounding an intermittent chime.
Once the sequence starts, it will
continue for the entire duration. After
the sequence completes, the seat belt
reminder light
remains illuminated
until the respective seat belts are
fastened and the message remains on
for 5 seconds.
If the opened front door on the driver
or passenger side is closed and the
occupant presence sensor detects a
status change from occupant notBefore Starting
2
64
Page 88 of 436

Cleaning the Park Assist
Sensors When cleaning the sensors, take
special care not to scratch or damage
them; therefore, do not use dry, rough
or hard cloths.
The sensors must be washed with clean
water, possibly adding car shampoo.
Should you need to repaint the
bumper or in case of paint touch-ups
in the sensor area, please contact
exclusively the Authorized Maserati
Dealer . Incorrect paint application
could affect the parking sensors
operation.
Park Assist System Usage
Precautions NOTE:
• Jackhammers, large trucks, and other
vibrations could affect the
performance of Park Assist.
• Objects such as bicycle carriers, trailer
hitches, etc., must not be placed
within 12 in (30 cm) from the rear
bumper while driving the vehicle.
Failure to do so can result in the
system misinterpreting a close object
as a sensor problem, causing the
service Park Assist message to be
displayed in the instrument cluster. CAUTION!
• Park Assist is only a parking aid and
it is unable to recognize every
obstacle, including small obstacles.
Parking curbs might only be
temporarily detected or not detected
at all. Obstacles located above or
below the sensors will not be
detected when they are in close
proximity.
• The vehicle must be driven slowly
when using Park Assist in order to be
able to stop in time when an
obstacle is detected. When backing
up, it is recommended that the driver
looks over his/her shoulder when
using Park Assist.
WARNING!
Drivers must be careful when backing
up even when using the Park Assist
system. Always check carefully behind
your vehicle, look behind you, and be
sure to check for pedestrians, animals,
other vehicles, obstructions, and blind
spots before backing up. You are
responsible for safety and must
continue to pay attention to your surroundings. Failure to do so can
result in serious injury or death.
Park Assist Volume The volume of the acoustic signal
emitted by the front and rear parking
sensors is set to the medium level.
Three different levels of volume can be
selected via the submenu “Safety &
Driving Assistant” from the MTC+
System.
Low level is useful in certain conditions
when the parking sensor acoustic
signal keeps coming on although there
is no actual collision hazard. This may
typically occur when driving in a queue
or when the vehicle is overtaken by
motorcycles or other vehicles on one
or both sides in a queue of traffic.
When you set the volume, only the
parking sensor acoustic signal will be
affected. The radio or any other
devices connected to the vehicle sound
system will not be affected.
Refer to chapter “MTC+ Settings” in
section “Dashboard Instruments and
Controls” for further information.
Operation with a Trailer The operation of the rear sensors is
automatically deactivated when the
trailer's electric plug is inserted in theBefore Starting
2
84
Page 95 of 436
checked by the Authorized Maserati
Dealer .
WARNING!
Certain components of this vehicle
such as air bag modules, seat belt
pretensioners, adaptive steering
columns, and button cell batteries
may contain Perchlorate material.
Special handling may apply for service
or vehicle end of life disposal. See
www.dtsc.ca.gov/hazardouswaste/
perchlorate.
Defroster
Check
operation by selecting
the
defrost mode and place the fan system
on high speed (see “Air Conditioning
Controls” chapter in section
“Dashboard Instruments and
Controls”).
You should be able to feel the air
directed against the windshield and
front side windows. Contact an
Authorized Maserati Dealer for service
if your defroster is inoperable.
Floor Mat
Always use floor mats designed to fit
the footwell of your vehicle. Use only
floor mats that leave the pedal area
unobstructed and that are firmly secured so that they cannot slip out of
position and interfere with the pedals
or impair safe operation of your
vehicle.
NOTE:
The Authorized Maserati Dealer can
provide you with any information
about the available Maserati floor
mats included in the “Genuine
Accessories” range.
WARNING!
Pedals that cannot move freely can
cause loss of vehicle control and
increase the risk of serious personal
injury.
• Always make sure that floor mats
are properly attached to the proper
fasteners.
• Never place or install floor mats or
other floor coverings in the vehicle
that cannot be properly secured to
prevent them from moving and
interfering with the pedals.
• Never put floor mats or other floor
coverings on top of already installed
floor mats. Additional floor mats
and other coverings will reduce the size of the pedal area and interfere
with the pedals.
• Check mounting of mats on a
regular basis. Always properly
reinstall and secure floor mats that
have been removed for cleaning.
• Always make sure that objects
cannot fall into the driver footwell
while the vehicle is moving. Objects
can become trapped under the
brake pedal and accelerator pedal
causing a loss of vehicle control.
• Mounting posts must be properly
installed, if not equipped from the
factory. Failure to properly follow
floor mat installation or mounting
can cause interference with the
brake pedal and accelerator pedal
operation causing loss of control of
the vehicle.
Tires
•
Examine tires for excessive tread
wear and uneven wear patterns.
• Check for stones, nails, glass, or
other objects lodged in the tread or
sidewall.
• Inspect the tread for cuts and cracks.
• Inspect sidewalls for cuts, cracks and
bulges.
• Check the wheel nuts for tightness.Before Starting
2
91
Page 96 of 436

• Check the tires (see “Tire Inflation
Pressure” chapter in section
“Features and Specifications”) for
proper cold inflation pressure.
Lights and Indicator Lights
• Have someone observe the operation
of exterior lights while you operate
the controls (see “Lights” chapter in
section “Understanding the
Vehicle”).
• Check turn signal and high beam
indicator lights on the instrument
cluster (see “Instrument Cluster”
chapter in section “Dashboard
Instruments and Controls”).
Door Latches
• Check for positive closing, latching,
and locking of doors and liftgate (see
“Unlock the Vehicle with Key fob”
chapter in this section).
Fluid Leaks
• Check area under vehicle after
overnight parking for recent fluid
leaks (oil, fuel, etc.).
• If gasoline fumes are detected or
fluid leaks are suspected, contact the
Authorized Maserati Dealer . WARNING!
California Proposition 65
Operating, servicing and maintaining
a passenger vehicle or off-road vehicle
can expose you to chemicals including
such as, engine exhaust, carbon
monoxide, phthalates and lead, that
which are known to the State of
California to cause cancer and birth
defects or other reproductive harm. To
minimize exposure, avoid breathing
exhaust, do not idle the engine except
as necessary, service your vehicle in a
well-ventilated area and wear gloves
or wash your hands frequently when
servicing your vehicle. For more
information go to:
www.P65Warnings.ca.gov/passenger-
vehicleBefore Starting
2
92
Page 103 of 436
Seat movement may become limited if
there is an obstruction in the way.
Front Heated Seats The front seats are equipped with
heaters in both seat cushions and
seatbacks.
The seats comfort commands are in
the “Climate” screen of the MTC+.
They are present in the "Climate"
screen even when the A/C is off. See
“Air Conditioning Controls” in section
“Dashboard Instruments and
Controls” for further details.
When the MTC+ System is in any mode
other than “Climate” (Radio”,
“Media”, “Controls”, etc.) the icons of
the active front seats comfort
functions will be indicated on the
upper part of the display.
WARNING!
• Persons with low skin sensitivity
because of advanced age, chronic
illness, diabetes, spinal cord injury,
medication, alcohol use, exhaustion
or other physical conditions must be
careful when using the seat heater.
It may cause irritation even at low
temperatures, especially if used for
long periods of time. • Do not place anything on the seat
that insulates against heat, such as a
blanket or cushion. This may cause
the seat heater to overheat.
Front Seats Heat Function
NOTE:
The
engine must be
running for the
heated seats to operate.
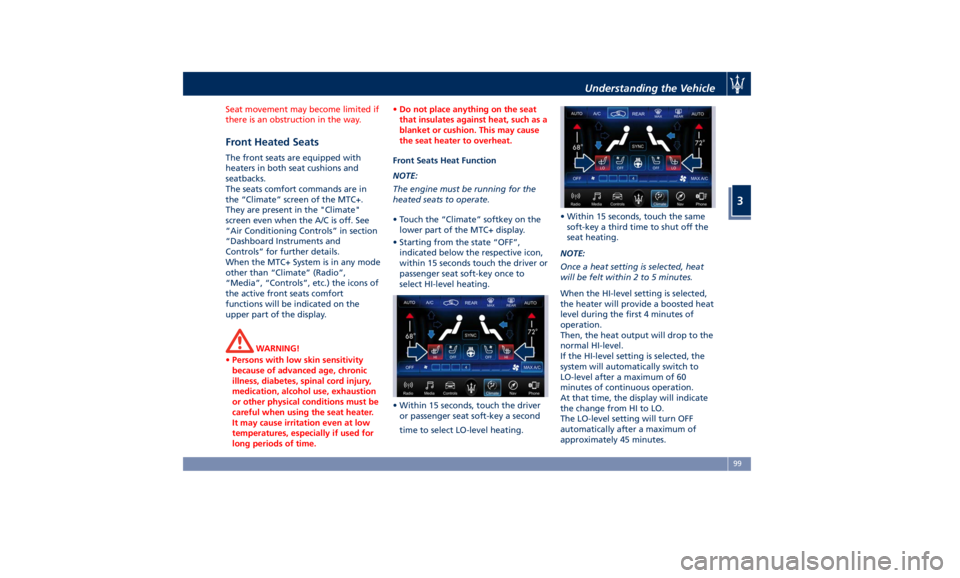
• Touch the “Climate” softkey on the
lower part of the MTC+ display.
• Starting from the state “OFF”,
indicated below the respective icon,
within 15 seconds touch the driver or
passenger seat soft-key once to
select HI-level heating.
• Within 15 seconds, touch the driver
or passenger seat soft-key a second
time to select LO-level heating. • Within 15 seconds, touch the same
soft-key a third time to shut off the
seat heating.
NOTE:
Once a heat setting is selected, heat
will be felt within 2 to 5 minutes.
When the HI-level setting is selected,
the heater will provide a boosted heat
level during the first 4 minutes of
operation.
Then, the heat output will drop to the
normal HI-level.
If the HI-level setting is selected, the
system will automatically switch to
LO-level after a maximum of 60
minutes of continuous operation.
At that time, the display will indicate
the change from HI to LO.
The LO-level setting will turn OFF
automatically after a maximum of
approximately 45 minutes.Understanding the Vehicle
3
99