2019 MASERATI LEVANTE Operation
[x] Cancel search: OperationPage 165 of 436

Warning and Indicator Lights
on Analog Instruments Telltales on Speedometer
The following telltales are displayed
on the speedometer, and related
messages are visible for 5 seconds on
the central sector of the display, unless
otherwise indicated (see “TFT Display:
Warning/Indicator Lights of Set
Modes/Functions” paragraph in this
chapter).
Malfunction Indicator Light (MIL)
The Malfunction Indicator
Light (MIL) is part of an
onboard diagnostic system
that monitors engine and
automatic transmission control
systems.
Under normal conditions, this
indicator light should switch on when
the ignition switch is in RUN position and switch off soon after the engine is
started (the MIL does not shut off
immediately).
This is a sign of the indicator light
working properly. If the indicator
remains illuminated or switches on
while driving, there is a failure in the
fuel supply/ignition and emission
control systems.
The failure could cause high exhaust
emissions, loss of performance, poor
vehicle handling and high
consumption levels.
Should this occur, proceed with
caution to your Authorized Maserati
Dealer without heavy throttle
application or driving at high speeds.
Obey all applicable local traffic
regulations.
The indicator light will go out if the
problem is no longer present.
The error will be registered by the
system in any case.
CAUTION!
• When the ignition switch is in the
RUN position and if the indicator
light does not switch on or if it
switches on while driving, contact an
Authorized Maserati Dealer as soon
as possible. • Prolonged driving with the MIL on
could cause damage to the engine
control system. It also could affect
fuel economy and drivability. If the
MIL is flashing, severe catalytic
converter damage and power loss
will soon occur. Immediate service is
required. In addition, the OBDII
system incorporates a diagnostic
connector that can be interfaced
using diagnostic equipment. This
makes it possible to read the error
codes stored in the control unit,
together with a set of specific
parameters for the engine operation
diagnostic cycle, for compliance with
CARB & EPA OBDII regulations.
Left Turn Signal Indicator Light
The
indicator lights up when
the left turn signals or the
hazard flashers are turned on.
The indicator light will flash at
the same frequency of the turn signals
and is controlled by the multifunction
lever behind the steering wheel.
If the vehicle electronics sense that the
vehicle drives for more than 1 mile
(1.6 km) with either turn signal on, a
continuous sound will alert the driver
to turn the signal off.Dashboard Instruments and Controls
4
161
Page 186 of 436

WARNING!
Do not drive with this warning light
on. Check that the fuel filler cap is
tightened correctly.
Electric Parking Brake Failure Warning
Light
This
warning light and
related
message illuminate when
there is an EPB system failure.
The failure could also
completely or partially block the
vehicle because the parking brake
could remain on even after it has been
automatically or manually disengaged
though its controls.
If it is still possible to use the vehicle
(parking brake not engaged) drive to
the nearest Authorized Maserati
Dealer and remember to performing
each operation/command that the
electric parking brake is not
functioning.
Start&Stop Disable Indicator
This indicator illuminates
when Start&Stop is turned off
through the controls located
on the right side of the
steering wheel or through the relevant
soft-key of the MTC+. See chapter “Automatic Start&Stop System” of
section “Driving” for further
information.
Start&Stop Failure Warning Light
This warning light illuminates
when there is a failure in the
Start&Stop system. Switch the
engine on or off using the
normal procedure with the ignition
device START/STOP and have the
vehicle checked at an Authorized
Maserati Dealer .
Scheduled Maintenance (Service)
Indicator
This indicator illuminates and
a message flashes on the
display for approximately 5
seconds after an acoustic
signal to indicate that the next
scheduled maintenance is due or is
already overdue.
Unless reset, the message will continue
to display each time you cycle the
ignition to the RUN position.
To turn off the message temporarily,
press and release the
button on the
steering wheel. To reset the service
indicator system, please visit an
Authorized Maserati Dealer . ADAS Status Indicators (If equipped)
When you are not viewing the
“Drive Assist” page, the
indicators at the top left-hand
side of the display indicate
status of individual ADAS system or
the combination of them (see
examples).
For further details, refer to
“Adaptive Cruise Control -
ACC”, “Lane Keeping Assist -
LKA” and “Highway Assist - HAS” in
section “Driving”.
Forward Collision Warning (FCW) Off
(If equipped)
This warning light informs the
driver that Forward Collision
Warning (FCW) is disabled. If
this light occurs together with
other specific messages, take your
vehicle to an Authorized Maserati
Dealer for service. This warning light
will light even when the activation of
another driver assistance feature or
drive mode (such as “
-ESC OFF”)
disables the FCW.
Forward Collision Warning (FCW) Fault
(If equipped)
This warning light informs that
FCW is in fault state. If this
occurred together with other
specific messages, could meanDashboard Instruments and Controls
4
182
Page 192 of 436
Touch one of these soft-keys to access
the list of functions that users can set.
Touchscreen Display Warnings
CAUTION!
• Do NOT attach any object to the
touchscreen, doing so can result in
damage to the touchscreen.
• Do not press the screen with any
hard or sharp objects (pen, USB stick,
jewelry, etc.) which could scratch the
touchscreen surface.
• Do not spray any liquid or caustic
chemicals directly on the screen. Use
a clean and dry micro fiber lens
cleaning cloth in order to clean the
touchscreen.
• If necessary, use a lint-free cloth
dampened with a cleaning solution,
such as isopropyl alcohol, or an
isopropyl alcohol and water solution
ratio of 50:50. Be sure to follow the
solvent manufacturer’s precautions
and directions.
Switch OFF Touchscreen Backlight
If
the screen backlight becomes
annoying when driving, it is possible to
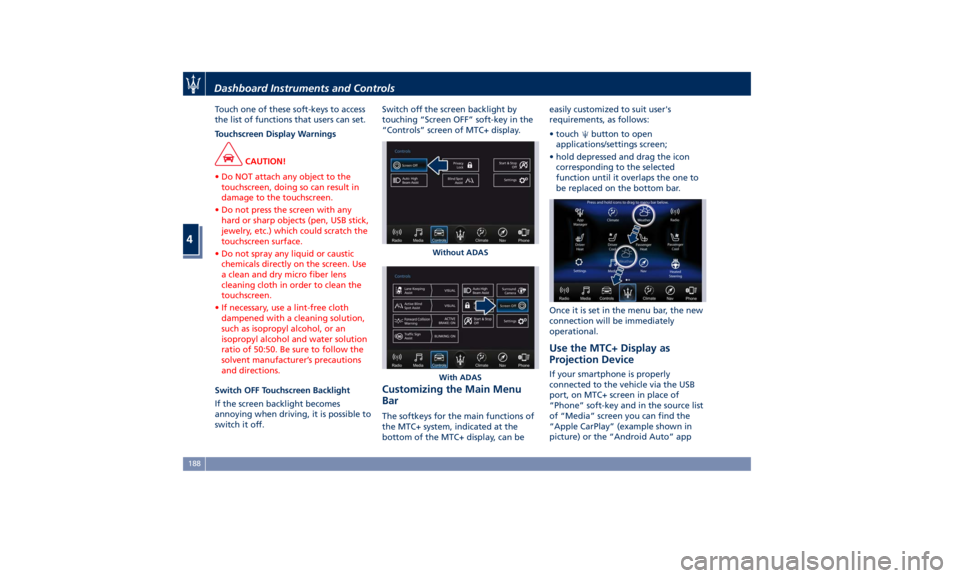
switch it off. Switch off the screen backlight by
touching “Screen OFF” soft-key in the
“Controls” screen of MTC+ display.
Customizing the Main Menu
Bar The softkeys for the main functions of
the MTC+ system, indicated at the
bottom of the MTC+ display, can be easily customized to suit user's
requirements, as follows:
• touch
button to open
applications/settings screen;
• hold depressed and drag the icon
corresponding to the selected
function until it overlaps the one to
be replaced on the bottom bar.
Once it is set in the menu bar, the new
connection will be immediately
operational.
Use the MTC+ Display as
Projection Device If your smartphone is properly
connected to the vehicle via the USB
port, on MTC+ screen in place of
“Phone” soft-key and in the source list
of “Media” screen you can find the
“Apple CarPlay” (example shown in
picture) or the “Android Auto” appWithout ADAS
With ADASDashboard Instruments and Controls
4
188
Page 203 of 436

NOTE:
• For further details refer to the
“Maserati Touch Control Plus
(MTC+)” guide.
• All settings must be edited with
ignition device set to RUN position.
To display the programmable features
menu on MTC+, you can also touch
soft-key to view all available
applications and then select
“Settings”. In this mode the MTC+ System allows
you to access the following
programmable features (some of them
are optional or for a specific
model/version and may not be
available on your vehicle): Display,
Units, Voice Commands, Clock, Safety
& Driving Assistant, Lights, Doors &
Locks, Auto-On Comfort & Remote
Start, Engine Off Options, Suspension,
Audio, Phone/Bluetooth, SiriusXM
Setup, Restore Settings and Clear
Personal Data.
NOTE:
• Only one touch screen area/soft-key
may be selected at a time.
• Menu navigation indications refer to
the use of soft-keys on MTC+ display:
the same operations can be
performed using the manual
controls on central console. To make a selection, and enter the
desired function, touch the
corresponding soft-key on the menu
(the picture shown is “Engine Off
Options”).
To scroll through the functions, move
the cursor up or down, or touch the
arrow
or . Once the desired
mode is entered, press and release the
touch screen area of the setting that
you wish to modify. The new setting
will be highlighted with one or more
boxes to indicate status or possible
variants of the function status. A
check mark in a box indicates the
current status of the function. Touch
the check mark to cancel, or the
empty box to insert the check mark,
and change the status of the function.With ADAS Dashboard Instruments and Controls
4
199
Page 209 of 436
horn will sound when the doors are
locked with the key fob RKE
transmitter. You can choose from
the following options: “Off” (no
sound), “1st Press” (sound on the
first press of the
button) and
“2nd Press” (sound on the second
press of the
button).
• Sound Horn with Remote Start
When this feature is selected, the
horn will sound when you use the
key fob RKE transmitter to start the
engine. The feature can be set to
“On” or “Off”. See “Remote Start
System” in section “Before Starting”
for further details.
• Remote Unlock Sequence
By selecting this feature you may set
up only the driver's door or all
doors mode will unlock on the first
press of the key fob RKE transmitter
button. When “Driver Door” is
selected, you must press the key fob
RKE transmitter
button twice to
unlock also the passenger's doors.
When unlocking “All Doors” by first
press selection mode, all doors will unlock on the first press of the key
fob RKE transmitter
button.
If the vehicle is programmed on “1st
Press of Key Fob Unlocks”:
• all doors will unlock no matter
which “Passive Entry” equipped
door handle is grasped;
• only the driver’s door will unlock
when the driver’s door is grasped;
• with “Passive Entry”, touching the
handle more than once will only
result in the driver’s door opening.
If driver door first is selected, once
the driver door is opened, the
interior door lock/unlock switch can
be used to unlock all doors (or use
key fob RKE transmitter).
• Passive Entry
This feature allows you to lock and
unlock the vehicle door(s) without
having to push the key fob RKE
transmitter
or buttons. By
selecting this feature, “Passive
Entry” may be set to “On” or “Off”.
The default status is “On”. With
“Passive Entry” deactivated, also the
“Pre-Short Drop” function is
disabled (for further information,
refer to “Bodywork Maintenance
and Care” in section “Maintenance
and Care”). • Personal Settings Linked to Key Fob
This selected mode enables to
combine the key fob to personal
driver’s position settings. These
settings will be implemented when
pressing the
button on the key
fob RKE transmitter with ignition
device in RUN position.
• Power Liftgate Alert
When this feature is available, if it
selected, further to turn indicators
flashing, an acoustic warning will
also be triggered when opening
and closing the liftgate and also
when the fully open position of the
liftgate is set by the user. The
feature can be set to “On” or “Off”.
• Hands Free Power Liftgate
To prevent the accidental opening
of the power liftgate/Hand free
(optional) with the movement of
the foot, it is possible to disable the
“Hand Free” function. The feature
can be set to “On” or “Off”. This
operation is recommended when
you have to wash the car (for
further information, refer to
“Power Liftgate Operation” in
section “Before Starting”).Dashboard Instruments and Controls
4
205
Page 211 of 436
clearance when driver takes
transmission to P (Park) to help
entry into and exit from the vehicle
and unloading of cargo from the
trunk compartment. The feature
can be set to “On” or “Off”.
• Warning/Suspension Warning
Messages Only
Select this mode to choose whether
to display only warnings (option
“On”). The feature can be set to
“On” or “Off”.
• Tire Change Mode/Stationary Auto
Leveling
Select this mode to disable the
pneumatic suspension to avoid
automatic levelling, when vehicle
must be lifted for changing a wheel
or tire. The feature can be set to
“On” or “Off”.
• Transport To Mode
Select this mode to lower the
pneumatic suspension to minimum
ride height and disable system
operation to help vehicle loading
and transport, for instance on the
platform of a tow truck. The feature
can be set to “On” or “Off”.
• Wheel Alignment Mode
Select this mode to prevent
automatic pneumatic suspension alignment when servicing
suspension and/or steering parts.
The feature can be set to “On” or
“Off”.
Audio This feature enables to view and set
the available audio modes depending
on the type of audio system supplied
on the car.
The following modes refer to the
“High Premium” audio system.
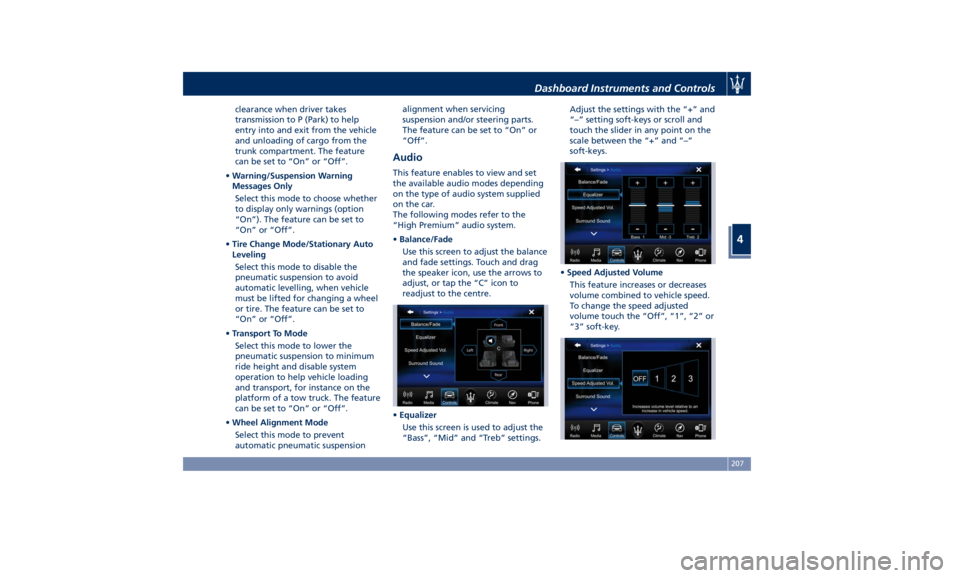
• Balance/Fade
Use this screen to adjust the balance
and fade settings. Touch and drag
the speaker icon, use the arrows to
adjust, or tap the “C” icon to
readjust to the centre.
• Equalizer
Use this screen is used to adjust the
“Bass”, “Mid” and “Treb” settings. Adjust the settings with the “+” and
“–” setting soft-keys or scroll and
touch the slider in any point on the
scale between the “+” and “–”
soft-keys.
• Speed Adjusted Volume
This feature increases or decreases
volume combined to vehicle speed.
To change the speed adjusted
volume touch the “Off”, “1”, “2” or
“3” soft-key.Dashboard Instruments and Controls
4
207
Page 216 of 436
NOTE:
• If you do not enter all PIN digits, a
prompt will indicate that you should
do so.
• In case of an incoming call while
entering the PIN, the MTC+ system
will temporarily stop the release
function. As soon as the call is over,
the keypad screen will be displayed
again so that you can enter the PIN.
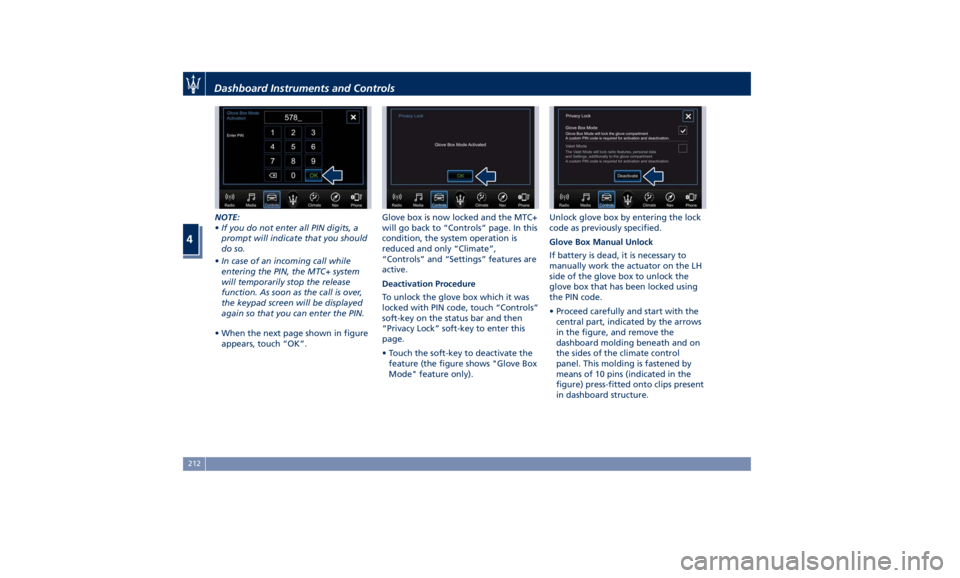
• When the next page shown in figure
appears, touch “OK”. Glove box is now locked and the MTC+
will go back to “Controls” page. In this
condition, the system operation is
reduced and only “Climate”,
“Controls” and “Settings” features are
active.
Deactivation Procedure
To unlock the glove box which it was
locked with PIN code, touch “Controls”
soft-key on the status bar and then
“Privacy Lock” soft-key to enter this
page.
• Touch the soft-key to deactivate the
feature (the figure shows "Glove Box
Mode" feature only). Unlock glove box by entering the lock
code as previously specified.
Glove Box Manual Unlock
If battery is dead, it is necessary to
manually work the actuator on the LH
side of the glove box to unlock the
glove box that has been locked using
the PIN code.
• Proceed carefully and start with the
central part, indicated by the arrows
in the figure, and remove the
dashboard molding beneath and on
the sides of the climate control
panel. This molding is fastened by
means of 10 pins (indicated in the
figure) press-fitted onto clips present
in dashboard structure.Dashboard Instruments and Controls
4
212
Page 220 of 436
NOTE:
For vehicles equipped with Remote
Start, the Air Conditioning System will
not function during Remote Start
operation if the climate control is left
in “OFF”.
2. A/C
Touch the "A/C" soft-key to change
the current air conditioning setting;
the soft-key illuminates when the A/C
is on. Operating this function will
cause the automatic feature to switch
into manual mode and the “AUTO”
LED on the buttons and MTC+ soft-key
will turn off.
3. Driver temperature control
Provides the driver with independent
temperature control. Touch the blue
soft-key for cooler temperature.
Touch the red
soft-key for warmer
temperature. The driver's temperature
setting will be displayed on the MTC+
between the soft-key
and . The
MTC+ display can also be used to
adjust the temperature by touching
and sliding the bar towards soft-key
, to increase temperature, or
towards soft-keys
to decrease it.
During this phase, a small pop-up on
the side will show the corresponding
temperature. You can increase or decrease the
temperature using the rocker switch
on the climate control panel.
NOTE:
In “SYNC” mode, this control will also
automatically and simultaneously
adjust the passenger temperature.
4. Passenger temperature control
Provides the passenger with
independent temperature control.
Touch the
soft-key for cooler
temperature. Touch the
soft-key for
warmer temperature. The passenger's
temperature setting will be displayed
on the MTC+ screen between the
soft-keys
and .
You can increase or decrease the
temperature using the rocker switch
on the climate control panel.
NOTE:
Pressing the 4 button/soft-key while in
“SYNC” mode will automatically exit
“SYNC”.
5. Recirculation
Press to change the current setting,
the LED indicator on the button and
the relevant soft-key illuminates to
indicate which recirculation function is
activated. For further details, see paragraph “Dual zone Climate Control
Functions” in this chapter.
6. Blower control
Blower control is used to adjust the
amount of air forced through the
climate system. Eight levels of blower
speed can be selected. Adjusting the
blower will cause automatic mode to
switch to manual.
On the climate control panel, push the
rocker switch up to increase fan speed.
Push the rocker switch down to
decrease fan speed. Pushing down the
rocker switch when set blower is at the
first speed, causes the A/C system
shutdown (OFF condition).
On the MTC+ display, touch the small
icon of the blower to decrease the
speed, or the big icon to increase it.
Between the two icons, bars will
appear to show the number of the
corresponding selected speed.
The blower can also be activated/
regulated by touching the bars
between the two blower icons.
When the MTC+ is displayed in any
mode other than “Climate”, the
blower speed is indicated by the bright
segments in the climate icon.
7-8. AUTO
This function automatically controls
the interior temperature by adjustingDashboard Instruments and Controls
4
216