2019 MASERATI LEVANTE Operation
[x] Cancel search: OperationPage 224 of 436
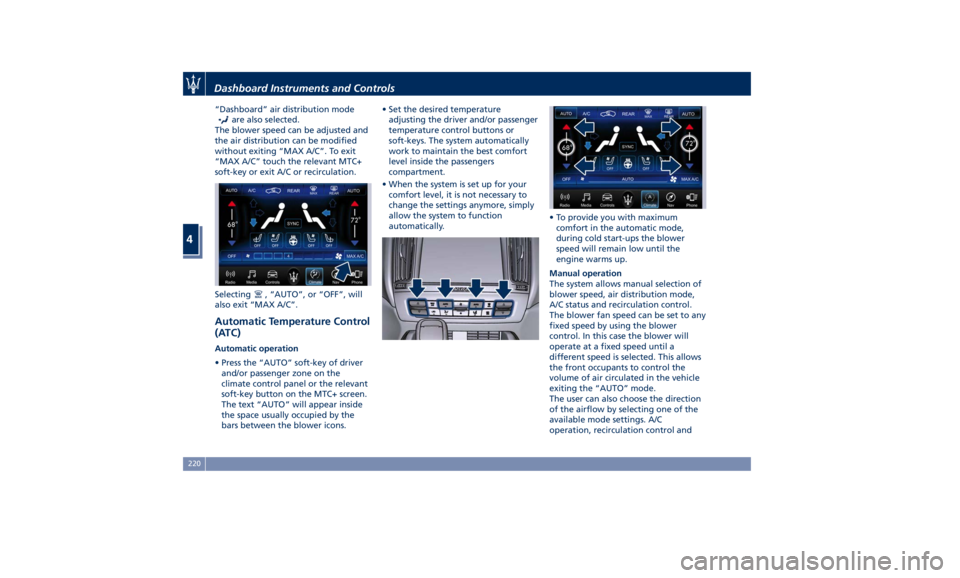
“Dashboard” air distribution mode
are also selected.
The blower speed can be adjusted and
the air distribution can be modified
without exiting “MAX A/C”. To exit
“MAX A/C” touch the relevant MTC+
soft-key or exit A/C or recirculation.
Selecting
, “AUTO”, or “OFF”, will
also exit “MAX A/C”.
Automatic Temperature Control
(ATC) Automatic operation
• Press the “AUTO” soft-key of driver
and/or passenger zone on the
climate control panel or the relevant
soft-key button on the MTC+ screen.
The text “AUTO” will appear inside
the space usually occupied by the
bars between the blower icons. • Set the desired temperature
adjusting the driver and/or passenger
temperature control buttons or
soft-keys. The system automatically
work to maintain the best comfort
level inside the passengers
compartment.
• When the system is set up for your
comfort level, it is not necessary to
change the settings anymore, simply
allow the system to function
automatically. • To provide you with maximum
comfort in the automatic mode,
during cold start-ups the blower
speed will remain low until the
engine warms up.
Manual operation
The system allows manual selection of
blower speed, air distribution mode,
A/C status and recirculation control.
The blower fan speed can be set to any
fixed speed by using the blower
control. In this case the blower will
operate at a fixed speed until a
different speed is selected. This allows
the front occupants to control the
volume of air circulated in the vehicle
exiting the “AUTO” mode.
The user can also choose the direction
of the airflow by selecting one of the
available mode settings. A/C
operation, recirculation control andDashboard Instruments and Controls
4
220
Page 225 of 436
“SYNC” mode can also be manually
selected.
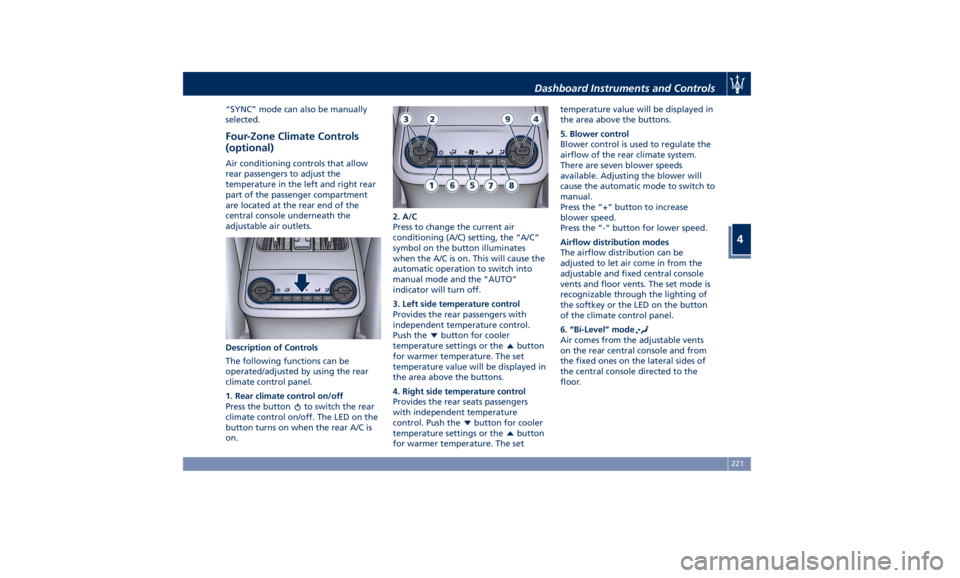
Four-Zone Climate Controls
(optional) Air conditioning controls that allow
rear passengers to adjust the
temperature in the left and right rear
part of the passenger compartment
are located at the rear end of the
central console underneath the
adjustable air outlets.
Description of Controls
The following functions can be
operated/adjusted by using the rear
climate control panel.
1. Rear climate control on/off
Press the button
to switch the rear
climate control on/off. The LED on the
button turns on when the rear A/C is
on. 2. A/C
Press to change the current air
conditioning (A/C) setting, the “A/C”
symbol on the button illuminates
when the A/C is on. This will cause the
automatic operation to switch into
manual mode and the “AUTO”
indicator will turn off.
3. Left side temperature control
Provides the rear passengers with
independent temperature control.
Push the
button for cooler
temperature settings or the
button
for warmer temperature. The set
temperature value will be displayed in
the area above the buttons.
4. Right side temperature control
Provides the rear seats passengers
with independent temperature
control. Push the
button for cooler
temperature settings or the
button
for warmer temperature. The set temperature value will be displayed in
the area above the buttons.
5. Blower control
Blower control is used to regulate the
airflow of the rear climate system.
There are seven blower speeds
available. Adjusting the blower will
cause the automatic mode to switch to
manual.
Press the “+“ button to increase
blower speed.
Press the “-“ button for lower speed.
Airflow distribution modes
The airflow distribution can be
adjusted to let air come in from the
adjustable and fixed central console
vents and floor vents. The set mode is
recognizable through the lighting of
the softkey or the LED on the button
of the climate control panel.
6. “Bi-Level” mode
Air comes from the adjustable vents
on the rear central console and from
the fixed ones on the lateral sides of
the central console directed to the
floor.Dashboard Instruments and Controls
4
221
Page 238 of 436
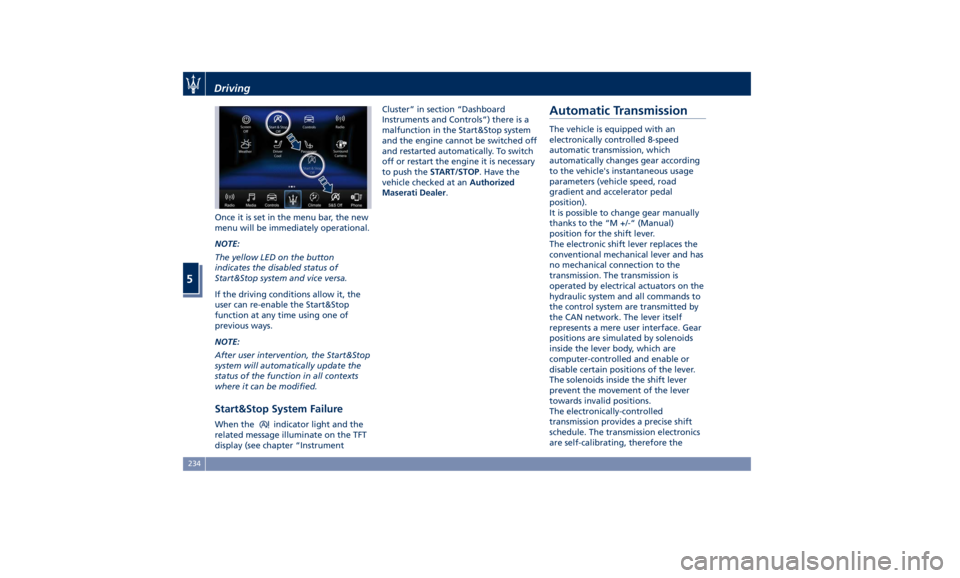
Once it is set in the menu bar, the new
menu will be immediately operational.
NOTE:
The yellow LED on the button
indicates the disabled status of
Start&Stop system and vice versa.
If the driving conditions allow it, the
user can re-enable the Start&Stop
function at any time using one of
previous ways.
NOTE:
After user intervention, the Start&Stop
system will automatically update the
status of the function in all contexts
where it can be modified.
Start&Stop System Failure When the indicator light and the
related message illuminate on the TFT
display (see chapter “Instrument Cluster” in section “Dashboard
Instruments and Controls”) there is a
malfunction in the Start&Stop system
and the engine cannot be switched off
and restarted automatically. To switch
off or restart the engine it is necessary
to push the START/STOP . Have the
vehicle checked at an Authorized
Maserati Dealer .
Automatic Transmission The vehicle is equipped with an
electronically controlled 8-speed
automatic transmission, which
automatically changes gear according
to the vehicle's instantaneous usage
parameters (vehicle speed, road
gradient and accelerator pedal
position).
It is possible to change gear manually
thanks to the “M +/-“ (Manual)
position for the shift lever.
The electronic shift lever replaces the
conventional mechanical lever and has
no mechanical connection to the
transmission. The transmission is
operated by electrical actuators on the
hydraulic system and all commands to
the control system are transmitted by
the CAN network. The lever itself
represents a mere user interface. Gear
positions are simulated by solenoids
inside the lever body, which are
computer-controlled and enable or
disable certain positions of the lever.
The solenoids inside the shift lever
prevent the movement of the lever
towards invalid positions.
The electronically-controlled
transmission provides a precise shift
schedule. The transmission electronics
are self-calibrating, therefore theDriving
5
234
Page 239 of 436
gearshift behaviour could become
perfect as expected after few
hundreds of km.
CAUTION!
In order to properly use the automatic
transmission, it is essential that you
read through the whole chapter, so
that you can understand right from
the start what the correct and granted
operations are.
Damage to the transmission may occur
if the following precautions are not
observed:
• Shift into P (Park) only after the
vehicle has come to a complete stop:
this is the default position of the
lever. After engaged P (Park) it is
possible set the ignition switch to
OFF .
• Shift into or out of R (Reverse) only
after the vehicle has come to a
complete stop and the engine is at
idle speed.
• Do not shift between P (Park), R
(Reverse), N (Neutral) or D (Drive)
when the engine is above idle speed
• To effect any change from vehicle
stop to R (Reverse), D (Drive), 1 st
or 2 nd
gear, it is necessary to keep the
brake pedal fully depressed.
WARNING!
• It is dangerous to move the shift
lever out of P (Park) or N (Neutral) if
the engine speed is higher than idle
speed. Only shift into gear when the
engine is idling normally and when
your foot is firmly pressing on the
brake pedal.
• As with all vehicles, you should
never exit a vehicle while the engine
is running. Before exiting a vehicle,
always apply the electronic parking
brake, shift the transmission into P
(Park), and turn the engine off.
• When leaving the vehicle, always
remove the key fob and lock your
vehicle.
• Do not leave the key fob in or near
the vehicle.
This vehicle is equipped with a feature
which
requires the transmission to be
placed in P (Park) before the engine
can be turned off. This prevents the
driver from inadvertently leaving the
vehicle without having placed the
transmission in P (Park). This system
also locks the transmission in P (Park) whenever the ignition switch is in the
OFF position.
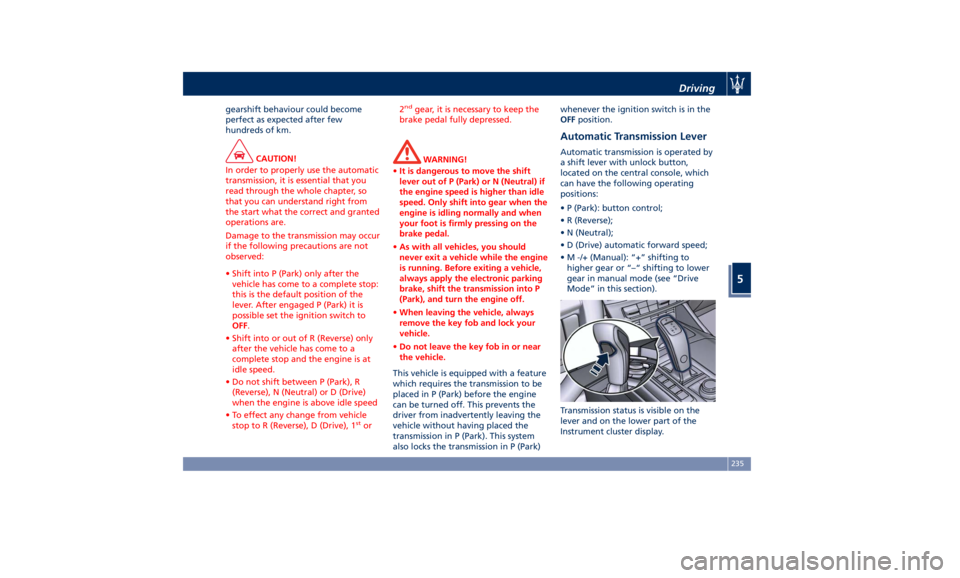
Automatic Transmission Lever Automatic transmission is operated by
a shift lever with unlock button,
located on the central console, which
can have the following operating
positions:
• P (Park): button control;
• R (Reverse);
• N (Neutral);
• D (Drive) automatic forward speed;
• M -/+ (Manual): “+” shifting to
higher gear or “–“ shifting to lower
gear in manual mode (see “Drive
Mode” in this section).
Transmission status is visible on the
lever and on the lower part of the
Instrument cluster display.Driving
5
235
Page 244 of 436
the smoothest upshifts and downshifts
and the best fuel economy. The
transmission automatically shifts up
and down through all gears. The D
(Drive) mode provides optimum
driving characteristics under all normal
operating conditions of the vehicle.
• Vehicle stationary: to switch from D
(Drive) to R (Reverse) requires brake
pedal and unlock button pressed and
the action on the shift lever: to reach
N (Neutral) starting from D (Drive) is
possible by only acting on the shift
lever.
• To enable special operations while
the car is moving at a low speed,
such as getting out of marsh or snow,
it is possible to run quickly from D
(Drive) to R (Reverse), and vice versa,
by pressing the unlock button and
acting on the shift lever passing from
N (Neutral).
• Vehicle moving: switching to N
(Neutral) from D (Drive) it is not
necessary to press brake pedal.
• From D (Drive) selected mode it is
always possible to switch to M +/-
(Manual) mode, by move the shift
lever to the left (see following
paragraph); to return to “D”
position, move the shift lever to the
right. It is possible to shift from D (Drive) mode to M +/- (Manual) mode
regardless of car speed.
• When in D (Drive) mode, using the
paddles behind the steering wheel (if
equipped), will cause the system to
enter a temporary function and
enable the manual shift mode. This
range is indicated with the symbols
“+/-” above and below “D” letter on
the gear range field of the display.
The system will then switch back to
automatic mode according to time
elapsed in “temporary” mode and
driving conditions.
At extremely cold temperatures (-23°F /
-30°C or below), transmission may be
affected by the low temperature of
the engine and transmission. Normal
operation will resume once the
transmission temperature has risen to
a normal level.
M +/- (Manual)
This mode is obtained by moving the
shift lever to the left in “M +/-“
position.
In this mode, the transmission interacts
with the driver in order to allow
manual shift and ensure increased
control of the vehicle. The current
mode allows the transmission system
to optimise the engine brake action,
remove undesired shifting into higher and lower gears and improve the
overall performance of the vehicle.
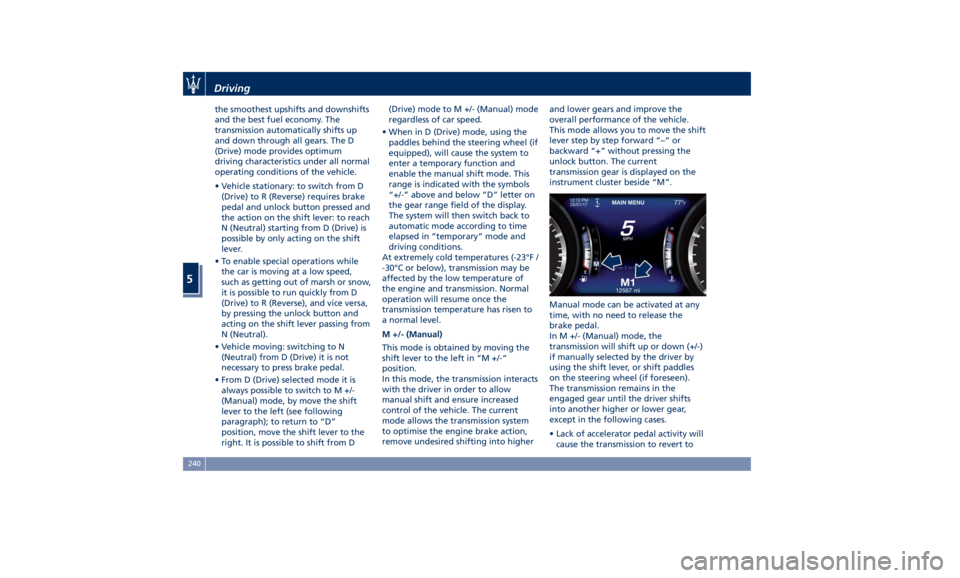
This mode allows you to move the shift
lever step by step forward “–“ or
backward “+” without pressing the
unlock button. The current
transmission gear is displayed on the
instrument cluster beside “M”.
Manual mode can be activated at any
time, with no need to release the
brake pedal.
In M +/- (Manual) mode, the
transmission will shift up or down (+/-)
if manually selected by the driver by
using the shift lever, or shift paddles
on the steering wheel (if foreseen).
The transmission remains in the
engaged gear until the driver shifts
into another higher or lower gear,
except in the following cases.
• Lack of accelerator pedal activity will
cause the transmission to revert toDriving
5
240
Page 245 of 436
automatic operation. The
transmission will also upshift
automatically once maximum engine
speed is reached.
• If in SPORT mode, the transmission
will remain in the selected gear even
when maximum engine speed is
reached. The transmission will
upshift only if enabled by the driver.
Manual upshift or downshift will be
maintained as long as SPORT mode is
selected, even by full stroke pedal
press.
• If in “M +/-“ or in SPORT mode, the
transmission will automatically
downshift as the vehicle slows to
halt (to prevent engine lugging) and
the current gear will display on the
instrument cluster. Shifting the shift
lever backward “+” or moving the
right shift paddle “+” towards the
steering wheel when stationary, will
cause the vehicle to start in second
gear. If the vehicle speed is too low,
the system will ignore further
upshifts. Avoid using speed control
when the M +/- (Manual) mode is
engaged.
When the car stops in M +/- (Manual)
mode, the transmission automatically
moves the shift lever and inserts P
(Park). If you enter the I.C.E. drive mode
when the gearshift is in “M +/-”
position, the system activates the
automatic return of the shift lever in D
(Drive) mode.
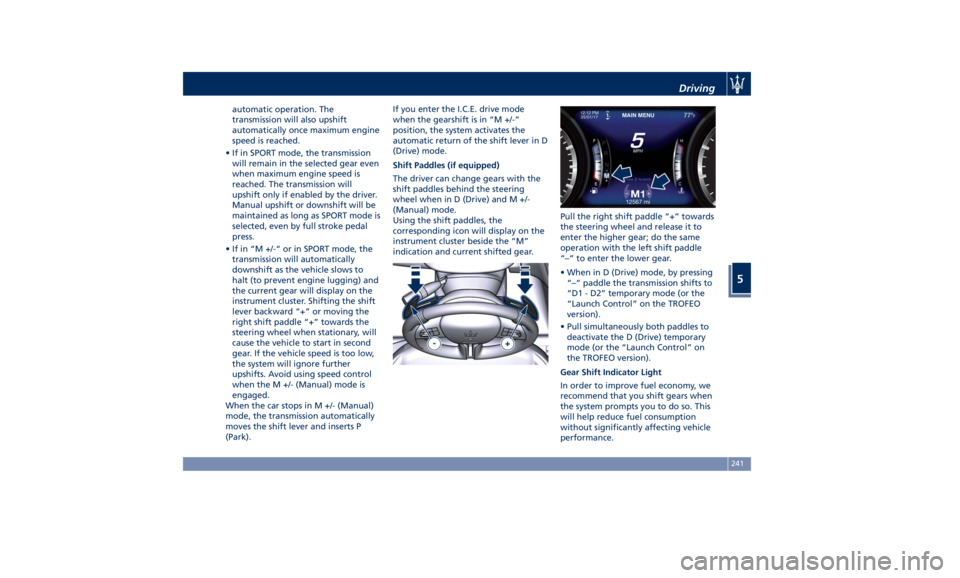
Shift Paddles (if equipped)
The driver can change gears with the
shift paddles behind the steering
wheel when in D (Drive) and M +/-
(Manual) mode.
Using the shift paddles, the
corresponding icon will display on the
instrument cluster beside the “M”
indication and current shifted gear. Pull the right shift paddle “+” towards
the steering wheel and release it to
enter the higher gear; do the same
operation with the left shift paddle
“–“ to enter the lower gear.
• When in D (Drive) mode, by pressing
“–“ paddle the transmission shifts to
“D1 - D2” temporary mode (or the
“Launch Control” on the TROFEO
version).
• Pull simultaneously both paddles to
deactivate the D (Drive) temporary
mode (or the “Launch Control” on
the TROFEO version).
Gear Shift Indicator Light
In order to improve fuel economy, we
recommend that you shift gears when
the system prompts you to do so. This
will help reduce fuel consumption
without significantly affecting vehicle
performance.Driving
5
241
Page 247 of 436

perform the following procedure
preferably at an Authorized Maserati
Dealer .
In the event of a momentary problem,
the transmission can be reset to regain
all forward gears by performing the
following steps.
• Stop the vehicle.
• Shift the transmission into P (Park), if
possible.
• Turn the engine off.
• Wait approximately 30 seconds.
• Restart the engine.
• Shift the transmission into D (Drive)
and then into the desired gear
range. If the problem is no longer
detected, the transmission will
return to normal operation.
NOTE:
Even if the transmission can be reset,
we recommend that you visit an
Authorized Maserati Dealer at your
earliest possible convenience, which
has diagnostic equipment to
determine if the problem could recur.
Transmission Manual Release of P
(Park) Position
See chapter “Transmission Manual
Release of P (Park) Position” in section
“In an Emergency”. All-Wheel Drive The active on-demand All-Wheel Drive
(AWD) system provides available
optimum traction for a wide variety of
road and off-road surface and driving
conditions. The system minimizes
wheel slip by automatically redirecting
torque to the front and rear wheels as
necessary.
To maximize fuel economy, the AWD
system automatically disengages
torque distribution on front axle when
road and environmental conditions
are such that wheel slip is unlikely to
occur. When specific road and
environmental conditions require
increased levels of road traction, the
AWD system automatically distributes
the torque between front and rear
axle in order to grant the best driving
experience. Torque distribution is
displayed on the TFT in the “Drive
Mode” main menu. Refer to
paragraph “TFT Display: Menus and
Settings” in chapter “Instrument
Cluster” of section “Dashboard
Instruments and Controls” for further
information. WARNING!
There may be a slight delay for AWD
engagement after a wheel slip
condition occurs.
NOTE:
If the A WD
system service warning
light and message appears after
engine start up, or during driving, it
means that the AWD system is not
functioning properly or is in recovery
mode due to overheating caused by
the excessive wheel spin. In this
condition the vehicle can continue
driving but only rear wheel drive is
working. If the warning light and
message are often activated, it is
recommended to have the vehicle
serviced at an Authorized Maserati
Dealer .Driving
5
243
Page 264 of 436
the position of the vehicle with little
suspension movements to ensure a
proper appearance.
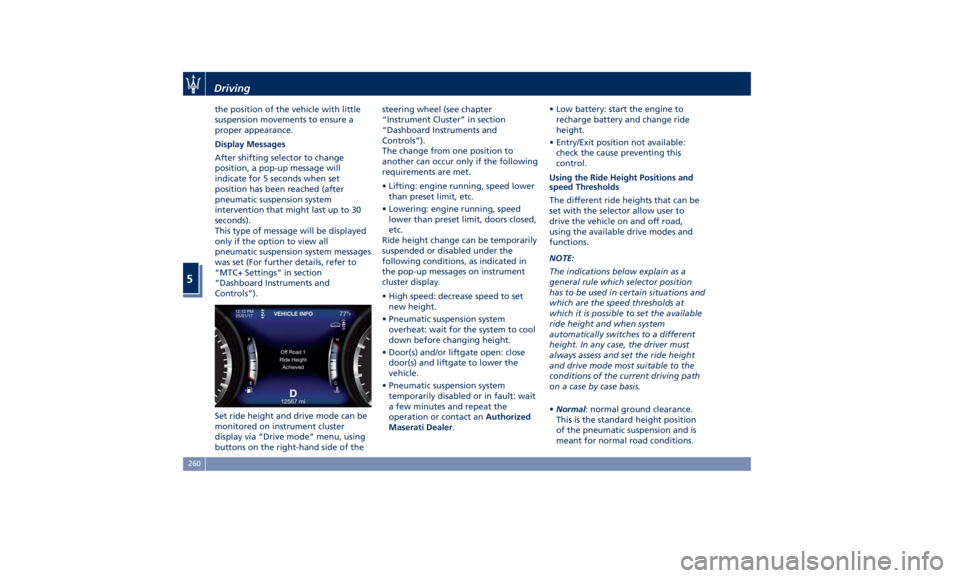
Display Messages
After shifting selector to change
position, a pop-up message will
indicate for 5 seconds when set
position has been reached (after
pneumatic suspension system
intervention that might last up to 30
seconds).
This type of message will be displayed
only if the option to view all
pneumatic suspension system messages
was set (For further details, refer to
“MTC+ Settings” in section
“Dashboard Instruments and
Controls”).
Set ride height and drive mode can be
monitored on instrument cluster
display via “Drive mode” menu, using
buttons on the right-hand side of the steering wheel (see chapter
“Instrument Cluster” in section
“Dashboard Instruments and
Controls”).
The change from one position to
another can occur only if the following
requirements are met.
• Lifting: engine running, speed lower
than preset limit, etc.
• Lowering: engine running, speed
lower than preset limit, doors closed,
etc.
Ride height change can be temporarily
suspended or disabled under the
following conditions, as indicated in
the pop-up messages on instrument
cluster display.
• High speed: decrease speed to set
new height.
• Pneumatic suspension system
overheat: wait for the system to cool
down before changing height.
• Door(s) and/or liftgate open: close
door(s) and liftgate to lower the
vehicle.
• Pneumatic suspension system
temporarily disabled or in fault: wait
a few minutes and repeat the
operation or contact an Authorized
Maserati Dealer . • Low battery: start the engine to
recharge battery and change ride
height.
• Entry/Exit position not available:
check the cause preventing this
control.
Using the Ride Height Positions and
speed Thresholds
The different ride heights that can be
set with the selector allow user to
drive the vehicle on and off road,
using the available drive modes and
functions.
NOTE:
The indications below explain as a
general rule which selector position
has to be used in certain situations and
which are the speed thresholds at
which it is possible to set the available
ride height and when system
automatically switches to a different
height. In any case, the driver must
always assess and set the ride height
and drive mode most suitable to the
conditions of the current driving path
on a case by case basis.
• Normal : normal ground clearance.
This is the standard height position
of the pneumatic suspension and is
meant for normal road conditions.Driving
5
260