2019 Hyundai Santa Fe engine
[x] Cancel search: enginePage 536 of 682
5-207
Driving your vehicle
5
When the clutch is overheated,
the safe protection mode
engages. If the safe protection
mode engages, the gear posi-
tion indicator on the cluster
blinks with a chime sound.
At this time, a warning message
will appear on the LCD display
and driving may not be smooth.
If you ignore this warning, the
driving condition may become
worse.
To return to normal driving con-
ditions, stop the vehicle on a flat
road and apply the foot brake for
a few minutes before driving off.Parking on hills
Generally, if you have a trailer
attached to your vehicle, you should
not park your vehicle on a hill.
However, if you ever have to park your
trailer on a hill, here's how to do it:
1. Pull the vehicle into the parking
space.
Turn the steering wheel in the
direction of the kerb (left if headed
down hill, right if headed up hill).
2. Shift the vehicle to P (Park, for
automatic transmission vehicle) or
neutral (for manual transmission
vehicle).
3. Set the parking brake and shut off
the vehicle.
4. Place wheel chocks under the
trailer wheels on the down hill side
of the wheels.
5. Start the vehicle, hold the brakes,
shift to neutral, release the park-
ing brake and slowly release the
brakes until the trailer chocks
absorb the load.6. Reapply the brakes and parking
brakes.
7. Move the shift lever to P (Park, for
automatic transmission vehicle) or
1st gear (for manual transmission
vehicle) when the vehicle is
parked on a uphill gradient and in
R (Reverse) on a downhill.
8. Shut off the vehicle and release
the vehicle brakes but leave the
parking brake set.
To prevent serious or fatal
injury:
•Do not get out of the vehicle
without the parking brake
firmly set. If you have left the
engine running, the vehicle
can move suddenly. You and
others could be seriously or
fatally injured.
•Do not apply the accelerator
pedal to hold the vehicle on
an uphill.
WARNING
Page 537 of 682
5-208
Driving your vehicle
Ready to leave after parking on
a hill
1. With the shift lever in P (Park, for
automatic transmission vehicle) or
neutral (for manual transmission
vehicle), apply your brakes and
hold the brake pedal down whilst
you:
• Start your engine;
• Shift into gear; and
• Release the parking brake.
2. Slowly remove your foot from the
brake pedal.
3. Drive slowly until the trailer is clear
of the chocks.
4. Stop and have someone pick up
and store the chocks.
Maintenance when towing a
trailer
Your vehicle will need service more
often when you regularly pull a trail-
er. Important items to pay particular
attention to include engine oil, auto-
matic transmission fluid, axle lubri-
cant and cooling system fluid. Brake
condition is another important item to
frequently check. If you're trailering,
it's a good idea to review these items
before you start your trip. Don't forget
to also maintain your trailer and tow-
bar. Follow the maintenance sched-
ule that accompanied your trailer and
check it periodically. Preferably, con-
duct the check at the start of each
day's driving. Most importantly, all
towbar nuts and bolts should be
tight.To prevent vehicle damage:
• Due to higher load during trailer
usage, overheating might occur
on hot days or during uphill driv-
ing. If the coolant gauge indi-
cates over-heating, switch off
the air conditioner and stop the
vehicle in a safe area to cool
down the engine.
• Do not switch off the engine
whilst the coolant gauge indi-
cates over-heating.
(Keep the engine idle to cool
down the engine)
• When towing check automatic
transmission fluid more fre-
quently.
• If your vehicle is not equipped
with an air conditioner, you
should install a condenser fan
to improve engine performance
when towing a trailer.
NOTICE
Page 539 of 682
What to do in an emergency
Hazard warning flasher ........................................6-2
In case of an emergency whilst driving .............6-2
If the engine stalls whilst driving ..................................6-2
If the engine stalls at a crossroad or crossing .........6-2
If you have a flat tyre whilst driving ..........................6-3
If the engine will not start ...................................6-3
If the engine doesn't turn over
or turns over slowly .........................................................6-3
If the engine turns over normally
but doesn't start ................................................................6-4
Jump starting ..........................................................6-4
If the engine overheats ........................................6-7
Tyre pressure monitoring system (TPMS) .........6-9
Check tyre pressure .........................................................6-9
Tyre pressure monitoring system ...............................6-10
Low tyre pressure telltale.............................................6-11
Low tyre pressure position telltale
and tyre pressure telltale..............................................6-11
TPMS (Tyre Pressure Monitoring System)
malfunction indicator .....................................................6-12
Changing a tyre with TPMS .........................................6-13
If you have a flat tyre (with spare tyre) .........6-15
Jack and tools ..................................................................6-15
Removing and storing the spare tyre ........................6-16
Changing tyres .................................................................6-17
Jack label ...........................................................................6-24
EC Declaration of conformity for Jack......................6-25
If you have a flat tyre
(with tyre mobility kit) ........................................6-26
Introduction ......................................................................6-26
Notes on the safe use of the Tyre Mobility Kit......6-27
Components of the Tyre Mobility Kit ........................6-28
Using the Tyre Mobility Kit...........................................6-29
Checking the tyre inflation pressure .........................6-31
Towing ...................................................................6-33
Towing service .................................................................6-33
Removable towing hook ................................................6-34
Emergency towing ..........................................................6-35
Emergency commodity ........................................6-37
Fire extinguisher .............................................................6-37
First aid kit ........................................................................6-37
Triangle reflector ............................................................6-37
Tyre pressure gauge ......................................................6-37
6
Page 540 of 682
6-2
What to do in an emergency
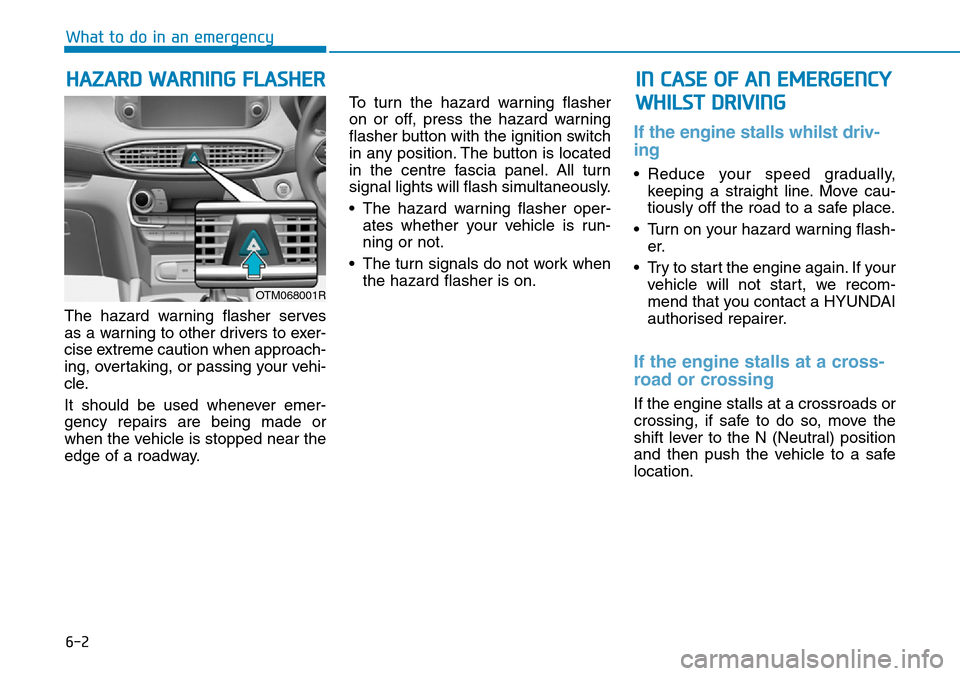
The hazard warning flasher serves
as a warning to other drivers to exer-
cise extreme caution when approach-
ing, overtaking, or passing your vehi-
cle.
It should be used whenever emer-
gency repairs are being made or
when the vehicle is stopped near the
edge of a roadway.To turn the hazard warning flasher
on or off, press the hazard warning
flasher button with the ignition switch
in any position. The button is located
in the centre fascia panel. All turn
signal lights will flash simultaneously.
• The hazard warning flasher oper-
ates whether your vehicle is run-
ning or not.
• The turn signals do not work when
the hazard flasher is on.
If the engine stalls whilst driv-
ing
• Reduce your speed gradually,
keeping a straight line. Move cau-
tiously off the road to a safe place.
• Turn on your hazard warning flash-
er.
• Try to start the engine again. If your
vehicle will not start, we recom-
mend that you contact a HYUNDAI
authorised repairer.
If the engine stalls at a cross-
road or crossing
If the engine stalls at a crossroads or
crossing, if safe to do so, move the
shift lever to the N (Neutral) position
and then push the vehicle to a safe
location.
HAZARD WARNING FLASHER IN CASE OF AN EMERGENCY
WHILST DRIVING
OTM068001R
Page 541 of 682

6-3
What to do in an emergency
6
If you have a flat tyre whilst
driving
If a tyre goes flat whilst you are driv-
ing:
• Take your foot off the accelerator
pedal and let the vehicle slow
down whilst driving straight ahead.
Do not apply the brakes immedi-
ately or attempt to pull off the road
as this may cause loss of vehicle
control resulting in an accident.
When the vehicle has slowed to
such a speed that it is safe to do
so, brake carefully and pull off the
road. Drive off the road as far as
possible and park on firm, level
ground. If you are on a divided
highway, do not park in the median
area between the two traffic lanes.• When the vehicle is stopped, press
the hazard warning flasher button,
move the shift lever into P (Park,
for automatic transmission vehicle)
or neutral (for manual transmission
vehicle), apply the parking brake,
and place the ignition switch in the
LOCK/OFF position.
• Have all passengers get out of the
vehicle. Be sure they all get out on
the side of the vehicle that is away
from traffic.
• When changing a flat tyre, follow
the instructions provided later in
this chapter.If the engine doesn't turn over
or turns over slowly
• Be sure the shift lever is in N
(Neutral) or P (Park) if it is auto-
matic transmission vehicle. The
engine starts only when the shift
lever is in N (Neutral) or P (Park).
• Check the battery connections to
be sure they are clean and tight.
• Turn on the interior light. If the light
dims or goes out when you operate
the starter, the battery is drained.
Do not push or pull the vehicle to start
it. This could cause damage to your
vehicle.See instructions for "Jump
Starting" provided in this chapter.
IF THE ENGINE WILL NOT
START
Push or pull starting the vehicle
may cause the catalytic con-
verter to overload which can
lead to damage to the emission
control system.
CAUTION
Page 542 of 682
6-4
What to do in an emergency
If the engine turns over nor-
mally but doesn't start
• Check the fuel level and add fuel if
necessary.
If the engine still does not start, we
recommend that you call a HYUNDAI
authorised repairer for assistance.Jump starting can be dangerous if
done incorrectly. Follow the jump
starting procedure in this section to
avoid serious injury or damage to
your vehicle. If in doubt about how to
properly jump start your vehicle, we
strongly recommend that you have a
service technician or towing service
do it for you.
JUMP STARTING
To prevent SERIOUS INJURY or
DEATH to you or bystanders,
always follow these precautions
when working near or handling
the battery:
Always read and follow
instructions carefully
when handling a battery.
Wear eye protection
designed to protect the
eyes from acid splashes.
Keep all flames, sparks,
or smoking materials
away from the battery.
WARNING
Hydrogen is always
present in battery cells,
is highly combustible,
and may explode if ignit-
ed.
Keep batteries out of
reach of children.
Batteries contain sulfu-
ric acid which is highly
corrosive. Do not allow
acid to contact your
eyes, skin or clothing.
If acid gets into your eyes, flush
your eyes with clean water for at
least 15 minutes and get imme-
diate medical attention. If acid
gets on your skin, thoroughly
wash the area. If you feel pain or
a burning sensation, get med-
ical attention immediately.
•When lifting a plastic-cased
battery, excessive pressure
on the case may cause battery
acid to leak. Lift with a battery
carrier or with your hands on
opposite corners.
Page 543 of 682
6-5
What to do in an emergency
6
To prevent damage to your vehi-
cle:
• Only use a 12-volt power supply
(battery or jumper system) to
jump start your vehicle.
• Do not attempt to jump start
your vehicle by push-starting.
Information
An inappropriately disposed
battery can be harmful to the
environment and human
health. Dispose the battery
according to your local law(s)
or regulations.
Jump starting procedure
1. Position the vehicles close enough
that the jumper cables will reach,
but do not allow the vehicles to
touch.
2. Avoid fans or any moving parts in
the engine compartment at all
times, even when the vehicles are
turned off.
3. Turn off all electrical devices such
as radios, lights, air conditioning,
etc. Put the vehicles in P (Park, for
automatic transmission vehicle) or
neutral (for manual transmission
vehicle), and set the parking
brakes. Turn both vehicles OFF.
i
NOTICE•Do not attempt to jump start
your vehicle if your battery is
frozen.
•NEVER attempt to recharge
the battery when the vehicle’s
battery cables are connected
to the battery.
•The electrical ignition system
works with high voltage.
NEVER touch these compo-
nents with the engine running
or when the ignition switch is
in the ON position.
•Do not allow the (+) and (-)
jumper cables to touch. It may
cause sparks.
•The battery may rupture or
explode when you jump start
with a low or frozen battery.
Pb
Page 544 of 682
6-6
What to do in an emergency
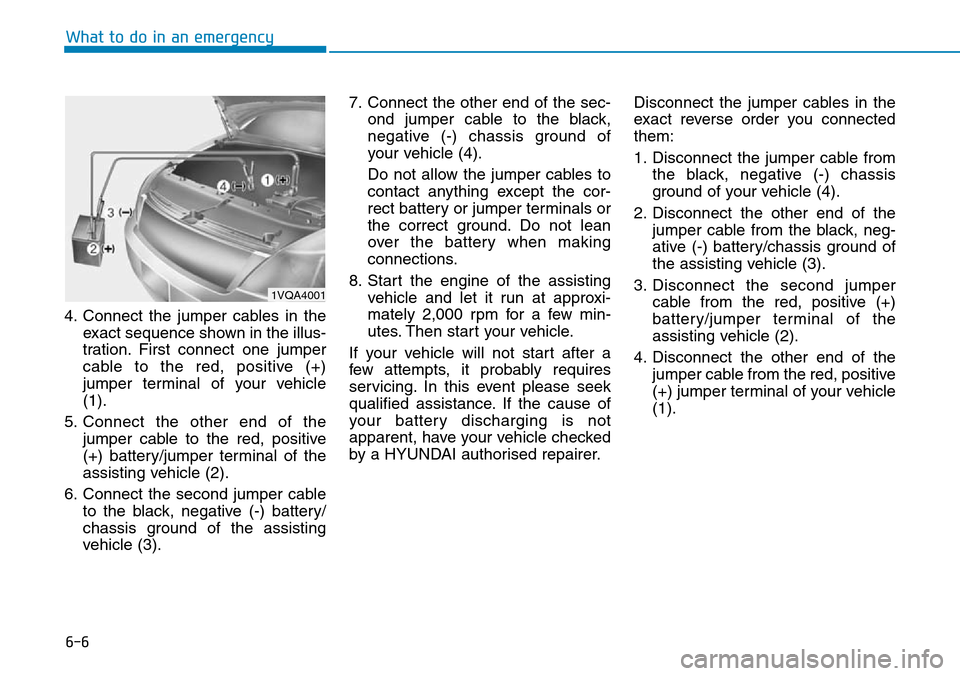
4. Connect the jumper cables in the
exact sequence shown in the illus-
tration. First connect one jumper
cable to the red, positive (+)
jumper terminal of your vehicle
(1).
5. Connect the other end of the
jumper cable to the red, positive
(+) battery/jumper terminal of the
assisting vehicle (2).
6. Connect the second jumper cable
to the black, negative (-) battery/
chassis ground of the assisting
vehicle (3).7. Connect the other end of the sec-
ond jumper cable to the black,
negative (-) chassis ground of
your vehicle (4).
Do not allow the jumper cables to
contact anything except the cor-
rect battery or jumper terminals or
the correct ground. Do not lean
over the battery when making
connections.
8. Start the engine of the assisting
vehicle and let it run at approxi-
mately 2,000 rpm for a few min-
utes. Then start your vehicle.
If your vehicle will not start after a
few attempts, it probably requires
servicing. In this event please seek
qualified assistance. If the cause of
your battery discharging is not
apparent, have your vehicle checked
by a HYUNDAI authorised repairer.Disconnect the jumper cables in the
exact reverse order you connected
them:
1. Disconnect the jumper cable from
the black, negative (-) chassis
ground of your vehicle (4).
2. Disconnect the other end of the
jumper cable from the black, neg-
ative (-) battery/chassis ground of
the assisting vehicle (3).
3. Disconnect the second jumper
cable from the red, positive (+)
battery/jumper terminal of the
assisting vehicle (2).
4. Disconnect the other end of the
jumper cable from the red, positive
(+) jumper terminal of your vehicle
(1).
1VQA4001