Page 377 of 727
375
uuCustomized Features u
Continued
Features
*1:Default Setting
Setup
GroupCustomizable FeaturesDescriptionSelectable Settings
Settings Display Change
Changes the display type. Audio
*1/
Clock/Wallpaper /
Current Drive /History of
Trip A
History of
Trip A
Delete History Resets the trip meter. Yes/No
Clock/
Wallpaper
Type Clock
Changes the clock display type. Analog
*1/Off
Wallpaper Select
Changes the wallpaper type. Blank*1/
Image 1/ Image 2/
Image 3
Import Imports an image file for a new wallpaper.
2
Wallpaper Setup P. 255—
Delete Deletes an image file for a wallpaper. Image 1/Image 2/ Image 3
Color Theme Changes the background color of the audio/
information screen. Blue
*1/
Red /Amber /Violet/
Bluegreen
Language Changes the display language. English
*1/Français /Español
Header Clock Display Selects whether the header clock display
comes on. On
*1/
Off
Clock Format Selects the digital clock display from 12H to
24H. 12h
*1/
24h
Page 390 of 727
388
uuCustomized Features u
Features
■List of customizable options
*1:Default Setting Setup
Group Customizable Features
DescriptionSelectable Settings
SystemDay & Time
Set
Date &
Time
Automatic
Date &
TimeSelects ON to have the GPS automatically adjust
the clock. Select OFF to cancel this function.ON*1/OFF
Set DateAdjusts date.
2 Adjusting the Clock P. 164—
Set TimeAdjusts clock.
2Adjusting the Clock P. 164—
Time
Zone
Automatic
Time Zone*
Sets the navigation system to automatically adjust
the clock when driving through different time
zones.
ON*1/ OFF
(Select time
zone)Changes the time zone manually.—
Auto Daylight Saving
TimeSelect ON to have the GPS automatically adjust the
clock to daylight savings time. Select OFF to cancel
this function.
ON*1/ OFF
Date FormatSets the date format.
MM/DD/YYYY*1/
DD/MM/YYYY /
YYYY/MM/DD
Time FormatSelects the digital clock display from 12H to 24H .12H*1/24H
* Not available on all models
Page 500 of 727

uuWhen Driving uTire Pressure Monitoring System (TPMS)
498
Driving
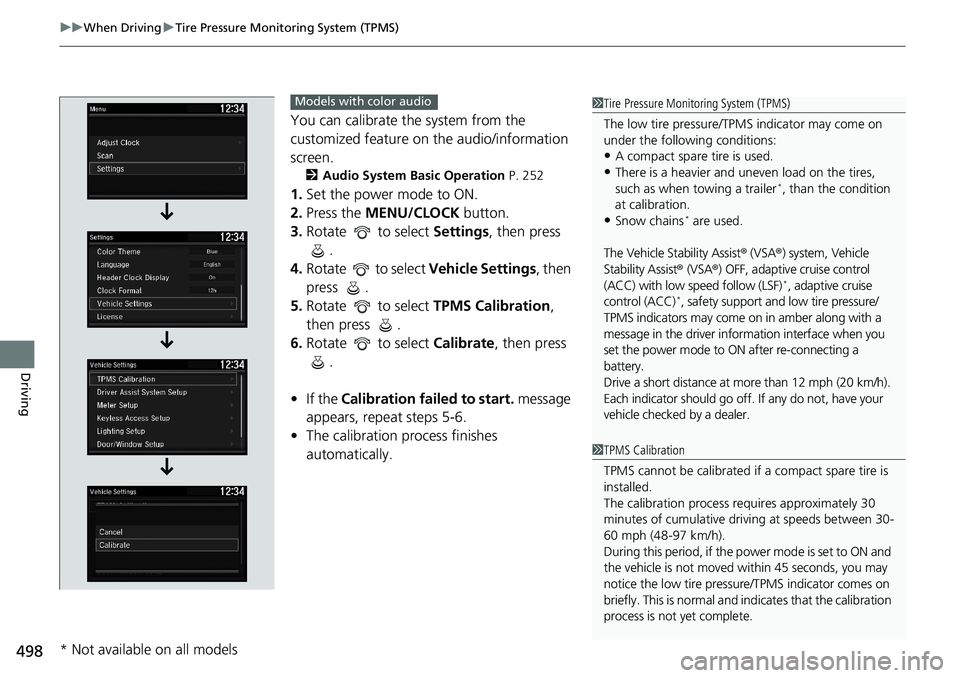
You can calibrate the system from the
customized feature on the audio/information
screen.
2 Audio System Basic Operation P. 252
1.Set the power mode to ON.
2. Press the MENU/CLOCK button.
3. Rotate to select Settings, then press
.
4. Rotate to select Vehicle Settings, then
press .
5. Rotate to select TPMS Calibration,
then press .
6. Rotate to select Calibrate, then press
.
• If the Calibration failed to start. message
appears, repeat steps 5-6.
• The calibration pr ocess finishes
automatically.
1 Tire Pressure Monitoring System (TPMS)
The low tire pressure/TPMS indicator may come on
under the following conditions:
•A compact spare tire is used.
•There is a heavier and une ven load on the tires,
such as when towing a trailer*, than the condition
at calibration.
•Snow chains* are used.
The Vehicle Stability Assist ® (VSA ®) system, Vehicle
Stability Assist® (VSA®) OFF, adaptive cruise control
(ACC) with low speed follow (LSF)
*, adaptive cruise
control (ACC)*, safety support and low tire pressure/
TPMS indicators may come on in amber along with a
message in the driver info rmation interface when you
set the power mode to ON after re-connecting a
battery.
Drive a short distance at mo re than 12 mph (20 km/h).
Each indicator should go off. If any do not, have your
vehicle checked by a dealer.
1 TPMS Calibration
TPMS cannot be calibrated if a compact spare tire is
installed.
The calibration process requires approximately 30
minutes of cumulative driv ing at speeds between 30-
60 mph (48-97 km/h).
During this period, if the pow er mode is set to ON and
the vehicle is not moved wi thin 45 seconds, you may
notice the low tire pressu re/TPMS indicator comes on
briefly. This is normal and indicates that the calibration
process is not yet complete.
Models with color audio
* Not available on all models
Page 623 of 727

621
uuMaintenance Under the Hood uChanging the Engine Oil and Oil Filter
Continued
Maintenance
Changing the Engine Oil and Oil Filter
You must change the engine oil and oil fi lter regularly in order to maintain the
engine’s lubrication. The engine may be damaged if they are not changed regularly.
Change the oil and filter in accordance with the maintenance message on the driver
information interface. 1.Run the engine until it reaches normal
operating temperature, and then turn the
engine off.
2. Open the hood and remove the engine oil
fill cap.
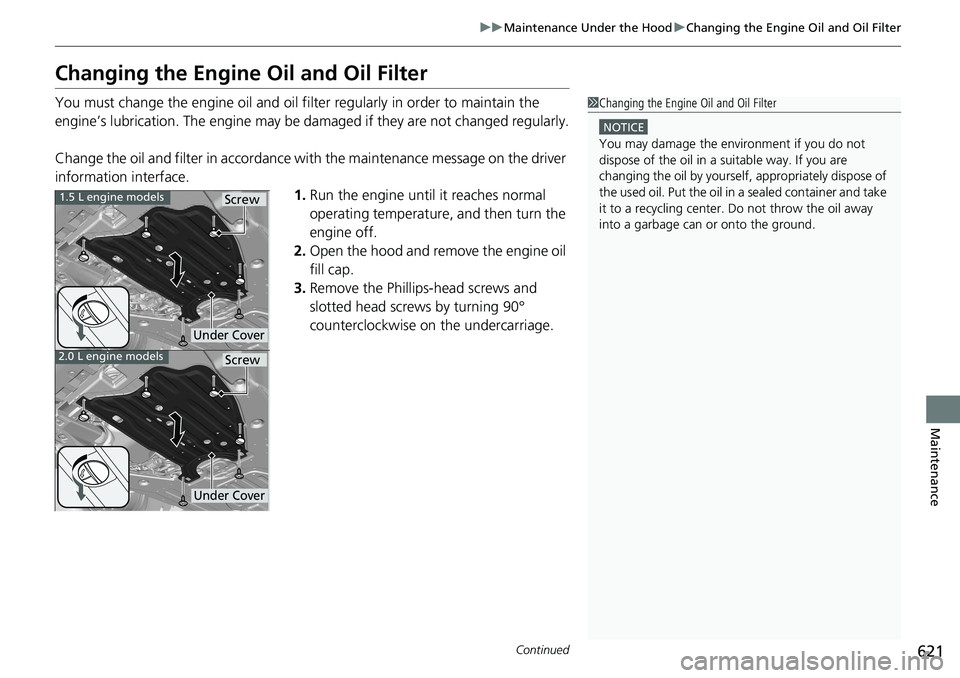
3. Remove the Phillips-head screws and
slotted head screws by turning 90°
counterclockwise on the undercarriage.1Changing the Engine Oil and Oil Filter
NOTICE
You may damage the environment if you do not
dispose of the oil in a suitable way. If you are
changing the oil by yourself , appropriately dispose of
the used oil. Put the oil in a sealed container and take
it to a recycling center. Do not throw the oil away
into a garbage can or onto the ground.
1.5 L engine models
2.0 L engine models
Under Cover
Screw
Under Cover
Screw
Page 628 of 727
uuMaintenance Under the Hood uEngine Coolant
626
Maintenance
1. Make sure the engine and radiator are
cool.
2. Turn the radiator cap 1/8 turn counter-
clockwise and relieve any pressure in the
cooling system.
3. Push down and turn the radiator cap
counterclockwise to remove it.
4. The coolant level should be up to the base
of the filler neck. Add coolant if it is low.
5. Put the radiator cap back on, and tighten it
fully.
■Radiator1Radiator
NOTICE
Pour the fluid slowly and ca refully so you do not spill
any. Clean up any spills immediately; they can
damage components in the engine compartment.Radiator Cap
Page 634 of 727

uuReplacing Light Bulbs uHeadlight Bulbs
632
Maintenance
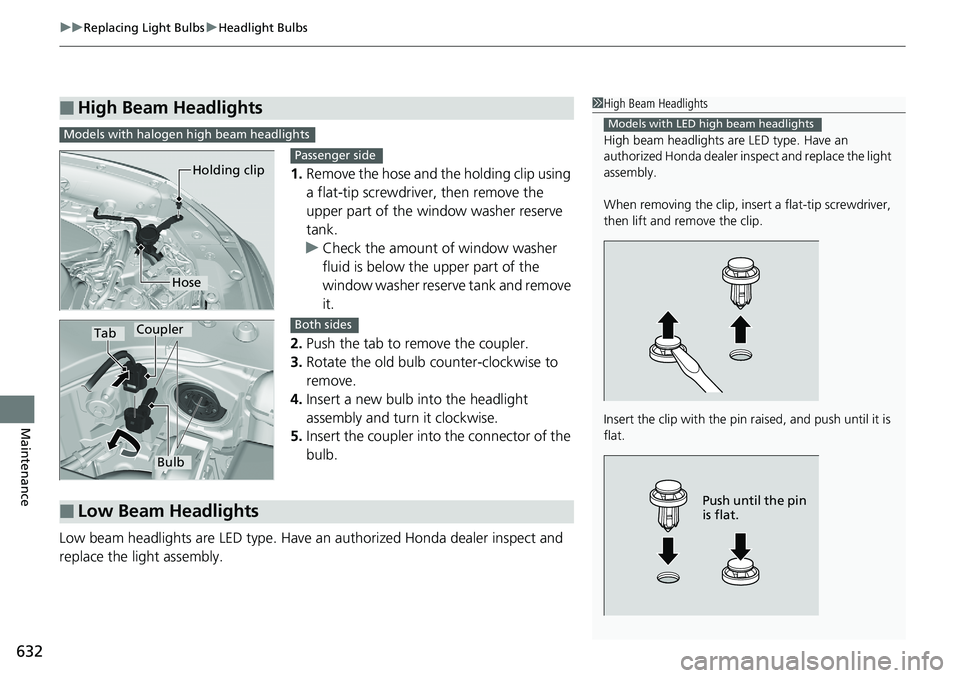
1. Remove the hose and the holding clip using
a flat-tip screwdriver, then remove the
upper part of the window washer reserve
tank.
u Check the amount of window washer
fluid is below the upper part of the
window washer reserve tank and remove
it.
2. Push the tab to remove the coupler.
3. Rotate the old bulb counter-clockwise to
remove.
4. Insert a new bulb into the headlight
assembly and turn it clockwise.
5. Insert the coupler into the connector of the
bulb.
Low beam headlights are LED type. Have an authorized Honda dealer inspect and
replace the light assembly.
■High Beam Headlights1 High Beam Headlights
High beam headlights ar e LED type. Have an
authorized Honda dealer in spect and replace the light
assembly.
When removing the clip, insert a flat-tip screwdriver,
then lift and remove the clip.
Insert the clip with the pin raised, and push until it is
flat.
Models with LED high beam headlights
Push until the pin
is flat.
Models with halogen high beam headlights
Holding clip
Hose
Passenger side
TabCoupler
Bulb
Both sides
■Low Beam Headlights
Page 637 of 727
635
uuReplacing Light Bulbs uBrake, Taillight, Rear Side Marker Lights and Rear Turn Signal Light Bulbs
Maintenance
4. Turn the socket co unter-clockwise and
remove it.
5. Push and turn the ol d bulb clockwise and
remove it, and insert a new bulb.
Bulb
Socket
Page 638 of 727
636
uuReplacing Light Bulbs uTaillight, Brake Light* and Back-Up Light Bulbs
Maintenance
Taillight, Brake Light* and Back-Up Light Bulbs
When replacing, use the following bulbs.
1.Remove the holding clips using a flat-tip
screwdriver, then pull the lining back.
2. Turn the socket counter-clockwise and
remove it.
3. Remove the old bulb and insert a new bulb.
Taillight: LED
Brake Light*: LED
Back-Up Light: 16 W
1 Taillight, Brake Light* and Back-Up Light Bulbs
Taillights and brake lights
* are LED type. Have an
authorized Honda dealer in spect and replace the light
assembly.
When removing the clip, insert a flat-tip screwdriver,
then lift and remove the clip.
Insert the clip with the pin raised, and push until it is flat.
Clip
Push until the
pin is flat.
Holding Clip
BulbSocket
Driver side
* Not available on all models