Page 4 of 727

Contents
This owner’s manual should be considered a permanent part of the
vehicle and should remain with the vehicle when it is sold.
This owner’s manual covers all models of your vehicle. You may find
descriptions of equipment and features that are not on your
particular model.
Images throughout this owner’s manual (including the front cover)
represent features and equipment that are available on some, but
not all, models. Your particular mo del may not have some of these
features.
This owner’s manual is for vehicles sold in the United States and
Canada.
The information and specifications in cluded in this publication were
in effect at the time of approval for printing. Honda Motor Co., Ltd.
reserves the right, however, to discontinue or change specifications
or design at any time without notice and without incurring any
obligation.2 Safe Driving P. 33
For Safe Driving P. 34 Seat Belts P. 38 Airbags P. 45
2Instrument Panel P. 77
Indicators P. 78 Gauges and Displays P. 137
2Controls P. 163
Clock P. 164 Locking and Unlocking the Doors P. 166
Opening and Closing the Moonroof* P. 189
Adjusting the Seats P. 210
2 Features P. 243
Audio System P. 244 Audio System Basic Operation P. 252, 273
Customized Features P. 370, 381 HomeLink® Universal Transceiver* P. 400
2Driving P. 453
Before Driving P. 454 Towing a Trailer P. 459
Multi-View Rear Camera P. 594 Refueling P. 597
2Maintenance P. 603
Before Performing Maintenance P. 604 Maintenance MinderTM P. 607
Checking and Maintaining Wiper Blades P. 639
Climate Control System Maintenance P. 654
2Handling the Unexpected P. 663
Tools P. 664 If a Tire Goes Flat P. 665
Overheating P. 679 Indicator, Coming On/Blinking P. 681
When You Cannot Op en the Trunk P. 695
2Information P. 699
Specifications P. 700 Identification Numbers P. 704
Emissions Testing P. 707 Warranty Coverages P. 709
Page 14 of 727
12
Quick Reference Guide
Controls (P 163)
Clock (P164)
aPress the MENU/CLOCK button.
bSelect Adjust Clock, then press .
cRotate to adjust the hours.
dPress to switch to minute
adjustment.
eRotate to adjust the minutes.
fPress to switch to Set.
gPress to complete clock adjustment.
Models with color audio
To adjust time
To adjust date
aPress , then select Settings .
bSelect System , then Day & Time .
cSelect Set Date & Time .
dSelect Automatic Date & Time , then
select OFF.
Models with Display AudioeSelect Set Date or Set Time .
fAdjust the dates, hours and minutes by
selecting / .
gSelect Save to set the date or time.
The navigation system receives signals from
GPS satellites, updating the clock
automatically.
ENGINE START/STOP
Button
(P190)
Press the button to change the vehicle’s
power mode.
34
Models with navigation system
Page 20 of 727
18
Quick Reference Guide
Audio System (P 252, 273)
(P 252)Models with color audio
(Seek/Skip) Button
Selector Knob
(Day/Night) ButtonVOL
/ (Volume/Power) Knob
RADIO Button
(Sound) Button
Preset Buttons (1-6)
(Seek/Skip) Button
MEDIA
Button
MENU/CLOCK Button
(Phone) Button
(Back) Button
Audio/Information Screen
Page 21 of 727
19
Quick Reference Guide
(Home) Button
(Audio) Button
(Back) Button
Audio/Information Screen
(P273)
For navigation system operation () See the Navigation System Manual
Models with Display Audio
(Phone) Button
(Day/Night) Button
(Seek/Skip) Button
(Seek/Skip) Button
VOL/ (Volume/Power)
Knob
Selector Knob SOURCE Button
(Clock) Button*/ (Map) Button*
* Not available on all models
Page 165 of 727

163
Controls
This chapter explains how to operate the various controls necessary for driving.
Clock.................................................. 164
Locking and Unlocking the Doors
Key Types and Functions .................. 166
Low Remote Signal Strength ............ 168
Locking/Unlocking the Doors from the Outside .......................................... 169
Locking/Unlocking the Doors from the
Inside ............................................. 176
Childproof Door Locks ..................... 178
Auto Door Locking/Unlocking .......... 179
Opening and Closing the Trunk ....... 180
Security System
Immobilizer System .......................... 183
Security System Alarm ...................... 184
Opening and Closing the Windows ..... 186
Opening and Closing the Moonroof*..... 189Operating the Switches Around the
Steering Wheel ENGINE START/STOP Button............. 190
Turn Signals ..................................... 193
Light Switches.................................. 193
Fog Lights
*...................................... 195
Daytime Running Lights ................... 196
Auto High-Beam .............................. 197
Wipers and Washers ........................ 200
Rear Defogger/Heat ed Door Mirror
*
Button ........................................... 202 Heated Windshield Button ............... 202
Brightness Control ........................... 203
Driving Position Memory System
*.... 205
Adjusting the Steering Wheel .......... 207
Adjusting the Mirrors Interior Rearview Mirror ................... 208
Power Door Mirrors ......................... 209
Adjusting the Seats .......................... 210
Interior Lights/Interior Convenience
Items ................................................ 221
Climate Control System Using Automatic Climate Control .... 239
Automatic Climate Control Sensors ... 242
Canadian models
* Not available on all models
Page 166 of 727
164
Controls
Clock
Adjusting the Clock
You can adjust the time manually in the audio/information screen, with the power
mode in ON.
1.Press the MENU/CLOCK button.
2. Select Adjust Clock , then press .
3. Rotate to adjust the hours.
4. Press to switch to minute adjustment.
5. Rotate to adjust the minutes.
6. Press to switch to Set.
7. Press to complete clock adjustment.
■Adjusting the Time
1Clock
The clock is automatica lly updated through the
navigation system, so the ti me does not need to be
adjusted.
These indications are used to show how to operate
the selector knob.
Rotate to select.
Press to enter.
You can customize the clock display to show the 12
hour clock or 24 hour clock. 2 Customized Features P. 370
You can turn the clock display on and off. 2 Customized Features P. 370
Models with navigation system
Models with color audioMENU/CLOCK Button
Selector KnobModels with color audio
Page 167 of 727

165
uuClock uAdjusting the Clock
Controls
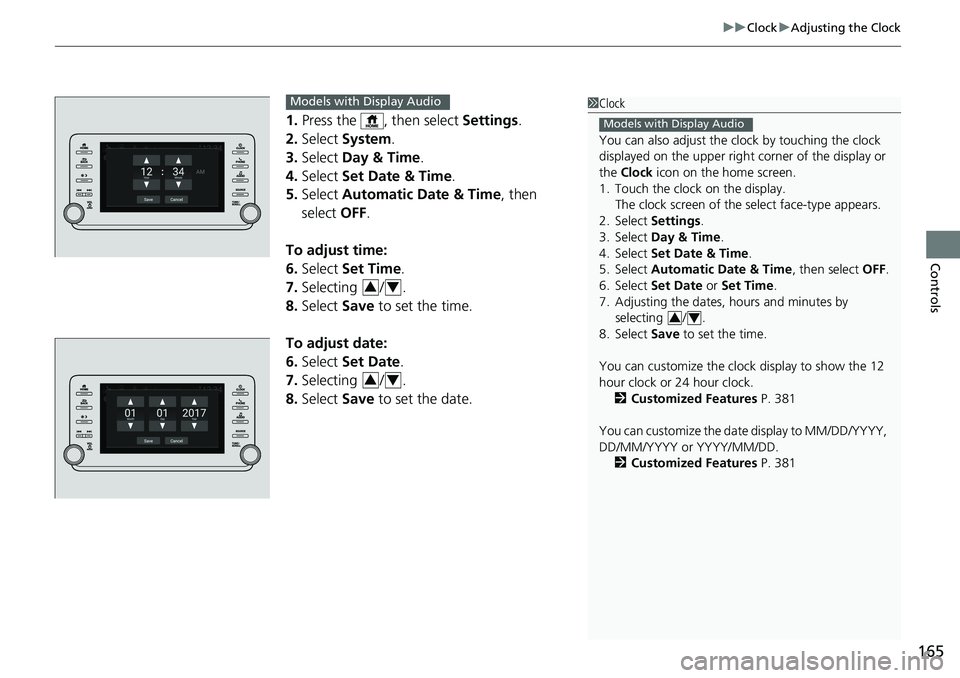
1. Press the , then select Settings.
2. Select System.
3. Select Day & Time.
4. Select Set Date & Time .
5. Select Automatic Date & Time , then
select OFF.
To adjust time:
6. Select Set Time.
7. Selecting / .
8. Select Save to set the time.
To adjust date:
6. Select Set Date.
7. Selecting / .
8. Select Save to set the date.
1Clock
You can also adjust the clock by touching the clock
displayed on the upper right corner of the display or
the Clock icon on the home screen.
1. Touch the clock on the display.
The clock screen of the select face-type appears.
2. Select Settings .
3. Select Day & Time.
4. Select Set Date & Time .
5. Select Automatic Date & Time , then select OFF.
6. Select Set Date or Set Time.
7. Adjusting the dates, hours and minutes by selecting / .
8. Select Save to set the time.
You can customize the clock display to show the 12
hour clock or 24 hour clock.
2 Customized Features P. 381
You can customize the date display to MM/DD/YYYY,
DD/MM/YYYY or YYYY/MM/DD. 2 Customized Features P. 381
Models with Display Audio
34
Models with Display Audio
34
34
Page 254 of 727

252
Features
Audio System Basic Operation
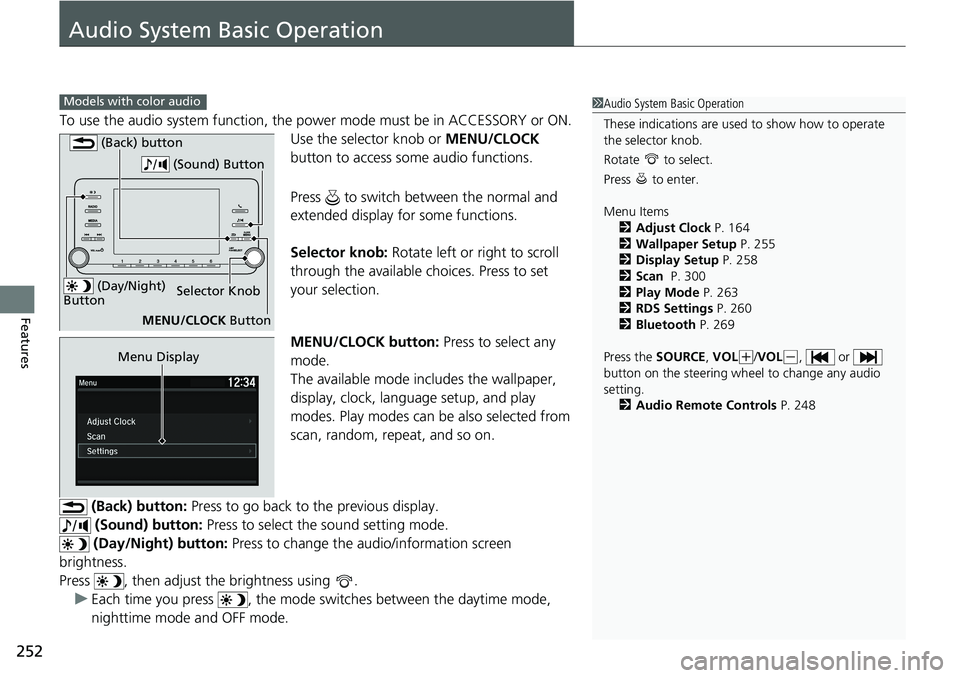
To use the audio system function, the power mode must be in ACCESSORY or ON.
Use the selector knob or MENU/CLOCK
button to access some audio functions.
Press to switch between the normal and
extended display fo r some functions.
Selector knob: Rotate left or right to scroll
through the available ch oices. Press to set
your selection.
MENU/CLOCK button: Press to select any
mode.
The available mode includes the wallpaper,
display, clock, langu age setup, and play
modes. Play modes can be also selected from
scan, random, repeat, and so on.
(Back) button: Press to go back to the previous display.
(Sound) button: Press to select the sound setting mode.
(Day/Night) button: Press to change the audio/information screen
brightness.
Press , then adjust the brightness using . u Each time you press , the mode sw itches between the daytime mode,
nighttime mode and OFF mode.
Models with color audio1 Audio System Basic Operation
These indications are used to show how to operate
the selector knob.
Rotate to select.
Press to enter.
Menu Items
2 Adjust Clock P. 164
2 Wallpaper Setup P. 255
2 Display Setup P. 258
2 Scan P. 300
2 Play Mode P. 263
2 RDS Settings P. 260
2 Bluetooth P. 269
Press the SOURCE, VOL
(+/VOL(-, or
button on the steering whee l to change any audio
setting. 2 Audio Remote Controls P. 248
(Day/Night)
ButtonSelector Knob
MENU/CLOCK Button
(Back) button
(Sound) Button
Menu Display