Page 279 of 727

Continued277
uuAudio System Basic Operation uAudio/Information Screen
Features
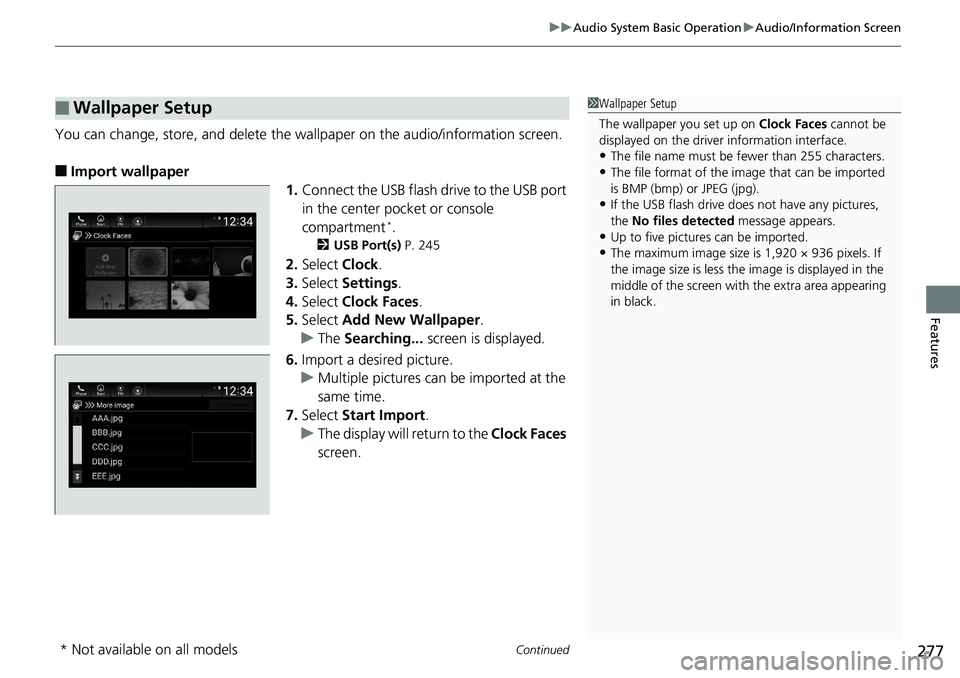
You can change, store, and delete the wa llpaper on the audio/information screen.
■Import wallpaper
1.Connect the USB flash drive to the USB port
in the center pocket or console
compartment
*.
2 USB Port(s) P. 245
2.Select Clock.
3. Select Settings .
4. Select Clock Faces .
5. Select Add New Wallpaper .
u The Searching... screen is displayed.
6. Import a desired picture.
u Multiple pictures can be imported at the
same time.
7. Select Start Import .
u The display will return to the Clock Faces
screen.
■Wallpaper Setup1 Wallpaper Setup
The wallpaper you set up on Clock Faces cannot be
displayed on the driver information interface.
•The file name must be fewer than 255 characters.
•The file format of the im age that can be imported
is BMP (bmp) or JPEG (jpg).
•If the USB flash drive doe s not have any pictures,
the No files detected message appears.
•Up to five pictur es can be imported.
•The maximum image size is 1,920 × 936 pixels. If
the image size is less the image is displayed in the
middle of the screen with the extra area appearing
in black.
* Not available on all models
Page 280 of 727
uuAudio System Basic Operation uAudio/Information Screen
278
Features
■Select wallpaper
1. Select Clock.
2. Select Settings .
3. Select Clock Faces .
4. Select a desired wallpaper.
5. Select Set.
u The display will return to the Clock Faces screen.
■To view wallpaper once it is set
1. Press the button.
2. Select Clock.
■Delete wallpaper
1. Select Clock.
2. Select Settings .
3. Select Clock Faces .
4. Select a desired wallpaper.
5. Select Delete.
6. Select Yes.
u The display will return to the Clock Faces screen.
1Wallpaper Setup
You cannot delete the in itial imported wallpapers.
Page 336 of 727

uuAudio System Basic Operation uNear Field Communication (NFC)*
334
Features
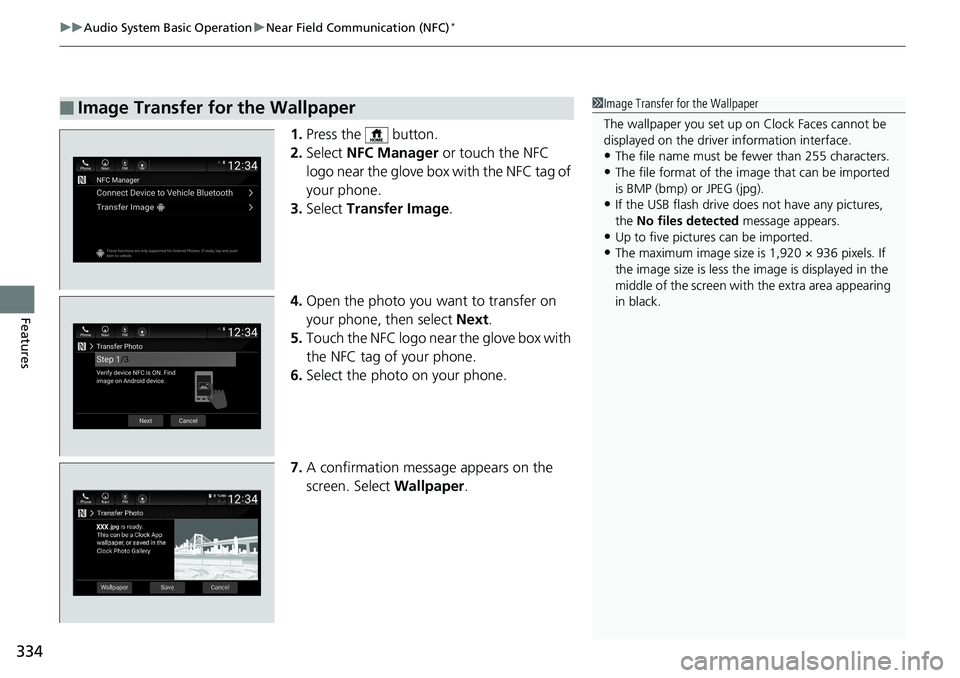
1. Press the button.
2. Select NFC Manager or touch the NFC
logo near the glove box with the NFC tag of
your phone.
3. Select Transfer Image .
4. Open the photo you want to transfer on
your phone, then select Next.
5. Touch the NFC logo near the glove box with
the NFC tag of your phone.
6. Select the photo on your phone.
7. A confirmation message appears on the
screen. Select Wallpaper.
■Image Transfer for the Wallpaper1Image Transfer for the Wallpaper
The wallpaper you set up on Clock Faces cannot be
displayed on the driver information interface.
•The file name must be fewer than 255 characters.
•The file format of the im age that can be imported
is BMP (bmp) or JPEG (jpg).
•If the USB flash drive doe s not have any pictures,
the No files detected message appears.
•Up to five pictur es can be imported.
•The maximum image size is 1,920 × 936 pixels. If
the image size is less the image is displayed in the
middle of the screen with the extra area appearing
in black.
Page 366 of 727
364
uuGeneral Information on the Audio System uAbout Open Source Licenses
Features
About Open Source Licenses
To see the open source license information, follow these steps.
1. Press the MENU/CLOCK button.
2. Rotate to select Settings, then press .
3. Rotate to select License, then press .
1. Press the button.
2. Select Settings .
3. Select System .
4. Select About .
5. Select Legal Information .
6. Select License .1About Open Source Licenses
Free/Open Source Software Information
This product contains Free/Open Source
Software(FOSS).
The license information and/ or the source code of
such FOSS can be found at the following URL.
https://www.denso.com/global/en/opensource/tcu/
honda/
Models with Telematics Control UnitModels with color audio
Models with Display Audio
Page 372 of 727
370
Features
Customized Features
Use the audio/information screen to customize certain features.
■How to customize
While the vehicle is at a complete stop with the power mode in ON, press the
MENU/CLOCK button, then select Settings. To customize the phone settings,
press the button, then select Phone Setup.
1Customized Features
When you customize settings:
•Make sure that the vehicle is at a complete stop.
•Shift to (P.
Models with color audio
1 How to customize
These indications are used to show how to operate
the selector knob.
Rotate to select.
Press to enter.
To customize other features, select Settings, rotate
, and press .
2 List of customizable options P. 388
Audio/Information Screen
(Phone) Button
Page 373 of 727
371
uuCustomized Features u
Continued
Features
■Customization Flow
Press the MENU/CLOCK button.
Adjust Clock
Settings
Bluetooth SetupAdd New Device
Connect an Audio Device
Display AdjustmentBrightness
Contrast
Black Level
Rear CameraFixed Guideline
RDS Settings*1RDS Information
Radio Text
*1 : FM mode
Dynamic Guideline
Display ChangeAudio
Current Drive
History of Trip A
Clock/Wallpaper
History of Trip ADelete History
Clock/Wallpaper TypeClock
Wallpaper
Page 374 of 727
372
uuCustomized Features u
Features
Color ThemeBlue
Red
Amber
Violet
Language
Clock Format12h
24h
License
Bluegreen
Header Clock DisplayOn
Off
Vehicle SettingsTPMS Calibration
Driver Assist System Setup
Meter Setup
Default
Lighting Setup
Door/Window Setup
Page 376 of 727

374
uuCustomized Features u
Features
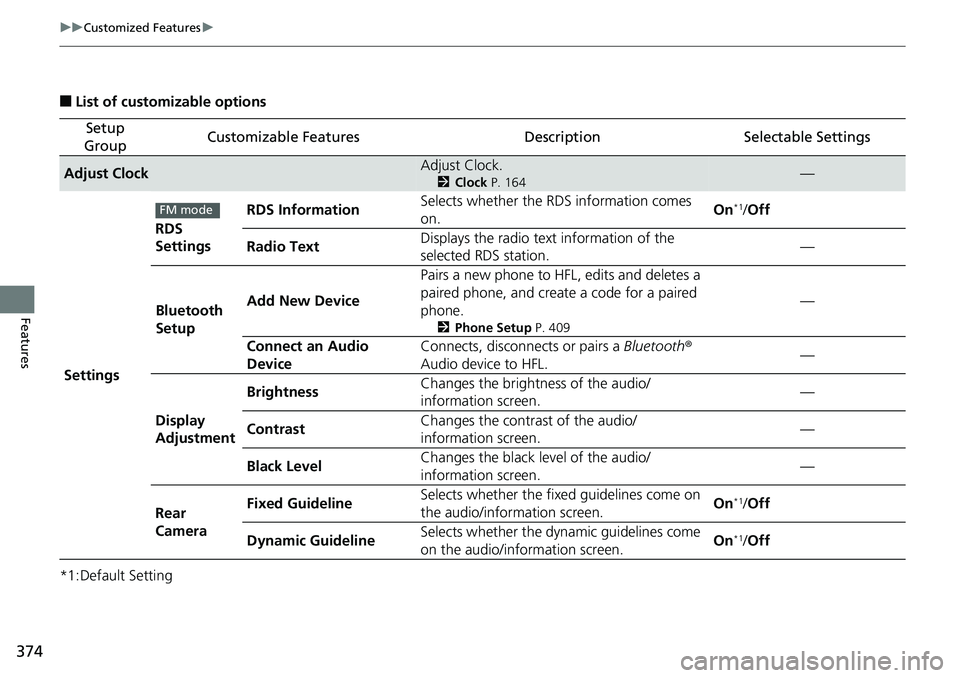
■List of customizable options
*1:Default Setting
Setup
GroupCustomizable FeaturesDescriptionSelectable Settings
Adjust ClockAdjust Clock.
2 Clock P. 164—
Settings RDS
Settings
RDS Information
Selects whether the RDS information comes
on. On
*1/
Off
Radio Text Displays the radio text information of the
selected RDS station. —
Bluetooth
Setup Add New Device
Pairs a new phone to HFL, edits and deletes a
paired phone, and create a code for a paired
phone.
2
Phone Setup P. 409
—
Connect an Audio
Device Connects, disconnects or pairs a
Bluetooth®
Audio device to HFL. —
Display
Adjustment Brightness
Changes the brightness of the audio/
information screen. —
Contrast Changes the contrast of the audio/
information screen.
—
Black Level Changes the black level of the audio/
information screen. —
Rear
Camera Fixed Guideline
Selects whether the fixed guidelines come on
the audio/information screen. On
*1/
Off
Dynamic Guideline Selects whether the dy
namic guidelines come
on the audio/information screen. On
*1/
Off
FM mode