2019 DODGE GRAND CARAVAN technical specifications
[x] Cancel search: technical specificationsPage 3 of 490

TABLE OF CONTENTSSECTIONPAGE
1INTRODUCTION
...................................................................3
2GRAPHICAL TABLE OF CONTENTS
......................................................7
3GETTING TO KNOW YOUR VEHICLE
...................................................13
4GETTING TO KNOW YOUR INSTRUMENT PANEL
.........................................129
5SAFETY
........................................................................\
157
6STARTING AND OPERATING
.........................................................239
7IN CASE OF EMERGENCY
...........................................................285
8SERVICING AND MAINTENANCE
.....................................................333
9TECHNICAL SPECIFICATIONS
........................................................387
10MULTIMEDIA
....................................................................401
11CUSTOMER ASSISTANCE
............................................................465
12INDEX
........................................................................\
..471
1
2
3
4
5
6
7
8
9
10 11
12
Page 89 of 490

Summer Operation
The engine cooling system must be protected with a
high-quality antifreeze coolant to provide proper corrosion
protection and to protect against engine overheating. OAT
coolant (conforming to MS.90032) is recommended. Refer
to “Fluids And Lubricants” in “Technical Specifications”
for proper coolant selection.
Winter Operation
To ensure the best possible heater and defroster perfor-
mance, make sure the engine cooling system is functioning
properly and the proper amount, type, and concentration
of coolant is used. Refer to “Fluids And Lubricants” in
“Technical Specifications” for proper coolant selection. Use
of the air Recirculation mode during Winter months is not
recommended, because it may cause window fogging.
Vacation/Storage
Before you store your vehicle, or keep it out of service (i.e.,
vacation) for two weeks or more, run the air conditioning
system at idle for about five minutes, in fresh air with the
blower setting on high. This will ensure adequate system
lubrication to minimize the possibility of compressor dam-
age when the system is started again.
Window Fogging
Vehicle windows tend to fog on the inside in mild, rainy,
and/or humid weather. To clear the windows, select De-
frost or Mix mode and increase the front blower speed. Do
not use the Recirculation mode without A/C for long
periods, as fogging may occur.
CAUTION!
Failure to follow these cautions can cause damage to
the heating elements:
•Use care when washing the inside of the rear win-
dow. Do not use abrasive window cleaners on the
interior surface of the window. Use a soft cloth and a
mild washing solution, wiping parallel to the heat-
ing elements. Labels can be peeled off after soaking
with warm water.
• Do not use scrapers, sharp instruments, or abrasive
window cleaners on the interior surface of the win-
dow.
• Keep all objects a safe distance from the window.
3
GETTING TO KNOW YOUR VEHICLE 87
Page 257 of 490

WARNING!
Fluid level should be checked on a level surface and
with the engine off to prevent injury from moving
parts and to ensure accurate fluid level reading. Do not
overfill. Use only manufacturer’s recommended power
steering fluid.
CAUTION!
Do not use chemical flushes in your power steering
system as the chemicals can damage your power steer-
ing components. Such damage is not covered by the
New Vehicle Limited Warranty.
If necessary, add fluid to restore to the proper indicated
level. With a clean cloth, wipe any spilled fluid from all
surfaces. Refer to “Fluids And Lubricants” in “Technical
Specifications” for the correct fluid type.
SPEED CONTROL — IF EQUIPPED
When engaged, the Speed Control takes over accelerator
operations at speeds greater than 25 mph (40 km/h).
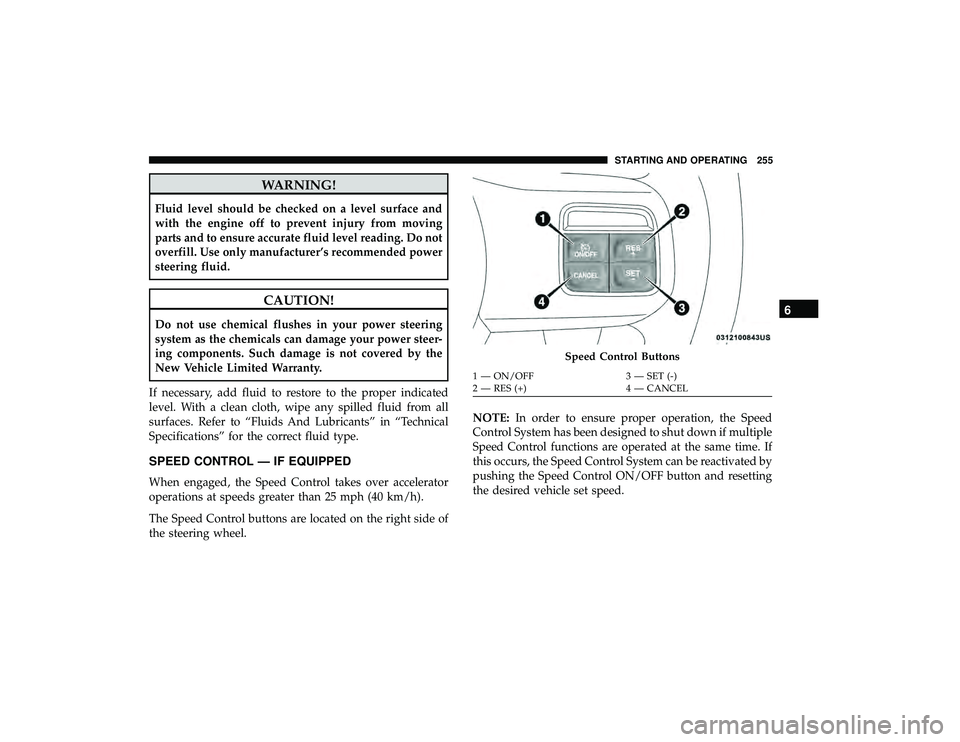
The Speed Control buttons are located on the right side of
the steering wheel. NOTE:
In order to ensure proper operation, the Speed
Control System has been designed to shut down if multiple
Speed Control functions are operated at the same time. If
this occurs, the Speed Control System can be reactivated by
pushing the Speed Control ON/OFF button and resetting
the desired vehicle set speed.
Speed Control Buttons
1 — ON/OFF 3 — SET (-)
2 — RES (+) 4 — CANCEL
6
STARTING AND OPERATING 255
Page 311 of 490

WARNING!
To avoid the risk of forcing the vehicle off the jack, do
not tighten the wheel nuts fully until the vehicle has
been lowered. Failure to follow this warning may
result in serious injury.
NOTE: Do not install the wheel cover on the compact
spare.
7. Lower the vehicle by turning the jack screw to the left. 8. Finish tightening the lug nuts. Push down on the
wrench while at the end of the handle for increased
leverage. Tighten the lug nuts in a star pattern until each
nut has been tightened twice. For correct lug nut torque
refer to “Torque Specifications” in “Technical Specifica-
tions”. If in doubt about the correct tightness, have them
checked with a torque wrench by your authorized
dealer or at a service station.
9. Lower the jack to its fully-closed position.
WARNING!
A loose tire or jack thrown forward in a collision or
hard stop could endanger the occupants of the vehicle.
Always stow the jack parts and the spare tire in the
places provided. Have the deflated (flat) tire repaired
or replaced immediately.
10. Place the deflated (flat) tire and compact spare tire cover assembly in the rear cargo area. Do not stow the
deflated tire in the compact spare tire location. Have
the full-sized tire repaired or replaced, as soon as
possible.Mounting Compact Spare Tire
7
IN CASE OF EMERGENCY 309
Page 314 of 490

3. Align the valve notch in the wheel cover with the valvestem on the wheel. Install the cover by hand, snapping
the cover over the two lug nuts. Do not use a hammer or
excessive force to install the cover.
4. Install the remaining lug nuts with the cone shaped end of the nut toward the wheel. Lightly tighten all the lug
nuts until the wheel sits flush onto the hub and there is
no play. The nuts will have to be fully tightened once the vehicle is lowered. Tightening an improperly seated
wheel under vehicle load can damage the threads, cause
vibration, and undermine safety.
WARNING!
To avoid the risk of forcing the vehicle off the jack, do
not tighten the wheel nuts fully until the vehicle has
been lowered. Failure to follow this warning may
result in serious injury.
5. Lower the vehicle to the ground by turning the jack handle counterclockwise.
6. Finish tightening the lug nuts. Push down on the wrench while at the end of the handle for increased
leverage. Tighten the lug nuts in a star pattern until each
nut has been tightened twice. Refer to “Torque Specifi-
cations” in “Technical Specifications” for proper wheel
lug nut torque. If in doubt about the correct tightness,
have them checked with a torque wrench by an autho-
rized dealer or at a service station.
7. After 25 miles (40 km) check the lug nut torque with a torque wrench to ensure that all lug nuts are properly
seated against the wheel.
Tire And Wheel Cover Or Center Cap
1 — Valve Stem 4 — Wheel Cover
2 — Valve Notch 5 — Mounting Stud
3 — Wheel Lug Nut 312 IN CASE OF EMERGENCY
Page 315 of 490

Vehicles Without Wheel Covers
1. Mount the road tire on the axle.
2. Install the remaining lug nuts with the cone shaped endof the nut toward the wheel. Lightly tighten all the lug
nuts until the wheel sits flush onto the hub and there is
no play. The nuts will have to be fully tightened once the
vehicle is lowered. Tightening an improperly seated
wheel under vehicle load can damage the threads, cause
vibration, and undermine safety.
WARNING!
To avoid the risk of forcing the vehicle off the jack, do
not tighten the wheel nuts fully until the vehicle has
been lowered. Failure to follow this warning may
result in serious injury.
3. Lower the vehicle to the ground by turning the jack handle counterclockwise. 4. Finish tightening the lug nuts. Push down on the
wrench while at the end of the handle for increased
leverage. Tighten the lug nuts in a star pattern until each
nut has been tightened twice. Refer to “Torque Specifi-
cations” in the “Technical Specifications” section for
proper wheel lug nut torque. If in doubt about the
correct tightness, have them checked with a torque
wrench by your authorized dealer or at a service station.
5. After 25 miles (40 km) check the lug nut torque with a torque wrench to ensure that all lug nuts are properly
seated against the wheel.TIRE SERVICE KIT — IF EQUIPPED
Your vehicle may be equipped with a Tire Service Kit.
Small punctures up to 1/4 inch (6 mm) in the tire tread can
be sealed with Tire Service Kit. Foreign objects (e.g., screws
or nails) should not be removed from the tire. Tire Service
Kit can be used in outside temperatures down to approxi-
mately -4°F (-20°C). This kit will provide a temporary tire
seal, allowing you to drive your vehicle up to 100 miles
(160 km) with a maximum speed of 50 mph (80 km/h).
7
IN CASE OF EMERGENCY 313
Page 357 of 490

Master Cylinder — Brake Fluid Level Check
The fluid level in the master cylinder should be checked
when performing underhood services, or immediately if
the “Brake System Warning Light” indicates system failure.
Clean the top of the master cylinder area before removing
the cap. Add fluid to bring the level up to the top of the
“FULL” mark on the side of the master cylinder reservoir.
Overfilling of fluid is not recommended because it may
cause leaking in the system.
Add enough fluid to bring the level up to the requirements
described on the brake fluid reservoir. With disc brakes,
fluid level can be expected to fall as the brake pads wear.
However, low fluid level may be caused by a leak and a
checkup may be needed.
Use only manufacturer’s recommended brake fluid. Refer
to “Fluids And Lubricants” in “Technical Specifications”
for further information.
WARNING!
•Use only manufacturer’s recommended brake fluid.
Refer to “Fluids And Lubricants” in “Technical
Specifications” for further information. Using the
wrong type of brake fluid can severely damage your
brake system and/or impair its performance. The
proper type of brake fluid for your vehicle is also
identified on the original factory installed hydraulic
master cylinder reservoir.
• To avoid contamination from foreign matter or mois-
ture, use only new brake fluid or fluid that has been
in a tightly closed container. Keep the master cylin-
der reservoir cap secured at all times. Brake fluid in
a open container absorbs moisture from the air
resulting in a lower boiling point. This may cause it
to boil unexpectedly during hard or prolonged brak-
ing, resulting in sudden brake failure. This could
result in a collision.
• Overfilling the brake fluid reservoir can result in
spilling brake fluid on hot engine parts, causing the
brake fluid to catch fire. Brake fluid can also damage
painted and vinyl surfaces, care should be taken to
avoid its contact with these surfaces.
(Continued)
8
SERVICING AND MAINTENANCE 355
Page 358 of 490

WARNING!(Continued)
•Do not allow petroleum based fluid to contaminate
the brake fluid. Brake seal components could be
damaged, causing partial or complete brake failure.
This could result in a collision.
Automatic Transmission
Selection Of Lubricant
It is important to use the proper transmission fluid to
ensure optimum transmission performance and life. Use
only the manufacturer’s specified transmission fluid. Refer
to “Fluids And Lubricants” in “Technical Specifications”
for fluid specifications. It is important to maintain the
transmission fluid at the correct level using the recom-
mended fluid. No chemical flushes should be used in any
transmission; only the approved lubricant should be used.
CAUTION!
Using a transmission fluid other than the manufactur-
er ’s recommended fluid may cause deterioration in
transmission shift quality and/or torque converter
shudder, and will require more frequent fluid and
filter changes. Refer to “Fluids And Lubricants” in
“Technical Specifications” for fluid specifications.
Special Additives
The manufacturer strongly recommends against using any
special additives in the transmission. Automatic Transmis-
sion Fluid (ATF) is an engineered product and its perfor-
mance may be impaired by supplemental additives. There-
fore, do not add any fluid additives to the transmission.
The only exception to this policy is the use of special dyes
for diagnosing fluid leaks. Avoid using transmission seal-
ers as they may adversely affect seals.
CAUTION!
Do not use chemical flushes in your transmission as
the chemicals can damage your transmission compo-
nents. Such damage is not covered by the New Vehicle
Limited Warranty.
356 SERVICING AND MAINTENANCE