2019 DODGE GRAND CARAVAN ECU
[x] Cancel search: ECUPage 231 of 490
WARNING!
•Improper installation or failure to properly secure a
child restraint can lead to failure of the restraint. The
child could be badly injured or killed.
• Follow the child restraint manufacturer ’s directions
exactly when installing an infant or child restraint.
1. Place the child seat in the center of the seating position. For some second row seats, you may need to recline the
seat and/or raise the head restraint (if adjustable) to get
a better fit. If the rear seat can be moved forward and
rearward in the vehicle, you may wish to move it to its
rear-most position to make room for the child seat. You
may also move the front seat forward to allow more
room for the child seat.
2. Pull enough of the seat belt webbing from the retractor to pass it through the belt path of the child restraint. Do
not twist the belt webbing in the belt path.
3. Slide the latch plate into the buckle until you hear a “click.”
4. Pull on the webbing to make the lap portion tight against the child seat. 5. To lock the seat belt, pull down on the shoulder part of
the belt until you have pulled all the seat belt webbing
out of the retractor. Then, allow the webbing to retract
back into the retractor. As the webbing retracts, you will
hear a clicking sound. This means the seat belt is now in
the Automatic Locking mode.
6. Try to pull the webbing out of the retractor. If it is locked, you should not be able to pull out any webbing.
If the retractor is not locked, repeat step 5.
7. Finally, pull up on any excess webbing to tighten the lap portion around the child restraint while you push the
child restraint rearward and downward into the vehicle
seat.
8. If the child restraint has a top tether strap and the seating position has a top tether anchorage, connect the
tether strap to the anchorage and tighten the tether
strap. See the section “Installing Child Restraints Using
the Top Tether Anchorage” for directions to attach a
tether anchor.
9. Test that the child restraint is installed tightly by pulling back and forth on the child seat at the belt path. It
should not move more than 1 inch (25.4 mm) in any
direction.
5
SAFETY 229
Page 232 of 490
Any seat belt system will loosen with time, so check the
belt occasionally, and pull it tight if necessary.
Installing A Child Restraint With A Cinching Latch
Plate (CINCH) — If Equipped:
Child restraint systems are designed to be secured in
vehicle seats by lap belts or the lap belt portion of a
lap/shoulder belt.
WARNING!
•Improper installation or failure to properly secure a
child restraint can lead to failure of the restraint. The
child could be badly injured or killed.
• Follow the child restraint manufacturer ’s directions
exactly when installing an infant or child restraint.
1. Place the child seat in the center of the seating position. For some second row seats, you may need to recline the
seat and / or raise the head restraint (if adjustable) to get
a better fit. If the rear seat can be moved forward and
rearward in the vehicle, you may wish to move it to its
rear-most position to make room for the child seat. You
may also move the front seat forward to allow more
room for the child seat. 2. Next, pull enough of the seat belt webbing from the
retractor to pass it through the belt path of the child
restraint. Do not twist the belt webbing in the belt path.
3. Slide the latch plate into the buckle until you hear a “click.”
4. Finally, pull up on any excess webbing to tighten the lap portion around the child restraint while you push the
child restraint rearward and downward into the vehicle
seat.
5. If the child restraint has a top tether strap and the seating position has a top tether anchorage, connect the
tether strap to the anchorage and tighten the tether
strap. See the section “Installing Child Restraints Using
the Top Tether Anchorage” for directions to attach a
tether anchor.
6. Test that the child restraint is installed tightly by pulling back and forth on the child seat at the belt path. It
should not move more than 1 inch (25.4 mm) in any
direction.
Any seat belt system will loosen with time, so check the
belt occasionally, and pull it tight if necessary.
230 SAFETY
Page 235 of 490
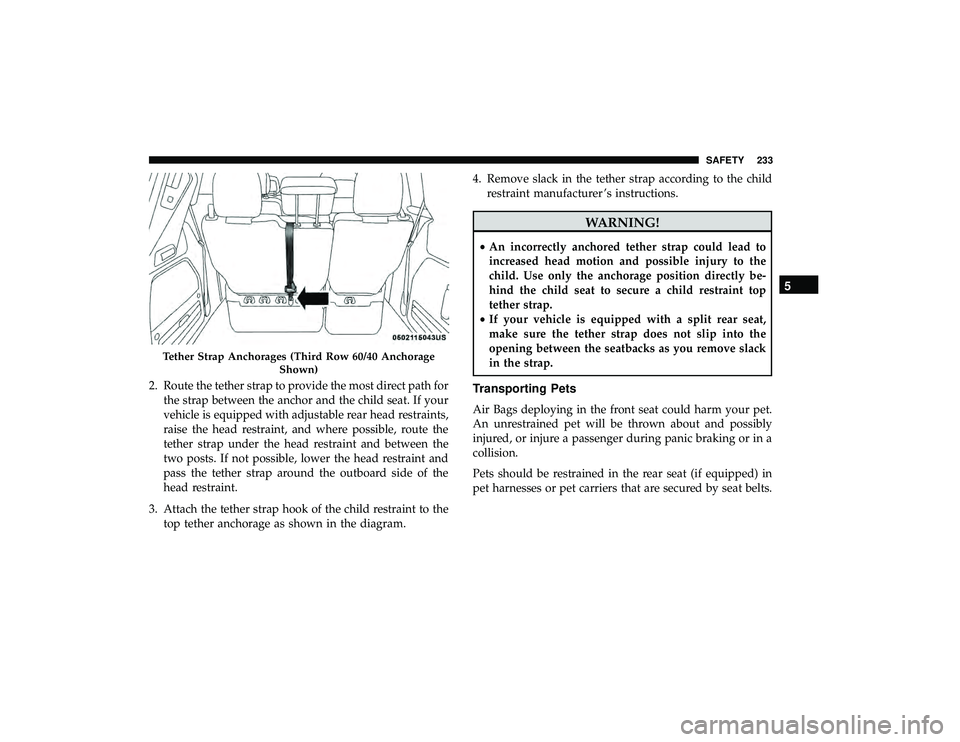
2. Route the tether strap to provide the most direct path forthe strap between the anchor and the child seat. If your
vehicle is equipped with adjustable rear head restraints,
raise the head restraint, and where possible, route the
tether strap under the head restraint and between the
two posts. If not possible, lower the head restraint and
pass the tether strap around the outboard side of the
head restraint.
3. Attach the tether strap hook of the child restraint to the top tether anchorage as shown in the diagram. 4. Remove slack in the tether strap according to the child
restraint manufacturer ’s instructions.
WARNING!
•An incorrectly anchored tether strap could lead to
increased head motion and possible injury to the
child. Use only the anchorage position directly be-
hind the child seat to secure a child restraint top
tether strap.
• If your vehicle is equipped with a split rear seat,
make sure the tether strap does not slip into the
opening between the seatbacks as you remove slack
in the strap.
Transporting Pets
Air Bags deploying in the front seat could harm your pet.
An unrestrained pet will be thrown about and possibly
injured, or injure a passenger during panic braking or in a
collision.
Pets should be restrained in the rear seat (if equipped) in
pet harnesses or pet carriers that are secured by seat belts.
Tether Strap Anchorages (Third Row 60/40 Anchorage
Shown)
5
SAFETY 233
Page 238 of 490
Floor Mat Safety Information
Always use floor mats designed to fit your vehicle. Only
use a floor mat that does not interfere with the operation of
the accelerator, brake or clutch pedals. Only use a floor mat
that is securely attached using the floor mat fasteners so it
cannot slip out of position and interfere with the accelera-
tor, brake or clutch pedals or impair safe operation of your
vehicle in other ways.
WARNING!
An improperly attached, damaged, folded, or stacked
floor mat, or damaged floor mat fasteners may cause
your floor mat to interfere with the accelerator, brake,
or clutch pedals and cause a loss of vehicle control. To
prevent SERIOUS INJURY or DEATH:
•ALWAYS securely attach
your floor mat using the
floor mat fasteners. DO NOT install your floor mat
upside down or turn your floor mat over. Lightly pull
to confirm mat is secured using the floor mat fasten-
ers on a regular basis.
(Continued)
WARNING! (Continued)
•ALWAYS REMOVE THE EXISTING FLOOR MAT
FROM THE VEHICLE
before installing any other
floor mat. NEVER install or stack an additional floor
mat on top of an existing floor mat.
• ONLY install floor mats designed to fit your vehicle.
NEVER install a floor mat that cannot be properly
attached and secured to your vehicle. If a floor mat
needs to be replaced, only use a FCA approved floor
mat for the specific make, model, and year of your
vehicle.
• ONLY use the driver ’s side floor mat on the driver ’s
side floor area. To check for interference, with the
vehicle properly parked with the engine off, fully
depress the accelerator, the brake, and the clutch
pedal (if present) to check for interference. If your
floor mat interferes with the operation of any pedal,
or is not secure to the floor, remove the floor mat
from the vehicle and place the floor mat in your
trunk.
• ONLY use the passenger ’s side floor mat on the
passenger ’s side floor area.
(Continued)
236 SAFETY
Page 239 of 490
WARNING!(Continued)
•ALWAYS make sure objects cannot fall or slide into
the driver ’s side floor area when the vehicle is
moving. Objects can become trapped under accelera-
tor, brake, or clutch pedals and could cause a loss of
vehicle control.
• NEVER place any objects under the floor mat (e.g.,
towels, keys, etc.). These objects could change the
position of the floor mat and may cause interference
with the accelerator, brake, or clutch pedals.
• If the vehicle carpet has been removed and re-
installed, always properly attach carpet to the floor
and check the floor mat fasteners are secure to the
vehicle carpet. Fully depress each pedal to check for
interference with the accelerator, brake, or clutch
pedals then re-install the floor mats.
• It is recommended to only use mild soap and water
to clean your floor mats. After cleaning, always check
your floor mat has been properly installed and is
secured to your vehicle using the floor mat fasteners
by lightly pulling mat.
Periodic Safety Checks You Should Make Outside
The Vehicle
Tires
Examine tires for excessive tread wear and uneven wear
patterns. Check for stones, nails, glass, or other objects
lodged in the tread or sidewall. Inspect the tread for cuts
and cracks. Inspect sidewalls for cuts, cracks, and bulges.
Check the wheel nuts for tightness. Check the tires (includ-
ing spare) for proper cold inflation pressure.
Lights
Have someone observe the operation of brake lights and
exterior lights while you work the controls. Check turn
signal and high beam indicator lights on the instrument
panel.
Door Latches
Check for proper closing, latching, and locking.
Fluid Leaks
Check area under the vehicle after overnight parking for
fuel, coolant, oil, or other fluid leaks. Also, if gasoline
fumes are detected or if fuel, or brake fluid leaks are
suspected. The cause should be located and corrected
immediately.
5
SAFETY 237
Page 247 of 490
CAUTION!
If the Brake System Warning Light remains on with the
parking brake released, a brake system malfunction is
indicated. Have the brake system serviced by an au-
thorized dealer immediately.
AUTOMATIC TRANSMISSION
WARNING!
•It is dangerous to shift out of PARK or NEUTRAL if
the engine speed is higher than idle speed. If your
foot is not firmly pressing the brake pedal, the
vehicle could accelerate quickly forward or in re-
verse. You could lose control of the vehicle and hit
someone or something. Only shift into gear when the
engine is idling normally and your foot is firmly
pressing the brake pedal.
(Continued)
WARNING! (Continued)
•Unintended movement of a vehicle could injure
those in or near the vehicle. As with all vehicles, you
should never exit a vehicle while the engine is
running. Before exiting a vehicle, always come to a
complete stop, then apply the parking brake, shift
the transmission into PARK, turn the engine OFF,
and remove the key fob. When the ignition is in the
LOCK/OFF (key removal) position, the transmission
is locked in PARK, securing the vehicle against
unwanted movement.
• When leaving the vehicle, always make sure the
ignition is in the OFF mode, remove the key fob from
the vehicle, and lock the vehicle.
• Never use the PARK position as a substitute for the
parking brake. Always apply the parking brake fully
when exiting the vehicle to guard against vehicle
movement and possible injury or damage.
• Your vehicle could move and injure you and others if
it is not in PARK. Check by trying to move the gear
selector out of PARK with the brake pedal released.
Make sure the transmission is in PARK before exit-
ing the vehicle.
(Continued)
6
STARTING AND OPERATING 245
Page 251 of 490
When exiting the vehicle, always:
•Apply the parking brake.
• Shift the transmission into PARK.
• Turn the engine OFF.
• Remove the key fob.
WARNING!
• It is dangerous to shift out of PARK or NEUTRAL if
the engine speed is higher than idle speed. If your
foot is not firmly pressing the brake pedal, the
vehicle could accelerate quickly forward or in re-
verse. You could lose control of the vehicle and hit
someone or something. Only shift into gear when the
engine is idling normally and your foot is firmly
pressing the brake pedal.
(Continued)
WARNING! (Continued)
•Unintended movement of a vehicle could injure
those in or near the vehicle. As with all vehicles, you
should never exit a vehicle while the engine is
running. Before exiting a vehicle, always come to a
complete stop, then apply the parking brake, shift
the transmission into PARK, turn the engine OFF,
and remove the key fob. When the ignition is in the
LOCK/OFF (key removal) position, the transmission
is locked in PARK, securing the vehicle against
unwanted movement.
• When leaving the vehicle, always make sure the
ignition is in the OFF mode, remove the key fob from
the vehicle, and lock the vehicle.
• Never use the PARK position as a substitute for the
parking brake. Always apply the parking brake fully
when exiting the vehicle to guard against vehicle
movement and possible injury or damage.
• Your vehicle could move and injure you and others if
it is not in PARK. Check by trying to move the gear
selector out of PARK with the brake pedal released.
Make sure the transmission is in PARK before exit-
ing the vehicle.
(Continued)
6
STARTING AND OPERATING 249
Page 271 of 490
Gross Axle Weight Rating (GAWR)
The GAWR is the maximum permissible load on the front
and rear axles. The load must be distributed in the cargo
area so that the GAWR of each axle is not exceeded.
Each axle GAWR is determined by the components in the
system with the lowest load carrying capacity (axle,
springs, tires or wheels). Heavier axles or suspension
components sometimes specified by purchasers for in-
creased durability does not necessarily increase the vehi-
cle’s GVWR.
Tire Size
The tire size on the Vehicle Certification Label represents
the actual tire size on your vehicle. Replacement tires must
be equal to the load capacity of this tire size.
Rim Size
This is the rim size that is appropriate for the tire size
listed.
Inflation Pressure
This is the cold tire inflation pressure for your vehicle for
all loading conditions up to full GAWR.
Curb Weight
The curb weight of a vehicle is defined as the total weight
of the vehicle with all fluids, including vehicle fuel, at full
capacity conditions, and with no occupants or cargo loaded
into the vehicle. The front and rear curb weight values are
determined by weighing your vehicle on a commercial
scale before any occupants or cargo are added.
Loading
The actual total weight and the weight of the front and rear
of your vehicle at the ground can best be determined by
weighing it when it is loaded and ready for operation.
The entire vehicle should first be weighed on a commercial
scale to insure that the GVWR has not been exceeded. The
weight on the front and rear of the vehicle should then be
determined separately to be sure that the load is properly
distributed over the front and rear axle. Weighing the
vehicle may show that the GAWR of either the front or rear
axles has been exceeded but the total load is within the
specified GVWR. If so, weight must be shifted from front to
rear or rear to front as appropriate until the specified
weight limitations are met. Store the heavier items down
low and be sure that the weight is distributed equally. Stow
all loose items securely before driving.6
STARTING AND OPERATING 269