Page 114 of 490

WARNING!(Continued)
•Do not drive the vehicle with the storage bin covers
open. Keep the storage bin covers closed and latched
while the vehicle is in motion.
• Do not operate the storage bin covers while the
vehicle is in motion.
• Do not use a storage bin latch as a tie down.
CAUTION!
The storage bin cover must lay flat and be locked to
avoid damage from contact with the front seat tracks,
which have minimal clearance to the cover. If the
storage bin cover is left in the open position, front seat
adjustment may damage the cover.
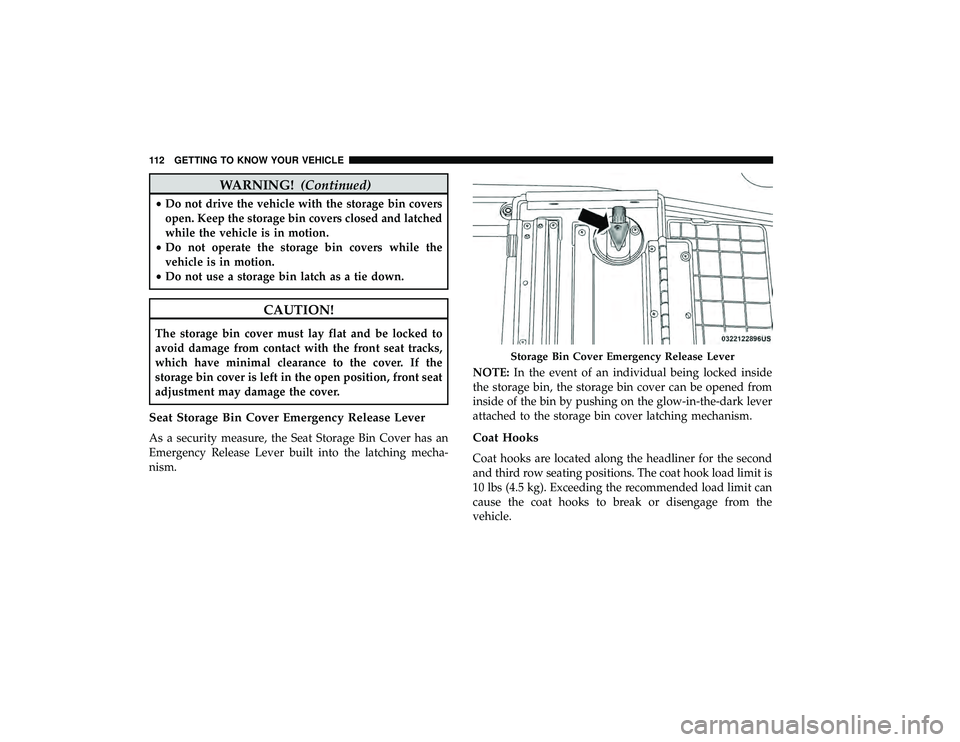
Seat Storage Bin Cover Emergency Release Lever
As a security measure, the Seat Storage Bin Cover has an
Emergency Release Lever built into the latching mecha-
nism. NOTE:
In the event of an individual being locked inside
the storage bin, the storage bin cover can be opened from
inside of the bin by pushing on the glow-in-the-dark lever
attached to the storage bin cover latching mechanism.Coat Hooks
Coat hooks are located along the headliner for the second
and third row seating positions. The coat hook load limit is
10 lbs (4.5 kg). Exceeding the recommended load limit can
cause the coat hooks to break or disengage from the
vehicle.
Storage Bin Cover Emergency Release Lever
112 GETTING TO KNOW YOUR VEHICLE
Page 122 of 490
Smoker’s Package Kit — If Equipped
With the optional authorized dealer installed Smoker’s
Package Kit, a removable ash receiver is inserted into one
of the two cupholders in the center front instrument panel.
To install the ash receiver, align the receiver so the thumb
grip on the lid is facing rearward. Push the ash receiver
into either of the cup wells to secure. Pull upward on the
ash receiver to remove for cleaning and/or storage.
The left rear trim panel cupholder is designed to accom-
modate a second ash receiver, if desired.
Sunglass Storage Bin — If Equipped
At the front of the overhead console, a compartment is
provided for the storage of two pairs of sunglasses.
From the closed position, push the door latch to open the
compartment.
Over Door Latch
120 GETTING TO KNOW YOUR VEHICLE
Page 128 of 490

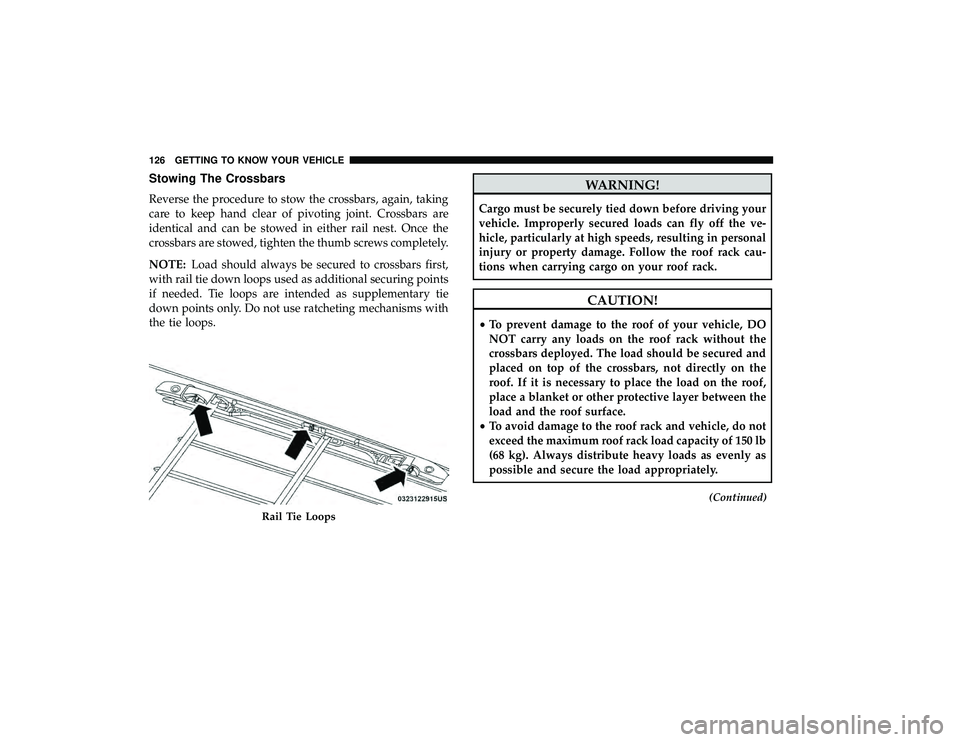
Stowing The Crossbars
Reverse the procedure to stow the crossbars, again, taking
care to keep hand clear of pivoting joint. Crossbars are
identical and can be stowed in either rail nest. Once the
crossbars are stowed, tighten the thumb screws completely.
NOTE:Load should always be secured to crossbars first,
with rail tie down loops used as additional securing points
if needed. Tie loops are intended as supplementary tie
down points only. Do not use ratcheting mechanisms with
the tie loops.
WARNING!
Cargo must be securely tied down before driving your
vehicle. Improperly secured loads can fly off the ve-
hicle, particularly at high speeds, resulting in personal
injury or property damage. Follow the roof rack cau-
tions when carrying cargo on your roof rack.
CAUTION!
• To prevent damage to the roof of your vehicle, DO
NOT carry any loads on the roof rack without the
crossbars deployed. The load should be secured and
placed on top of the crossbars, not directly on the
roof. If it is necessary to place the load on the roof,
place a blanket or other protective layer between the
load and the roof surface.
• To avoid damage to the roof rack and vehicle, do not
exceed the maximum roof rack load capacity of 150 lb
(68 kg). Always distribute heavy loads as evenly as
possible and secure the load appropriately.
(Continued)
Rail Tie Loops
126 GETTING TO KNOW YOUR VEHICLE
Page 129 of 490
CAUTION!(Continued)
•Load should always be secured to cross bars first,
with tie down loops used as additional securing
points if needed. Tie loops are intended as supple-
mentary tie down points only. Do not use ratcheting
mechanisms with the tie loops. Check the straps and
thumb wheels frequently to be sure that the load
remains securely attached.
• Long loads that extend over the windshield, such as
wood panels or surfboards, or loads with large
frontal area should be secured to both the front and
rear of the vehicle.
• Travel at reduced speeds and turn corners carefully
when carrying large or heavy loads on the roof rack.
Wind forces, due to natural causes or nearby truck
traffic, can add sudden upward lift to a load. This is
especially true on large flat loads and may result in
damage to the cargo or your vehicle.
3
GETTING TO KNOW YOUR VEHICLE 127
Page 131 of 490
GETTING TO KNOW YOUR INSTRUMENT PANEL
CONTENTS
�INSTRUMENT CLUSTER ..................130
▫ Instrument Cluster Descriptions ............131
� INSTRUMENT CLUSTER DISPLAY ...........133
▫ Instrument Cluster Display Location And
Controls ............................ .133
▫ Oil Life Reset ......................... .135
▫ Instrument Cluster Display Menu Items ......135
� TRIP COMPUTER ...................... .144
� WARNING LIGHTS AND MESSAGES .........144
▫ Red Warning Lights .................... .145▫
Yellow Warning Lights .................. .148
▫ White Indicator Lights .................. .152
▫ Green Indicator Lights .................. .152
▫ Blue Indicator Lights ................... .153
� ONBOARD DIAGNOSTIC SYSTEM — OBD II . . .153
▫ Onboard Diagnostic System (OBD II)
Cybersecurity ........................ .154
� EMISSIONS INSPECTION AND MAINTENANCE
PROGRAMS .......................... .1544
Page 150 of 490

— Transmission Temperature Warning Light — If
Equipped
This warning light will illuminate to warn of a high
transmission fluid temperature. This may occur with
strenuous usage such as trailer towing. If this light turns
on, stop the vehicle and run the engine at idle or slightly
faster, with the transmission in PARK or NEUTRAL, until
the light turns off. Once the light turns off, you may
continue to drive normally.
WARNING!
If you continue operating the vehicle when the Trans-
mission Temperature Warning Light is illuminated you
could cause the fluid to boil over, come in contact with
hot engine or exhaust components and cause a fire.
CAUTION!
Continuous driving with the Transmission Tempera-
ture Warning Light illuminated will eventually cause
severe transmission damage or transmission failure.
— Vehicle Security Warning Light — If Equipped
This light will flash at a fast rate for approximately 15
seconds when the vehicle security alarm is arming, and
then will flash slowly until the vehicle is disarmed.
Yellow Warning Lights
— Anti-Lock Brake (ABS) Warning Light
This warning light monitors the Anti-Lock Brake System
(ABS). The light will turn on when the ignition is placed in
the ON/RUN or ACC/ON/RUN position and may stay on
for as long as four seconds.
If the ABS light remains on or turns on while driving, then
the Anti-Lock portion of the brake system is not function-
ing and service is required as soon as possible. However,
the conventional brake system will continue to operate
normally, assuming the Brake Warning Light is not also on.
If the ABS light does not turn on when the ignition is
placed in the ON/RUN or ACC/ON/RUN position, have
the brake system inspected by an authorized dealer.
148 GETTING TO KNOW YOUR INSTRUMENT PANEL
Page 156 of 490

Onboard Diagnostic System (OBD II) Cybersecurity
Your vehicle is required to have an Onboard Diagnostic
system (OBD II) and a connection port to allow access to
information related to the performance of your emissions
controls. Authorized service technicians may need to ac-
cess this information to assist with the diagnosis and
service of your vehicle and emissions system.
WARNING!
•ONLY an authorized service technician should con-
nect equipment to the OBD II connection port in
order to read the VIN, diagnose, or service your
vehicle.
• If unauthorized equipment is connected to the OBD
II connection port, such as a driver-behavior tracking
device, it may:
• Be possible that vehicle systems, including safety
related systems, could be impaired or a loss of
vehicle control could occur that may result in an
accident involving serious injury or death.
• Access, or allow others to access, information
stored in your vehicle systems, including personal
information. For further information, refer to “Cybersecurity” in “Mul-
timedia”.
EMISSIONS INSPECTION AND MAINTENANCE
PROGRAMS
In some localities, it may be a legal requirement to pass an
inspection of your vehicle’s emissions control system.
Failure to pass could prevent vehicle registration.
For states that require an Inspection and Main-
tenance (I/M), this check verifies the “Malfunc-
tion Indicator Light (MIL)” is functioning and is
not on when the engine is running, and that the
OBD II system is ready for testing.
Normally, the OBD II system will be ready. The OBD II
system may notbe ready if your vehicle was recently
serviced, recently had a dead battery or a battery replace-
ment. If the OBD II system should be determined not ready
for the I/M test, your vehicle may fail the test.
Your vehicle has a simple ignition actuated test, which you
can use prior to going to the test station. To check if your
vehicle’s OBD II system is ready, you must do the following:
1. Cycle the ignition switch to the ON position, but do not crank or start the engine.
154 GETTING TO KNOW YOUR INSTRUMENT PANEL
Page 182 of 490

Here are some simple steps you can take to minimize the
risk of harm from a deploying air bag:
1. Children 12 years old and under should always ridebuckled up in the rear seat of a vehicle with a rear seat.
2. A child who is not big enough to wear the vehicle seat belt properly (Refer to “Child Restraints” in this section
for further information) must be secured in the appro-
priate child restraint or belt-positioning booster seat in a
rear seating position.
3. If a child from 2 to 12 years old (not in a rear-facing child restraint) must ride in the front passenger seat, move the
seat as far back as possible and use the proper child
restraint (Refer to “Child Restraints” in this section for
further information).
4. Never allow children to slide the shoulder belt behind them or under their arm.
5. You should read the instructions provided with your child restraint to make sure that you are using it
properly.
6. All occupants should always wear their lap and shoul- der belts properly. 7. The driver and front passenger seats should be moved
back as far as practical to allow the front air bags room
to inflate.
8. Do not lean against the door or window. If your vehicle has side air bags, and deployment occurs, the side air
bags will inflate forcefully into the space between occu-
pants and the door and occupants could be injured.
9. If the air bag system in this vehicle needs to be modified to accommodate a disabled person, refer to the “Cus-
tomer Assistance” section for customer service contact
information.
WARNING!
•Never place a rear-facing child restraint in front of an
air bag. A deploying passenger front air bag can
cause death or serious injury to a child 12 years or
younger, including a child in a rear-facing child
restraint.
• Never install a rear-facing child restraint in the front
seat of a vehicle. Only use a rear-facing child re-
straint in the rear seat. If the vehicle does not have a
rear seat, do not transport a rear-facing child restraint
in that vehicle.
180 SAFETY