Page 28 of 490
NOTE:
•The driver’s door key cylinder and the liftgate button on
the key fob cannot arm or disarm the vehicle security
alarm.
• The vehicle security alarm remains armed during power
liftgate entry. Pushing the liftgate button will not disarm
the vehicle security alarm. If someone enters the vehicle
through the liftgate and opens any door, the alarm will
sound.
• When the vehicle security alarm is armed, the interior
power door lock switches will not unlock the doors.
The vehicle security alarm is designed to protect your
vehicle. However, you can create conditions where the
system will give you a false alarm. If one of the previously
described arming sequences has occurred, the vehicle
security alarm will arm regardless of whether you are in
the vehicle or not. If you remain in the vehicle and open a
door, the alarm will sound. If this occurs, disarm the
vehicle security alarm. If the vehicle security alarm is armed and the battery
becomes disconnected, the vehicle security alarm will
remain armed when the battery is reconnected; the exterior
lights will flash, and the horn will sound. If this occurs,
disarm the vehicle security alarm.
Tamper Alert
If something has triggered the vehicle security alarm in
your absence, the horn will sound three times and the
exterior lights will blink three times when you disarm the
vehicle security alarm. Check the vehicle for tampering.
26 GETTING TO KNOW YOUR VEHICLE
Page 29 of 490
DOORS
Manual Door Locks
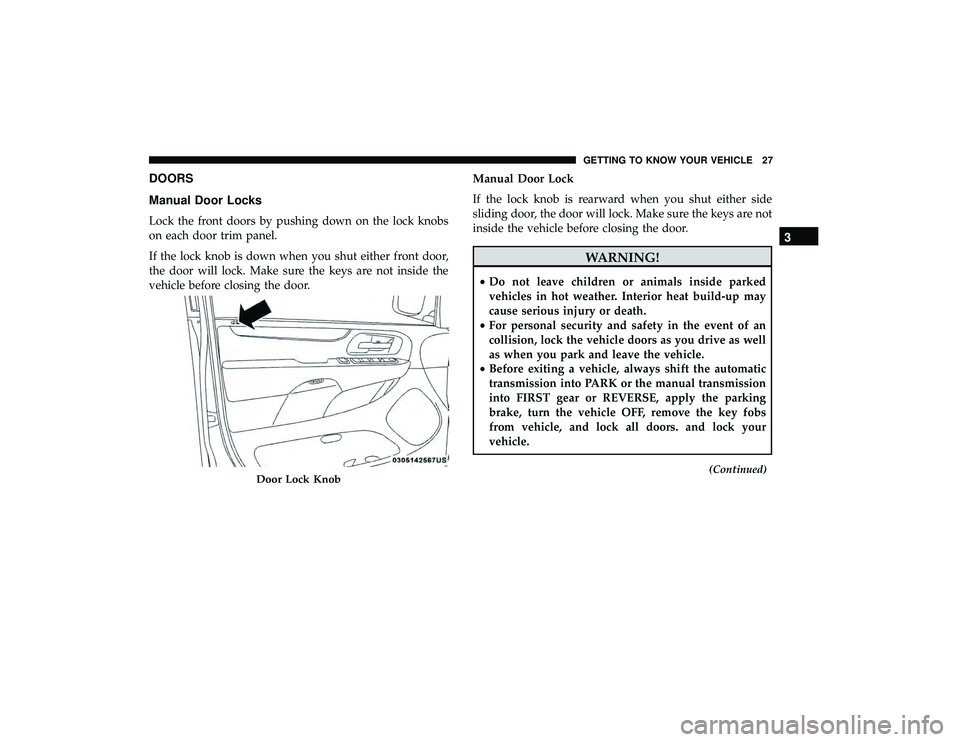
Lock the front doors by pushing down on the lock knobs
on each door trim panel.
If the lock knob is down when you shut either front door,
the door will lock. Make sure the keys are not inside the
vehicle before closing the door.Manual Door Lock
If the lock knob is rearward when you shut either side
sliding door, the door will lock. Make sure the keys are not
inside the vehicle before closing the door.
WARNING!
•
Do not leave children or animals inside parked
vehicles in hot weather. Interior heat build-up may
cause serious injury or death.
• For personal security and safety in the event of an
collision, lock the vehicle doors as you drive as well
as when you park and leave the vehicle.
• Before exiting a vehicle, always shift the automatic
transmission into PARK or the manual transmission
into FIRST gear or REVERSE, apply the parking
brake, turn the vehicle OFF, remove the key fobs
from vehicle, and lock all doors. and lock your
vehicle.
(Continued)Door Lock Knob
3
GETTING TO KNOW YOUR VEHICLE 27
Page 54 of 490

WARNING!
•ALL the head restraints MUST be reinstalled in the
vehicle to properly protect the occupants.
• All occupants, including the driver, should not oper-
ate a vehicle or sit in a vehicle’s seat until the head
restraints are placed in their proper positions in
order to minimize the risk of neck injury in the event
of a collision.
• Do not place items over the top of the Active Head
Restraint, such as coats, seat covers or portable DVD
players. These items may interfere with the opera-
tion of the Active Head Restraint in the event of a
collision and could result in serious injury or death.
• Active Head Restraints may be deployed if they are
struck by an object such as a hand, foot or loose
cargo. To avoid accidental deployment of the Active
Head Restraint ensure that all cargo is secured, as
loose cargo could contact the Active Head Restraint
during sudden stops. Failure to follow this warning
could cause personal injury if the Active Head Re-
straint is deployed.
Head Restraints — Second Row Quad Seats
The head restraints on the second row quad seats are
non-adjustable and non-removable. The head restraint will
automatically fold forward when the seat release lever is
pulled during the Stow n’ Go procedure. Refer to “Seats” in
this section for further information.
Head Restraints — Second Row Bench
The second row bench seat is equipped with adjustable
head restraints.
To raise the head restraint, pull upward on the head
restraint. To lower the head restraint, push the adjustment
button, located at the base of the head restraint, and push
downward.
52 GETTING TO KNOW YOUR VEHICLE
Page 55 of 490
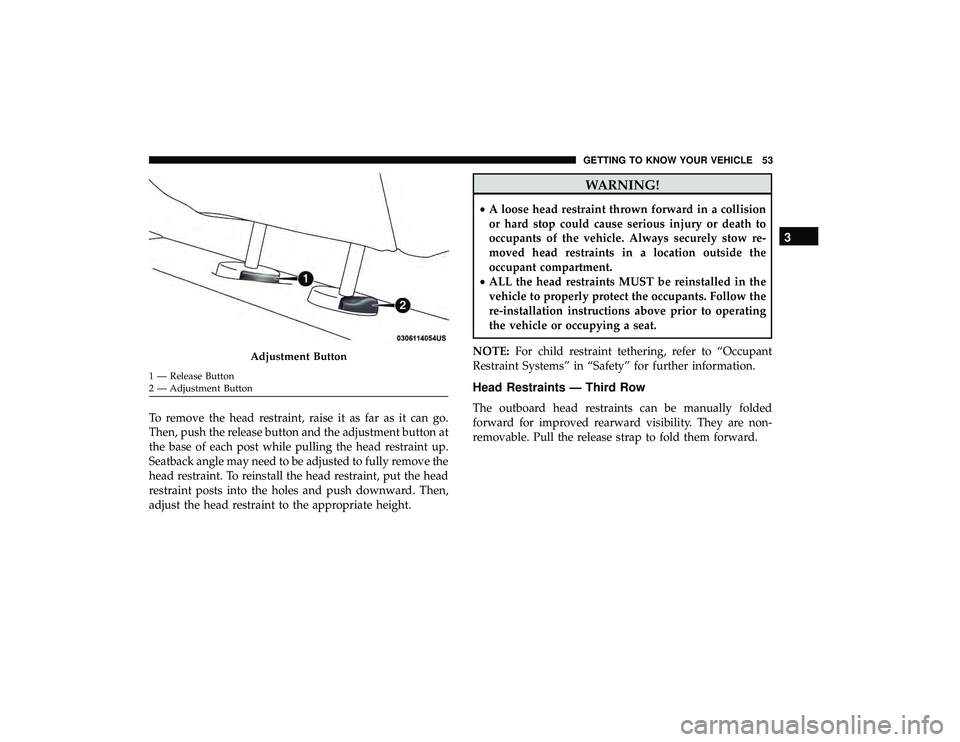
To remove the head restraint, raise it as far as it can go.
Then, push the release button and the adjustment button at
the base of each post while pulling the head restraint up.
Seatback angle may need to be adjusted to fully remove the
head restraint. To reinstall the head restraint, put the head
restraint posts into the holes and push downward. Then,
adjust the head restraint to the appropriate height.
WARNING!
•A loose head restraint thrown forward in a collision
or hard stop could cause serious injury or death to
occupants of the vehicle. Always securely stow re-
moved head restraints in a location outside the
occupant compartment.
• ALL the head restraints MUST be reinstalled in the
vehicle to properly protect the occupants. Follow the
re-installation instructions above prior to operating
the vehicle or occupying a seat.
NOTE: For child restraint tethering, refer to “Occupant
Restraint Systems” in “Safety” for further information.
Head Restraints — Third Row
The outboard head restraints can be manually folded
forward for improved rearward visibility. They are non-
removable. Pull the release strap to fold them forward.
Adjustment Button
1 — Release Button
2 — Adjustment Button
3
GETTING TO KNOW YOUR VEHICLE 53
Page 95 of 490
2. Move to the front of the vehicle and look inside thecenter of the hood opening. Locate, then push the safety
catch downward while raising the hood at the same
time.
Use the hood prop rod to secure the hood in the open
position.
Closing The Hood
WARNING!
Be sure the hood is fully latched before driving your
vehicle. If the hood is not fully latched, it could open
when the vehicle is in motion and block your vision.
Failure to follow this warning could result in serious
injury or death.Safety Lever Location
Hood Prop Rod
3
GETTING TO KNOW YOUR VEHICLE 93
Page 100 of 490
GARAGE DOOR OPENER — IF EQUIPPED
HomeLink replaces up to three remote controls (hand-held
transmitters) that operate devices such as garage door
openers, motorized gates, lighting or home security sys-
tems. The HomeLink unit operates off your vehicle’s
battery.
The HomeLink buttons, located on either the overhead
console, headliner or sunvisor, designate the three different
HomeLink channels. The HomeLink indicator is located
above the center button.NOTE:HomeLink is disabled when the Vehicle Security
Alarm is active.
Before You Begin Programming HomeLink
Be sure that your vehicle is parked outside of the garage
before you begin programming.
For more efficient programming and accurate transmission
of the radio-frequency signal, it is recommended that a new
battery be placed in the hand-held transmitter of the device
that is being programmed to the HomeLink system.
HomeLink Buttons/Overhead Consoles
HomeLink Buttons/Sunvisor/Headliner
98 GETTING TO KNOW YOUR VEHICLE
Page 104 of 490
the signal during programming. Similar to this Canadian
law, some U.S. gate operators are designed to time-out in
the same manner.
It may be helpful to unplug the device during the cycling
process to prevent possible overheating of the garage door
or gate motor.
1. Cycle the ignition to the ON/RUN position.
2. Place the hand-held transmitter 1 to 3 inches (3 to 8 cm)away from the HomeLink button you wish to program
while keeping the HomeLink indicator light in view.
3. Continue to push and hold the HomeLink button while you push and release (“cycle”) your hand-held trans-
mitter every two seconds until HomeLink has success-
fully accepted the frequency signal. The indicator light
will flash slowly and then rapidly when fully trained.
4. Watch for the HomeLink indicator to change flash rates. When it changes, it is programmed. It may take up to 30
seconds or longer in rare cases. The garage door may
open and close while you are programming.
5. Push and hold the programmed HomeLink button and observe the indicator light. NOTE:
•If the indicator light stays on constantly, programming
is complete and the garage door/device should acti-
vate when the HomeLink button is pushed.
• To program the two remaining HomeLink buttons,
repeat each step for each remaining button. DO NOT
erase the channels.
If you unplugged the garage door opener/device for
programming, plug it back in at this time.
Using HomeLink
To operate, push and release the programmed HomeLink
button. Activation will now occur for the programmed
device (i.e. garage door opener, gate operator, security
system, entry door lock, home/office lighting, etc.) The
hand-held transmitter of the device may also be used at
any time.
Security
It is advised to erase all channels before you sell or turn in
your vehicle.
To do this, push and hold the two outside buttons for 20
seconds until the red indicator flashes.
102 GETTING TO KNOW YOUR VEHICLE
Page 105 of 490
NOTE:All channels will be erased. Individual channels
cannot be erased.
The HomeLink Universal Transceiver is disabled when the
Vehicle Security Alarm is active.
Troubleshooting Tips
If you are having trouble programming HomeLink, here
are some of the most common solutions:
• Replace the battery in the Garage Door Opener hand-
held transmitter.
• Push the LEARN button on the Garage Door Opener to
complete the training for a Rolling Code.
• Did you unplug the device for programming and re-
member to plug it back in?
If you have any problems, or require assistance, please call
toll-free 1-800-355-3515 or, on the Internet at
HomeLink.com for information or assistance.
WARNING!
• Vehicle exhaust contains carbon monoxide, a danger-
ous gas. Do not run your vehicle in the garage while
programming the transceiver. Exhaust gas can cause
serious injury or death.
• Your motorized door or gate will open and close
while you are programming the universal trans-
ceiver. Do not program the transceiver if people, pets
or other objects are in the path of the door or gate.
Only use this transceiver with a garage door opener
that has a “stop and reverse” feature as required by
Federal safety standards. This includes most garage
door opener models manufactured after 1982. Do not
use a garage door opener without these safety fea-
tures. Call toll-free 1-800-355-3515 or, on the Internet
at HomeLink.com for safety information or assis-
tance.
3
GETTING TO KNOW YOUR VEHICLE 103