2019 DODGE GRAND CARAVAN warning light
[x] Cancel search: warning lightPage 7 of 490

HOW TO USE THIS MANUAL
Essential Information
Consult the Table of Contents to determine which section
contains the information you desire.
Since the specification of your vehicle depends on the items
of equipment ordered, certain descriptions and illustra-
tions may differ from your vehicle’s equipment.
The detailed index at the back of this Owner’s Manual
contains a complete listing of all subjects.
Symbols
Some vehicle components have colored labels whose sym-
bols indicate precautions to be observed when using this
component. Refer to “Warning Lights and Messages” in
“Getting To Know Your Instrument Panel” for further
information on the symbols used in your vehicle.
WARNINGS AND CAUTIONS
This Owner ’s Manual containsWARNINGSagainst oper-
ating procedures that could result in a collision, bodily
injury and/or death. It also contains CAUTIONSagainst
procedures that could result in damage to your vehicle. If
you do not read this entire Owner ’s Manual, you may miss
important information. Observe all Warnings and Cau-
tions.
VEHICLE MODIFICATIONS/ALTERATIONS
WARNING!
Any modifications or alterations to this vehicle could
seriously affect its roadworthiness and safety and may
lead to a collision resulting in serious injury or death.
1
INTRODUCTION 5
Page 36 of 490

WARNING!
•Adjusting a seat while driving may be dangerous.
Moving a seat while driving could result in loss of
control which could cause a collision and serious
injury or death.
• Seats should be adjusted before fastening the seat
belts and while the vehicle is parked. Serious injury
or death could result from a poorly adjusted seat belt.
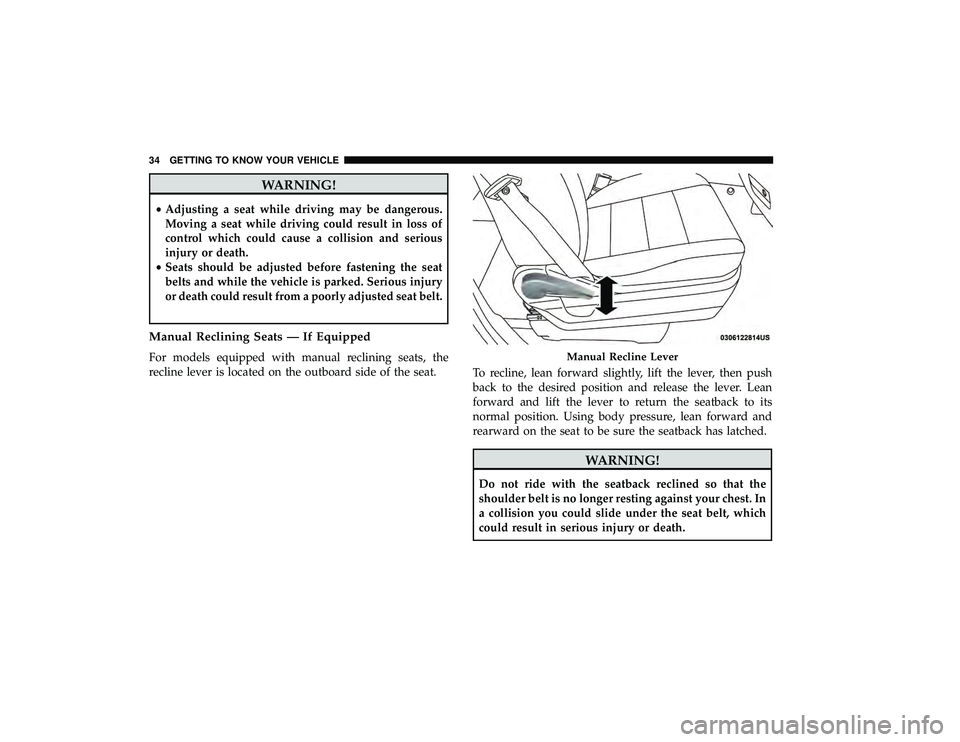
Manual Reclining Seats — If Equipped
For models equipped with manual reclining seats, the
recline lever is located on the outboard side of the seat. To recline, lean forward slightly, lift the lever, then push
back to the desired position and release the lever. Lean
forward and lift the lever to return the seatback to its
normal position. Using body pressure, lean forward and
rearward on the seat to be sure the seatback has latched.
WARNING!
Do not ride with the seatback reclined so that the
shoulder belt is no longer resting against your chest. In
a collision you could slide under the seat belt, which
could result in serious injury or death.
Manual Recline Lever
34 GETTING TO KNOW YOUR VEHICLE
Page 50 of 490

WARNING!
•Persons who are unable to feel pain to the skin
because of advanced age, chronic illness, diabetes,
spinal cord injury, medication, alcohol use, exhaus-
tion or other physical condition must exercise care
when using the seat heater. It may cause burns even
at low temperatures, especially if used for long
periods of time.
• Do not place anything on the seat or seatback that
insulates against heat, such as a blanket or cushion.
This may cause the seat heater to overheat. Sitting in
a seat that has been overheated could cause serious
burns due to the increased surface temperature of the
seat.
Front Heated Seats
There are two heated seat switches that allow the driver
and passenger to operate the seats independently. The
controls for each heater are located on the switch bank
below the climate controls.
You can choose from HI, LO or OFF heat settings. Amber
indicator lights in each switch indicate the level of heat in
use. Two indicator lights will illuminate for HI, one for LO
and none for OFF. •
Push the heated seat button
once to turn the HI
setting on.
• Push the heated seat buttona second time to turn
the LO setting on.
• Push the heated seat buttona third time to turn the
heating elements off.
NOTE: Once a heat setting is selected, heat will be felt
within two to five minutes.
If the HI-level setting is selected, the system will automati-
cally switch to LO-level after approximately 60 minutes of
continuous operation. At that time, the display will change
from HI to LO, indicating the change. The LO-level setting
will turn off automatically after approximately 45 minutes.
Vehicles Equipped With Remote Start
On models that are equipped with remote start, the heated
seats can be programmed to come on during a remote start.
This feature can be programmed through the instrument
cluster display. Refer to “Instrument Cluster Display” in
“Getting To Know Your Instrument Panel” for further
information.
48 GETTING TO KNOW YOUR VEHICLE
Page 58 of 490

•Push the heated steering wheel buttona second time
to turn the heating element off.
NOTE: The engine must be running for the heated steering
wheel to operate.
Vehicles Equipped With Remote Start
On models that are equipped with remote start, the heated
steering wheel can be programed to come on during a
remote start. Refer to “Instrument Cluster Display” in
“Getting To Know Your Instrument Panel” for further
information.
WARNING!
• Persons who are unable to feel pain to the skin
because of advanced age, chronic illness, diabetes,
spinal cord injury, medication, alcohol use, exhaus-
tion, or other physical conditions must exercise care
when using the steering wheel heater. It may cause
burns even at low temperatures, especially if used
for long periods.
• Do not place anything on the steering wheel that
insulates against heat, such as a blanket or steering
wheel covers of any type and material. This may
cause the steering wheel heater to overheat.
MIRRORS
Automatic Dimming Mirror — If Equipped
The mirror head can be adjusted up, down, left, and right
for various drivers. The mirror should be adjusted to center
on the view through the rear window.
This mirror automatically adjusts for headlight glare from
vehicles behind you.
NOTE: The Automatic Dimming feature is disabled when
the vehicle is in REVERSE to improve rear view viewing.
The Automatic Dimming feature can be turned on or off
through the touchscreen.
• Press the mirror dimmer button once to turn the feature
on.
• Press the mirror dimmer button a second time to turn
the feature off.
56 GETTING TO KNOW YOUR VEHICLE
Page 60 of 490

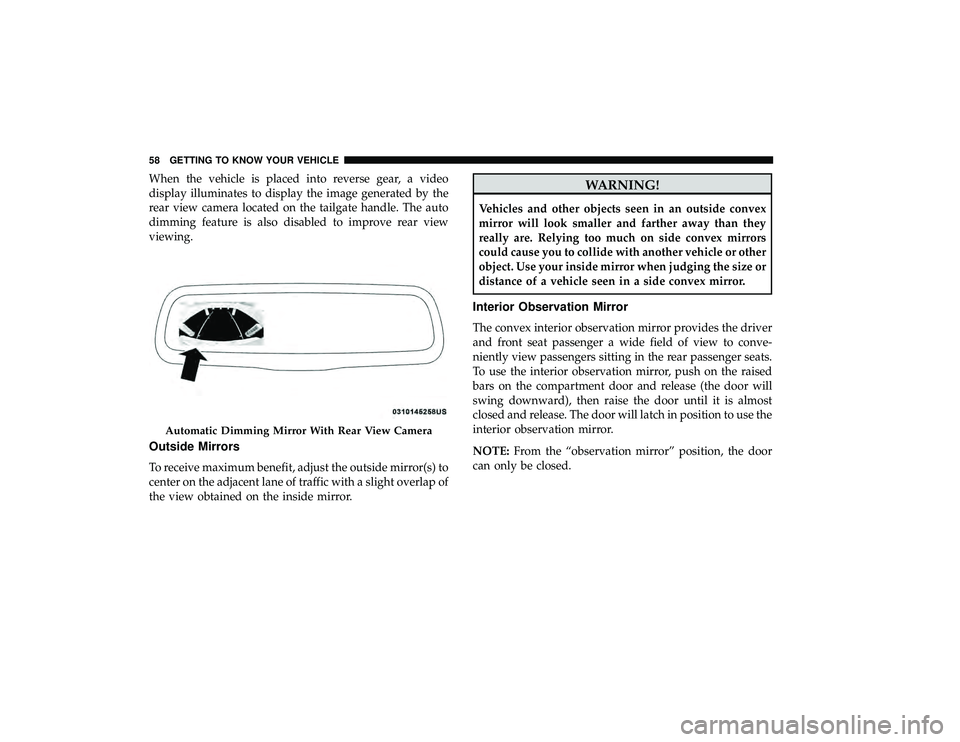
When the vehicle is placed into reverse gear, a video
display illuminates to display the image generated by the
rear view camera located on the tailgate handle. The auto
dimming feature is also disabled to improve rear view
viewing.
Outside Mirrors
To receive maximum benefit, adjust the outside mirror(s) to
center on the adjacent lane of traffic with a slight overlap of
the view obtained on the inside mirror.
WARNING!
Vehicles and other objects seen in an outside convex
mirror will look smaller and farther away than they
really are. Relying too much on side convex mirrors
could cause you to collide with another vehicle or other
object. Use your inside mirror when judging the size or
distance of a vehicle seen in a side convex mirror.
Interior Observation Mirror
The convex interior observation mirror provides the driver
and front seat passenger a wide field of view to conve-
niently view passengers sitting in the rear passenger seats.
To use the interior observation mirror, push on the raised
bars on the compartment door and release (the door will
swing downward), then raise the door until it is almost
closed and release. The door will latch in position to use the
interior observation mirror.
NOTE:From the “observation mirror” position, the door
can only be closed.
Automatic Dimming Mirror With Rear View Camera
58 GETTING TO KNOW YOUR VEHICLE
Page 66 of 490

Turn Signal Warning
If the vehicle electronics sense that the vehicle has traveled
at over 18 mph (29 km/h) for about 1 mile (1.6 km) with the
turn signals on, a chime will sound to alert the driver.
Lane Change Assist
Tap the lever up or down once, without moving beyond
the detent, and the turn signal (right or left) will flash three
times then automatically turn off.
Battery Protection
This feature provides battery protection to avoid wearing
down the battery if the headlights or parking lights are left
on for extended periods of time when the ignition is in the
OFF position. After eight minutes of the ignition being in
the OFF position and the headlight switch in any position
other than OFF or AUTO, the lights will turn off automati-
cally until the next cycle of the ignition or headlight switch.
The battery protection feature will be disabled if the
ignition is placed in any position other than OFF during the
eight minute delay.
INTERIOR LIGHTS
Courtesy/Interior Lighting
At the forward end of the overhead console are two
courtesy lights (standard dome light has two buttons).
These interior lights are turned on when a door or the
liftgate is opened, the remote keyless entry key fob is
activated, or when the dimmer control is moved to the
extreme top.
The interior lights will automatically turn off in approxi-
mately 10 minutes for the first activation and 90 seconds
every activation thereafter until the engine is started, if one
of the following occur:
•A door, sliding door or the liftgate is left open.
• Any overhead reading light is left on.
NOTE: The ignition must be cycled to the OFF position for
this feature to operate.
The courtesy lights also function as reading lights. Push in
on each lens to turn these lights on while inside the vehicle.
Push a second time to turn each light off. You may adjust
the direction of these lights by pushing the outside ring,
which is identified with four directional arrows (LED
lamps only).
64 GETTING TO KNOW YOUR VEHICLE
Page 108 of 490

Basic Console
The Basic Console consists of the following features:
•The Basic Console profile allows vehicle occupants to
easily pass through the first row to the second.
• Four cupholders accept up to extra large size beverage
cups or 20 oz (0.6 L) plastic bottles. Cupholders are
dishwasher safe for cleaning.
• The cupholders are removable to access a large storage
bin.
• The Basic Console is removable from the vehicle for
additional floor space by removing the anchor cup plug
and clip at the console base, sliding the console base
forward while lifting slightly to clear the rear load floor
hook. To reinstall the Basic Console:
1. Position the console at a slight angle (front slightly
higher than the rear).
2. Slide the console rearward into the floor bracket/hook.
3. Align the console until the front anchor cup plug hole is centered on the winch hole.
4. Reinstall the clip first and then while pushing down- ward on the console with slight pressure, reinstall the
cover plug.
5. Pull up on the console to be sure it is firmly latched.
WARNING!
In an accident, serious injury could result if the remov-
able floor console is not properly installed. Always be
sure the removable floor console is fully latched.
106 GETTING TO KNOW YOUR VEHICLE
Page 111 of 490

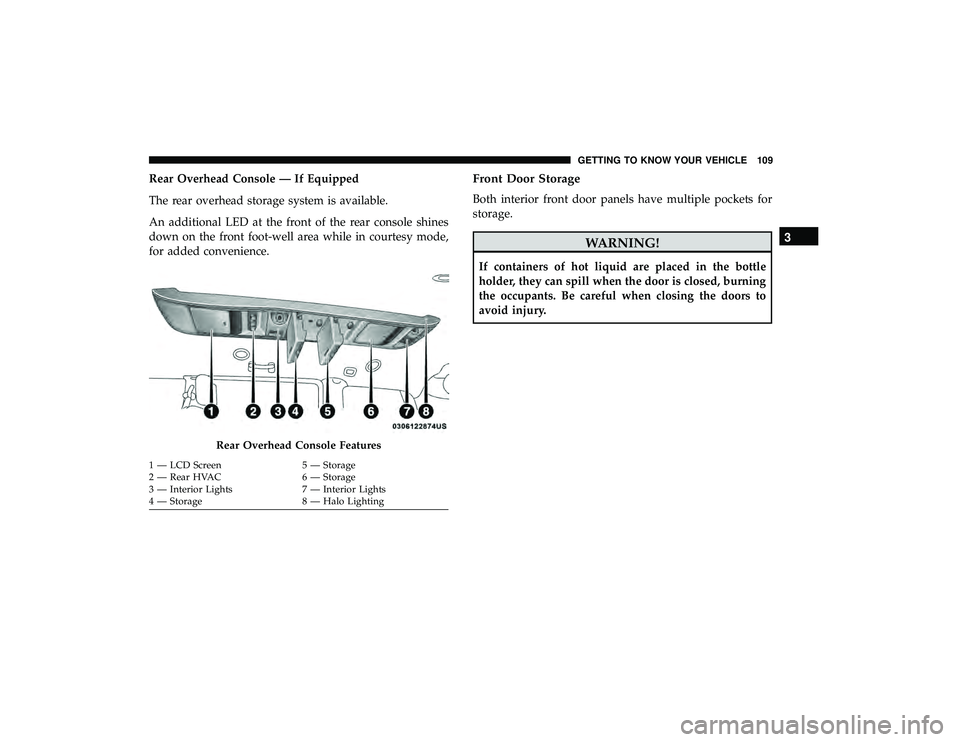
Rear Overhead Console — If Equipped
The rear overhead storage system is available.
An additional LED at the front of the rear console shines
down on the front foot-well area while in courtesy mode,
for added convenience.Front Door Storage
Both interior front door panels have multiple pockets for
storage.
WARNING!
If containers of hot liquid are placed in the bottle
holder, they can spill when the door is closed, burning
the occupants. Be careful when closing the doors to
avoid injury.
Rear Overhead Console Features
1 — LCD Screen5 — Storage
2 — Rear HVAC 6 — Storage
3 — Interior Lights 7 — Interior Lights
4 — Storage 8 — Halo Lighting
3
GETTING TO KNOW YOUR VEHICLE 109