2019 DODGE GRAND CARAVAN oil pressure
[x] Cancel search: oil pressurePage 134 of 490

•Odometer Display / Trip Odometer Display
The odometer display shows the total distance the
vehicle has been driven.
This also displays Trip A and Trip B, DTE, MPG or
L/100km, OAT (Outside Air Temperature) information
to Base Cluster, use STEP and RESET button (on
steering wheel) to access or reset the display.
• Message Display Area
When the appropriate conditions exist, the following
odometer messages will display:
door — Door Ajar
gATE — Liftgate Ajar
LoW tirE — Low Tire Pressure
gASCAP — Fuel Cap Fault
noFUSE — Fuse Fault
CHAngE OIL — Oil Change Required
LoCOOL — Low Coolant
3. Speedometer
Indicates vehicle speed. 4.
Fuel Gauge
• The gauge shows the level of fuel in the fuel tank when
the ignition switch is in the ON/RUN position.
•
The fuel pump symbol points to the side of the
vehicle where the fuel door is located.
5. Temperature Gauge
• The temperature gauge shows engine coolant tem-
perature. Any reading within the normal range indi-
cates that the engine cooling system is operating
satisfactorily.
• The gauge can indicate a higher temperature when
driving in hot weather or up mountain grades. It
should not be allowed to exceed the upper limits of the
normal operating range.
WARNING!
Driving with a hot engine cooling system could dam-
age your vehicle. If the temperature gauge reaches “H”
pull over and stop the vehicle. Idle the vehicle with the
air conditioner turned off until the gauge drops back
into the normal range and is no longer red. If the gauge
remains on the “H”, turn the engine off immediately
and call an authorized dealer for service.
132 GETTING TO KNOW YOUR INSTRUMENT PANEL
Page 139 of 490

down until the preferred setting is highlighted, then push
and release therightarrow button until a check-mark
appears next to the setting, showing that the setting has
been selected.
Vehicle Info (Customer Information Features)
Push and release the upordown arrow button until
“Vehicle Info” displays in the instrument cluster display
and push the rightarrow button. Push the upordown
arrow button to scroll through the available information
displays.
• Coolant Temperature
Displays the actual coolant temperature.
• Oil Temperature
Displays the actual oil temperature.
• Oil Pressure — If Equipped
Displays the actual oil pressure.
• Transmission Temperature
Displays the actual transmission temperature.
• Engine Hours
Displays the number of hours of engine operation.
Messages
Push and release the upordown arrow button until
“Messages: XX” displays highlighted in the instrument
cluster display. If there is more than one message, pushing
the right arrow button will display a stored warning
message. Push and release the upordown arrow button if
there is more than one message to cycle through the
remaining stored messages. If there are no messages,
pushing the rightarrow button will not change the display.
Compass/Outside Temperature Display
The compass readings indicate the direction the vehicle is
facing. The instrument cluster display will display eight or
fifteen compass readings and the outside temperature.
NOTE: The system will display the last known outside
temperature when starting the vehicle and may need to be
driven several minutes before the updated temperature is
displayed. Engine temperature can also affect the dis-
played temperature; therefore, temperature readings are
not updated when the vehicle is not moving.
4
GETTING TO KNOW YOUR INSTRUMENT PANEL 137
Page 149 of 490

come on when the ignition is placed in the ON/RUN or
ACC/ON/RUN position and remain on briefly as a bulb
check. If the light does not come on during starting, have
the system checked by an authorized dealer.
— Engine Coolant Temperature Warning Light
This warning light warns of an overheated engine condi-
tion. If the engine coolant temperature is too high, this
indicator will illuminate and a single chime will sound. If
the temperature reaches the upper limit, a continuous
chime will sound for four minutes or until the engine is
able to cool: whichever comes first.
If the light turns on while driving, safely pull over and stop
the vehicle. If the A/C system is on, turn it off. Also, shift
the transmission into NEUTRAL and idle the vehicle. If the
temperature reading does not return to normal, turn the
engine off immediately and call for service.
Refer to “If Your Engine Overheats” in “In Case Of
Emergency” for further information.
— Liftgate Open Warning Light
This indicator will turn when the liftgate is open.
NOTE:If the vehicle is moving, there will also be a single
chime.
— Oil Pressure Warning Light
This warning light will illuminate to indicate low engine
oil pressure. If the light turns on while driving, stop the
vehicle, shut off the engine as soon as possible, and contact
an authorized dealer. A chime will sound when this light
turns on.
Do not operate the vehicle until the cause is corrected. This
light does not indicate how much oil is in the engine. The
engine oil level must be checked under the hood.
— Seat Belt Reminder Warning Light
This warning light indicates when the driver or passenger
seat belt is unbuckled. When the ignition is first placed in
the ON/RUN or ACC/ON/RUN position and if the
driver ’s seat belt is unbuckled, a chime will sound and the
light will turn on. When driving, if the driver or front
passenger seat belt remains unbuckled, the Seat Belt Re-
minder Light will flash or remain on continuously and a
chime will sound.
Refer to “Occupant Restraint Systems” in “Safety” for
further information.
4
GETTING TO KNOW YOUR INSTRUMENT PANEL 147
Page 239 of 490

WARNING!(Continued)
•ALWAYS make sure objects cannot fall or slide into
the driver ’s side floor area when the vehicle is
moving. Objects can become trapped under accelera-
tor, brake, or clutch pedals and could cause a loss of
vehicle control.
• NEVER place any objects under the floor mat (e.g.,
towels, keys, etc.). These objects could change the
position of the floor mat and may cause interference
with the accelerator, brake, or clutch pedals.
• If the vehicle carpet has been removed and re-
installed, always properly attach carpet to the floor
and check the floor mat fasteners are secure to the
vehicle carpet. Fully depress each pedal to check for
interference with the accelerator, brake, or clutch
pedals then re-install the floor mats.
• It is recommended to only use mild soap and water
to clean your floor mats. After cleaning, always check
your floor mat has been properly installed and is
secured to your vehicle using the floor mat fasteners
by lightly pulling mat.
Periodic Safety Checks You Should Make Outside
The Vehicle
Tires
Examine tires for excessive tread wear and uneven wear
patterns. Check for stones, nails, glass, or other objects
lodged in the tread or sidewall. Inspect the tread for cuts
and cracks. Inspect sidewalls for cuts, cracks, and bulges.
Check the wheel nuts for tightness. Check the tires (includ-
ing spare) for proper cold inflation pressure.
Lights
Have someone observe the operation of brake lights and
exterior lights while you work the controls. Check turn
signal and high beam indicator lights on the instrument
panel.
Door Latches
Check for proper closing, latching, and locking.
Fluid Leaks
Check area under the vehicle after overnight parking for
fuel, coolant, oil, or other fluid leaks. Also, if gasoline
fumes are detected or if fuel, or brake fluid leaks are
suspected. The cause should be located and corrected
immediately.
5
SAFETY 237
Page 323 of 490

After Driving:
Pull over to a safe location. Refer to “Whenever You Stop
To Use Tire Service Kit” in this section before continuing.
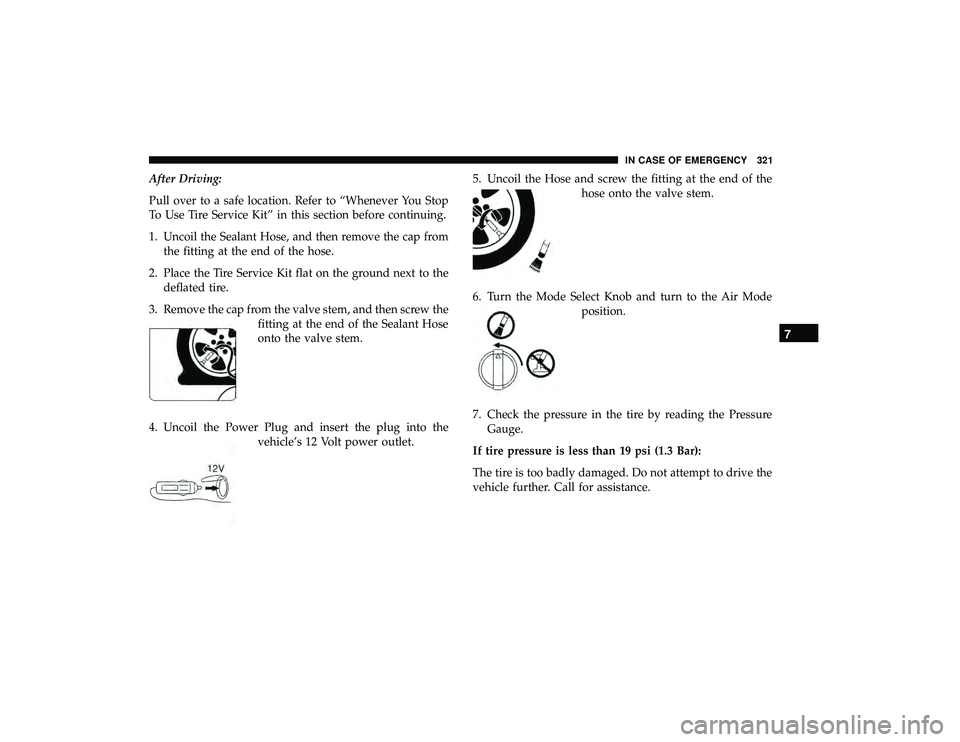
1. Uncoil the Sealant Hose, and then remove the cap fromthe fitting at the end of the hose.
2. Place the Tire Service Kit flat on the ground next to the deflated tire.
3. Remove the cap from the valve stem, and then screw the fitting at the end of the Sealant Hose
onto the valve stem.
4. Uncoil the Power Plug and insert the plug into the vehicle’s 12 Volt power outlet. 5. Uncoil the Hose and screw the fitting at the end of the
hose onto the valve stem.
6. Turn the Mode Select Knob and turn to the Air Mode position.
7. Check the pressure in the tire by reading the Pressure Gauge.
If tire pressure is less than 19 psi (1.3 Bar):
The tire is too badly damaged. Do not attempt to drive the
vehicle further. Call for assistance.
7
IN CASE OF EMERGENCY 321
Page 337 of 490

SCHEDULED SERVICING
Your vehicle is equipped with an automatic oil change
indicator system. The oil change indicator system will
remind you that it is time to take your vehicle in for
scheduled maintenance.
Based on engine operation conditions, the oil change
indicator message will illuminate. This means that service
is required for your vehicle. Operating conditions such as
frequent short-trips, trailer tow, extremely hot or cold
ambient temperatures, and E85 fuel usage will influence
when the “Oil Change Required” message is displayed.
Severe Operating Conditions can cause the change oil
message to illuminate as early as 3,500 miles (5,600 km)
since last reset. Have your vehicle serviced as soon as
possible, within the next 500 miles (805 km).
Your authorized dealer will reset the oil change indicator
message after completing the scheduled oil change. If a
scheduled oil change is performed by someone other than
your authorized dealer, the message can be reset by
referring to the steps described under “Instrument Cluster
Display” in “Getting To Know Your Instrument Panel” for
further information.NOTE:
Under no circumstances should oil change inter-
vals exceed 10,000 miles (16,000 km), 12 months or 350
hours of engine run time, whichever comes first. The 350
hours of engine run or idle time is generally only a concern
for fleet customers.
Severe Duty All Models
Change engine oil at 4,000 miles (6,500 km) if the vehicle is
operated in a dusty and off road environment or is
operated predominately at idle or only very low engine
RPM’s. This type of vehicle use is considered Severe Duty.
Once A Month Or Before A Long Trip:
• Check engine oil level.
• Check windshield washer fluid level.
• Check tire pressure and look for unusual wear or
damage. Rotate tires at the first sign of irregular wear,
even if it occurs before the oil indicator system turns on.
• Check the fluid levels of the coolant reservoir, brake
master cylinder, and power steering and fill as needed.
• Check function of all interior and exterior lights.
8
SERVICING AND MAINTENANCE 335
Page 341 of 490

ENGINE COMPARTMENT
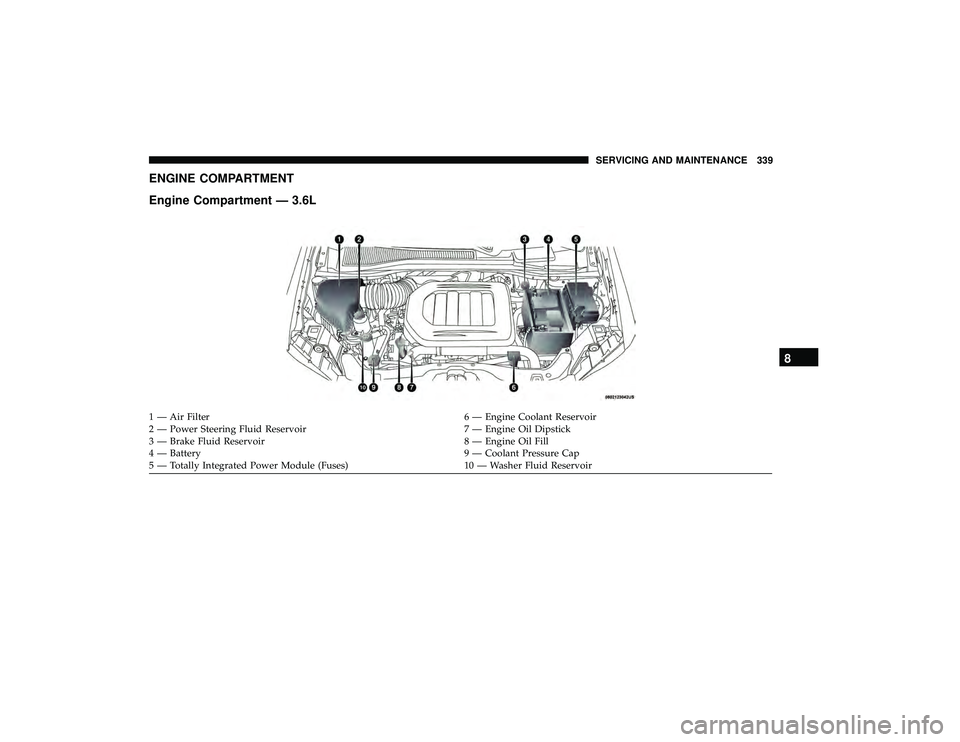
Engine Compartment — 3.6L
1 — Air Filter6 — Engine Coolant Reservoir
2 — Power Steering Fluid Reservoir 7 — Engine Oil Dipstick
3 — Brake Fluid Reservoir 8 — Engine Oil Fill
4 — Battery 9 — Coolant Pressure Cap
5 — Totally Integrated Power Module (Fuses) 10 — Washer Fluid Reservoir
8
SERVICING AND MAINTENANCE 339
Page 342 of 490

Checking Oil Level
To assure proper engine lubrication, the engine oil must be
maintained at the correct level. Check the oil level at
regular intervals, such as every fuel stop. The best time to
check the engine oil level is about five minutes after a fully
warmed engine is shut OFF.
Checking the oil while the vehicle is on level ground will
improve the accuracy of the oil level readings. Maintain the
oil level within the SAFE crosshatch marking on the
dipstick. Adding one quart of oil when the reading is at the
bottom of the mark will result in reading the top of the
mark on these engines.
CAUTION!
Overfilling or underfilling will cause oil aeration, or
loss of oil pressure. This could damage your engine.
Adding Washer Fluid
The fluid reservoir for the windshield washers and the rear
window washer is shared. It is located in the engine
compartment and should be checked at regular intervals.
Fill the reservoir with windshield washer solvent (not
radiator antifreeze) and operate the system for a few
seconds to flush out any residual water.The washer fluid reservoir will hold a full gallon of fluid
when the Low Washer Fluid Light illuminates.
WARNING!
Commercially available windshield washer solvents
are flammable. They could ignite and burn you. Care
must be exercised when filling or working around the
washer solution.
After the engine has warmed, operate the defroster for a
few minutes to reduce the possibility of smearing or
freezing the fluid on the cold windshield. Mopar All
Weather Windshield Washer Solution or equivalent, used
with water as directed on the container, aids cleaning
action, reduces the freezing point to avoid line clogging,
and is not harmful to paint or trim.
Maintenance-Free Battery
Your vehicle is equipped with a maintenance-free battery.
You will never have to add water, nor is periodic mainte-
nance required.
340 SERVICING AND MAINTENANCE