Page 10 of 490
FRONT VIEW
Front View
1 — Doors3 — Wheels/Tires5 — Windshield
2 — Exterior Mirrors 4 — Headlights6 — Hood/Engine Compartment
8 GRAPHICAL TABLE OF CONTENTS
Page 12 of 490
INSTRUMENT PANEL
Instrument Panel
1 — Headlight Switch7 — Gear Selector
2 — Instrument Cluster Display Controls 8 — Uconnect System
3 — Multifunction Lever (Behind Steering Wheel) 9 — Climate Controls
4 — Instrument Cluster 10 — Switch Panel
5 — Speed Controls 11 — Upper Glove Compartment
6 — Ignition 12 — Lower Glove Compartment
10 GRAPHICAL TABLE OF CONTENTS
Page 16 of 490

▫Manual Adjustment (Rear Seats) .............35
▫ Power Seats — If Equipped ................45
▫ Heated Seats — If Equipped ...............47
▫ Plastic Grocery Bag Retainer Hooks ...........49
� HEAD RESTRAINTS ......................49
▫ Supplemental Active Head Restraints — Front
Seats .................................50
▫ Head Restraints — Second Row Quad Seats .....52
▫ Head Restraints — Second Row Bench .........52
▫ Head Restraints — Third Row ..............53
� STEERING WHEEL .......................55
▫ Tilt/Telescoping Steering Column ............55
▫ Heated Steering Wheel — If Equipped ........55
� MIRRORS ..............................56
▫ Automatic Dimming Mirror — If Equipped .....56
▫ Automatic Dimming Mirror With Rear View
Camera Display — If Equipped .............57
▫ Outside Mirrors ........................58 ▫
Interior Observation Mirror ................58
▫ Power Mirrors — If Equipped ..............59
▫ Outside Mirrors Folding Feature ............60
▫ Heated Mirrors — If Equipped .............60
▫ Illuminated Vanity Mirrors — If Equipped .....60
� EXTERIOR LIGHTS .......................61
▫ Headlight Switch ........................61
▫ Multifunction Lever .....................61
▫ Daytime Running Lights (DRL) — If Equipped . .62
▫ High/Low Beam Switch ..................62
▫ Flash-To-Pass ..........................62
▫ Automatic Headlights ....................62
▫ Headlights On With Wipers — If Equipped .....62
▫ Headlight Delay — If Equipped .............63
▫ Lights-On Reminder .....................63
▫ Front Fog Lights — If Equipped .............63
▫ Turn Signals ...........................63
14 GETTING TO KNOW YOUR VEHICLE
Page 43 of 490
Second Row Bench Seat — If Equipped
While the bench seat does not stow in the floor, it is
removable for added cargo space.
Release levers are located on the rear leg assemblies, near
the floor. To remove the seat, squeeze each release handle
and rotate downwards to deploy the wheels. A lock
indicator button pops up when the seat is unlocked. The
seat assembly can now be removed from the vehicle and
moved on its Easy Out Rollers.To reinstall the seat, align the seat into the detent positions
on the floor. Squeeze the release handle and rotate upward
until the lock indicator button returns into the handle.
WARNING!
If not properly latched, the seat could become loose.
Personal injuries could result. After reinstalling these
seats, be sure the red indicator button on the release
handles return into the handles.
Second Row Bench Seat
Release Handles
3
GETTING TO KNOW YOUR VEHICLE 41
Page 57 of 490

STEERING WHEEL
Tilt/Telescoping Steering Column
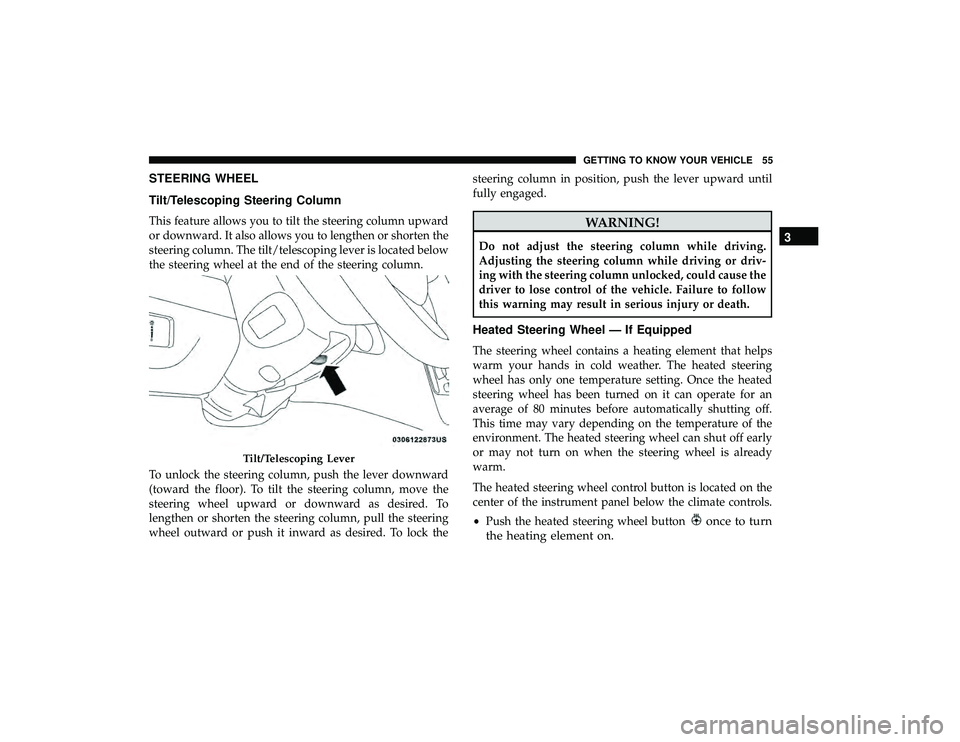
This feature allows you to tilt the steering column upward
or downward. It also allows you to lengthen or shorten the
steering column. The tilt/telescoping lever is located below
the steering wheel at the end of the steering column.
To unlock the steering column, push the lever downward
(toward the floor). To tilt the steering column, move the
steering wheel upward or downward as desired. To
lengthen or shorten the steering column, pull the steering
wheel outward or push it inward as desired. To lock thesteering column in position, push the lever upward until
fully engaged.WARNING!
Do not adjust the steering column while driving.
Adjusting the steering column while driving or driv-
ing with the steering column unlocked, could cause the
driver to lose control of the vehicle. Failure to follow
this warning may result in serious injury or death.
Heated Steering Wheel — If Equipped
The steering wheel contains a heating element that helps
warm your hands in cold weather. The heated steering
wheel has only one temperature setting. Once the heated
steering wheel has been turned on it can operate for an
average of 80 minutes before automatically shutting off.
This time may vary depending on the temperature of the
environment. The heated steering wheel can shut off early
or may not turn on when the steering wheel is already
warm.
The heated steering wheel control button is located on the
center of the instrument panel below the climate controls.
•
Push the heated steering wheel button
once to turn
the heating element on.
Tilt/Telescoping Lever
3
GETTING TO KNOW YOUR VEHICLE 55
Page 58 of 490

•Push the heated steering wheel buttona second time
to turn the heating element off.
NOTE: The engine must be running for the heated steering
wheel to operate.
Vehicles Equipped With Remote Start
On models that are equipped with remote start, the heated
steering wheel can be programed to come on during a
remote start. Refer to “Instrument Cluster Display” in
“Getting To Know Your Instrument Panel” for further
information.
WARNING!
• Persons who are unable to feel pain to the skin
because of advanced age, chronic illness, diabetes,
spinal cord injury, medication, alcohol use, exhaus-
tion, or other physical conditions must exercise care
when using the steering wheel heater. It may cause
burns even at low temperatures, especially if used
for long periods.
• Do not place anything on the steering wheel that
insulates against heat, such as a blanket or steering
wheel covers of any type and material. This may
cause the steering wheel heater to overheat.
MIRRORS
Automatic Dimming Mirror — If Equipped
The mirror head can be adjusted up, down, left, and right
for various drivers. The mirror should be adjusted to center
on the view through the rear window.
This mirror automatically adjusts for headlight glare from
vehicles behind you.
NOTE: The Automatic Dimming feature is disabled when
the vehicle is in REVERSE to improve rear view viewing.
The Automatic Dimming feature can be turned on or off
through the touchscreen.
• Press the mirror dimmer button once to turn the feature
on.
• Press the mirror dimmer button a second time to turn
the feature off.
56 GETTING TO KNOW YOUR VEHICLE
Page 64 of 490

Daytime Running Lights (DRL) — If Equipped
The headlights on your vehicle will illuminate when the
engine is started and the transmission is in any gear except
PARK. This provides a constant�lights on�condition until
the ignition is turned OFF. The lights illuminate at less than
half of normal intensity. If the parking brake is applied, the
Daytime Running Lights (DRL) will turn off. Also, if a turn
signal is activated, the DRL lamp on the same side of the
vehicle may turn off for the duration of the turn signal
activation. Once the turn signal is no longer active, the DRL
lamp will illuminate.
High/Low Beam Switch
Push the multifunction lever toward the instrument panel
to switch the headlights to high beams. Pulling the multi-
function lever back toward the steering wheel will return
the lights to low beams.
Flash-To-Pass
You can signal another vehicle with your headlights by
lightly pulling the multifunction lever toward you. This
will cause the high beam headlights to turn on, and remain
on, until the lever is released.
Automatic Headlights
This system automatically turns the headlights on or off
according to ambient light levels. To turn the system on,
rotate the headlight switch counterclockwise to the AUTO
position. When the system is on, the headlight time delay
feature is also on. This means the headlights will stay on
for up to 90 seconds after you place the ignition into the
OFF position. The headlight time delay can be pro-
grammed 0/30/60/90 seconds. Refer to “Headlight Delay”
in this section for further information.
To turn the automatic system off, move the headlight
switch out of the AUTO position.
NOTE: The engine must be running before the headlights
will come on in the automatic mode.
Headlights On With Wipers — If Equipped
When your headlights are in the AUTO mode and the
engine is running, the headlights will automatically turn
on when the wiper system is also turned on. Headlights on
when windshield wipers are on may be found on vehicles
equipped with an automatic headlight system.
62 GETTING TO KNOW YOUR VEHICLE
Page 129 of 490
CAUTION!(Continued)
•Load should always be secured to cross bars first,
with tie down loops used as additional securing
points if needed. Tie loops are intended as supple-
mentary tie down points only. Do not use ratcheting
mechanisms with the tie loops. Check the straps and
thumb wheels frequently to be sure that the load
remains securely attached.
• Long loads that extend over the windshield, such as
wood panels or surfboards, or loads with large
frontal area should be secured to both the front and
rear of the vehicle.
• Travel at reduced speeds and turn corners carefully
when carrying large or heavy loads on the roof rack.
Wind forces, due to natural causes or nearby truck
traffic, can add sudden upward lift to a load. This is
especially true on large flat loads and may result in
damage to the cargo or your vehicle.
3
GETTING TO KNOW YOUR VEHICLE 127