2019 AUDI TT ROADSTER warning
[x] Cancel search: warningPage 44 of 304

Lights and Vision
Dimming the mirrors
Manual dimming rearview mirror
> Pull the lever on the bottom of the mirror back.
Automatic dimming rearview mirror*
> The interior rearview mirror and exterior mir-
rors* dim automatically when light shines on
them, for example from headlights on a vehicle
behind you.
Z\ WARNING
Electrolyte fluid can leak from automatic dim-
ming mirrors if the glass is broken. Electrolyte
fluid can irritate skin, eyes and airways.
— Repeated or long-term exposure to electro-
lyte fluid can lead to irritation of the air-
ways, especially in people with asthma or
other respiratory conditions. Take deep
breaths immediately after leaving the vehi-
cle or, if this is not possible, open all of the
doors
and windows as wide as possible.
— If electrolyte fluid enters the eyes, flush
them thoroughly with a large amount of
clean water for at least 15 minutes and then
seek medical attention.
— If electrolyte fluid comes into contact with
the skin, flush the affected area with clean
water for at least 15 minutes and then clean
with soap and water and seek medical atten-
tion. Clean affected clothing and shoes thor-
oughly before wearing again.
— If the fluid was swallowed and the person is
conscious, flush the mouth with water for at
least 15 minutes. Do not induce vomiting
unless this is recommended by medical pro-
fessionals. Seek medical attention immedi-
ately.
@) Note
If the glass on an automatic dimming mirror
breaks, electrolyte can leak out. This liquid
damages plastic surfaces. Remove the liquid
as quickly as possible, for example using a
wet sponge.
42
G) Tips
— If the light reaching the rearview mirror is
obstructed, the automatic dimming mirror
will not function correctly,
—The automatic dimming mirrors do not dim
when the interior lighting is turned on or
the reverse gear is selected.
BFV-0298
Fig. 43 Sun visor
The vanity mirrors on the sun visors have covers.
Slide
the cover in the direction of the arrow.
Windshield wipers
Switching the windshield wipers on
BFV-0019
Fig. 44 Windshield wiper lever
Move the windshield wiper lever to the corre-
sponding position:
© - Windshield wipers off
@- Interval mode. To increase/decrease the wip-
er intervals, move the switch @ to the left/right.
In vehicles with a rain sensor*, the wipers turn on
in the rain once the vehicle speed exceeds ap-
proximately 2 mph (4 km/h). The higher the sen-
sitivity of the rain sensor* is set (switch @) to the >
Page 45 of 304

8S8012721BA
Lights and Vision
right), the earlier the windshield wipers react to
moisture on the windshield. You can deactivate
the rain sensor mode* in the Infotainment sys-
tem, which switches the intermittent mode on.
Select in the Infotainment system: MENU button
> Vehicle > left control button > Driver assis-
tance > Rain sensor > Off.
@- Slow wiping
@- Fast wiping
@- Single wipe. If you hold the lever in this posi-
tion longer, the wipers switch from slow wiping
to fast wiping.
©)- Clean the windshield. To eliminate water
droplets, the windshield wipers perform one af-
terwipe after several seconds while driving in
temperatures above 39 °F (4 °C). You can switch
this function off by moving the lever to position
©) within 10 seconds of the afterwipe. The after-
wipe function is reactivated the next time you
switch the ignition on.
Clean the headlights*. The headlight washer sys-
tem* only functions when the lights are switched
on. The headlights are automatically cleaned the
first time and every fifth time the lever is moved
to position @).
Z\ WARNING
— The rain sensor* is only intended to assist
the driver. The driver may still be responsi-
ble for manually switching the wipers on
based on visibility conditions.
— The windshield must not be treated with
water-repelling windshield coating agents.
Unfavorable conditions, such as wetness,
darkness, and when the sun is low, can
cause increased glare, which increases the
risk of an accident. Wiper blade chatter is al-
so possible.
— Properly functioning windshield wiper
blades are required for a clear view and safe
driving > page 44, Replacing windshield
wiper blades.
() Note
— If there is frost, make sure the windshield
wiper blades are not frozen to the wind-
shield. Switching on the windshield wipers
when the blades are frozen to the wind-
shield can damage the wiper blades.
— The windshield wiper system must be
switched off (lever in position 0) before us-
ing
a car wash. This prevents the wipers
from switching on unintentionally and caus-
ing damage to the windshield wiper system.
Gi) Tips
— The windshield wipers switch off when the
ignition is switched off. You can activate the
windshield wipers after the ignition is
switched on again by moving the windshield
wiper lever to any position.
— Worn or dirty windshield wiper blades result
in streaking. This can affect the rain sensor*
function. Check your windshield wiper
blades regularly.
—The washer fluid nozzles in the windshield
washer system are heated* at low tempera-
tures when the ignition is on.
—When stopping temporarily, such as ata
traffic light, the speed of the windshield
wipers automatically reduces by one level.
Cleaning windshield wiper blades
Clean the wiper blades when you see wiper
streaks. Clean the wiper blades with a soft towel
and glass cleaner.
> Place the windshield wiper arms in the service
position > page 44.
> Fold the windshield wiper arms away from the
windshield.
ZA WARNING
Dirty windshield wiper blades can impair vi-
sion, which increases the risk of an accident.
43
Page 46 of 304

Lights and Vision
Replacing windshield wiper blades
he
B8R-0379
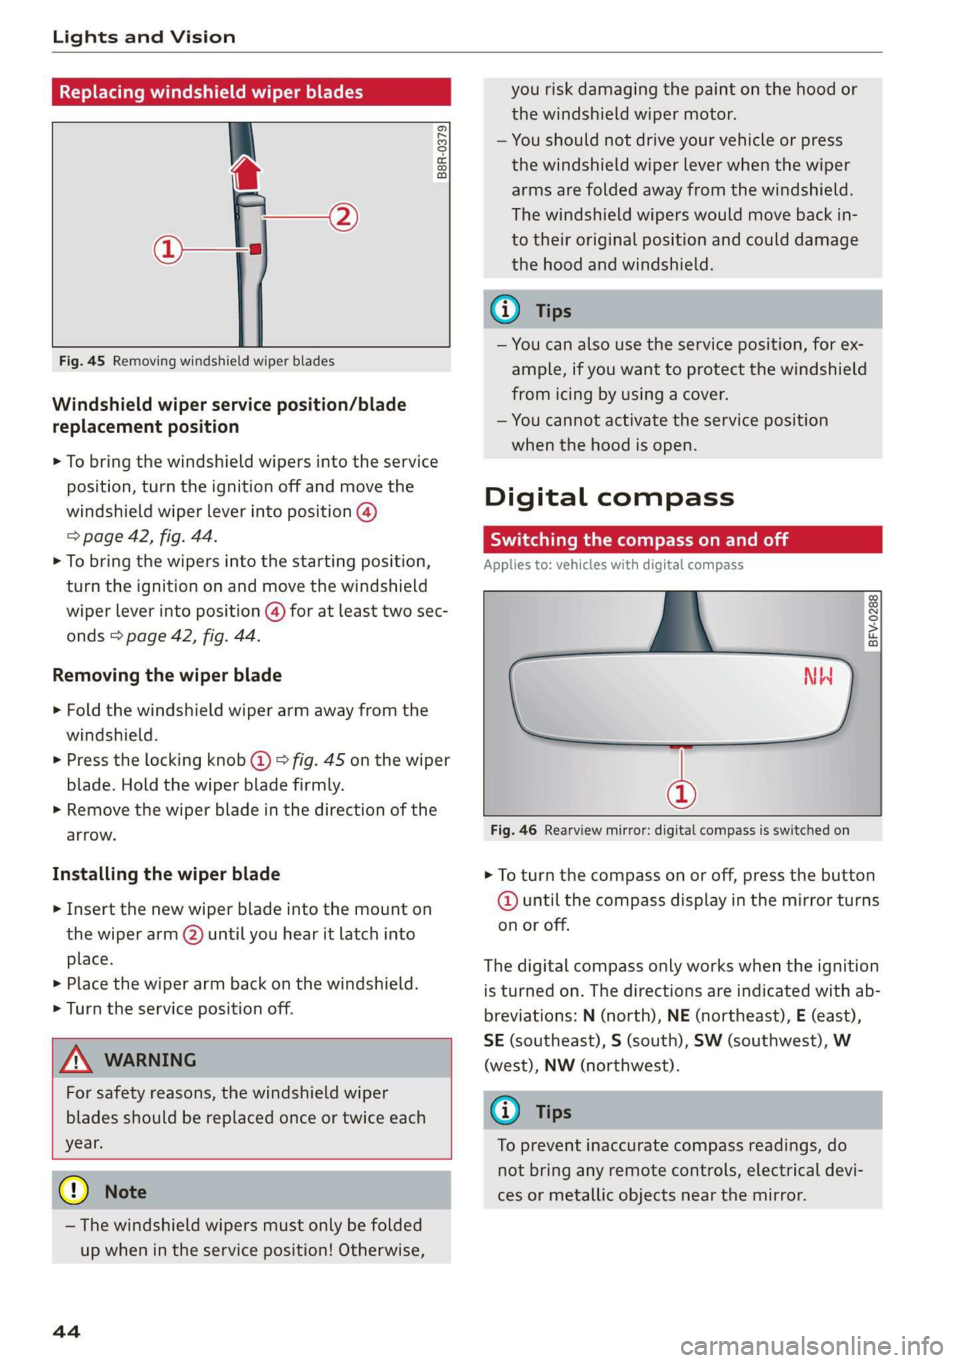
Fig. 45 Removing windshield wiper blades
Windshield wiper service position/blade
replacement position
> To bring the windshield wipers into the service
position, turn the ignition off and move the
windshield wiper lever into position @)
> page 42, fig. 44.
> To bring the wipers into the starting position,
turn the ignition on and move the windshield
wiper lever into position (@) for at least two sec-
onds > page 42, fig. 44.
Removing the wiper blade
> Fold the windshield wiper arm away from the
windshield.
> Press the locking knob (@) > fig. 45 on the wiper
blade. Hold the wiper blade firmly.
> Remove the wiper blade in the direction of the
arrow.
Installing the wiper blade
> Insert the new wiper blade into the mount on
the wiper arm (2) until you hear it latch into
place.
» Place the wiper arm back on the windshield.
> Turn the service position off.
Z\ WARNING
For safety reasons, the windshield wiper
blades should be replaced once or twice each
year.
@) Note
— The windshield wipers must only be folded
up when in the service position! Otherwise,
44
you risk damaging the paint on the hood or
the windshield wiper motor.
— You should not drive your vehicle or press
the windshield wiper lever when the wiper
arms are folded away from the windshield.
The windshield wipers would move back in-
to their original position and could damage
the hood and windshield.
G) Tips
— You can also use the service position, for ex-
ample, if you want to protect the windshield
from icing by using a cover.
— You cannot activate the service position
when the hood is open.
Digital compass
Scale ma meel eR meme a
Applies to: vehicles with digital compass
BFV-0288
NW
@
Fig. 46 Rearview mirror: digital compass is switched on
> To turn the compass on or off, press the button
@ until the compass display in the mirror turns
on or off.
The digital compass only works when the ignition
is turned on. The directions are indicated with ab-
breviations: N (north), NE (northeast), E (east),
SE (southeast), S (south), SW (southwest), W
(west), NW (northwest).
(i) Tips
To prevent inaccurate compass readings, do
not bring any remote controls, electrical devi-
ces or metallic objects near the mirror.
Page 48 of 304

Seats
Seats
General information
Z\ WARNING
See = page 177, Safe driving for important
information, tips, suggestions and warnings
that you should read and follow for your own
safety and the safety of your passengers.
Front seats
Power seat adjustment
Applies to: vehicles with power adjustable seats
2 & Sn Kd
z a
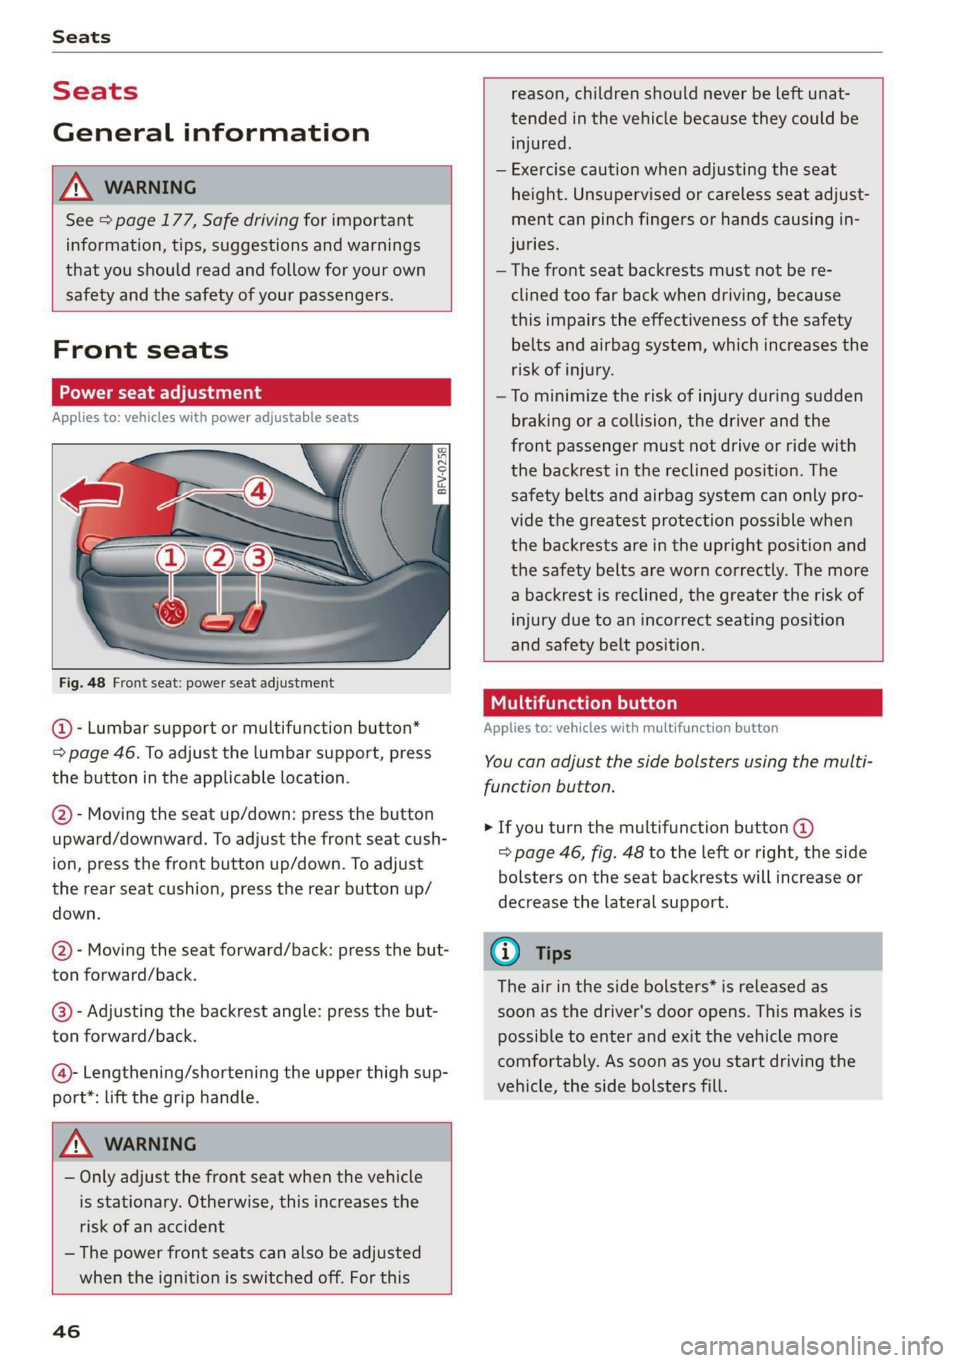
Fig. 48 Front seat: power seat adjustment
@ - Lumbar support or multifunction button*
= page 46. To adjust the lumbar support, press
the button in the applicable location.
@- Moving the seat up/down: press the button
upward/downward. To adjust the front seat cush-
ion, press the front button up/down. To adjust
the rear seat cushion, press the rear button up/
down.
@- Moving the seat forward/back: press the but-
ton forward/back.
@®)- Adjusting the backrest angle: press the but-
ton forward/back.
@- Lengthening/shortening the upper thigh sup-
port*: lift the grip handle.
Z\ WARNING
— Only adjust the front seat when the vehicle
is stationary. Otherwise, this increases the
risk of an accident
— The power front seats can also be adjusted
when the ignition is switched off. For this
46
reason, children should never be left unat-
tended in the vehicle because they could be
injured.
— Exercise caution when adjusting the seat
height. Unsupervised or careless seat adjust-
ment can pinch fingers or hands causing in-
juries.
— The front seat backrests must not be re-
clined too far back when driving, because
this impairs the effectiveness of the safety
belts and airbag system, which increases the
risk of injury.
—To minimize the risk of injury during sudden
braking or a collision, the driver and the
front passenger must not drive or ride with
the backrest in the reclined position. The
safety belts and airbag system can only pro-
vide the greatest protection possible when
the backrests are in the upright position and
the safety belts are worn correctly. The more
a backrest is reclined, the greater the risk of
injury due to an incorrect seating position
and safety belt position.
Multifunction button
Applies to: vehicles with multifunction button
You can adjust the side bolsters using the multi-
function button.
> If you turn the multifunction button @
=> page 46, fig. 48 to the left or right, the side
bolsters on the seat backrests will increase or
decrease the lateral support.
G) Tips
The air in the side bolsters* is released as
soon as the driver's door opens. This makes is
possible to enter and exit the vehicle more
comfortably. As soon as you start driving the
vehicle, the side bolsters fill.
Page 50 of 304

Stowing and using
Stowing and using
Ashtray
Applies to: vehicles with ashtray
2 3 ° >
c o
Fig. 50 Center armrest folded up: ashtray
The ashtray is placed in the center console under
the center armrest.
Opening and closing
> To open or close the ashtray, fold the cover up
or down.
Emptying
> To empty the ashtray, pull it upward and out.
ZA WARNING
Never use the ashtray to hold paper, because
this increases the risk of a fire.
Cigarette lighter
Fig. 51 Center armrest folded up: cigarette lighter
The
cigarette lighter only works when the igni-
tion is switched on.
> Fold the center armrest up to reach the ciga-
rette lighter, if necessary.
> Press the cigarette lighter in.
48
> Remove the cigarette lighter when it pops out.
The cigarette lighter may be used as a power
source for the tire mobility kit/compact spare
tire* compressor only when absolutely necessary.
Z\ WARNING
— The cigarette lighter only works when the ig-
nition is switched on. Incorrect usage can
lead to serious injuries or burns. To reduce
the risk of injuries, never leave children un-
attended in the vehicle with the vehicle key.
— Be careful when using the cigarette lighter.
Inattentive or unsupervised use of the ciga-
rette
lighter can cause burns.
Power sources
When the ignition is switched on, you may be
able to use the electric power sources for exter-
nal devices, depending on the vehicle equipment.
12 volt sockets
You can connect electrical accessories to the 12
volt sockets. The power usage must not exceed
120 watts.
The 12 volt sockets are labeled with the & or
12V symbol. They are located in the front center
console* and on the side trim panel in the lug-
gage compartment*.
USB ports
Applies to: Vehicles with USB port
You can charge mobile devices using the USB
ports. The USB ports are labeled with the «<> or
[4 symbol or CHARGE ONLY.
Z\ WARNING
—To reduce the risk of fatal injury, store all
connected devices securely when driving so
that they do not move around inside the ve-
hicle when braking or in the event of an acci-
dent.
— Incorrect usage can lead to serious injuries
or burns. To reduce the risk of injuries, never
leave children unattended in the vehicle
with the vehicle key. >
Page 51 of 304

8S58012721BA
Stowing and using
@) Note
— Read the operating manuals for the con-
nected devices.
—To reduce the risk of damage to the vehicle
electrical system, never attempt to charge
the vehicle battery by connecting accesso-
ries that provide power to the power sour-
ces.
— Do not connect any device whose network
class (voltage) does not match the network
class designed for the socket.
— Disconnect the connectors from the power
sources carefully to reduce the risk of dam-
aging them.
Storage
(ety miele (Te
Applies to: vehicles with cup holders
BFV-0075
S Ss
2
= eg a
Fig. 53 Center armrest folded up: cup holder
> To use the cup holder under the center armrest,
fold it upward > page 47.
> Fold the plastic bracket toward the rear, if nec-
essary > fig. 53.
ZX WARNING
Spilled hot liquid can increase the risk of acci-
dents and injuries.
— Never drive with containers that contain hot
liquid such as coffee or tea. The hot liquid
could spill and cause burns during a colli-
sion, sudden braking or other vehicle move-
ment. Spilled hot liquid can also increase
the risk of accidents and injuries.
— Only use soft containers in the cup holders.
Hard cups and glasses can increase the risk
of injury during a collision.
— Never use the cup holder or the adapter as
an ashtray because this is a fire hazard.
C) Note
Beverage containers in the cup holders should
always
have a lid. Otherwise, the liquid inside
could spill and cause damage to vehicle
equipment.
Additional storage
You will find a range of storage compartments
and holders at different locations in the vehicle.
— Compartments in the doors
— Storage area in the glove compartment. The
glove
compartment can be locked using the
mechanical key > page 23.
— Storage compartment under the center arm-
rest*
— Storage compartment between the seat backr-
ests
— Key compartment in the center console
— Storage compartment on the rear side of the
seat*. The compartment can hold a maximum
weight of 2.2 lbs (1 kg).
ZA WARNING
—To reduce the risk of injury, make sure the
covers for all storage compartments are al-
ways closed while driving.
— Only use the storage compartments in the
door trim panels to store small objects that
will not stick out of the compartment and
impair the function of the side airbags.
49
Page 52 of 304

Stowing and using
Luggage compartment
General information
All pieces of luggage or objects must be securely
fastened in the luggage compartment. Note the
following to maintain good vehicle handling:
> Distribute the load evenly in the luggage com-
partment.
> Stow heavy luggage as far forward in the lug-
gage compartment as possible.
» Use non-elastic cords attached to the tie-downs
to secure objects.
Z\ WARNING
— Loose objects can be thrown around the ve-
hicle interior during sudden driving or brak-
ing maneuvers, which increases the risk of
an accident. Always stow objects securely in
the luggage compartment and secure them
at the tie-downs. Use straps suitable for
heavy objects.
— If pieces of luggage or objects are secured
to the tie-downs with unsuitable or dam-
aged straps, this can increase the risk of in-
jury during braking maneuvers or accidents.
— When transporting heavy objects, the vehi-
cle characteristics will change due to the
shift in the center of gravity, which increases
the risk of an accident. You may need to
adapt your driving style and speed to the
current conditions.
— The cargo net is only strong enough to se-
cure light objects. Heavy objects are not ade-
quately secured. Attempting to secure heavy
objects increases the risk of injury.
— Never exceed the permitted axle and load
and vehicle weight > page 286.
— Never secure a child safety seat to the tie-
downs.
— Never leave your vehicle unattended, espe-
cially if the luggage compartment lid is
open. Children could enter the luggage com-
partment and close the luggage compart-
ment lid from the inside. This creates the
risk of fatal injury, since the children would
be locked in and may not be able to escape
by themselves.
sO
— Do not allow children to play in or on the ve-
hicle. Close and lock the luggage compart-
ment lid as well as all other doors when you
leave the vehicle.
— Never transport passengers in the luggage
compartment. Every passenger must be cor-
rectly secured with the safety belts in the
vehicle > page 182.
() Note
Make sure that the heating grid strips for the
rear window defogger are not damaged by
abrasive objects.
G) Tips
— The tire pressure must be adapted to the
load > page 250.
— You can purchase straps at specialty stores.
Pass-through with bag
Applies to: vehicles with pass-through and removable ski bag
BFV-0159
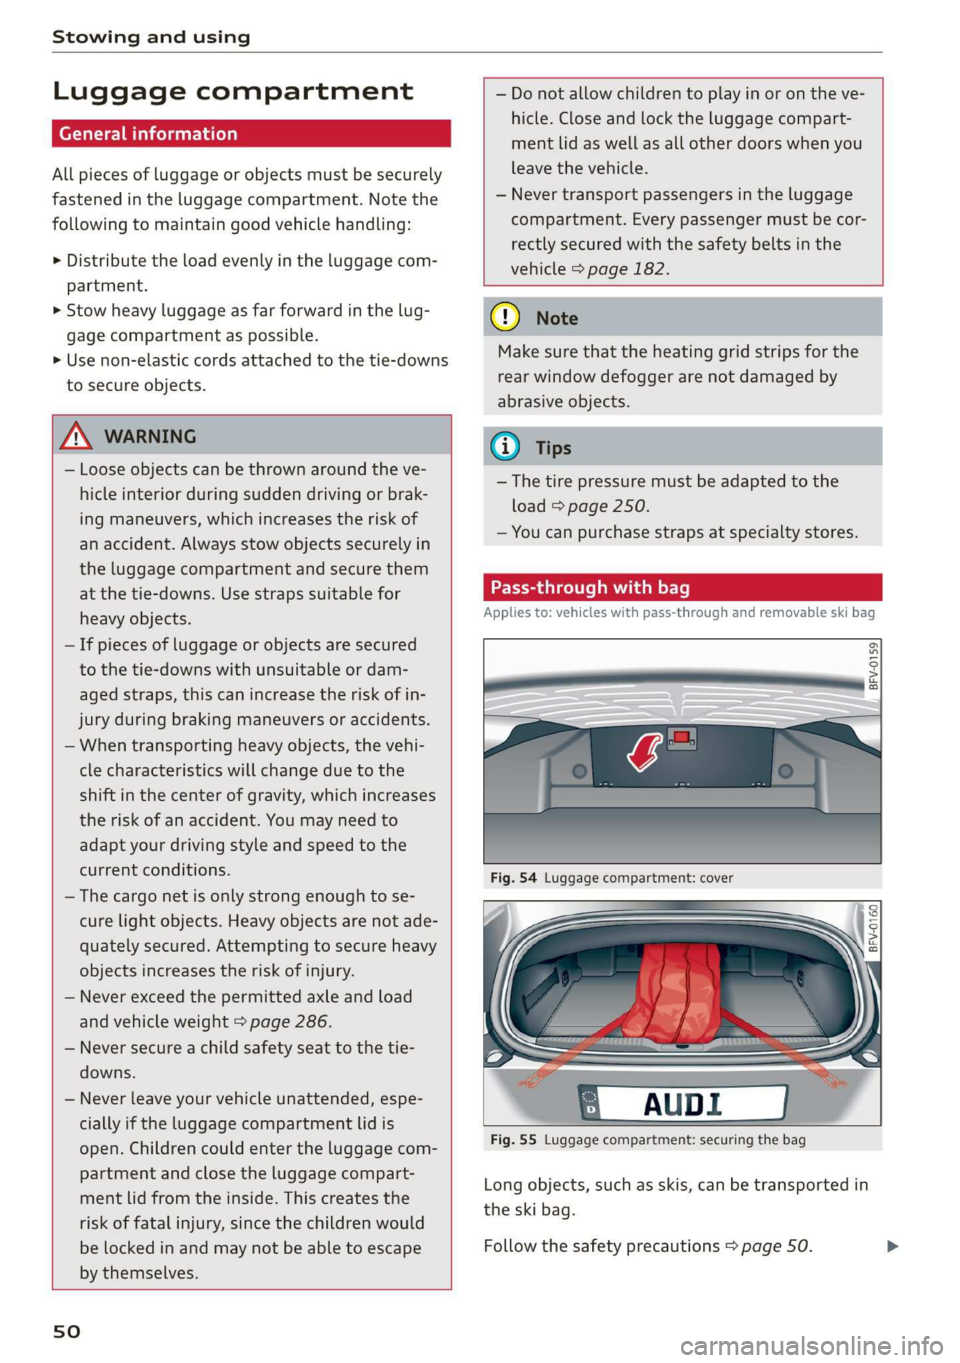
Fig. 55 Luggage compartment: securing the bag
Long objects, such as skis, can be transported in
the ski bag.
Follow the safety precautions > page 50.
Page 53 of 304

8S58012721BA
Stowing and using
Loading
> Open the storage compartment cover between
the seat backrests.
> Open the luggage compartment lid.
> Press the release button and fold the cover for
the pass-through towards the luggage com-
partment © fig. 54.
> Slide the bag from the luggage compartment
into the vehicle interior with the zipper facing
toward the rear > /\.
> Load the ski bag.
Securing
> Secure the carabiner hooks on both straps in
the corresponding rear tie-downs > fig. 55.
Z\ WARNING
After loading the bag, it must be tied down
with both straps.
@) Tips
— Only fold the ski bag up if it is dry.
— Lay skis in the bag with the points facing
forward and ski pole points facing the rear.
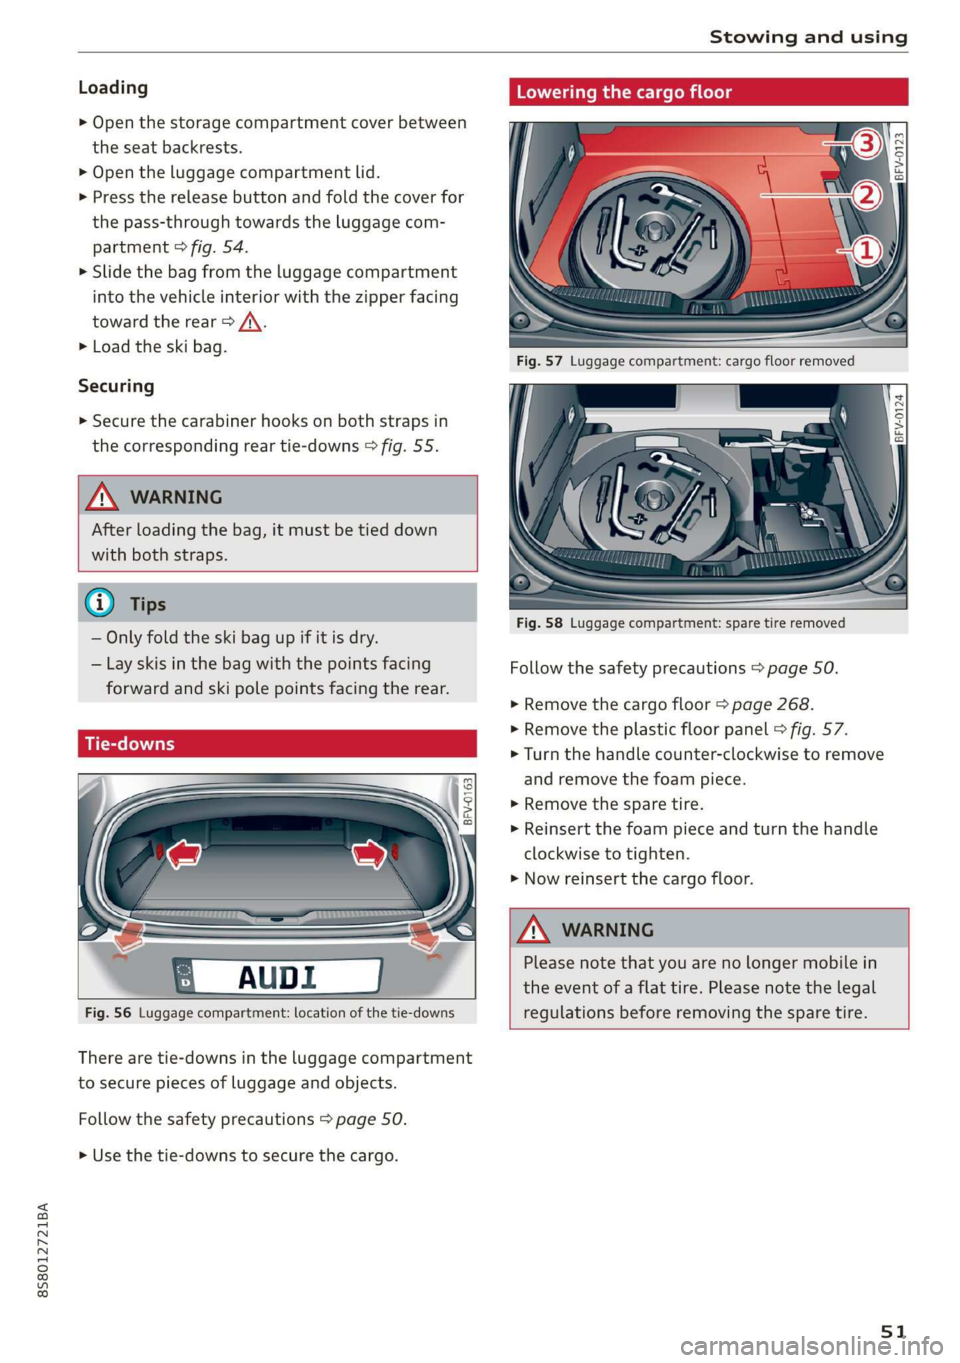
Fig. 56 Luggage compartment: location of the tie-downs
There are tie-downs in the luggage compartment
to secure pieces of luggage and objects.
Follow the safety precautions > page 50.
> Use the tie-downs to secure the cargo.
Lowering the cargo floor
BFV-0124
Fig. 58 Luggage compartment: spare tire removed
Follow the safety precautions > page 50.
> Remove the cargo floor > page 268.
> Remove the plastic floor panel > fig. 57.
> Turn the handle counter-clockwise to remove
and remove the foam piece.
> Remove the spare tire.
> Reinsert the foam piece and turn the handle
clockwise to tighten.
> Now reinsert the cargo floor.
ZA WARNING
Please note that you are no longer mobile in
the event of a flat tire. Please note the legal
regulations before removing the spare tire.
51