2019 AUDI TT ROADSTER ECU
[x] Cancel search: ECUPage 50 of 304

Stowing and using
Stowing and using
Ashtray
Applies to: vehicles with ashtray
2 3 ° >
c o
Fig. 50 Center armrest folded up: ashtray
The ashtray is placed in the center console under
the center armrest.
Opening and closing
> To open or close the ashtray, fold the cover up
or down.
Emptying
> To empty the ashtray, pull it upward and out.
ZA WARNING
Never use the ashtray to hold paper, because
this increases the risk of a fire.
Cigarette lighter
Fig. 51 Center armrest folded up: cigarette lighter
The
cigarette lighter only works when the igni-
tion is switched on.
> Fold the center armrest up to reach the ciga-
rette lighter, if necessary.
> Press the cigarette lighter in.
48
> Remove the cigarette lighter when it pops out.
The cigarette lighter may be used as a power
source for the tire mobility kit/compact spare
tire* compressor only when absolutely necessary.
Z\ WARNING
— The cigarette lighter only works when the ig-
nition is switched on. Incorrect usage can
lead to serious injuries or burns. To reduce
the risk of injuries, never leave children un-
attended in the vehicle with the vehicle key.
— Be careful when using the cigarette lighter.
Inattentive or unsupervised use of the ciga-
rette
lighter can cause burns.
Power sources
When the ignition is switched on, you may be
able to use the electric power sources for exter-
nal devices, depending on the vehicle equipment.
12 volt sockets
You can connect electrical accessories to the 12
volt sockets. The power usage must not exceed
120 watts.
The 12 volt sockets are labeled with the & or
12V symbol. They are located in the front center
console* and on the side trim panel in the lug-
gage compartment*.
USB ports
Applies to: Vehicles with USB port
You can charge mobile devices using the USB
ports. The USB ports are labeled with the «<> or
[4 symbol or CHARGE ONLY.
Z\ WARNING
—To reduce the risk of fatal injury, store all
connected devices securely when driving so
that they do not move around inside the ve-
hicle when braking or in the event of an acci-
dent.
— Incorrect usage can lead to serious injuries
or burns. To reduce the risk of injuries, never
leave children unattended in the vehicle
with the vehicle key. >
Page 52 of 304
Stowing and using
Luggage compartment
General information
All pieces of luggage or objects must be securely
fastened in the luggage compartment. Note the
following to maintain good vehicle handling:
> Distribute the load evenly in the luggage com-
partment.
> Stow heavy luggage as far forward in the lug-
gage compartment as possible.
» Use non-elastic cords attached to the tie-downs
to secure objects.
Z\ WARNING
— Loose objects can be thrown around the ve-
hicle interior during sudden driving or brak-
ing maneuvers, which increases the risk of
an accident. Always stow objects securely in
the luggage compartment and secure them
at the tie-downs. Use straps suitable for
heavy objects.
— If pieces of luggage or objects are secured
to the tie-downs with unsuitable or dam-
aged straps, this can increase the risk of in-
jury during braking maneuvers or accidents.
— When transporting heavy objects, the vehi-
cle characteristics will change due to the
shift in the center of gravity, which increases
the risk of an accident. You may need to
adapt your driving style and speed to the
current conditions.
— The cargo net is only strong enough to se-
cure light objects. Heavy objects are not ade-
quately secured. Attempting to secure heavy
objects increases the risk of injury.
— Never exceed the permitted axle and load
and vehicle weight > page 286.
— Never secure a child safety seat to the tie-
downs.
— Never leave your vehicle unattended, espe-
cially if the luggage compartment lid is
open. Children could enter the luggage com-
partment and close the luggage compart-
ment lid from the inside. This creates the
risk of fatal injury, since the children would
be locked in and may not be able to escape
by themselves.
sO
— Do not allow children to play in or on the ve-
hicle. Close and lock the luggage compart-
ment lid as well as all other doors when you
leave the vehicle.
— Never transport passengers in the luggage
compartment. Every passenger must be cor-
rectly secured with the safety belts in the
vehicle > page 182.
() Note
Make sure that the heating grid strips for the
rear window defogger are not damaged by
abrasive objects.
G) Tips
— The tire pressure must be adapted to the
load > page 250.
— You can purchase straps at specialty stores.
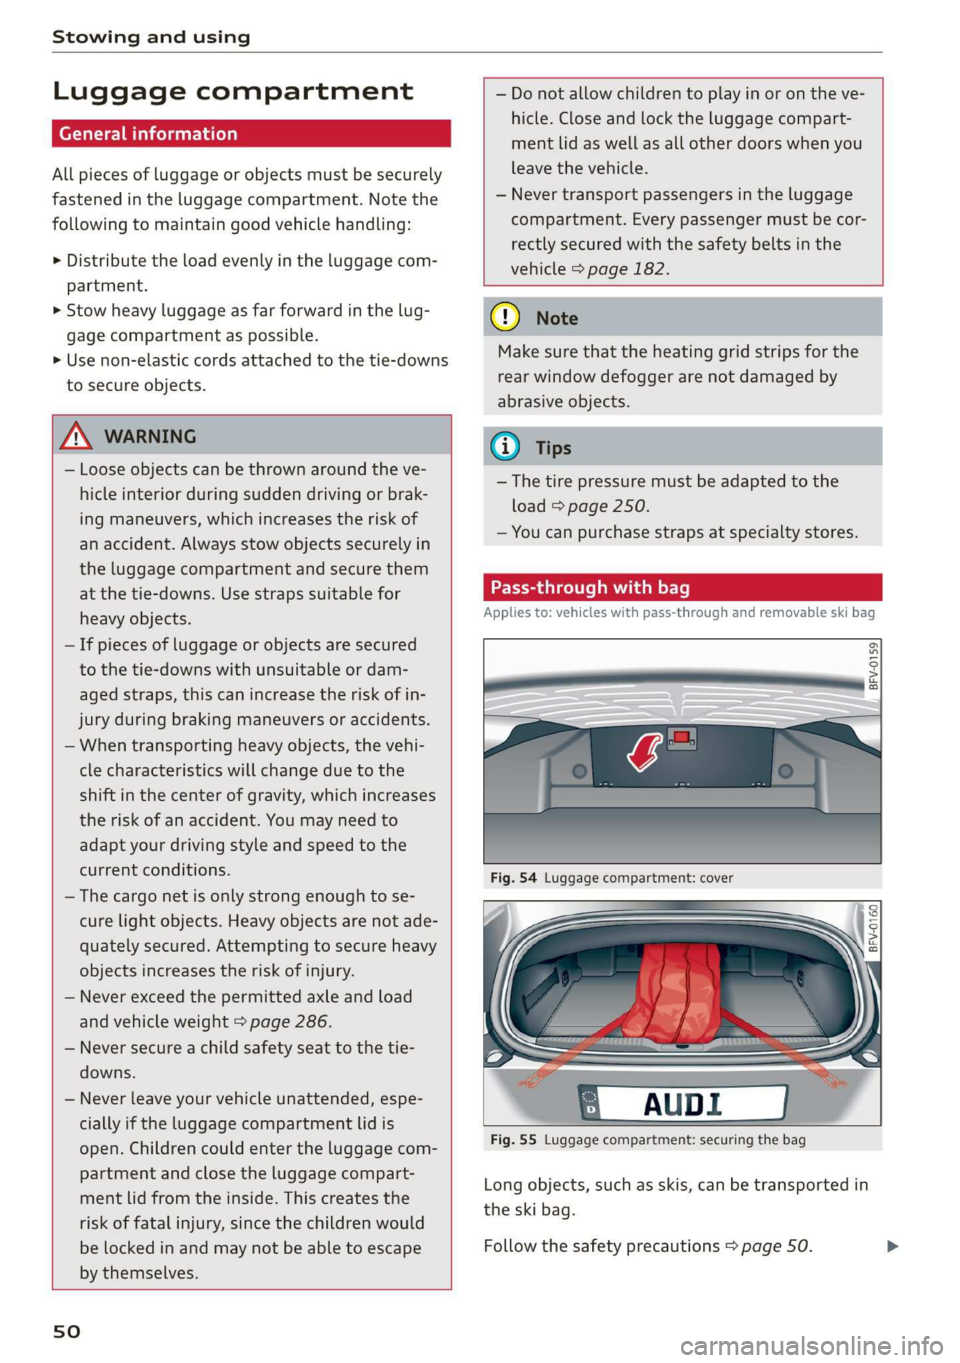
Pass-through with bag
Applies to: vehicles with pass-through and removable ski bag
BFV-0159
Fig. 55 Luggage compartment: securing the bag
Long objects, such as skis, can be transported in
the ski bag.
Follow the safety precautions > page 50.
Page 53 of 304
8S58012721BA
Stowing and using
Loading
> Open the storage compartment cover between
the seat backrests.
> Open the luggage compartment lid.
> Press the release button and fold the cover for
the pass-through towards the luggage com-
partment © fig. 54.
> Slide the bag from the luggage compartment
into the vehicle interior with the zipper facing
toward the rear > /\.
> Load the ski bag.
Securing
> Secure the carabiner hooks on both straps in
the corresponding rear tie-downs > fig. 55.
Z\ WARNING
After loading the bag, it must be tied down
with both straps.
@) Tips
— Only fold the ski bag up if it is dry.
— Lay skis in the bag with the points facing
forward and ski pole points facing the rear.
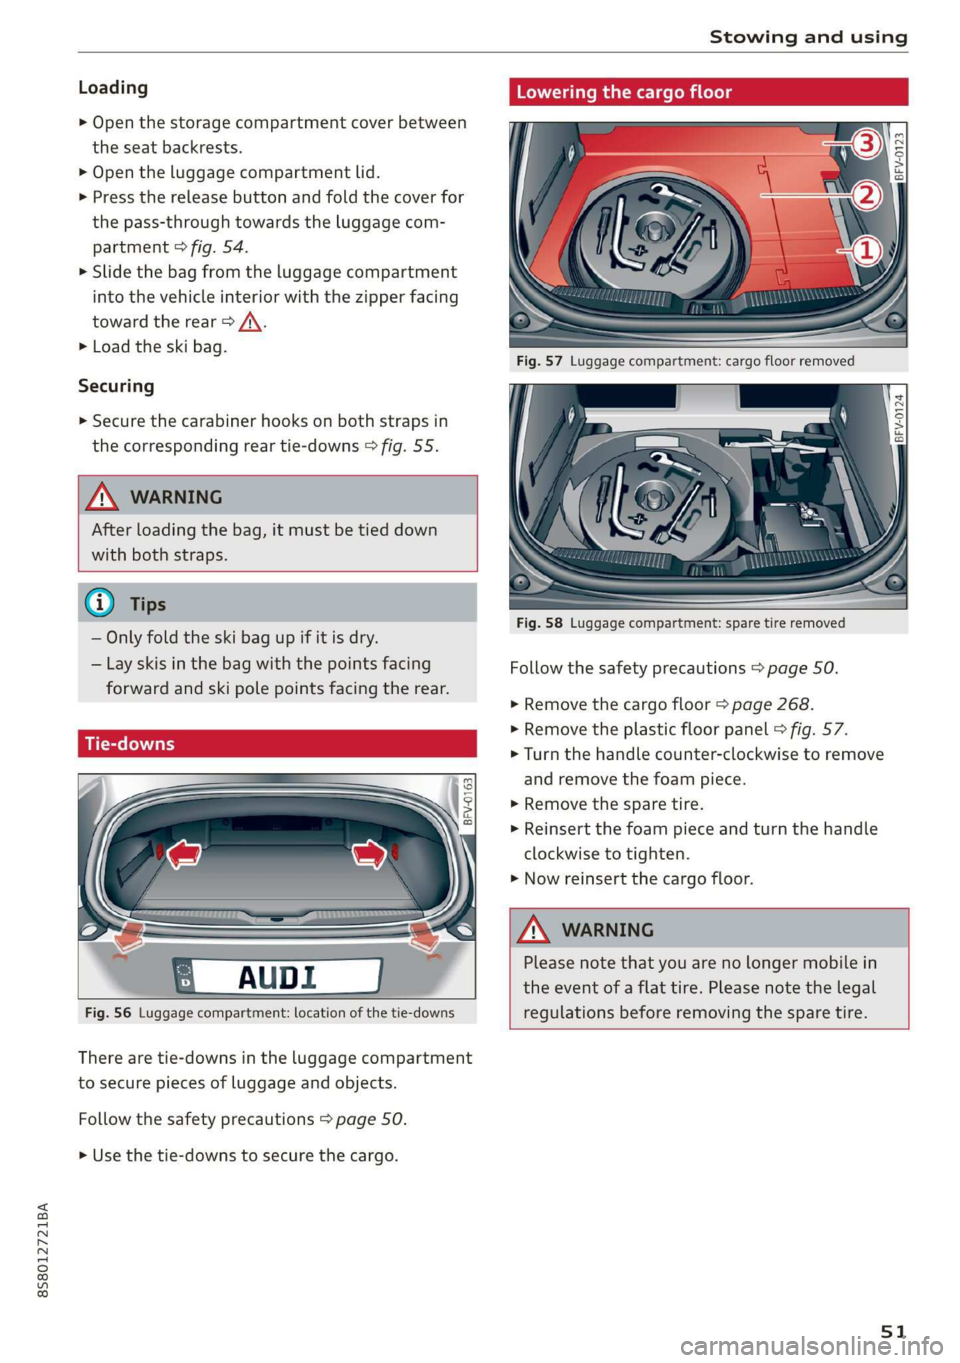
Fig. 56 Luggage compartment: location of the tie-downs
There are tie-downs in the luggage compartment
to secure pieces of luggage and objects.
Follow the safety precautions > page 50.
> Use the tie-downs to secure the cargo.
Lowering the cargo floor
BFV-0124
Fig. 58 Luggage compartment: spare tire removed
Follow the safety precautions > page 50.
> Remove the cargo floor > page 268.
> Remove the plastic floor panel > fig. 57.
> Turn the handle counter-clockwise to remove
and remove the foam piece.
> Remove the spare tire.
> Reinsert the foam piece and turn the handle
clockwise to tighten.
> Now reinsert the cargo floor.
ZA WARNING
Please note that you are no longer mobile in
the event of a flat tire. Please note the legal
regulations before removing the spare tire.
51
Page 59 of 304

8S8012721BA
Driving
sporty style. Show respect to others around
you and the environment with the way you op-
erate your vehicle, especially at night.
Steering
Adjusting the steering wheel position
The steering wheel position is fully adjustable up
and down and forward and back.
2 s g
> gc oa
Fig. 64 Lever on the steering column
> Tilt the lever = fig. 64 downward > A\.
> Bring the steering wheel into the desired posi-
tion.
> Push the lever against the steering column un-
tilit is secure.
tion during a collision. Always make sure
that the steering wheel is level with your
chest.
— Always hold the steering wheel with your
hands in the 9 o'clock and 3 o'clock posi-
tions to reduce the risk of injury if the airbag
deploys.
— Never hold the steering wheel in the 12
o'clock position or with both hands on the
rim or the center of the steering wheel.
Holding the steering wheel incorrectly sig-
nificantly increases the risk of injury to the
hands, arms and head if the airbag deploys.
ZA WARNING
Incorrect use of the steering wheel adjust-
ment and an incorrect seating position can
cause serious injuries.
— Only adjust the steering column when the
vehicle is stationary so that you do not lose
control of the vehicle.
— Adjust the driver's seat or steering wheel so
that there is at least a 10 in (25 cm) dis-
tance between your chest and the steering
wheel. If you do not maintain this distance,
you will not be properly protected by the air-
bag system.
— If your physical characteristics prevent you
from sitting at least 10 in (25 cm) or more
away from the steering wheel, see if an au-
thorized Audi dealer or authorized Audi
Service Facility can provide adapters that
will help.
— If your face is level with the steering wheel,
the airbag does not provide as much protec-
Starting and stopping
the engine
Tatars ma eae tn
The [START ENGINE STOP] button switches the
ignition on and starts the engine.
a
Sg
x >
i o
Fig. 65 Center console: START ENGINE STOP button
Switching the ignition on or off
If you would like to switch the ignition on with-
out starting the engine, follow these steps:
> Press the [START ENGINE STOP] button without
pressing the brake pedal.
Starting the engine
> Automatic transmission: press the brake pedal
and move the selector lever into the P or N po-
sition > A\.
> Press the [START ENGINE STOP] button. The
engine will start.
If the engine does not start immediately, the
starting procedure stops automatically after a
57
>
Page 62 of 304
Driving
Setting/manually releasing the parking
brake
> Pull the ©) switch to set the parking brake. The
LED in the switch turns on. The PARK (USA mod-
els) (Canada models) indicator light also
turns on in the instrument cluster display.
> To release the parking brake manually, press
the brake or accelerator pedal while the igni-
tion is switched on and press the ©) switch at
the same time. The LED in the button and the
indicator light in the display turn off.
Releasing the parking brake automatically
Requirement: the driver's door must be closed.
> To start driving and release the parking brake
automatically, press the accelerator pedal as
usual.
In addition to releasing the parking brake auto-
matically, other convenience and safety functions
are available when you start driving > page 61,
Starting to drive.
Emergency braking function
You can use the emergency braking function in an
emergency situation, or if the standard brakes
are malfunctioning or the pedal is obstructed.
> Pull and hold the ©) switch.
> As soon as you release the ©) switch or acceler-
ate, the braking stops.
Pulling
and holding the ©) switch while driving
the vehicle activates the emergency braking func-
tion. The hydraulic brake system will brake all
four wheels. The braking effect is similar to heavy
braking > A\.
To reduce the risk of activating the emergency
braking by mistake, a warning tone (buzzer)
sounds when the ©) switch is pulled. Emergency
braking stops as soon as the ©) switch is released
or the accelerator pedal is pressed.
Parking
> Press the brake pedal to stop the vehicle.
> Pull the © switch to set the parking brake.
>» Place the selector lever in the “P” position.
> Turn the engine off > A\.
60
> Turn the steering wheel when parking on in-
clines so that the wheels will roll into the curb
if the vehicle starts moving.
ZA WARNING
— Ifa gear is engaged while the vehicle is sta-
tionary and the engine is running, do not
press the accelerator pedal inadvertently.
Otherwise, the vehicle will start to move im-
mediately and this could result in an acci-
dent.
— Emergency braking should only be used in
an emergency, when the when the standard
brake pedal is malfunctioning or obstructed.
During emergency braking, your vehicle will
brake similar to heavy braking. ESC and the
associated components (ABS, ASR, EDL) can-
not overcome the laws of physics. In corners
and when road or weather conditions are
bad, a full brake application can cause the
vehicle to skid or the rear end to swerve,
which increases the risk of an accident.
— If the power supply fails, you cannot set the
parking brake once it is released. In this
case, park the vehicle on level ground and
secure it by placing the selector lever in the
P position. See an authorized Audi dealer or
authorized Audi Service Facility for assis-
tance.
— If you leave the vehicle, switch the ignition
off and take the vehicle key with you. This
applies particularly when children remain in
the vehicle. Otherwise children could start
the engine, release the parking brake or op-
erate electrical equipment such as power
windows, which increases the risk of an acci-
dent.
— No one should remain in the vehicle when it
is locked - especially children. Locked doors
make it more difficult for emergency work-
ers to get into the vehicle, which puts lives
at risk.
C) Note
Do not leave your vehicle unattended while
the engine is running, because this increases
the risk of an accident.
Page 69 of 304
8S8012721BA
Driving
ZA\ WARNING
Please note that the wheels could spin on
slick or slippery roads when kick-down is ac-
tive.
Launch Control
The Launch Control Program enables maximum
acceleration.
Requirement: the engine must be at operating
temperature and the steering wheel must not be
turned.
> With the engine running, press the |[2OFF] but-
ton briefly one time )) .
> Pull the selector lever back out of the "D/S" po-
sition briefly to select the "S" position, or press
it toward the right into the tiptronic position or
select the Dynamic driving mode in drive se-
lect* > page 77.
> Press the brake pedal firmly with your left foot
and hold it all the way down for at least 1 sec-
ond.
> At the same time, press the gas pedal all the
way down with your right foot until the engine
reaches and stays at a high RPM level.
> Remove your left foot from the brake.
Z\ WARNING
— Always adapt your driving to the traffic flow.
— Only use Launch Control when road and traf-
fic conditions allow it and other drivers will
not be endangered or impacted by your driv-
ing and the vehicle's acceleration.
— Please note that the drive wheels can spin
and the vehicle can break away when sport
mode is switched on, especially when the
road is slippery.
— Once the vehicle has started moving, press
the |& OFF] button briefly to turn the sport
mode off.
D_ The ESC light turns on and stays on, and the message Sta-
bilization control (ESC): sport. Warning! Limited stabili-
ty appears temporarily in the Infotainment system to indi-
cate that the system was deactivated.
CG) Note
When accelerating using Launch Control, all
vehicle components are subject to heavy
loads. This can result in increased wear.
G@) Tips
After accelerating using the Launch Control,
the temperature of some vehicle components
may increase greatly. If that happens, the
function will not be available for a few mi-
nutes to reduce the risk of damage. After a
cool-down period, Launch Control will be
available again.
MeRoeumurlu adel)
& Transmission: malfunction! Safely stop vehi-
cle
Do not continue driving. Stop the vehicle as soon
as possible in a safe location and secure it so it
does not roll. See an authorized Audi dealer or
authorized Audi Service Facility for assistance.
& Transmission: too hot. Please stop vehicle
The transmission is too hot and can become dam-
aged. Stop and let the transmission cool with the
engine running (at idle) in the "P" selector lever
position. Then the indicator light and the mes-
sage turn off, drive to an authorized Audi dealer
or authorized Audi Service Facility immediately to
have the malfunction corrected. If the indicator
light and the driver message do not turn off, do
not continue driving. See an authorized Audi
dealer or authorized Audi Service Facility for as-
sistance.
[&] Transmission: malfunction! You can contin-
ue driving. See owner's manual
Drive to an authorized Audi dealer or authorized
Audi Service Facility immediately to have the
malfunction corrected.
67
Page 70 of 304
![AUDI TT ROADSTER 2019 Owners Manual Driving
[8] Transmission: malfunction! You can contin-
ue driving with limited function. No reverse
gear
There is a system malfunction in the transmis-
sion. The transmission is switching to e AUDI TT ROADSTER 2019 Owners Manual Driving
[8] Transmission: malfunction! You can contin-
ue driving with limited function. No reverse
gear
There is a system malfunction in the transmis-
sion. The transmission is switching to e](/manual-img/6/57667/w960_57667-69.png)
Driving
[8] Transmission: malfunction! You can contin-
ue driving with limited function. No reverse
gear
There is a system malfunction in the transmis-
sion. The transmission is switching to emergency
mode. This mode only shifts into certain gears or
may no longer shift at all. The engine may stall.
You cannot engage the reverse gear. Drive to an
authorized Audi dealer or authorized Audi Service
Facility immediately to have the malfunction cor-
rected.
[8] Transmission: malfunction! You can contin-
ue driving in D until engine is off
Drive the vehicle away from moving traffic and
park. See an authorized Audi dealer or authorized
Audi Service Facility for assistance.
[Gj Transmission: too hot. Please adapt driving
style
The transmission temperature has increased sig-
nificantly. Drive very cautiously or take a break
from driving until the temperature returns to the
normal range and the indicator light turns off.
[6] Transmission: please press brake pedal and
select gear again
If the transmission malfunctions because the
temperature is too high, a message appears
when the transmission is cooled.
Selector lever emergency release
Fig. 72 Selector lever: removing the cover
68
a 8
eS
2 &
Fig. 73 Selector lever: using the emergency release to
move out of the Park position
The emergency release mechanism is located in
the right area under the selector lever shift gate.
Using the emergency release can be complicated.
See an authorized Audi dealer or authorized Audi
Service Facility for assistance.
You will need the screwdriver from the vehicle
tool kit to release it > page 268. Use the flat side
of the reversible screwdriver blade.
Removing the cover
> Set the parking brake to secure your vehicle
from rolling away. If this is not possible, secure
your vehicle from rolling using another meth-
od.
> Switch the ignition off.
> To loosen the shifter boot, carefully insert the
flat side of the screwdriver sideways into the
slit near the shifter boot > fig. 72.
> Carefully pry the shifter boot out with the
screwdriver while gripping the boot at the fold
and pulling it upward and out of the opening
> fig. 73.
> Fold the shifter boot up around the shifter
knob.
Selector lever emergency release
> Press and hold the yellow release button with
the screwdriver.
> At the same time, press the release button on
the selector lever @) and move the selector lev-
er to the “N” position.
Reattaching the cover
> Clip the shift cover back into the shift gate. >
Page 71 of 304
8S58012721BA
Driving
ZA WARNING
— The parking lock may only be released using
the emergency release if the parking brake
is set. If it is not working, secure the vehicle
from rolling using the brake pedal or other
suitable means, such as blocking a front and
a rear wheel. An unsecured vehicle may roll
away, which increases the risk of an acci-
dent.
— Only activate the emergency release while
ona level surface or a slight slope.
—To reduce the risk of an accident, you must
not drive when the emergency release is ac-
tivated.
Trailer towing
General information
Your Audi is not designed to tow a trailer.
Towing a trailer with your Audi is not recom-
mended and can cause damage to the car. Dam-
aged caused by towing a trailer is not covered by
your Audi Warranty.
69