Page 572 of 660
5728-2. Steps to take in an emergency
AVENSIS_OM_OM20C79E_(EE)
Vehicles with compact spare tire
Vehicles with full-size spare tire
Location of the spare tire, jack and tools (wagon)
Rear auxiliary box
Jack handle
Spare tire
Jack
Wheel nut wrench
Parking brake release tool
Towing eyelet
1
2
3
4
5
6
7
Rear auxiliary box
Jack handle
Spare tire
Parking brake release tool
Towing eyelet
Wheel nut wrench
Jack
1
2
3
4
5
6
7
Page 577 of 660
5778-2. Steps to take in an emergency
AVENSIS_OM_OM20C79E_(EE)
8
When trouble arises
Chock the tires.
Vehicles with full wheel orna-
ment, remove the wheel orna-
ment using the wrench.
To protect the wheel ornament,
place a rag between the wrench
and the wheel ornament, as shown
in the illustration.
Vehicles with the wheel cap clip,
refer to P. 489.
Slightly loosen the wheel nuts
(one turn).
Replacing a flat tire
1
SedanWagon
Flat tireWheel chock positions
Front Left-hand side Behind the rear right-hand side tire
Right-hand side Behind the rear left-hand side tire
RearLeft-hand sideIn front of the front right-hand side tire
Right-hand sideIn front of the front left-hand side tire
2
3
Page 578 of 660
5788-2. Steps to take in an emergency
AVENSIS_OM_OM20C79E_(EE)
Turn the tire jack portion by hand until the notch of the jack is in
contact with the jack point.
Raise the vehicle until the tire is
slightly raised off the ground.
Remove all the wheel nuts and
the tire.
When resting the tire on the
ground, place the tire so that the
wheel design faces up to avoid
scratching the wheel surface.
4A
SedanWagon
5
6
Page 579 of 660

5798-2. Steps to take in an emergency
AVENSIS_OM_OM20C79E_(EE)
8
When trouble arises
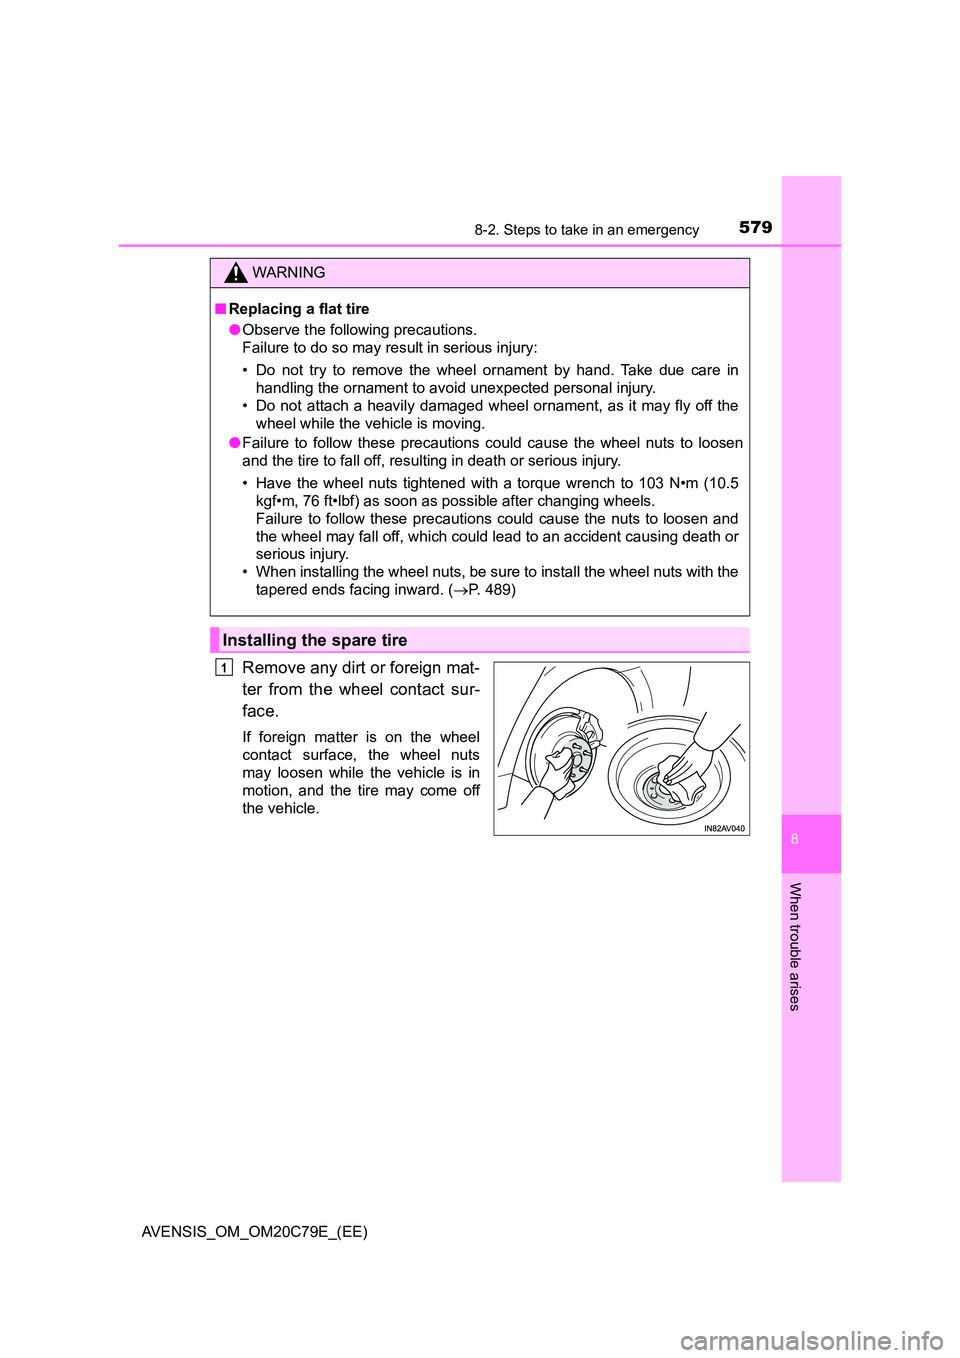
Remove any dirt or foreign mat-
ter from the wheel contact sur-
face.
If foreign matter is on the wheel
contact surface, the wheel nuts
may loosen while the vehicle is in
motion, and the tire may come off
the vehicle.
WARNING
■ Replacing a flat tire
● Observe the following precautions.
Failure to do so may result in serious injury:
• Do not try to remove the wheel ornament by hand. Take due care in
handling the ornament to avoid unexpected personal injury.
• Do not attach a heavily damaged wheel ornament, as it may fly off the
wheel while the vehicle is moving.
● Failure to follow these precautions could cause the wheel nuts to loosen
and the tire to fall off, resulting in death or serious injury.
• Have the wheel nuts tightened with a torque wrench to 103 N•m (10.5
kgf•m, 76 ft•lbf) as soon as possible after changing wheels.
Failure to follow these precautions could cause the nuts to loosen and
the wheel may fall off, which could lead to an accident causing death or
serious injury.
• When installing the wheel nuts, be sure to install the wheel nuts with the
tapered ends facing inward. ( P. 489)
Installing the spare tire
1
Page 580 of 660
5808-2. Steps to take in an emergency
AVENSIS_OM_OM20C79E_(EE)
Install the tire and loosely tighten each wheel nut by hand by
approximately the same amount.
Replacing a steel wheel with a steel wheel (including a compact
spare tire)
Tighten the nuts until the tapered
portion comes into loose contact
with the disc wheel sheet.
Replacing an aluminum wheel with a steel wheel (including a com-
pact spare tire)
Tighten the nuts until the tapered
portion comes into loose contact
with the disc wheel sheet.
Replacing an aluminum wheel with an aluminum wheel
Turn the wheel nuts until the
washers come into contact with
the disc wheel.
2
Disc wheel
sheet
Tapered portion
Tapered portion
Disc wheel
sheet
Washer
Disc wheel
Page 581 of 660
5818-2. Steps to take in an emergency
AVENSIS_OM_OM20C79E_(EE)
8
When trouble arises
Lower the vehicle.
Firmly tighten each nut two or
three times in the order shown
in the illustration.
Tightening torque:
103 N•m (10.5 kgf•m, 76 ft•lbf)
Vehicles with full wheel orna-
ment, reinstall the wheel orna-
ment.
Align the cutout of the wheel orna-
ment with the valve stem as
shown.
Stow the flat tire, tire jack and all tools.
3
4
5
6
Page 582 of 660

5828-2. Steps to take in an emergency
AVENSIS_OM_OM20C79E_(EE)
■The full-size spare tire
● On vehicles with a tire pressure warning system, the full-size spare tire has
a “Temporary use only” label on the outer surface of the wheel.
Use the full-size spare tire temporarily, and only in an emergency.
● Make sure to check the tire inflation pressure of the full-size spare tire.
( P. 623)
■ The compact spare tire
● The compact spare tire is identified by the label “TEMPORARY USE ONLY”
on the tire sidewall.
Use the compact spare tire temporarily, and only in an emergency.
● Make sure to check the tire inflation pressure of the compact spare tire.
( P. 623)
■ When using the spare tire (vehicles with tire pressure warning system)
As the spare tire is not equipped with a tire pressure warning valve and trans-
mitter, low inflation pressure of the spare tire will not be indicated by the tire
pressure warning system. Also, if you repl ace the spare tire after the tire pres-
sure warning light comes on, the light remains on.
■ If you have a flat front tire on a road covered with snow or ice (vehicles
with compact spare tire)
Install the compact spare tire on the rear of the vehicle. Perform the following
steps and fit tire chains to the front tires.
Replace a rear tire with the compact spare tire.
Replace the flat front tire with the tire removed from the rear of the vehicle.
Fit tire chains to the front tires.
1
2
3
Page 585 of 660

5858-2. Steps to take in an emergency
AVENSIS_OM_OM20C79E_(EE)
8
When trouble arises
NOTICE
■Be careful when driving over bumps with the compact spare tire
installed on the vehicle
The vehicle becomes lower when driving with the compact spare tire com-
pared to when driving with standard tires. Be careful when driving over
uneven road surfaces.
■ Driving with tire chains and the compact spare tire
Do not fit tire chains to the compact spare tire.
Tire chains may damage the vehicle body and adversely affect driving per-
formance.
■ When replacing the tires
When removing or fitting the wheels, tire s or the tire pressure warning valve
and transmitter, contact any authorized Toyota retailer or Toyota authorized
repairer, or any reliable repairer as the tire pressure warning valve and
transmitter may be damaged if not handled correctly.
■ To avoid damage to the tire pressure warning valves and transmitters
When a tire is repaired with liquid sealants, the tire pressure warning valve
and transmitter may not operate properly. If a liquid sealant is used, contact
any authorized Toyota retailer or Toyota authorized repairer, or any reliable
repairer or other qualified service shop as soon as possible. Make sure to
replace the tire pressure warning va lve and transmitter when replacing the
tire. ( P. 470)