Page 65 of 180

WARNING!
• Never place a rear-facing child restraintin front of an air bag. A deploying pas-
senger front air bag can cause death or
serious injury to a child 12 years or
younger, including a child in a rear-
facing child restraint.
• Only use a rear-facing child restraint in a
vehicle with a rear seat.
Older Children And Child Restraints
Children who are two years old or who have
outgrown their rear-facing convertible child
seat can ride forward-facing in the vehicle.
Forward-facing child seats and convertible
child seats used in the forward-facing direc-
tion are for children who are over two years
old or who have outgrown the rear-facing
weight or height limit of their rear-facing
convertible child seat. Children should re-
main in a forward-facing child seat with a
harness for as long as possible, up to the
highest weight or height allowed by the child
seat. All children whose weight or height is above
the forward-facing limit for the child seat
should use a belt-positioning booster seat
until the vehicle’s seat belts fit properly. If
the child cannot sit with knees bent over the
vehicle’s seat cushion while the child’s back
is against the seatback, they should use a
belt-positioning booster seat. The child and
belt-positioning booster seat are held in the
vehicle by the seat belt.
WARNING!
• Improper installation can lead to failure
of an infant or child restraint. It could
come loose in a collision. The child
could be badly injured or killed. Follow
the child restraint manufacturer’s direc-
tions exactly when installing an infant or
child restraint.
• After a child restraint is installed in the
vehicle, do not move the vehicle seat
forward or rearward because it can
loosen the child restraint attachments.
Remove the child restraint before ad-
justing the vehicle seat position. When
WARNING!
the vehicle seat has been adjusted, re-
install the child restraint.
• When your child restraint is not in use,
secure it in the vehicle with the seat belt
or LATCH anchorages, or remove it from
the vehicle. Do not leave it loose in the
vehicle. In a sudden stop or accident, it
could strike the occupants or seatbacks
and cause serious personal injury.
Children Too Large For Booster Seats
Children who are large enough to wear the
shoulder belt comfortably, and whose legs are
long enough to bend over the front of the seat
when their back is against the seatback,
should use the seat belt in a rear seat. Use
this simple 5-step test to decide whether the
child can use the vehicle’s seat belt alone:
1. Can the child sit all the way back against
the back of the vehicle seat?
2. Do the child’s knees bend comfortably over the front of the vehicle seat – while
the child is still sitting all the way back?
63
Page 66 of 180

3. Does the shoulder belt cross the child’sshoulder between their neck and arm?
4. Is the lap part of the belt as low as possible, touching the child’s thighs and
not the stomach?
5. Can the child stay seated like this for the whole trip?
If the answer to any of these questions was
“no,” then the child still needs to use a
booster seat in this vehicle. If the child is
using the lap/shoulder belt, check seat belt
fit periodically and make sure the seat belt
buckle is latched. A child’s squirming or
slouching can move the belt out of position. If the shoulder belt contacts the face or neck,
move the child closer to the center of the
vehicle, or use a booster seat to position the
seat belt on the child correctly.
WARNING!
Never allow a child to put the shoulder belt
under an arm or behind their back. In a
crash, the shoulder belt will not protect a
child properly, which may result in serious
injury or death. A child must always wear
both the lap and shoulder portions of the
seat belt correctly.
Recommendations For Attaching Child Re-
straints
The following instructions for installing child
restraints are for vehicles with rear seating.
For instructions on how to install child re-
straints in vehicles without rear seating, refer
to “Installing Child Restraints in Commercial
Vehicles” in this section.”
Restraint Type Combined Weight of the
Child + Child Restraint Use Any Attachment Method Shown With An “X” Below
LATCH – Lower Anchors Only Seat Belt Only LATCH – Lower Anchors
+ Top Tether Anchor Seat Belt + Top Tether
Anchor
Rear-Facing Child Re- straint Up to 65 lbs (29.5 kg)
XX
Rear-Facing Child Re- straint More than 65 lbs
(29.5 kg) X
Forward-Facing Child Restraint Up to 65 lbs (29.5 kg)
XX
Forward-Facing Child Restraint More than 65 lbs
(29.5 kg) X
SAFETY
64
Page 67 of 180
 Restraint System
Your vehicle is equipped with the child re-
straint anchorage system called LATCH,
which stands for Lower Anchors and Tethersfor CHildre")
Lower Anchors And Tethers For CHildren
(LATCH) Restraint System
Your vehicle is equipped with the child re-
straint anchorage system called LATCH,
which stands for Lower Anchors and Tethersfor CHildren. The LATCH system has three
vehicle anchor points for installing LATCH-
equipped child seats. There are two lower
anchorages located at the back of the seat
cushion where it meets the seatback and one
top tether anchorage located behind the seat-
ing position. These anchorages are used to
install LATCH-equipped child seats without
using the vehicle’s seat belts. Some seating
positions may have a top tether anchorage
but no lower anchorages. In these seating
positions, the seat belt must be used with the
top tether anchorage to install the child re-
straint. Please see the following table for
more information.
LATCH Positions For Installing Child Re-
straints In This Vehicle
Frequently Asked Questions About Installing Child Restraints With LATCH
What is the weight limit (child’s weight +
weight of the child restraint) for using the
LATCH anchorage system to attach the child restraint? 65 lbs (29.5 kg)Use the LATCH anchorage system until the
combined weight of the child and the child
restraint is 65 lbs (29.5 kg). Use the seat belt
and tether anchor instead of the LATCH system once the combined weight is more than 65 lbs (29.5 kg).
LATCH Label
Lower Anchor / Top Tether Locations —Vehicle With Rear Seat
Lower Anchorage Symbol (2 An-
chorages Per Seating Position)
Top Tether Anchorage Symbol
65
Page 68 of 180

Frequently Asked Questions About Installing Child Restraints With LATCH
Can the LATCH anchorages and the seat belt be used together to attach a rear-facing or forward-facing child restraint? NoDo not use the seat belt when you use the
LATCH anchorage system to attach a rear- facing or forward-facing child restraint.
Booster seats may be attached to the LATCH anchorages if allowed by the booster seat
manufacturer. See your booster seat owner’s manual for more information.
Can a child seat be installed in the center posi- tion using the inner LATCH lower anchorages? NoUse the seat belt and tether anchor to install a
child seat in the center seating position.
Can two child restraints be attached using a common lower LATCH anchorage? NoNever “share” a LATCH anchorage with two or
more child restraints. If the center position
does not have dedicated LATCH lower anchor-
ages, use the seat belt to install a child seat in the center position next to a child seat using
the LATCH anchorages in an outboard position.
Can the rear-facing child restraint touch the back of the front passenger seat? Ye sThe child seat may touch the back of the front
passenger seat if the child restraint manufac- turer also allows contact. See your child re-
straint owner’s manual for more information.
Can the head restraints be removed? YesSecond row all positions.
SAFETY
66
Page 69 of 180

Locating The LATCH Anchorages
The lower anchorages are round bars that are
found at the rear of the seat cushion where it
meets the seatback, below the anchorage
symbols on the seatback. They are just visible
when you lean into the rear seat to install the
child restraint. You will easily feel them if you
run your finger along the gap between the
seatback and seat cushion.
Locating The Upper Tether Anchorages
There are tether strap anchorages behind
each rear seating position located on the
back of the seat.
LATCH-compatible child restraint systems
will be equipped with a rigid bar or a flexible
strap on each side. Each will have a hook or
connector to attach to the lower anchorage
and a way to tighten the connection to the
anchorage. Forward-facing child restraintsand some rear-facing child restraints will also
be equipped with a tether strap. The tether
strap will have a hook at the end to attach to
the top tether anchorage and a way to tighten
the strap after it is attached to the anchorage.
Center Seat LATCH
WARNING!
• Do not install a child restraint in the
center position using the LATCH system.
This position is not approved for install-
ing child seats using the LATCH attach-
ments. You must use the seat belt and
tether anchor to install a child seat in the
center seating position.
• Never use the same lower anchorage to
attach more than one child restraint.
Please refer to “To Install A LATCH-
Compatible Child Restraint” for typical
installation instructions.
Always follow the directions of the child re-
straint manufacturer when installing your
child restraint. Not all child restraint systems
will be installed as described here.
Lower Anchors
Tether Anchors
67
Page 70 of 180
 seat
belt, stow the seat belt, follo")
To Install A LATCH-Compatible Child Re-
straint In Vehicles With Rear Seating
If the selected seating position has a Switch-
able Automatic Locking Retractor (ALR) seat
belt, stow the seat belt, following the instruc-
tions below. See the section “Installing Child
Restraints Using the Vehicle Seat Belt” to
check what type of seat belt each seating
position has.
1. Loosen the adjusters on the lower strapsand on the tether strap of the child seat so
that you can more easily attach the hooks
or connectors to the vehicle anchorages.
2. Place the child seat between the lower anchorages for that seating position. For
some second row seats, you may need to
recline the seat and / or raise the head
restraint to get a better fit. If the rear seat
can be moved forward and rearward in the
vehicle, you may wish to move it to its
rear-most position to make room for the
child seat. You may also move the front
seat forward to allow more room for the
child seat. 3. Attach the lower hooks or connectors of
the child restraint to the lower anchorages
in the selected seating position.
4. If the child restraint has a tether strap, connect it to the top tether anchorage.
See the section “Installing Child Re-
straints Using the Top Tether Anchorage”
for directions to attach a tether anchor.
5. Tighten all of the straps as you push the child restraint rearward and downward
into the seat. Remove slack in the straps
according to the child restraint manufac-
turer’s instructions.
6. Test that the child restraint is installed tightly by pulling back and forth on the
child seat at the belt path. It should not
move more than 1 inch (25.4 mm) in any
direction.
How To Stow An Unused Switchable-ALR
(ALR) Seat Belt
When using the LATCH attaching system to
install a child restraint, stow all ALR seat
belts that are not being used by other occu-
pants or being used to secure child restraints.
An unused belt could injure a child if they play with it and accidentally lock the seat belt
retractor. Before installing a child restraint
using the LATCH system, buckle the seat belt
behind the child restraint and out of the
child’s reach. If the buckled seat belt inter-
feres with the child restraint installation,
instead of buckling it behind the child re-
straint, route the seat belt through the child
restraint belt path and then buckle it. Do not
lock the seat belt. Remind all children in the
vehicle that the seat belts are not toys and
that they should not play with them.
WARNING!
• Improper installation of a child restraint
to the LATCH anchorages can lead to
failure of the restraint. The child could
be badly injured or killed. Follow the
child restraint manufacturer’s directions
exactly when installing an infant or child
restraint.
• Child restraint anchorages are designed
to withstand only those loads imposed
by correctly-fitted child restraints. Un-
der no circumstances are they to be
used for adult seat belts, harnesses, or
SAFETY
68
Page 71 of 180

WARNING!
for attaching other items or equipment
to the vehicle.
Installing Child Restraints Using The Ve-
hicle Seat Belt In Vehicles With Rear Seat-
ing
Child restraint systems are designed to be
secured in vehicle seats by lap belts or the lap
belt portion of a lap/shoulder belt.
WARNING!
• Improper installation or failure to prop-erly secure a child restraint can lead to
failure of the restraint. The child could
be badly injured or killed.
WARNING!
• Follow the child restraint manufacturer’sdirections exactly when installing an in-
fant or child restraint.
The seat belts in the passenger seating posi-
tions are equipped with a Switchable Auto-
matic Locking Retractor (ALR) that is de-
signed to keep the lap portion of the seat belt
tight around the child restraint so that it is
not necessary to use a locking clip. The ALR
retractor can be “switched” into a locked
mode by pulling all of the webbing out of the
retractor and then letting the webbing retract
back into the retractor. If it is locked, the ALR
will make a clicking noise while the webbing
is pulled back into the retractor. Refer to the
“Automatic Locking Mode” description in
“Switchable Automatic Locking Retractors
(ALR)” under “Occupant Restraint Systems”
for additional information on ALR.
Lap/Shoulder Belt Systems For Installing
Child Restraints In This Vehicle
Frequently Asked Questions About Installing Child Restraints With Seat Belts
What is the weight limit (child’s weight +
weight of the child restraint) for using the
Tether Anchor with the seat belt to attach a forward facing child restraint? Weight limit of the Child RestraintAlways use the tether anchor when using the
seat belt to install a forward facing child re-
straint, up to the recommended weight limit of the child restraint.
Automatic Locking Retractor (ALR)
Locations — Vehicle With Rear Seating
ALR = Switchable Automatic Locking
Retractor
Top Tether Anchorage Symbol
69
Page 72 of 180

Frequently Asked Questions About Installing Child Restraints With Seat Belts
Can the rear-facing child restraint touch the back of the front passenger seat? Ye sContact between the front passenger seat and
the child restraint is allowed, if the child re- straint manufacturer also allows contact.
Can the head restraints be removed? YesSecond Row: The head restraints may be re-
moved from all positions.
Can the buckle stalk be twisted to tighten the seat belt against the belt path of the child re- straint? No
Do not twist the buckle stalk in a seating posi-
tion with an ALR retractor.
Installing A Child Restraint With A Switch-
able Automatic Locking Retractor (ALR):
Child restraint systems are designed to be
secured in vehicle seats by lap belts or the
lap belt portion of a lap/shoulder belt.
WARNING!
• Improper installation or failure to prop-
erly secure a child restraint can lead to
failure of the restraint. The child could
be badly injured or killed.
• Follow the child restraint manufactur-
er’s directions exactly when installing an
infant or child restraint. 1. Place the child seat in the center of the
seating position. For some second row
seats, you may need to recline the seat
and/or raise the head restraint to get a
better fit. If the rear seat can be moved
forward and rearward in the vehicle, you
may wish to move it to its rear-most posi-
tion to make room for the child seat. You
may also move the front seat forward to
allow more room for the child seat.
2. Pull enough of the seat belt webbing from the retractor to pass it through the belt
path of the child restraint. Do not twist the
belt webbing in the belt path.
3. Slide the latch plate into the buckle until you hear a “click.” 4. Pull on the webbing to make the lap
portion tight against the child seat.
5. To lock the seat belt, pull down on the shoulder part of the belt until you have
pulled all the seat belt webbing out of the
retractor. Then, allow the webbing to re-
tract back into the retractor. As the web-
bing retracts, you will hear a clicking
sound. This means the seat belt is now in
the Automatic Locking mode.
6. Try to pull the webbing out of the retractor. If it is locked, you should not be able to
pull out any webbing. If the retractor is
not locked, repeat step 5.
SAFETY
70
 1
1 2
2 3
3 4
4 5
5 6
6 7
7 8
8 9
9 10
10 11
11 12
12 13
13 14
14 15
15 16
16 17
17 18
18 19
19 20
20 21
21 22
22 23
23 24
24 25
25 26
26 27
27 28
28 29
29 30
30 31
31 32
32 33
33 34
34 35
35 36
36 37
37 38
38 39
39 40
40 41
41 42
42 43
43 44
44 45
45 46
46 47
47 48
48 49
49 50
50 51
51 52
52 53
53 54
54 55
55 56
56 57
57 58
58 59
59 60
60 61
61 62
62 63
63 64
64 65
65 66
66 67
67 68
68 69
69 70
70 71
71 72
72 73
73 74
74 75
75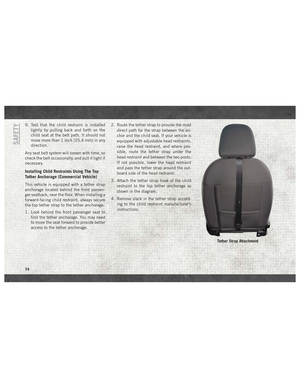 76
76 77
77 78
78 79
79 80
80 81
81 82
82 83
83 84
84 85
85 86
86 87
87 88
88 89
89 90
90 91
91 92
92 93
93 94
94 95
95 96
96 97
97 98
98 99
99 100
100 101
101 102
102 103
103 104
104 105
105 106
106 107
107 108
108 109
109 110
110 111
111 112
112 113
113 114
114 115
115 116
116 117
117 118
118 119
119 120
120 121
121 122
122 123
123 124
124 125
125 126
126 127
127 128
128 129
129 130
130 131
131 132
132 133
133 134
134 135
135 136
136 137
137 138
138 139
139 140
140 141
141 142
142 143
143 144
144 145
145 146
146 147
147 148
148 149
149 150
150 151
151 152
152 153
153 154
154 155
155 156
156 157
157 158
158 159
159 160
160 161
161 162
162 163
163 164
164 165
165 166
166 167
167 168
168 169
169 170
170 171
171 172
172 173
173 174
174 175
175 176
176 177
177 178
178 179
179