Page 89 of 416
87
Automatic "electrochrome"
model
In order to ensure optimum visibility during
your manoeuvres, the mirror lightens
automatically when reverse gear is
engaged.
This system automatically and progressively
changes between day and night use by means
of a sensor measuring the light coming from the
rear of the vehicle.
Front seats with manual
adjustments
For reasons of safety, seat adjustments
must only be made when the vehicle is
stationary.
Forwards-backwards
F Raise the control and slide the seat
forwards or backwards.
Height
F If fitted to your vehicle, pull the control upwards to raise or push it downwards to
lower, as many times as required to obtain
the position required.
For more information on the Seat belts ,
refer to the corresponding section.
3
Ease of use and comfort
Page 92 of 416
90
Backrest angle
F Tilt the control for wards or backwards to adjust the angle of the seat backrest.
Cushion height
F Tilt the control upwards or downwards to obtain the desired height.
Before moving the seat backwards,
ensure that there is no object or person in
the way, preventing full travel of the seat.
There is a risk of trapping or pinching
passengers if present in the rear seats
or jamming the seat if large objects are
placed on the floor behind the seat. For more information on the Seat belts
,
refer to the corresponding section.
Ease of use and comfort
Page 94 of 416

92
2-seat front bench seat
If applicable, it is fixed and has a seat belt
integral with the backrest for the seat next to
the driver seat.For more information on the Seat belts ,
refer to the corresponding section.
Do not use the function when the seat
is not occupied.
Reduce the intensity of the heating as
soon as possible.
When the seat and passenger
compartment have reached an
adequate temperature, you can stop
the function; reducing the consumption
of electrical current reduces fuel
consumption.
Prolonged use at the highest setting is
not recommended for those with sensitive
skin.
There is a risk of burns for people whose
perception of heat is impaired (illness,
taking medication, etc.).
There is a risk of overheating the system if
material with insulating properties is used,
such as cushions or seat covers.
Do not use the system:
-
i
f wearing damp clothing,
-
i
f child seats are fitted.
To avoid breaking the heating element in
the seat:
-
d
o not place heavy objects on the seat,
-
d
o not kneel or stand on the seat,
-
d
o not place sharp objects on the seat,
-
d
o not spill liquids onto the seat.
To avoid the risk of short-circuit:
-
d
o not use liquid products for cleaning
the seat,
-
n
ever use the heating function when
the seat is damp.
Ease of use and comfort
Page 101 of 416

99
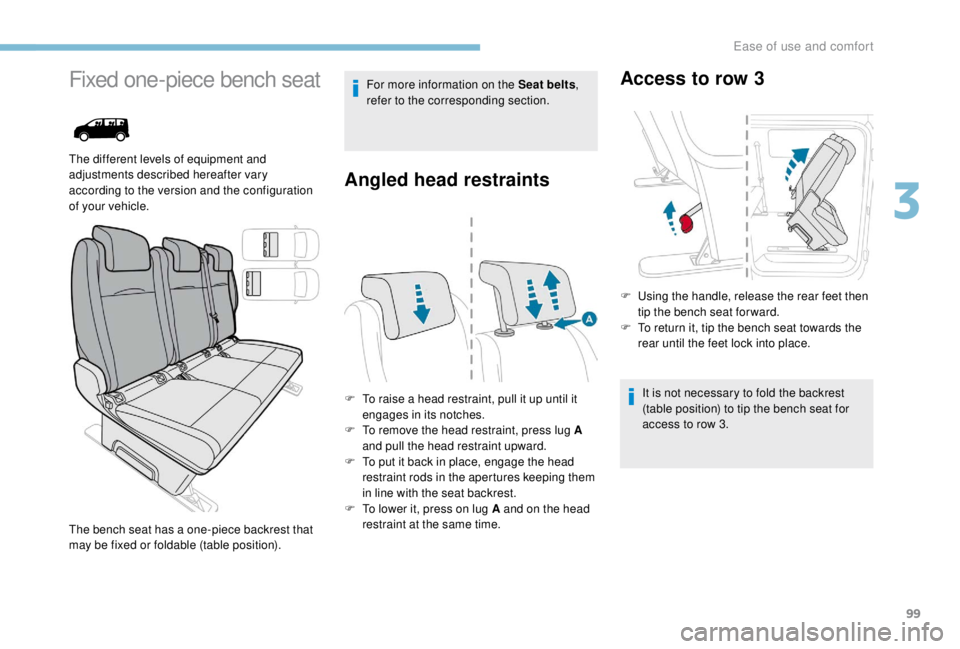
Fixed one-piece bench seat
The different levels of equipment and
adjustments described hereafter vary
according to the version and the configuration
of your vehicle.For more information on the Seat belts
,
refer to the corresponding section.
Angled head restraints
F To raise a head restraint, pull it up until it engages in its notches.
F
T
o remove the head restraint, press lug A
and pull the head restraint upward.
F
T
o put it back in place, engage the head
restraint rods in the apertures keeping them
in line with the seat backrest.
F
T
o lower it, press on lug A and on the head
restraint at the same time.
The bench seat has a one-piece backrest that
may be fixed or foldable (table position).
Access to row 3
F Using the handle, release the rear feet then
tip the bench seat for ward.
F
T
o return it, tip the bench seat towards the
rear until the feet lock into place.
It is not necessary to fold the backrest
(table position) to tip the bench seat for
access to row 3.
3
Ease of use and comfort
Page 104 of 416

102
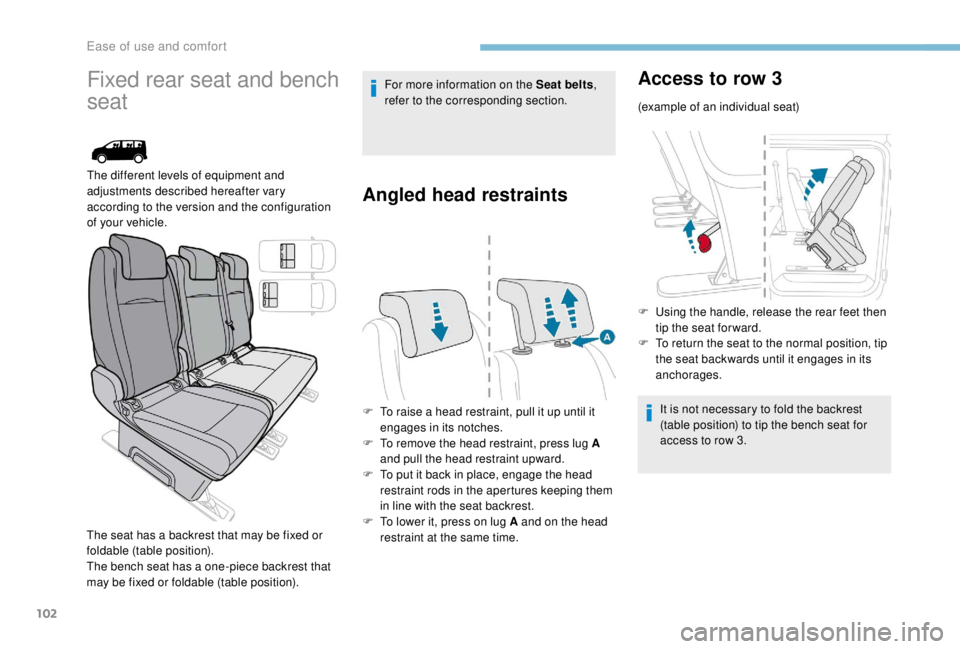
Fixed rear seat and bench
seat
The different levels of equipment and
adjustments described hereafter vary
according to the version and the configuration
of your vehicle.
The seat has a backrest that may be fixed or
foldable (table position).
The bench seat has a one-piece backrest that
may be fixed or foldable (table position). For more information on the Seat belts
,
refer to the corresponding section.
Angled head restraints
F To raise a head restraint, pull it up until it engages in its notches.
F
T
o remove the head restraint, press lug A
and pull the head restraint upward.
F
T
o put it back in place, engage the head
restraint rods in the apertures keeping them
in line with the seat backrest.
F
T
o lower it, press on lug A and on the head
restraint at the same time.
Access to row 3
(example of an individual seat)
F
U
sing the handle, release the rear feet then
tip the seat for ward.
F
T
o return the seat to the normal position, tip
the seat backwards until it engages in its
anchorages.
It is not necessary to fold the backrest
(table position) to tip the bench seat for
access to row 3.
Ease of use and comfort
Page 108 of 416
106
Fixed crew cab
Rear bench seatStorage compartment Under seat storage wells
For more information on ISOFIX
mountings
, refer to the corresponding
section.
If applicable, they are located underneath the
centre and outer left seats.
To gain access from the cab, tilt the required
seat forwards.
This ergonomic bench seat has three seats.
The two outer seats are fitted with ISOFIX
mountings.
If applicable, a storage compartment is
available at the front, underneath the bench
seat.
It comprises a fixed bench seat, seat belts,
storage compartments (depending on
equipment) and side windows.
It is separated from the loading area
by a high-
strength partition offering comfort and safety.
Ease of use and comfort
Page 116 of 416

114
Fitting the net
Unclip the upper fixing covers and secure the
lower fixings (as previously described).
F
F
old (table position) or remove the seats
and bench seats in rows 2
and 3 (depending
on equipment).
F
C
lose the rear heating and air conditioning
vents (depending on equipment).
F
U
nroll the high load retaining net.
F
P
osition the upper net fixings in the
corresponding anchorages in the roof (first
one side, then the other).
F
F
ully extend the straps.
F
O
n each side, attach the bottom fixings of
the net to the lower anchorages (behind
row 1) or in the stowing rings (behind row 2).
F
T
ension the straps to extend the net.
F
C
heck that the net is attached securely and
properly extended.
Never use the ISOFIX ring for the strap
fixing point of a child seat with Top Tether.
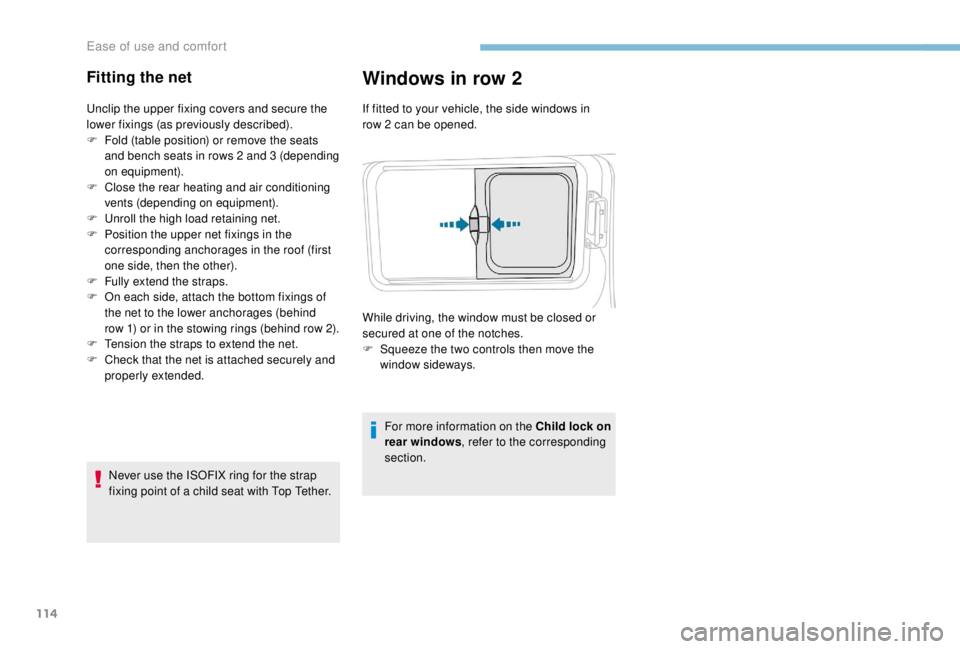
Windows in row 2
If fitted to your vehicle, the side windows in
row 2 can be opened.
For more information on the Child lock on
rear windows , refer to the corresponding
section.
While driving, the window must be closed or
secured at one of the notches.
F
S
queeze the two controls then move the
window sideways.
Ease of use and comfort
Page 118 of 416
116
Air distribution
Windscreen and side windows.
Central and side air vents.
Footwells.
The air distribution can be adapted by actioning
the corresponding buttons.
Air conditioning
With the engine running, the air conditioning is
designed to operate effectively in all seasons,
with the windows closed.
It allows you:
-
i
n summer, to lower the temperature,
-
t
o increase the effectiveness of the
demisting in winter, above 3°C.
Switching on
F Press this button, its indicator lamp comes on.
The air conditioning does not operate
when the air flow adjustment is set to off. To cool the air more quickly, you can
use recirculation of the interior air for
a few moments. Then return to the
intake of exterior air.
Switching off
F Press this button again, its indicator lamp goes off.
Switching the system off could result in
discomfort (humidity, condensation).
Ease of use and comfort