2018 Peugeot 308 boot
[x] Cancel search: bootPage 63 of 324

61
In the event of a fault with the socket, the green
indicator lamp flashes.
Have it checked by a PEUGEOT dealer or a
qualified workshop.
Connect only one device at a time to the
socket (no extension lead or multi-socket
connector).
Connect only devices with class II
insulation (shown on the device).
As a safety measure, when electrical
consumption is high and when required by
the vehicle's electrical system (particular
weather conditions, electrical overload,
etc.), the current supply to the socket will be
cut off; the green indicator lamp goes off.
The different "ports and sockets" may be
either not available, an option or standard,
depending on the trim level of the vehicle.
Rear armrestSki flap
It allows long objects to be carried in the vehicle.
Do not leave the flap open when not
carrying long objects in the vehicle.
Load space cover/blind
F Check that the indicator lamp is on and green.
F
C
onnect your multimedia or other electrical
device (telephone charger, laptop computer,
CD-DVD player, bottle warmer, etc.).
F
L
ower the rear armrest for a more
comfortable position.
It may be fitted with cup holders and also gives
access to the ski flap. F
P ress the flap opening control.
F L ower the flap.
F
L
oad the objects from inside the boot.
F
L
ower the armrest.Objects placed on the load space cover
can turn into projectiles during sudden
deceleration.
3
Ease of use and comfort
Page 64 of 324
62
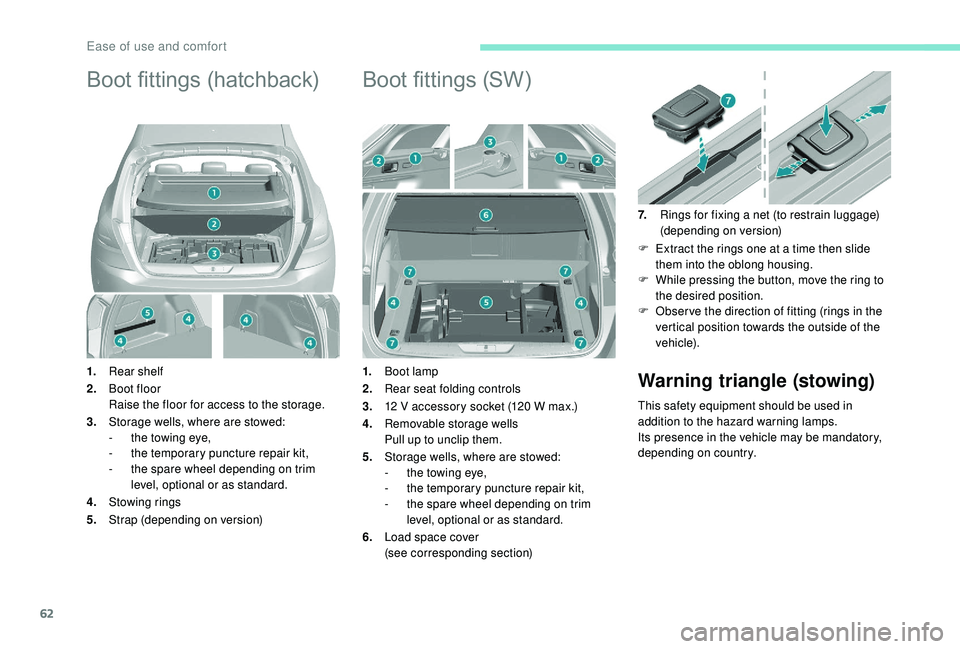
Boot fittings (hatchback)
1.Rear shelf
2. Boot floor
Raise the floor for access to the storage.
3. Storage wells, where are stowed:
-
t
he towing eye,
-
t
he temporary puncture repair kit,
-
t
he spare wheel depending on trim
level, optional or as standard.
4. Stowing rings
5. Strap (depending on version)
Boot fittings (SW)
1.Boot lamp
2. Rear seat folding controls
3. 12 V accessory socket (120 W max.)
4. Removable storage wells
Pull up to unclip them.
5. Storage wells, where are stowed:
-
t
he towing eye,
-
t
he temporary puncture repair kit,
-
t
he spare wheel depending on trim
level, optional or as standard.
6. Load space cover
(see corresponding section) 7.
Rings for fixing a net (to restrain luggage)
(depending on version)
F
E
xtract the rings one at a time then slide
them into the oblong housing.
F
W
hile pressing the button, move the ring to
the desired position.
F
O
bser ve the direction of fitting (rings in the
vertical position towards the outside of the
vehicle).Warning triangle (stowing)
This safety equipment should be used in
addition to the hazard warning lamps.
Its presence in the vehicle may be mandatory,
depending on country.
Ease of use and comfort
Page 65 of 324
63
Load space cover,
blind (SW)
When sharp deceleration occurs, objects
placed on the load space cover can turn
into projectiles.
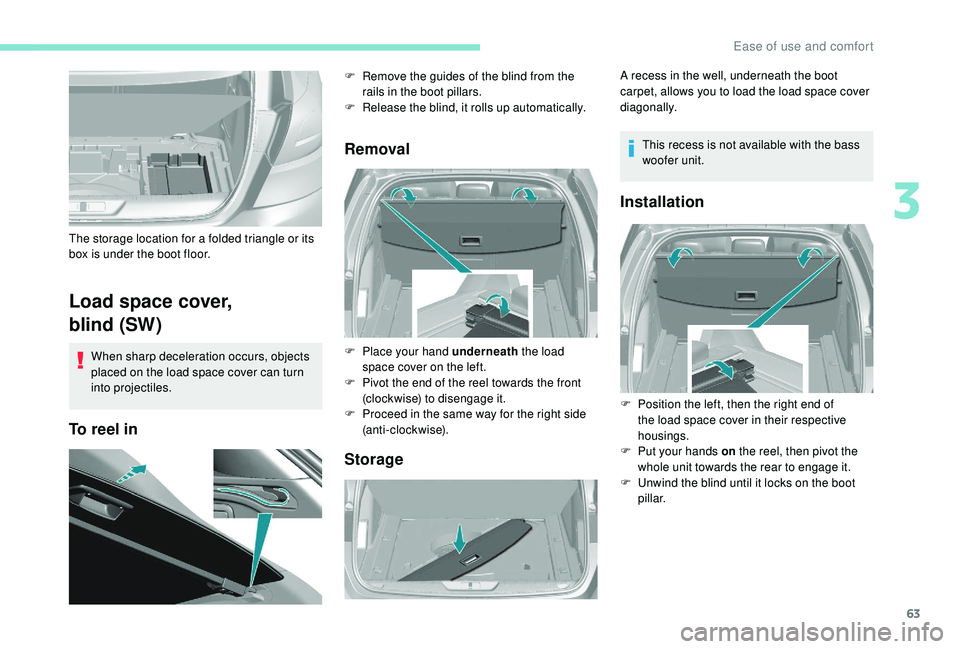
To reel inRemoval
Storage
The storage location for a folded triangle or its
box is under the boot floor. F
R
emove the guides of the blind from the
rails in the boot pillars.
F
R
elease the blind, it rolls up automatically.
F
P
lace your hand underneath the load
space cover on the left.
F
P
ivot the end of the reel towards the front
(clockwise) to disengage it.
F
P
roceed in the same way for the right side
(anti-clockwise). A recess in the well, underneath the boot
carpet, allows you to load the load space cover
diagonally.
This recess is not available with the bass
woofer unit.
Installation
F Position the left, then the right end of the load space cover in their respective
housings.
F
P
ut your hands on the reel, then pivot the
whole unit towards the rear to engage it.
F
U
nwind the blind until it locks on the boot
pillar.
3
Ease of use and comfort
Page 66 of 324
64
High load (SW)
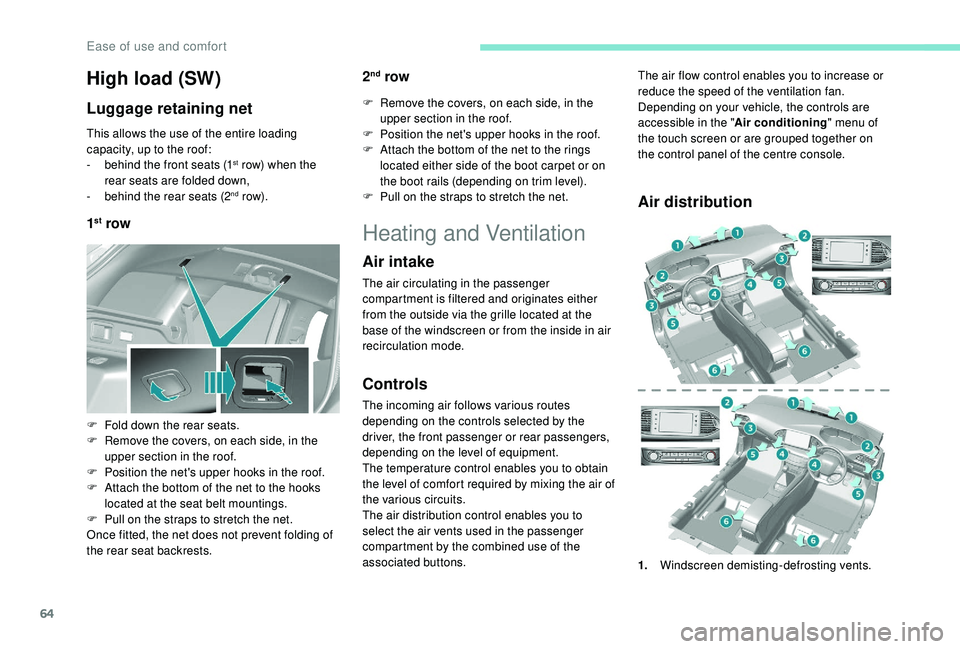
Luggage retaining net
This allows the use of the entire loading
capacity, up to the roof:
-
b
ehind the front seats (1
st row) when the
rear seats are folded down,
-
b
ehind the rear seats (2
nd row).
1st row 2
nd row
F Remove the covers, on each side, in the
upper section in the roof.
F
P
osition the net's upper hooks in the roof.
F
A
ttach the bottom of the net to the rings
located either side of the boot carpet or on
the boot rails (depending on trim level).
F
P
ull on the straps to stretch the net.
F
F
old down the rear seats.
F
R
emove the covers, on each side, in the
upper section in the roof.
F
P
osition the net's upper hooks in the roof.
F
A
ttach the bottom of the net to the hooks
located at the seat belt mountings.
F
P
ull on the straps to stretch the net.
Once fitted, the net does not prevent folding of
the rear seat backrests.
Heating and Ventilation
Air intake
The air circulating in the passenger
compartment is filtered and originates either
from the outside via the grille located at the
base of the windscreen or from the inside in air
recirculation mode.
Controls
The incoming air follows various routes
depending on the controls selected by the
driver, the front passenger or rear passengers,
depending on the level of equipment.
The temperature control enables you to obtain
the level of comfort required by mixing the air of
the various circuits.
The air distribution control enables you to
select the air vents used in the passenger
compartment by the combined use of the
associated buttons.
Air distribution
The air flow control enables you to increase or
reduce the speed of the ventilation fan.
Depending on your vehicle, the controls are
accessible in the " Air conditioning" menu of
the touch screen or are grouped together on
the control panel of the centre console.
1. Windscreen demisting-defrosting vents.
Ease of use and comfort
Page 67 of 324

65
2.Front side window demisting-defrosting
vents.
3. Adjustable and closable side air vents.
4. Adjustable and closable central air vents.
5. Air outlets to the front footwells.
6. Air outlets to the rear footwells.Advice
Using the ventilation and air
conditioning system
F
T
o ensure that the air is distributed
evenly, keep the external air intake
grilles at the base of the windscreen,
the nozzles, the vents, the air outlets
and the air extractor in the boot free
from obstructions.
F
D
o not cover the sunshine sensor,
located on the dashboard; this is used
for regulation of the automatic air
conditioning system.
F
O
perate the air conditioning system for
at least 5 to 10
minutes, once or twice
a month to keep it in per fect working
o r d e r.
F
I
f the system does not produce cold air,
switch it off and contact a PEUGEOT
dealer or a qualified workshop.
When towing the maximum load on a
steep gradient in high temperatures,
switching off the air conditioning increases
the available engine power and so
improves the towing ability. If after an extended stop in sunshine, the
interior temperature is very high, first air
the passenger compartment for a few
moments.
Put the air flow control at a setting high
enough to quickly change the air in the
passenger compartment.
The condensation created by the air
conditioning results in a discharge of water
under the vehicle which is per fectly normal.
Servicing the ventilation and air
conditioning system
F
E
nsure that the passenger compartment
filter is in good condition and have the
filter elements replaced regularly.
We recommend the use of a combined
passenger compartment filter. Thanks to
its special active additive, it contributes
to the purification of the air breathed by
the occupants and the cleanliness of the
passenger compartment (reduction of
allergic symptoms, bad odours and greasy
deposits).
F
T
o ensure correct operation of the
air conditioning system, you are also
advised to have it checked regularly
as recommended in the Warranty and
Maintenance Record.
3
Ease of use and comfort
Page 82 of 324
80
Automatic adjustment of
"Full LED" technology
headlamps
This system automatically adjusts the height
of the beams from this type of headlamp,
according to the load in the vehicle, to avoid
causing a nuisance to other road users.If a fault occurs, this warning lamp
comes on in the instrument panel,
accompanied by a message and an
audible signal.
Do not touch the "Full LED" technology
headlamps. Risk of electrocution!
The system then places the headlamp beams
in the lowest position.
Have the system checked by a PEUGEOT
dealer or a qualified workshop.
Wiper control stalk
Programming
Your vehicle may also include some functions
that can be configured:
-
a
utomatic windscreen wipers,
-
r
ear wiping on engaging reverse gear.
In wintry conditions, remove snow, ice or
frost present on the windscreen, around
the wiper arms and blades and the
windscreen seal, before operating the
wipers.
Do not operate the wipers on a dry
windscreen. Under extremely hot or cold
conditions, ensure that the wiper blades
are not stuck to the windscreen before
operating the wipers.
Manual controls
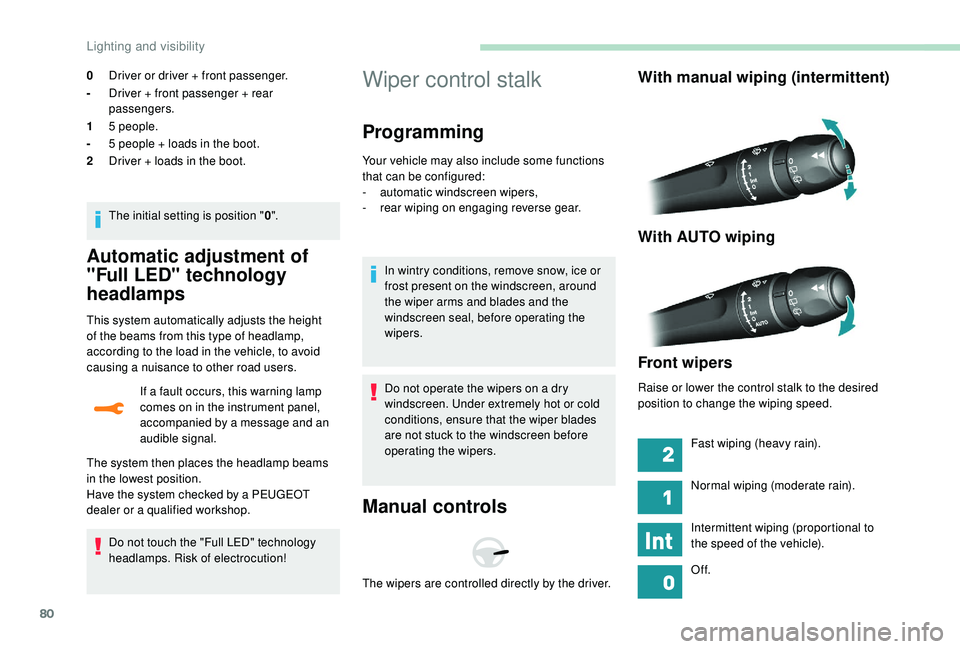
With manual wiping (intermittent)
With AUTO wiping
Front wipers
Raise or lower the control stalk to the desired
position to change the wiping speed.
The wipers are controlled directly by the driver. Fast wiping (heavy rain).
Normal wiping (moderate rain).
Intermittent wiping (proportional to
the speed of the vehicle).
Of f.
0
Driver or driver + front passenger.
- Driver + front passenger + rear
passengers.
1 5 people.
- 5 people + loads in the boot.
2 Driver + loads in the boot.
The initial setting is position " 0".
Lighting and visibility
Page 83 of 324
81
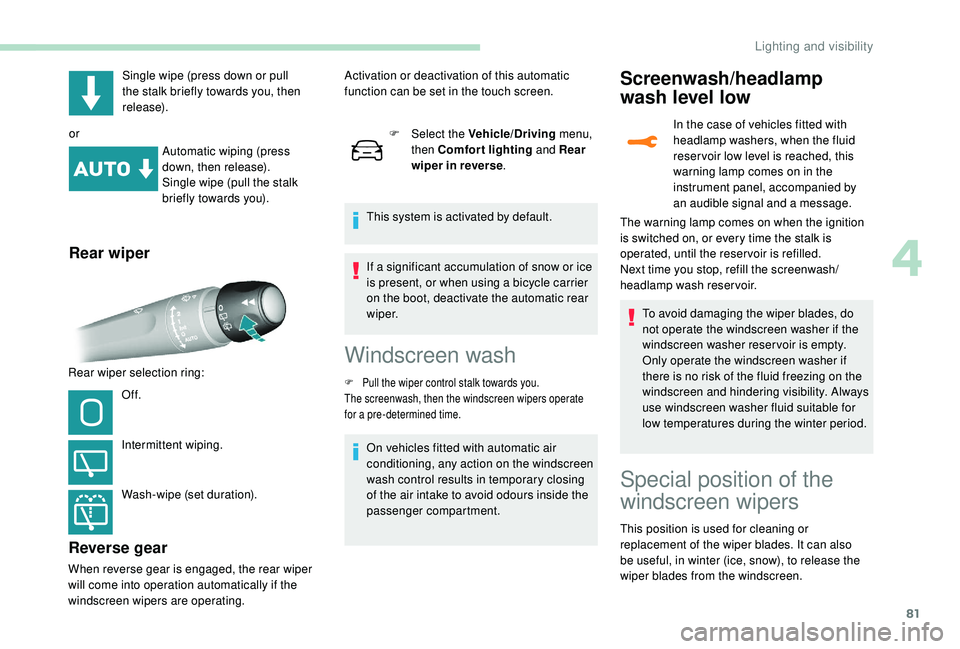
Single wipe (press down or pull
the stalk briefly towards you, then
release).
or Automatic wiping (press
down, then release).
Single wipe (pull the stalk
briefly towards you).
Rear wiper
Rear wiper selection ring:
Of f.
Intermittent wiping.
Wash-wipe (set duration).
Reverse gear
When reverse gear is engaged, the rear wiper
will come into operation automatically if the
windscreen wipers are operating. F
Sel
ect the Vehicle/Driving
menu,
then Comfort lighting and Rear
wiper in reverse .
This system is activated by default.
Activation or deactivation of this automatic
function can be set in the touch screen.
If a significant accumulation of snow or ice
is present, or when using a bicycle carrier
on the boot, deactivate the automatic rear
w i p e r.
Windscreen wash
F Pull the wiper control stalk towards you.
The screenwash, then the windscreen wipers operate
for a pre-determined time.
On vehicles fitted with automatic air
conditioning, any action on the windscreen
wash control results in temporary closing
of the air intake to avoid odours inside the
passenger compartment.
Screenwash/headlamp
wash level low
In the case of vehicles fitted with
headlamp washers, when the fluid
reser voir low level is reached, this
warning lamp comes on in the
instrument panel, accompanied by
an audible signal and a message.
To avoid damaging the wiper blades, do
not operate the windscreen washer if the
windscreen washer reservoir is empty.
Only operate the windscreen washer if
there is no risk of the fluid freezing on the
windscreen and hindering visibility. Always
use windscreen washer fluid suitable for
low temperatures during the winter period.
The warning lamp comes on when the ignition
is switched on, or every time the stalk is
operated, until the reser voir is refilled.
Next time you stop, refill the screenwash/
headlamp wash reservoir.
Special position of the
windscreen wipers
This position is used for cleaning or
replacement of the wiper blades. It can also
be useful, in winter (ice, snow), to release the
wiper blades from the windscreen.
4
Lighting and visibility
Page 105 of 324
103
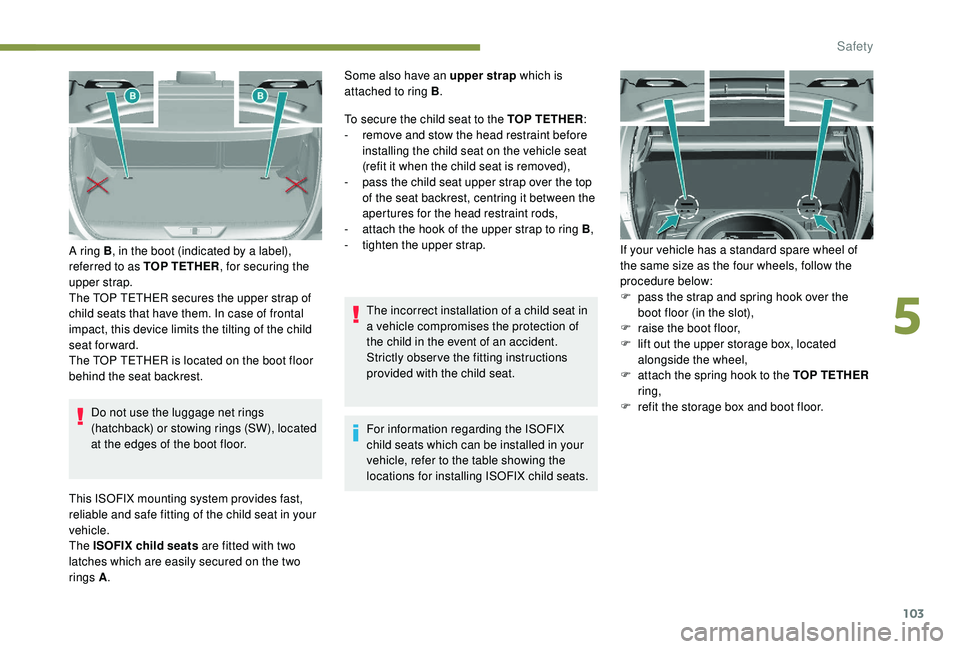
Do not use the luggage net rings
(hatchback) or stowing rings (SW), located
at the edges of the boot floor.
A ring B
, in the boot (indicated by a label),
referred to as TOP TETHER , for securing the
upper strap.
The TOP TETHER secures the upper strap of
child seats that have them. In case of frontal
impact, this device limits the tilting of the child
seat forward.
The TOP TETHER is located on the boot floor
behind the seat backrest.
This ISOFIX mounting system provides fast,
reliable and safe fitting of the child seat in your
vehicle.
The ISOFIX child seats are fitted with two
latches which are easily secured on the two
rings A . To secure the child seat to the TOP TETHER
:
-
r
emove and stow the head restraint before
installing the child seat on the vehicle seat
(refit it when the child seat is removed),
-
p
ass the child seat upper strap over the top
of the seat backrest, centring it between the
apertures for the head restraint rods,
-
a
ttach the hook of the upper strap to ring B
,
-
t
ighten the upper strap.
The incorrect installation of a child seat in
a vehicle compromises the protection of
the child in the event of an accident.
Strictly obser ve the fitting instructions
provided with the child seat.
For information regarding the ISOFIX
child seats which can be installed in your
vehicle, refer to the table showing the
locations for installing ISOFIX child seats. If your vehicle has a standard spare wheel of
the same size as the four wheels, follow the
procedure below:
F
p
ass the strap and spring hook over the
boot floor (in the slot),
F
r
aise the boot floor,
F
l
ift out the upper storage box, located
alongside the wheel,
F
a
ttach the spring hook to the TOP TETHER
ring,
F r efit the storage box and boot floor.
Some also have an upper strap
which is
attached to ring B .
5
Safety