Page 160 of 324

158
Reversing camera
The reversing camera cannot, in any
circumstances, replace the need for
vigilance on the part of the driver.They are represented as lines marked
"on the ground" and do not indicate the
position of tall obstacles (for example:
other vehicles, etc.) relative to the vehicle.
Some distortion of the image is normal.
It is normal to have a part of the number
plate showing in the bottom of the screen.
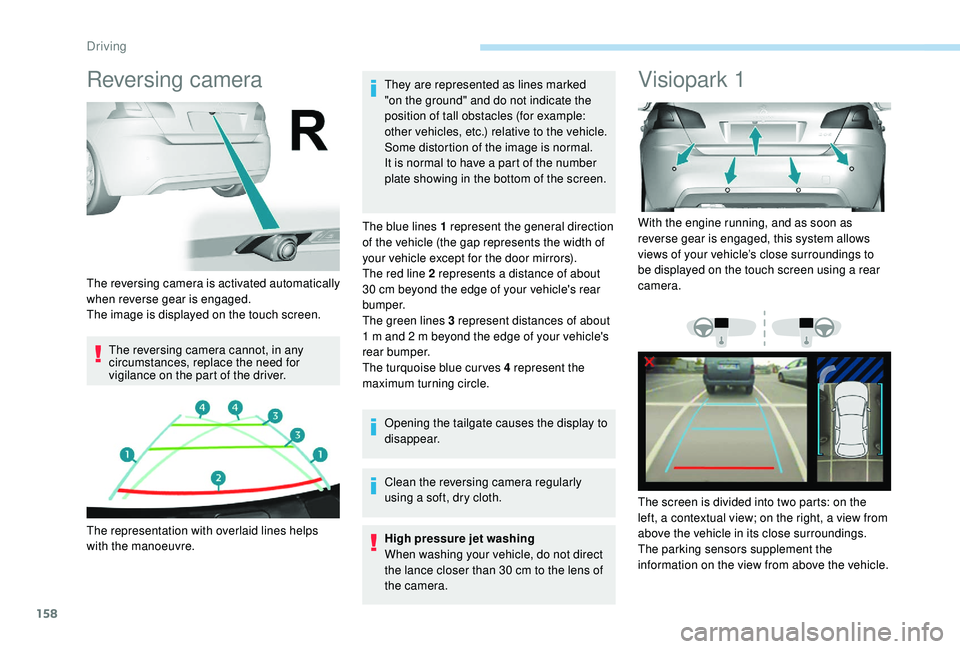
The blue lines 1 represent the general direction
of the vehicle (the gap represents the width of
your vehicle except for the door mirrors).
The red line 2 represents a distance of about
30 cm beyond the edge of your vehicle's rear
b u m p e r.
The green lines 3 represent distances of about
1 m and 2 m beyond the edge of your vehicle's
rear bumper.
The turquoise blue curves 4 represent the
maximum turning circle.
Opening the tailgate causes the display to
disappear.
Clean the reversing camera regularly
using a soft, dry cloth.
High pressure jet washing
When washing your vehicle, do not direct
the lance closer than 30
cm to the lens of
the camera.
Visiopark 1
The reversing camera is activated automatically
when reverse gear is engaged.
The image is displayed on the touch screen.
The representation with overlaid lines helps
with the manoeuvre. With the engine running, and as soon as
reverse gear is engaged, this system allows
views of your vehicle’s close surroundings to
be displayed on the touch screen using a rear
camera.
The screen is divided into two parts: on the
left, a contextual view; on the right, a view from
above the vehicle in its close surroundings.
The parking sensors supplement the
information on the view from above the vehicle.
Driving
Page 161 of 324

159
Different contextual views can be displayed in
the left-hand part:
-
s
tandard view,
-
1
80° view,
-
z
oom view.
The blue lines 1 represent the width of your
vehicle, with the mirrors unfolded; their
direction changes depending on the position of
the steering wheel.
The red line 2 represents a distance of 30
cm
from the bumper; the two blue lines 3 and 4
represent 1
m and 2 m, respectively.
AUTO mode is activated by default.
In this mode, the system chooses the best view
to display (standard or zoom) according to the
information from the parking sensors.
You can change the type of view at any time
during a manoeuvre.
The state of the system is not kept in memory
when the ignition is switched off.Principle of operation
Using the rear camera, the vehicle's
surroundings are recorded during manoeuvres
at low speed.
An image from above your vehicle in its close
surroundings is created in real time, as the
vehicle manoeuvre progresses.
This representation facilitates the alignment of
your vehicle when parking and allows obstacles
close to the vehicle to be seen.
This image is automatically deleted if the
vehicle remains stationary for too long.
This system is a visual aid that cannot in
any circumstances replace the need for
vigilance on the part of the driver. The images provided by the camera may
be distorted by the relief.
In the presence of areas in shade, or in
conditions of bright sunlight or inadequate
lighting, the image may be darkened and
with lower contrast.
Activation
Activation is automatic on engaging reverse at
a speed lower than 6
mph (10 km/h).
You can choose the display mode at any time
by pressing on this area.
When the sub-menu is displayed, select one of
the four views: "Standard view".
"180° view".
6
Driving
Page 162 of 324

160
The function will be deactivated:
- I f a trailer is attached or a bicycle
carrier is fitted on a towbar (vehicle
fitted with a towbar installed in line with
the manufacturer's recommendations).
-
A
bove about 6 mph (10 km/h).
-
O
n opening the tailgate.
-
W
hen shifting out of reverse (the image
remains displayed for 7
seconds).
-
B
y pressing the red cross in the top
left-hand corner of the touch screen.
Check the cleanliness of the camera lens
regularly.
Clean the reversing camera regularly
using a soft, dry cloth.
AUTO mode
Standard view Zoom view"Zoom view".
"AUTO m o de".
This mode is activated by default.
Using sensors in the rear bumper, the
automatic view changes from a rear view
(standard) to a view from above (zoom), as an
obstacle is approached at the level of the red
line (less than 30
cm) during a manoeuvre.The blue lines 1 represent the width of your
vehicle, with the mirrors unfolded; the direction
changes depending on the position of the
steering wheel.
The red line 2 represents a distance of 30
cm
from the rear bumper; the two blue lines 3 and
4 represent 1
m and 2 m, respectively.
This view is available with AUTO mode or in the
view selection menu.
The area behind the vehicle is displayed on the
screen. The camera records the vehicle's surroundings
during the manoeuvre in order to create a
view from above the rear of the vehicle in its
near surroundings, allowing the vehicle to be
manoeuvred around obstacles nearby.
This view is available with AUTO mode or in the
view selection menu.
Driving
Page 235 of 324

233
Commercial version
Number of seats: 2 people.
Useable boot volume: 1.31 m3
In metres (m )
Load floor length 1.4 5 8
Load width at the wheel arches 1.03 6
Load width at the centre 1.07 7
Load height
-
a
t the centre 0.916
-
a
t the roof sill 0.831
-
b
elow the load space cover 0.5
Identification markings
Different visible markings for the identification
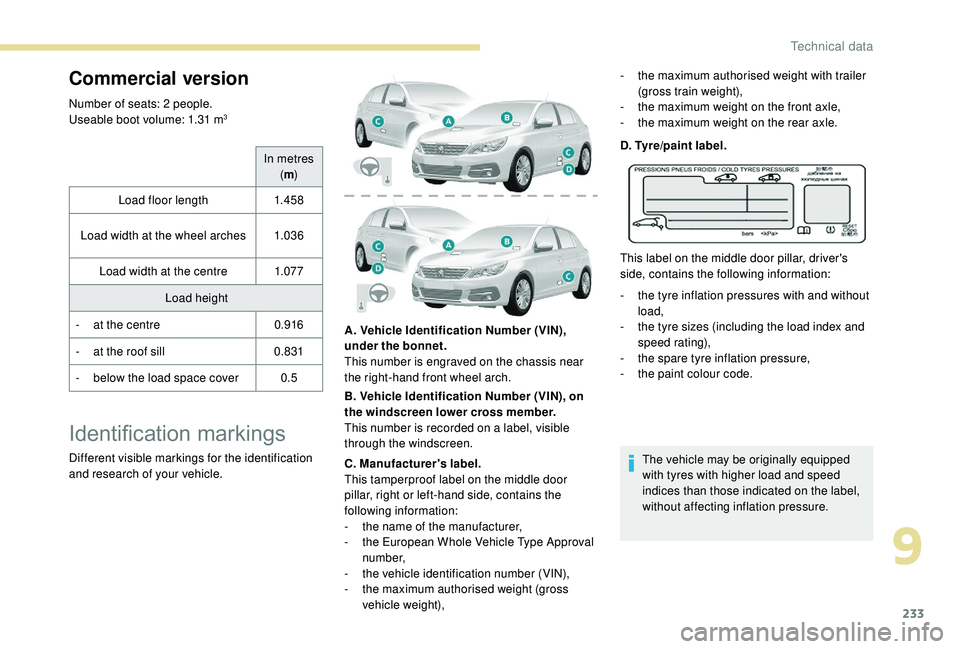
and research of your vehicle. A. Vehicle Identification Number (VIN),
under the bonnet.
This number is engraved on the chassis near
the right-hand front wheel arch.
B. Vehicle Identification Number (VIN), on
the windscreen lower cross member.
This number is recorded on a label, visible
through the windscreen.
C. Manufacturer's label.
This tamperproof label on the middle door
pillar, right or left-hand side, contains the
following information:
-
t
he name of the manufacturer,
-
t
he European Whole Vehicle Type Approval
number,
-
t
he vehicle identification number (VIN),
-
t
he maximum authorised weight (gross
vehicle weight), D. Tyre/paint label.
This label on the middle door pillar, driver's
side, contains the following information:
-
t
he tyre inflation pressures with and without
load,
-
t
he tyre sizes (including the load index and
speed rating),
-
t
he spare tyre inflation pressure,
-
t
he paint colour code.
The vehicle may be originally equipped
with tyres with higher load and speed
indices than those indicated on the label,
without affecting inflation pressure.
-
t
he maximum authorised weight with trailer
(gross train weight),
-
t
he maximum weight on the front axle,
-
t
he maximum weight on the rear axle.
9
Technical data