2018 Peugeot 308 boot
[x] Cancel search: bootPage 159 of 324
157
The sound emitted by the speaker (front or
rear) locates the obstacle in relation to the
vehicle, in front or behind.
Deactivation/activation of
the front and rear parking
sensors
The system is deactivated in the
Vehicle/Driving menu, then the
Driving functions tab of the touch
screen.
F
P
ress this button. The indicator
lamp in the button comes on.
Pressing this button again reactivates the function.
The indicator lamp in the button goes off.
The function will be automatically
deactivated when connecting a trailer or a
bicycle carrier on a towing device installed
in accordance with the manufacturer's
recommendations.
The parking sensors are deactivated while the
Park Assist system is measuring a space.
For more information on Park Assist , refer to
the corresponding section.
Operating limits
- Certain obstacles located in the sensors’ blind spots may not be detected or no
longer be detected during the manoeuvre.
-
S
ounds such as those emitted by noisy
vehicles and machinery (e.g. lorries,
pneumatic drills, etc.) may inter fere with the
vehicle's sensors.
-
C
ertain materials (fabrics) absorb sound
waves: pedestrians may not be detected.
-
A
ccumulated snow or dead leaves on the
road sur face can inter fere with the vehicle's
sensors.
-
A f
ront or rear impact to the vehicle can
distort the settings of the sensors, which is
not always detected by the system: distance
measurements may be incorrect.
-
T
he tilting of the vehicle if the boot is
very loaded can affect the distance
measurements.
-
T
he sensors may be affected by poor
weather conditions (heavy rain, thick fog,
snowfall, etc.).
Maintenance
recommendations
In bad or wintry weather, ensure that the
sensors are not covered with mud, ice or
snow. When reverse gear is engaged, an
audible signal (long beep) indicates that
the sensors may be dirty.
High pressure jet wash
When washing your vehicle, keep the
lance at least 12 inches (30
cm) away from
the sensors.
Operating fault
On engaging reverse gear:
This warning lamp comes on in the
instrument panel and/or a message
appears, accompanied by an audible
signal.
Contact a PEUGEOT dealer or a qualified
workshop.
6
Driving
Page 180 of 324

178
Maintenance
Correct operation is only possible if the towball
and its carrier are kept clean.
Before cleaning the vehicle with a high-
pressure jet wash, the towball must be removed
and the protective plug fitted to the carrier.Apply the label provided to a clearly visible
area, close to the carrier or in the boot.
Go to a PEUGEOT dealer or a qualified
workshop for any work on the towing
device system.
Towing device with
quickly detachable towball
(SW)
Presentation
F Extract the towball from the bottom of its carrier 1 .
F
R
elease the locking wheel; this
automatically stops in the unlocked position
(position B ).
F
R
efit protective plug 2 to carrier 1 .
F
C
arefully stow the towball in its bag away
from knocks and dirt. No tools are required to install or remove the
towball on this genuine towing device. 1.
Carrier.
2. Protective plug.
3. Safety eye.
4. Connection socket.
5. Detachable towball.
6. Locking/unlocking latch.
7. Locking/unlocking trigger.
8. Safety key lock.
9. Safety lock protective cap.
10. Stowing bag.
Practical information
Page 192 of 324
190
In the event of contact with the skin, wash the
affected area with soap and water. In the event
of contact with the eyes, wash (irrigate) the
eyes with large amounts of water or with an eye
wash solution for at least 15 minutes. If you feel
a persistent burning sensation or irritation, get
medical attention.
If swallowed, immediately wash out the mouth
with clean water and then drink plenty of water.
In certain conditions (at high temperature,
for example), the risk of release of ammonia
cannot be excluded: do not inhale the vapour.
Ammonia has an irritant effect on mucous
membranes (eyes, nose and throat).
Keep AdBlue
® in its original container and
out of the reach of children.
Procedure
Before starting the top up procedure, ensure
that the vehicle is parked on a flat and level
sur face.
In winter, check that the temperature of the
vehicle is above -11°C. If not, due to freezing,
the AdBlue
® cannot be poured into the tank.
Park your vehicle somewhere warmer for a few
hours before topping up. In the event of an AdBlue
® breakdown,
confirmed by the message "Add AdBlue:
Starting impossible", you must top up with
at least 5
litres.
Never pour AdBlue
® into the Diesel fuel
tank.
For the specifics associated with the
access configuration for the AdBlue
® tank
(via the boot or via the fuel filler flap), refer
to the descriptions given in detail further
on.
If any AdBlue
® is splashed, or if there are
any spillages on the side of the body, rinse
immediately with cold water or wipe with a
damp cloth.
If the fluid has crystallised, clean it off
using a sponge and hot water.
Important: in the event of a top-up after a
breakdown because of a lack of AdBlue,
you must wait around 5
minutes before
switching on the ignition, without opening
the driver’s door, locking the vehicle,
introducing the key into the ignition
switch, or introducing the key of the
K
eyless Entr y and Star ting system into
the passenger compartment.
Switch on the ignition, then wait for
10
seconds before starting the engine.
Practical information
Page 193 of 324

191
Access to the AdBlue® tank
via the boot
Filling the AdBlue® tank is an operation
included in every routine ser vice on your
vehicle by a PEUGEOT dealer or a qualified
workshop.
Nevertheless, given the capacity of the tank, it
may be necessary to top up the fluid between
ser vices, as soon as an alert (warning lamps
and a message) indicates it.
You can go to a PEUGEOT dealer or a qualified
workshop.
If you intend to do the topping-up yourself,
read the following procedure carefully.
The supply in a non-drip bottle simplifies
topping up.
F
S
witch off the ignition and remove the key. F
W
orking inside the boot, lift the carpet and
then, depending on the equipment, lift out
the spare wheel and/or the storage well.
F
W
ithout pressing, turn the black cap a
quarter turn anti-clockwise and lift it off.
F
T
urn the blue cap anti-clockwise.
F
O
btain non-drip bottles of AdBlue
®. After
first checking the use-by date, carefully
read the instructions for use on the label
before pouring the contents of the bottle into
your vehicle's AdBlue
® tank.
F
A
fter filling, per form the same operations in
reverse order.
With subwoofer
- Carefully disengage the wiring harness from its housing to give a little more free cable
length.
-
U
ndo the central nut and remove the
fastener (nut and bolt).
F
P
lace the subwoofer to the side of the boot.
7
Practical information
Page 195 of 324
193
Tool kit
This is a set of tools provided with the vehicle.
Its content depends on your vehicle's
equipment:
-
t
emporary puncture repair kit,
-
spar
e wheel.
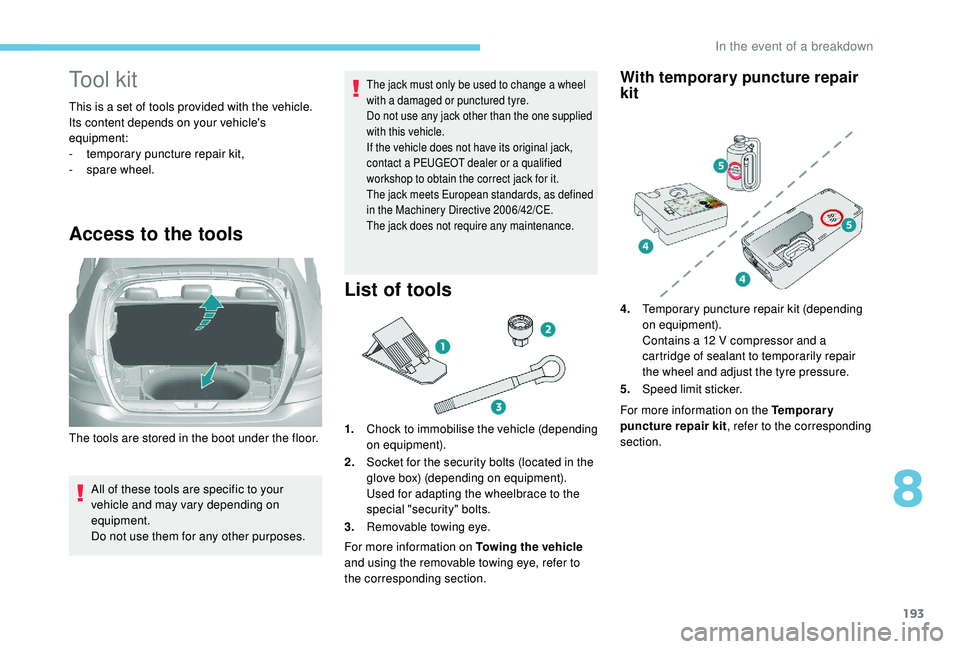
Access to the tools
All of these tools are specific to your
vehicle and may vary depending on
equipment.
Do not use them for any other purposes.
The jack must only be used to change a wheel
with a damaged or punctured tyre.
Do not use any jack other than the one supplied
with this vehicle.
If the vehicle does not have its original jack,
contact a PEUGEOT dealer or a qualified
workshop to obtain the correct jack for it.
The jack meets European standards, as defined
in the Machinery Directive 2006/42/CE.
The jack does not require any maintenance.
List of tools
1.Chock to immobilise the vehicle (depending
on equipment).
2. Socket for the security bolts (located in the
glove box) (depending on equipment).
Used for adapting the wheelbrace to the
special "security" bolts.
3. Removable towing eye.
For more information on Towing the vehicle
and using the removable towing eye, refer to
the corresponding section.
With temporary puncture repair
kit
The tools are stored in the boot under the floor. For more information on the Temporary
puncture repair kit
, refer to the corresponding
section. 4. Temporary puncture repair kit (depending
on equipment).
Contains a 12 V compressor and a
cartridge of sealant to temporarily repair
the wheel and adjust the tyre pressure.
5. Speed limit sticker.
8
In the event of a breakdown
Page 203 of 324
201
F Adjust the pressure using the compressor (to inflate: switch B in position " I"; to deflate:
switch B in position " O" and press button
C ), according to the vehicle's tyre pressure
label.
If after approximately seven minutes this
pressure is not reached, this indicates
that the tyre is not repairable; contact a
PEUGEOT dealer or a qualified workshop
for assistance.
F
R
emove the kit then stow it.
Do not drive more than 125
miles (200 km)
with the repaired tyre; see a PEUGEOT
dealer or a qualified workshop to change
the tyre.
Should the pressure of one or more tyres
be adjusted, it is necessary to reinitialise
the under-inflation detection system.
For more information on Tyre under-
inflation detection , refer to the
corresponding section.Spare wheel
Scan the QR code on page 3 to view
explanatory videos.
Procedure for changing a damaged wheel with
the spare wheel using the tools provided with
the vehicle. For more information on the Tool kit , refer
to the corresponding section.
The jack must only be used to change
a wheel with a damaged or punctured tyre.
The jack does not require any
maintenance.
The jack meets European standards,
as defined in the Machinery Directive
2006/42/EC.
Wheel with wheel trim
When refitting the wheel , refit the wheel
trim, starting by placing its aperture in
line with the valve and then pushing it into
place all round its edge with the palm of
your hand. F
P
ark the vehicle without obstructing any
traffic and apply the parking brake.
F F ollow the safety instructions (hazard
warning lamps, warning triangle, wearing
high visibility vest, etc.) according to the
legislation in force in the country where you
are driving.
F
S
witch off the ignition.
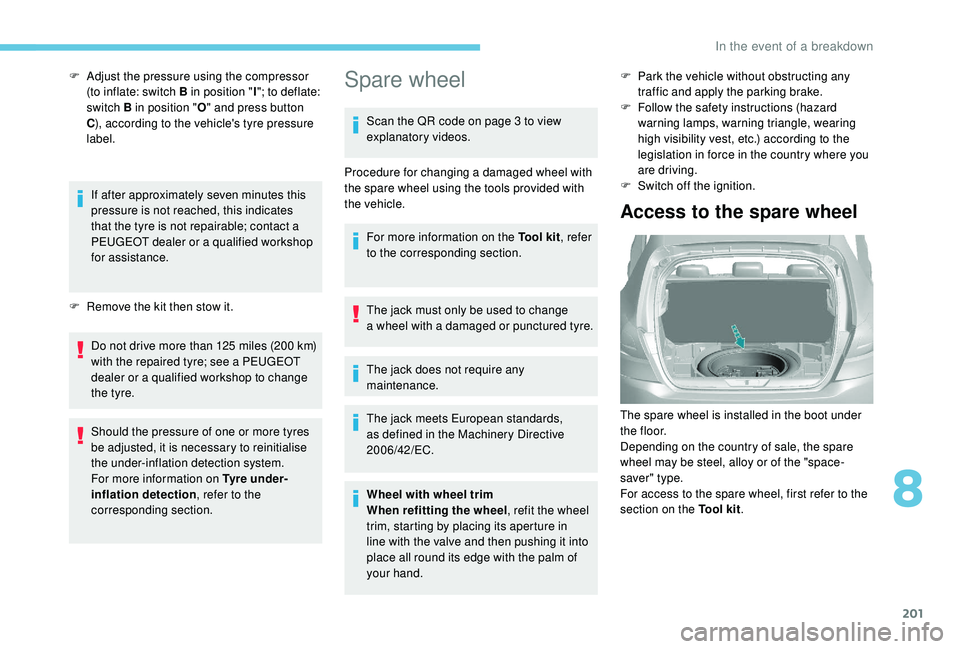
Access to the spare wheel
The spare wheel is installed in the boot under
t h e f l o o r.
Depending on the country of sale, the spare
wheel may be steel, alloy or of the "space-
saver" type.
For access to the spare wheel, first refer to the
section on the Tool kit.
8
In the event of a breakdown
Page 204 of 324
202
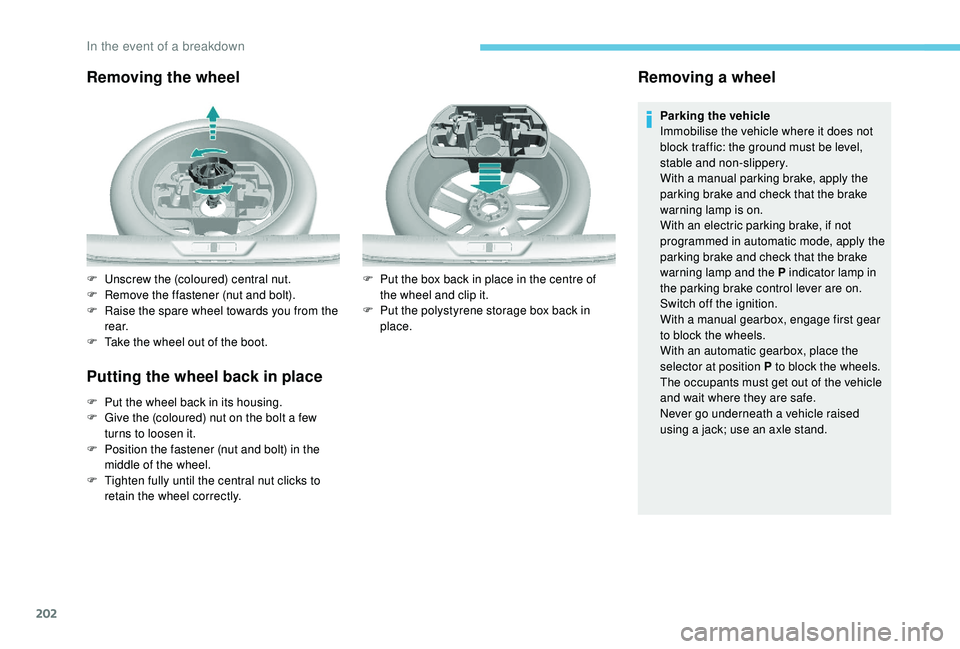
Removing the wheel
Putting the wheel back in place
F Put the wheel back in its housing.
F G ive the (coloured) nut on the bolt a few
turns to loosen it.
F
P
osition the fastener (nut and bolt) in the
middle of the wheel.
F
T
ighten fully until the central nut clicks to
retain the wheel correctly.
Removing a wheel
Parking the vehicle
Immobilise the vehicle where it does not
block traffic: the ground must be level,
stable and non-slippery.
With a manual parking brake, apply the
parking brake and check that the brake
warning lamp is on.
With an electric parking brake, if not
programmed in automatic mode, apply the
parking brake and check that the brake
warning lamp and the P indicator lamp in
the parking brake control lever are on.
Switch off the ignition.
With a manual gearbox, engage first gear
to block the wheels.
With an automatic gearbox, place the
selector at position P to block the wheels.
The occupants must get out of the vehicle
and wait where they are safe.
Never go underneath a vehicle raised
using a jack; use an axle stand.
F
U
nscrew the (coloured) central nut.
F
R
emove the ffastener (nut and bolt).
F
R
aise the spare wheel towards you from the
r e a r.
F
T
ake the wheel out of the boot. F
P
ut the box back in place in the centre of
the wheel and clip it.
F
P
ut the polystyrene storage box back in
place.
In the event of a breakdown
Page 207 of 324
205
After changing a wheel
To store the punctured wheel in the boot
correctly, first remove the central cover.
When using the "space-saver" type spare
wheel, do not exceed 50 mph (80 km/h).
Have the tightening of the bolts and the
pressure of the spare wheel checked by a
PEUGEOT dealer or a qualified workshop
without delay.
Have the punctured wheel repaired and
replace it on the vehicle as soon as
possible.
If your vehicle has tyre under-inflation
detection, check the tyre pressures and
reinitialise the system.
For more information on Tyre under-
inflation detection , refer to the
corresponding section.
The tyre inflation pressures are given on
this label.Changing a bulb
The headlamps have polycarbonate
lenses with a protective coating:
F
d
o not clean them using a dr y or
abrasive cloth, nor with a detergent
or solvent product,
F
u
se a sponge and soapy water or a pH
neutral product,
F
w
hen using a high pressure washer
on persistent marks, do not keep the
lance directed towards the lamps or
their edges for too long, so as not to
damage their protective coating and
seals.
Changing a bulb must only be done with
the ignition off and after the lamp has
been switched off for several minutes –
Risk of serious burns!
F
D
o not touch the bulb directly with your
fingers, use a lint-free cloth.
It is essential only to use anti-ultraviolet
(UV) type bulbs, so as not to damage the
lamp.
Always replace a failed bulb with a new
bulb with the same type and specification. In some weather conditions (e.g. low
temperature or humidity), the presence
of misting on the internal sur face of the
glass of the headlamps and rear lamps is
normal; it disappears after the lamps have
been on for a few minutes.
Light-emitting diodes –
LEDs
For replacement, contact a PEUGEOT
dealer or a qualified workshop.
Halogen bulbs
To ensure good quality lighting, check
that the bulb is correctly positioned in its
housing.
8
In the event of a breakdown