2018 Peugeot 308 change time
[x] Cancel search: change timePage 123 of 324
121
"Sport" and "Snow"
programmes
These two special programmes supplement
the automatic operation in specific conditions
of use.
"Sport"
F Press the "SPORT" button once
the engine has started.
" S " appears in the instrument panel.
The gearbox automatically favours a dynamic
style of driving.
On versions fitted with the Driver Sport Pack,
the " S" button is replaced by the " SPORT"
button.
"Snow"
F Press this button once the engine has started.
" T " appears in the instrument panel.
The gearbox adapts to driving on slippery
roads.
This programme improves starting and
handling when traction is poor.
Driver Sport Pack
This function favours a dynamic style of driving. F
P
ress the "
SPORT" button once
the engine has started.
" S " appears in the instrument panel.
For more information on the Driver Spor t
Pack , refer to the corresponding section.
Return to automatic operation
F At any time, press the button selected ( S or
" T ") again to quit the programme engaged
and return to auto-adaptive mode.
Manual operation
To reduce fuel consumption when at
a prolonged standstill with the engine
running (traffic jam, etc.), put the
selector in position N and apply the
parking brake.
F
Sel
ect position M for sequential changing
of the six gears.
F
P
ush towards the + sign to change up a
g e a r.
F
P
ush towards the – sign to change down a
g e a r. D disappears, and the gears
engaged appear in succession on
the instrument panel.
If the engine is under-revving or over-revving,
the gear selected flashes for a few seconds,
then the actual gear engaged is displayed.
It is possible to change from position D
(automatic) to position M (manual) at any time.
When the vehicle is stationary or moving
very slowly, the gearbox selects gear M1
automatically.
The sport and snow programmes are inactive
in manual operation.
Invalid value during manual
operation
This symbol is displayed if a gear is
not engaged correctly (gear selector
between two positions).
Stopping the vehicle
Before switching off the engine, you can
engage position P or N to place the gearbox in
neutral. Changing from one gear to another only
occurs if the vehicle speed and engine speed
conditions allow; other wise the gearbox will
operate temporarily in automatic mode.
6
Driving
Page 124 of 324

122
If the selector is not in position P, when the
driver's door is opened or approximately
45
seconds after the ignition is switched
off, an audible signal sounds and a
message appears.
F
R
eturn the gear selector to position
P ; the audible signal stops and the
message disappears.
Operating fault
When the ignition is on, a message
appears in the instrument panel screen
to indicate a gearbox fault.
In this case, the gearbox switches to back-up
mode and is locked in 3
rd gear. You may feel a
substantial jolt when changing from P to R and
from N to R. This will not cause any damage to
the gearbox.
Do not exceed 62
mph (100 km/h), local speed
restrictions permitting.
Have it checked by a PEUGEOT dealer or a
qualified workshop. There is a risk of damage to the gearbox:
-
i
f you press the accelerator and brake
pedals at the same time,
-
i
f you force the selector from position P
to another position when the battery is
flat.
EAT8 automatic gearbox
Eight-speed automatic gearbox with push
selector. It also offers a manual mode with
steering mounted paddle gear changes.
Gearbox selector positions
P. Park.
For parking the vehicle: the front wheels
are blocked.
R. Reverse.
N. Neutral.
For moving the vehicle with the ignition off:
in certain car wash stations, if towing the
vehicle, etc.
D. Automatic mode.
The gearbox manages gear changes
according to the style of driving, the road
profile and the vehicle load.
M. Manual mode.
The driver changes gear using the steering
mounted control paddles.
Push selector
In both cases, apply the parking brake to
immobilise the vehicle, unless it is programmed
to automatic mode.
Driving
Page 126 of 324
124
With the engine running and the brakes
released, if R, D or M is selected, the
vehicle moves off, even without pressing
the accelerator pedal.
Never leave children unsuper vised in the
vehicle when the engine is running.
Never press the accelerator and brake
pedals at the same time – Risk of damage
to the gearbox!
In the event of a battery failure, you
must place the chock supplied with the
vehicle tools against one of the wheels to
immobilise the vehicle.
General information
To unlock the gearbox:
- f rom mode P :
F
f
ully depress the brake pedal,
F
press the Unlock button,
F
s
elect another mode while continuing to
press the brake pedal and the Unlock
button.
-
f
rom the neutral position N , at a speed
below 3
mph (5 km/h):
F
f
ully depress the brake pedal,
F
s
elect another mode while continuing to
press the brake pedal. To select reverse:
F
s
low down until you come to a stop,
F
w
ith your foot on the brake pedal, press the
Unlock button,
F
s
elect mode R while continuing to press the
brake pedal and the Unlock button.
To select manual mode:
F
w
hile having mode D selected in advance,
F
p
ress button M
; the indicator lamp in the
button comes on.
To quit manual mode:
F
p
ush for wards once to go back to D
.
or
F
p
ress button M
; the indicator lamp in the
button goes off.
To switch off the ignition, the vehicle must
be stationary.
Changing to free-wheel
To put the vehicle in free-wheeling mode with
the engine switched off:
F
w
ith the vehicle stationary and the engine
running, select N ,
F
s
witch off the engine,
F
w
ithin five seconds, switch the ignition on
again,
F
w
ith the foot on the brake pedal, push the
selector for ward or back once to confirm N
and manually release the electric parking
brake,
F
s
witch off the ignition.If you open the driver's door when mode N
is engaged, an audible signal will sound. It
will stop when you close the driver's door
again.
Special aspects of automatic
mode
If you exceed the time limit of five seconds,
the gearbox engages mode P
; you should then
restart the procedure.
The gearbox selects the gear that offers
optimum per formance, taking account of the
exterior temperature, the profile of the road, the
load on the vehicle and the style of driving.
For maximum acceleration without touching the
selector, push the accelerator to the floor (kick-
down). The gearbox shifts down automatically
or holds the gear selected until the maximum
engine speed is reached.
The steering mounted controls allow the driver
to temporarily select a gear, if the vehicle
speed and engine speed permit.
Special aspects of manual mode
The change from one gear to another takes
place only if the vehicle speed and engine
speed permit.
Driving
Page 131 of 324
129
- With a manual gearbox, when you fully
depress the clutch pedal.
-
W
ith an automatic gearbox :
•
g
ear selector in position D or M , when
you release the brake pedal,
•
o
r gear selector in position N and brake
pedal released, when you place the gear
selector in position D or M ,
•
o
r when you engage reverse.
Special cases: START mode
activated automatically
START mode is activated automatically if:
- you open the driver's door,
-
y
ou unfasten the driver's seat belt,
-
t
he speed of the vehicle exceeds 2 mph
(3
km/h),
-
t
he electric parking brake is being
applied,
-
s
ome temporary conditions (battery
charge, engine temperature, braking
assistance, air conditioning setting,
etc.) require the engine to be running to
control the system or the vehicle.
In this case, this indicator lamp flashes
for a few seconds, then goes off.
This operation is perfectly normal.
Deactivation/Reactivation
In certain cases, such as the need to maintain
a comfortable temperature in the passenger
compartment, it may be useful to deactivate the
Stop & Start system.
The system can be deactivated at any time, once
the ignition is switched on.
If the engine is in STOP mode, it restarts
immediately.
The Stop & Start system is reactivated
automatically every time the ignition is switched on.
With the button on the
dashboard
F Press this button; the associated orange indicator lamp comes on.
Deactivation is confirmed by a message in the
instrument panel.
Pressing the button again reactivates the
system; the associated indicator lamp goes off. Deactivation is confirmed by a message in the
instrument panel.
A new selection reactivates the system.
Reactivation is confirmed by a message in the
instrument panel.
Opening the bonnet
Before doing anything under the bonnet,
deactivate the Stop & Start system to
avoid any risk of injury resulting from an
automatic change to START mode.
With the touch screen button
The function is activated/deactivated in
the Vehicle/Driving menu of the touch
screen.
Select the " Driving functions " then "Stop
& Star t ".
6
Driving
Page 140 of 324
138
Adaptive cruise control
This system provides the following
functions:
-
A
utomatically maintains the vehicle
at the speed set by the driver.
-
A
utomatic adjustment of the
distance between your vehicle and
the one in front.
With the EAT8 automatic gearbox or with the
BlueHDi 150 S&S EAT6 engine, automatic
adjustment can cause your vehicle to come to a
complete stop.
It manages the acceleration and deceleration
of the vehicle by automatically acting on the
engine and the braking system.
Principle of operation
The system automatically adapts the speed of
your vehicle to that of the vehicle in front, to
maintain a constant distance.
If the vehicle in front is driving more slowly, the
system slows, or even stops your vehicle (with
the EAT8 automatic gearbox or the BlueHDi
150 S&S EAT6 engine), using engine braking
and the braking system.
If the vehicle in front accelerates or changes
lane, the cruise control progressively
accelerates your vehicle to return to the
programmed speed.
If the driver operates a direction indicator to
overtake a slower vehicle, the cruise control
allows your vehicle to temporarily approach
the vehicle in front to assist the overtaking
manoeuvre, though never exceeding the
programmed speed.
The brake lamps illuminate as soon as
the braking system is activated with
deceleration of the vehicle. This system is a driving aid that cannot,
in any circumstances, replace the need to
obser ve speed limits and safety distances,
nor the need for vigilance on the part of
the driver.
Some vehicles present on the road may
not be properly seen or may be poorly
interpreted by the camera and/or radar
(e.g. a lorry), which may lead to a poor
assessment of the distances and lead to
the vehicle inappropriately accelerating or
braking.
The driver must be ready at all times
to retake control of their vehicle by
permanently holding both hands on the
steering wheel and keeping their feet near
the brake and accelerator pedals.
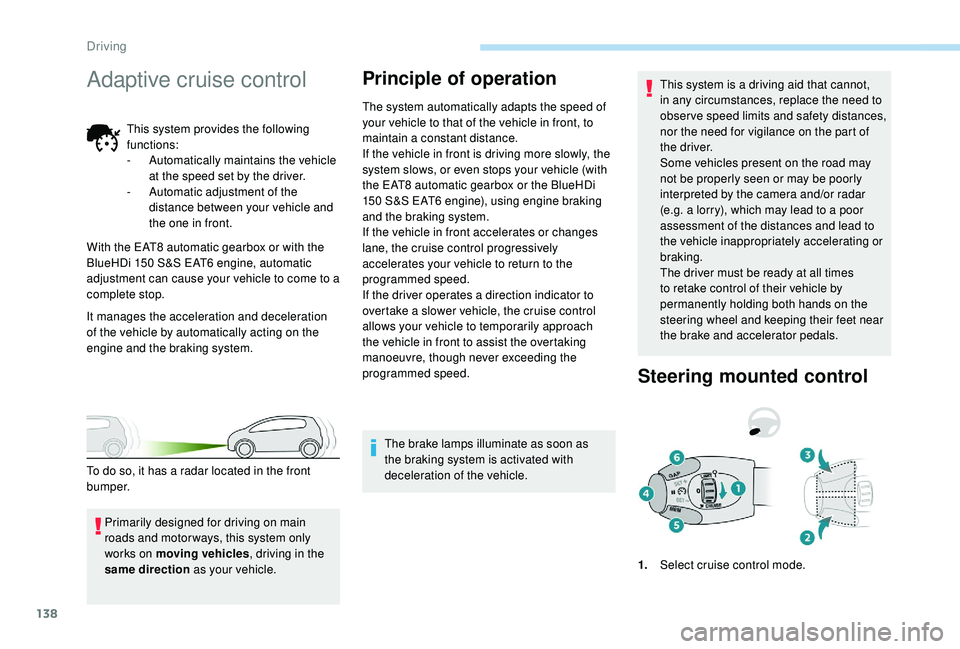
Steering mounted control
1.
Select cruise control mode.
Primarily designed for driving on main
roads and motor ways, this system only
works on moving vehicles
, driving in the
same direction as your vehicle.
To do so, it has a radar located in the front
b u m p e r.
Driving
Page 161 of 324

159
Different contextual views can be displayed in
the left-hand part:
-
s
tandard view,
-
1
80° view,
-
z
oom view.
The blue lines 1 represent the width of your
vehicle, with the mirrors unfolded; their
direction changes depending on the position of
the steering wheel.
The red line 2 represents a distance of 30
cm
from the bumper; the two blue lines 3 and 4
represent 1
m and 2 m, respectively.
AUTO mode is activated by default.
In this mode, the system chooses the best view
to display (standard or zoom) according to the
information from the parking sensors.
You can change the type of view at any time
during a manoeuvre.
The state of the system is not kept in memory
when the ignition is switched off.Principle of operation
Using the rear camera, the vehicle's
surroundings are recorded during manoeuvres
at low speed.
An image from above your vehicle in its close
surroundings is created in real time, as the
vehicle manoeuvre progresses.
This representation facilitates the alignment of
your vehicle when parking and allows obstacles
close to the vehicle to be seen.
This image is automatically deleted if the
vehicle remains stationary for too long.
This system is a visual aid that cannot in
any circumstances replace the need for
vigilance on the part of the driver. The images provided by the camera may
be distorted by the relief.
In the presence of areas in shade, or in
conditions of bright sunlight or inadequate
lighting, the image may be darkened and
with lower contrast.
Activation
Activation is automatic on engaging reverse at
a speed lower than 6
mph (10 km/h).
You can choose the display mode at any time
by pressing on this area.
When the sub-menu is displayed, select one of
the four views: "Standard view".
"180° view".
6
Driving
Page 186 of 324

184
1.Screenwash fluid reservoir.
2. Engine coolant reservoir.
3. Brake fluid reser voir.
4. Battery/Fuses.
5. Fusebox.
6. A i r f i l t e r.
7. Engine oil dipstick.
8. Engine oil filler cap.
9. Remote earth point.
10. Priming pump*
The Diesel circuit is under very high
pressure.
All work on this circuit must be carried out
only by a PEUGEOT dealer or a qualified
workshop.
*
D
epending on engine.
Checking levels
Check all of these levels regularly, in line with
the manufacturer's service schedule. Top them
up if necessary, unless other wise indicated.
If a level drops significantly, have the
corresponding system checked by a PEUGEOT
dealer or a qualified workshop. The liquid must comply with the
manufacturer's recommendations and with
the vehicle's engine.
Take care when working under the bonnet,
as certain areas of the engine may be
extremely hot (risk of burns) and the
cooling fan could start at any time (even
with the ignition off).
Used products
Avoid prolonged contact of used oil or
fluids with the skin.
Most of these fluids are harmful to health
or indeed very corrosive.
Do not discard used oil or fluids into
sewers or onto the ground.
Take used oil to a PEUGEOT dealer or
a qualified workshop and dispose of it in
the containers reser ved for this purpose.
Engine oil level
The check is carried out either when
the ignition is switched on using the oil
level indicator in the instrument panel
for vehicles equipped with an electric
gauge, or using the dipstick.
To ensure that the reading is correct, your
vehicle must be parked on a level sur face
with the engine stopped for more than
30
minutes.
It is normal to top up the oil level between
two ser vices (or oil changes). PEUGEOT
recommends that you check the level, and top
up if necessary, every 3,000
miles (5,000 km).
Checking using the dipstick
The location of the dipstick is shown in the
corresponding underbonnet layout view.
F
T
ake the dipstick by its coloured grip and
pull it out completely.
F
W
ipe the end of the dipstick using a clean
non-fluffy cloth.
F
R
efit the dipstick and push fully down, then
pull it out again to make the visual check:
the correct level is between marks A and B .
Practical information
Page 189 of 324
187
Passenger compartment filter
Depending on the environment
(e.g. dusty atmosphere) and the
use of the vehicle (e.g. city driving),
replace it twice as often if
necessary.
A clogged passenger compartment
filter may have an adverse effect on
the per formance of the air conditioning
system and generate undesirable odours.
Oil filter
Change the oil filter each time the
engine oil is changed.
Particle filter (Diesel)
The start of saturation of the particle
filter is signalled by the temporary
illumination of this warning lamp
accompanied by a message warning
of the risk of the filter clogging up. As soon as the traffic conditions permit,
regenerate the filter by driving at a speed
of at least 37
mph (60 km/h) until the
warning lamp goes off.
If the warning lamp stays on, this indicates
a low Diesel additive level.
For more information on Checking levels ,
refer to the corresponding section.
On a new vehicle, the first particle
filter regeneration operations may be
accompanied by a "burning" smell, which
is per fectly normal.
Following prolonged operation of the
vehicle at very low speed or at idle,
you may, in exceptional circumstances,
notice the emission of water vapour at the
exhaust on acceleration. This does not
affect the behaviour of the vehicle or the
environment.
Manual gearbox
The gearbox does not require any
maintenance (no oil change).
Automatic gearbox
The gearbox does not require any
maintenance (no oil change).
Parking brake
If excessive travel or a loss of
effectiveness of this system is
noticed, the parking brake must
be checked, even between two
services.
This system must be checked by a PEUGEOT
dealer or a qualified workshop.
Brake pads
Brake wear depends on the style
of driving, particularly in the case
of vehicles used in town, over short
distances. It may be necessary to
have the condition of the brakes
checked, even between vehicle
services.
Unless there is a leak in the circuit, a drop in
the brake fluid level indicates that the brake
pads are worn.
7
Practical information