2018 Peugeot 308 change time
[x] Cancel search: change timePage 8 of 324

6
As a passenger, if you avoid connecting your
multimedia devices (film, music, video game,
etc.), you will contribute towards limiting the
consumption of electrical energy, and so of
fuel.
Disconnect your portable devices before
leaving the vehicle.
Eco- driving
Optimise the use of your
gearbox
With a manual gearbox, move off gently
and change up without waiting. When
accelerating, change up early.
With an automatic or electronic gearbox,
favour automatic mode and avoid pressing the
accelerator pedal heavily or suddenly.
The gear shift indicator invites you to engage
the most suitable gear: as soon as the
indication is displayed in the instrument panel,
follow it straight away.
For vehicles fitted with an electronic or
automatic gearbox, this indicator appears only
in manual mode.
Drive smoothly
Maintain a safe distance between vehicles,
use engine braking rather than the
brake pedal, and press the accelerator
progressively. These practices contribute
towards a reduction in fuel consumption and
CO
2 emissions and also help reduce the
background traffic noise.
If your vehicle has cruise control, make use of
the system at speeds above 25
mph (40 km/h)
when the traffic is flowing well.
Control the use of your electrical
equipment
Before moving off, if the passenger
compartment is too warm, ventilate it by opening
the windows and air vents before using the air
conditioning.
Above 31
mph (50 km/h), close the windows and
leave the air vents open.
Consider using equipment that can help keep
the temperature in the passenger compartment
down (sunroof blind, window blinds, etc.).
Switch off the headlamps and foglamps when
the ambient light level does not require their
use.
Avoid running the engine before moving off,
particularly in winter; your vehicle will warm up
much faster while driving.
Unless it has automatic regulation, switch off
the air conditioning as soon as the desired
temperature has been reached.
Switch off the demisting and defrosting controls
when not required, if they are not automatically
controlled.
Switch off the heated seat as soon as possible.
Eco-driving is a range of everyday practices that allow the motorist to optimise their fuel consumption and CO2 emissions.
Eco-driving
Page 29 of 324

27
In the event of a fault with the SCR
emissions control system
A system that prevents engine starting is
activated automatically from 685 miles
(1,100
km) after confirmation of a fault with
the SCR emissions control system.
Have the system checked by a PEUGEOT
dealer or a qualified workshop as soon as
possible.
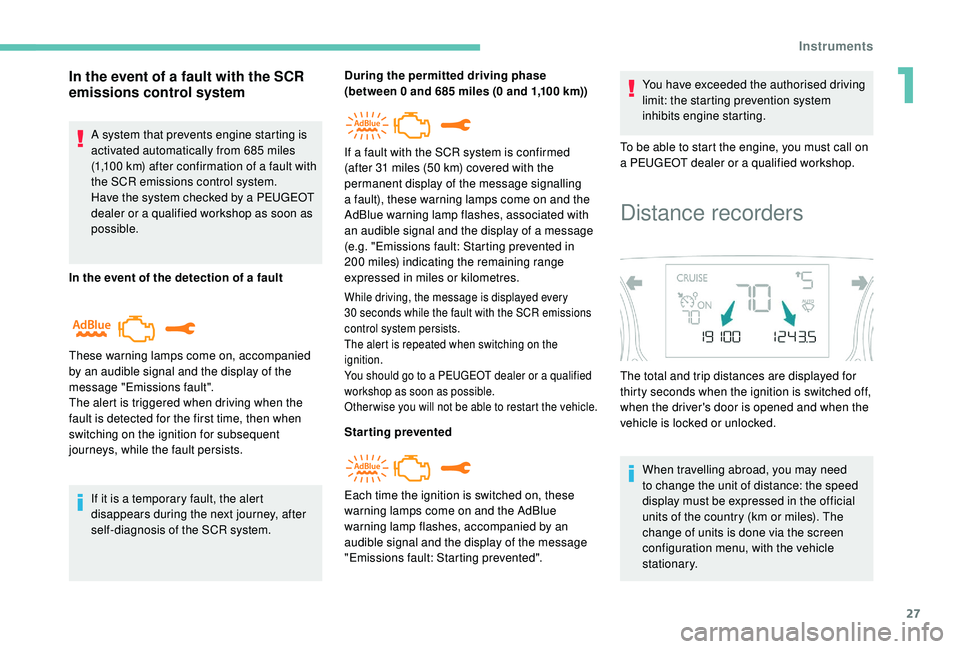
In the event of the detection of a fault
If it is a temporary fault, the alert
disappears during the next journey, after
self-diagnosis of the SCR system.
These warning lamps come on, accompanied
by an audible signal and the display of the
message "Emissions fault".
The alert is triggered when driving when the
fault is detected for the first time, then when
switching on the ignition for subsequent
journeys, while the fault persists. During the permitted driving phase
(between 0 and 685
miles (0 and 1,100 km))
While driving, the message is displayed every
30
seconds while the fault with the SCR emissions
control system persists.
The alert is repeated when switching on the
ignition.
You should go to a PEUGEOT dealer or a qualified
workshop as soon as possible.
Other wise you will not be able to restart the vehicle.
Starting prevented You have exceeded the authorised driving
limit: the starting prevention system
inhibits engine starting.
To be able to start the engine, you must call on
a PEUGEOT dealer or a qualified workshop.
Each time the ignition is switched on, these
warning lamps come on and the AdBlue
warning lamp flashes, accompanied by an
audible signal and the display of the message
"Emissions fault: Starting prevented". If a fault with the SCR system is confirmed
(after 31 miles (50 km) covered with the
permanent display of the message signalling
a fault), these warning lamps come on and the
AdBlue warning lamp flashes, associated with
an audible signal and the display of a message
(e.g. "Emissions fault: Starting prevented in
200
miles) indicating the remaining range
expressed in miles or kilometres.
Distance recorders
The total and trip distances are displayed for
thirty seconds when the ignition is switched off,
when the driver's door is opened and when the
vehicle is locked or unlocked.
When travelling abroad, you may need
to change the unit of distance: the speed
display must be expressed in the official
units of the country (km or miles). The
change of units is done via the screen
configuration menu, with the vehicle
stationary.
1
Instruments
Page 32 of 324

30
Tr i p s 1 and 2 are independent but their use is
identical.
For example, trip 1 can be used for daily figures
and trip 2 for monthly figures.
Trip computer, some
definitions
Range
(miles or km)
The distance which can still be
travelled with the fuel remaining in
the tank (related to the average fuel
consumption over the last few miles
(kilometres) travelled).
This value may fluctuate if a change
of driving style or terrain results in a
significant change in the current fuel
consumption.
Dashes are displayed when the range falls
below 19
miles (30 km). After filling with at least
5
litres of fuel, the range is recalculated and is
displayed if it exceeds 62
miles (100 km).
If dashes are displayed continuously while
driving in place of the digits, contact a
PEUGEOT dealer or a qualified workshop.
Current fuel consumption
(mpg or km/l or l/100 km)
C alculated during the last few
seconds.
This function is only displayed from
19
mph (30 km/h).
Average fuel consumption
(mpg or km/l or l/100 km)
C alculated since the last time the
trip recorder was reset to zero.
Average speed
(mph or km/h)
Calculated since the last time the
trip recorder was reset to zero.
Distance travelled
(miles or km)
Calculated since the last time the
trip recorder was reset to zero.
Stop & Start time counter
(minutes/seconds or hours/
minutes)
A time counter calculates the time
spent in STOP mode during a
j o u r n ey.
It resets to zero every time the
ignition is switched on.
Monochrome screen C
Displays in the screen
This displays the following information:
- t he time,
-
t
he date,
-
t
he exterior temperature (this flashes if
there is a risk of ice),
-
par
king sensor information,
-
t
he audio source being listened to,
-
t
elephone or hands-free kit information,
-
t
he trip computer,
-
a
lert messages,
-
s
ettings menus for the screen and the
vehicle equipment.
Controls
From the control panel of your audio system,
you can press:
F
button A to chooses between the display
of audio information in full screen or the
shared display of audio and trip computer
information,
Instruments
Page 33 of 324

31
F the "MENU" button to access the main
menu ,
F
t
he "5" or " 6" buttons to scroll through the
items in the screen,
F
t
he "7" or " 8" buttons to change a setting
value,
F
t
he "OK" button to confirm,
or
F
t
he "Back " button to abandon the operation
in progress.
Main menu
F Press the " MENU" button for access to the
main menu :
-
"Multimedia",
-
"Telephone",
-
"
Trip computer",
-
"
Bluetooth connection",
-
"Personalisation-configuration".
F
P
ress the " 7" or " 8" button to select the
menu required, then confirm by pressing the
" OK " button.
"Multimedia" menu
With the audio system switched on, this
menu allows you to activate or deactivate the
functions associated with use of the radio
(RDS, DAB
/ FM auto tracking, RadioText
(TXT) display) or to choose the media play
mode (Normal, Random, Random all, Repeat). For more information on the "Multimedia"
menu, refer to the Audio equipment and
telematics
section.
"Telephone" menu
With the audio system switched on, this menu
allows you to make a call or view the various
telephone directories.
For more information on the "Telephone" menu,
refer to the Audio equipment and telematics
section.
"Trip computer" menu
This menu allows you to consult information
concerning the status of the vehicle.
Diagnosis
Summarises the alert messages of various
functions.
"Bluetooth connection"
menu
player) to be connected or disconnected and
the connection mode to be defined (hands-free,
playing audio files).
For more information on the "Bluetooth
connection" menu, refer to the Audio
equipment and telematics section.
With the audio system switched on, this menu
allows a Bluetooth device (telephone, media
"Personalisation-
configuration" menu
This menu gives access to the following
functions:
-
"
Define the vehicle parameters",
-
"
Display configuration".
Define the vehicle parameters
This menu allows you to activate or deactivate
the following equipment, classified in different
categories:
-
"
Access to the vehicle":
•
"
Plip action" (Selective unlocking of the
driver's door).
-
"
Driving assistance":
•
"
Tyre inflation" (Under-inflation detection
syste m),
•
"
Rear wipe in reverse gear" (Rear wiper
linked to reverse gear),
•
"
Parking assistance".
1
Instruments
Page 40 of 324

38
With PEUGEOT Connect
Radio
F Select the "Settings" menu.
F
Sel
ect "Date and time ".
F
Sel
ect the " Date" or "Time " tab.
F
C
hoose the display formats.
F
C
hange the date and/or time using the
numeric keypad.
F
C
onfirm with " OK".
The system does not automatically
manage the change between winter and
summer time (depending on country).
With PEUGEOT Connect
Nav
Setting of the time and date is only available if
synchronisation with the GPS is deactivated.
F
P
ress the " OPTIONS " button to go to the
secondary page.
F
Sel
ect "Setting the time- date". F
Sel
ect the "
Date" or "Time " tab.
F
S
et the date and/or time using the numeric
keypad.
Additional settings
You can choose:
- T o change the display format of the date
and time (12h/24h).
-
T
o change the time zone.
-
T
o activate or deactivate synchronisation
with the GPS (UTC).
The system does not automatically
manage the change between winter and
summer time (depending on country).
The change between winter and summer
time is done by changing the time zone.
Setting the time and date
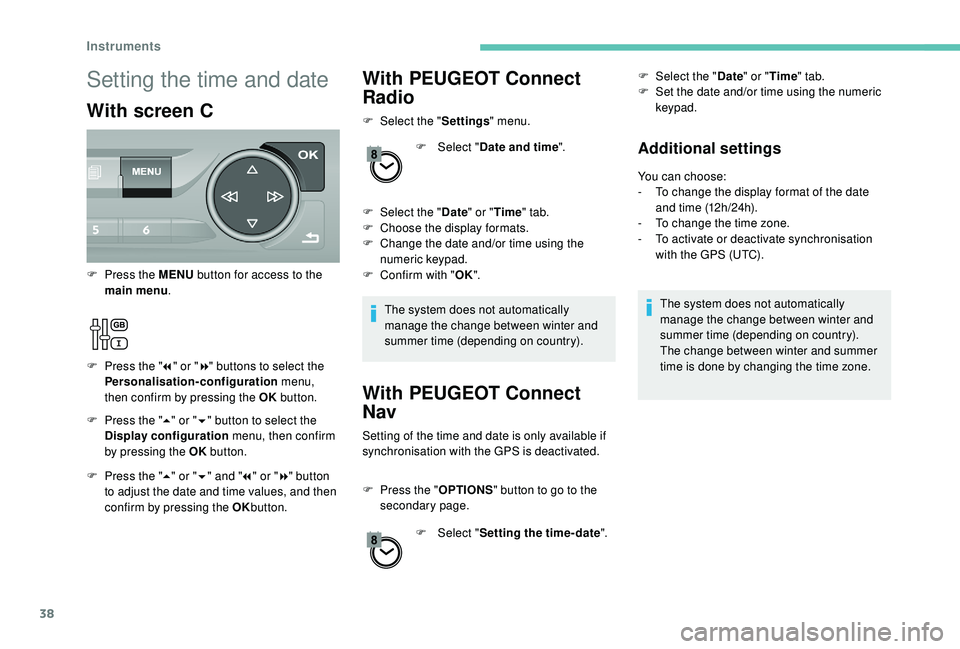
With screen C
F Press the " 5" or " 6" button to select the
Display configuration menu, then confirm
by pressing the OK button.
F
P
ress the MENU
button for access to the
main menu .
F
P
ress the "
7" or " 8" buttons to select the
Personalisation-configuration menu,
then confirm by pressing the OK button.
F
P
ress the " 5" or " 6" and " 7" or " 8" button
to adjust the date and time values, and then
confirm by pressing the OK button.
Instruments
Page 78 of 324

76
Daytime running lamps/
Sidelamps
These lamps light up automatically when the
engine starts.
Automatic illumination of
headlamps
When a low level of ambient light is detected
by the sunshine sensor, the number plate
lamps,
sidelamps and dipped beam headlamps
are switched on automatically, without any
action on the part of the driver. They may also
Switching on
Switching off
F Turn the ring to another position. Deactivation of the function is accompanied
by the display of a message.
Operating fault
In the event of a malfunction of the
sunshine sensor, the lighting comes
on, this warning lamp is displayed in
the instrument panel, accompanied
by an audible signal and/or a
message.
Contact a PEUGEOT dealer or a qualified
workshop. In fog or snow, the sunshine sensor may
detect sufficient light. In this case, the
lighting will not come on automatically.
Do not cover the sunshine sensor,
integrated with the rain sensor and located
at the top of the windscreen behind the
rear view mirror; the associated functions
would no longer be controlled.
They provide the following functions:
-
D
aytime running lamps (lighting control
stalk at position " 0" or " AUTO " with
adequate light level).
-
S
idelamps (lighting control stalk at position
" AUTO " with low light levels or "Sidelamps
only" or "Dipped/main beam headlamps"). F
T
urn the ring to the AUTO position.
Activation of the function is accompanied by
the display of a message.
Automatic headlamp
dipping
System which automatically changes between
dipped and main beam according to the
exterior light level and the driving conditions,
using a camera located at the top of the
windscreen.
This system is a driving aid.
The driver remains responsible for the
vehicle's lighting, its correct use for the
prevailing conditions of light, visibility,
traffic and obser vation of driving and
vehicle regulations.
The system will be operational as soon as
you exceed 16
mph (25 km/h).
If the speed drops below 9
mph (15 km/h),
the system no longer operates.
come on if rain is detected, at the same time as
automatic operation of the windscreen wipers.
As soon as the light returns to a sufficient level
or after the windscreen wipers are switched off,
the lamps are switched off automatically.
Lighting and visibility
Page 79 of 324

77
Activation/Deactivation
F Turn the lighting control stalk ring to the "AUTO " position.
F
I
n the Vehicle/Driving menu,
select the " Driving functions "
tab, then " Automatic headlamp
dip ".
The status of the system remains in memory
when the ignition is switched off.
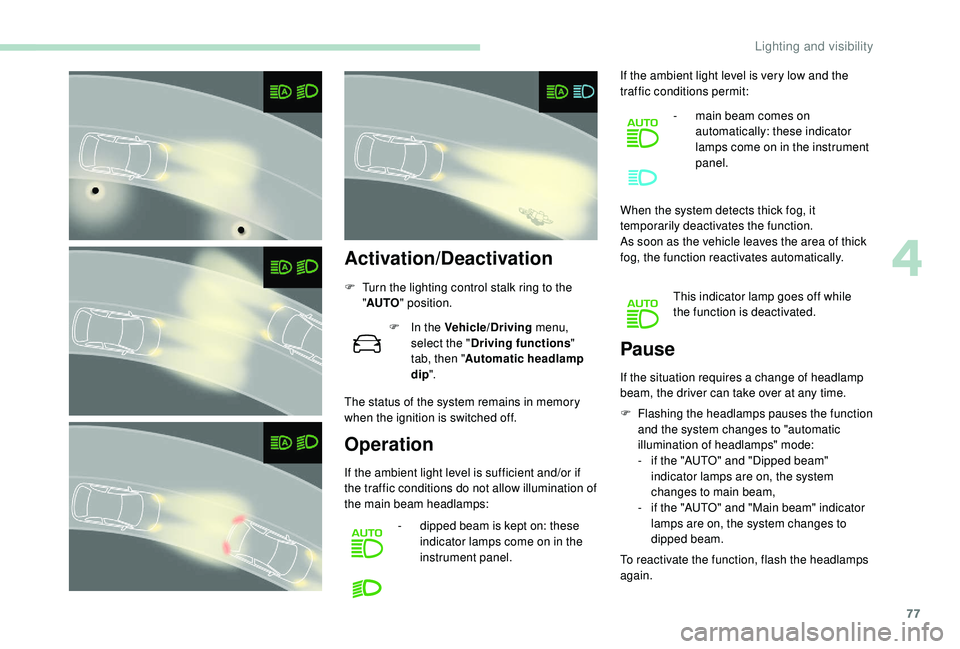
Operation
If the ambient light level is sufficient and/or if
the traffic conditions do not allow illumination of
the main beam headlamps: -
d
ipped beam is kept on: these
indicator lamps come on in the
instrument panel. If the ambient light level is very low and the
traffic conditions permit:
-
m
ain beam comes on
automatically: these indicator
lamps come on in the instrument
panel.
When the system detects thick fog, it
temporarily deactivates the function.
As soon as the vehicle leaves the area of thick
fog, the function reactivates automatically. This indicator lamp goes off while
the function is deactivated.
F
F
lashing the headlamps pauses the function
and the system changes to "automatic
illumination of headlamps" mode:
- i f the "AUTO" and "Dipped beam"
indicator lamps are on, the system
changes to main beam,
-
i
f the "AUTO" and "Main beam" indicator
lamps are on, the system changes to
dipped beam.
To reactivate the function, flash the headlamps
again.
Pause
If the situation requires a change of headlamp
beam, the driver can take over at any time.
4
Lighting and visibility
Page 93 of 324

91
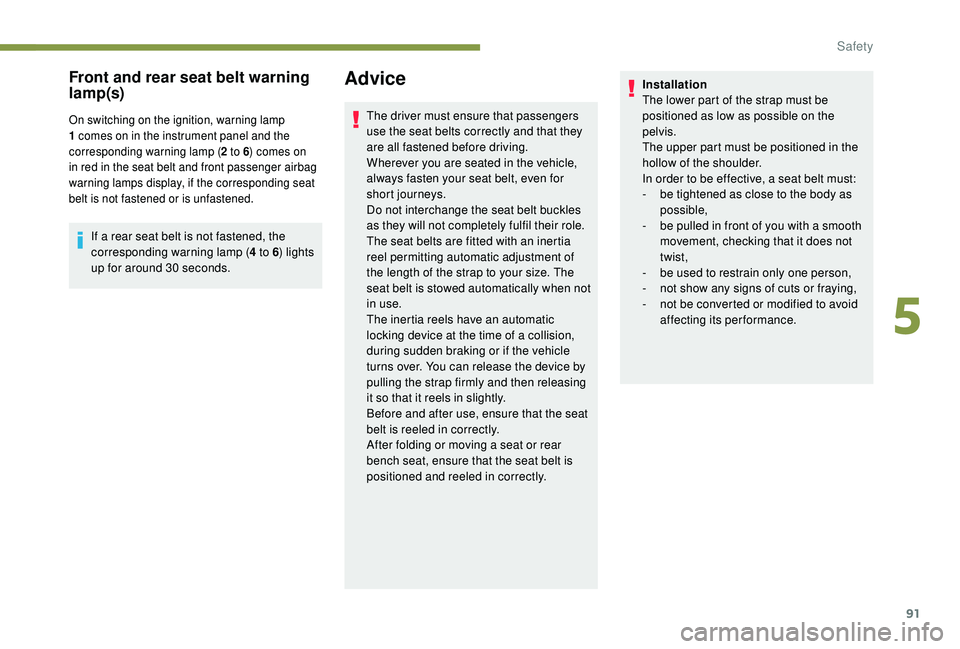
Front and rear seat belt warning
lamp(s)
On switching on the ignition, warning lamp
1 comes on in the instrument panel and the
corresponding warning lamp (2 to 6) comes on
in red in the seat belt and front passenger airbag
warning lamps display, if the corresponding seat
belt is not fastened or is unfastened.
If a rear seat belt is not fastened, the
corresponding warning lamp ( 4 to 6) lights
up for around 30
seconds.
Advice
The driver must ensure that passengers
use the seat belts correctly and that they
are all fastened before driving.
Wherever you are seated in the vehicle,
always fasten your seat belt, even for
short journeys.
Do not interchange the seat belt buckles
as they will not completely fulfil their role.
The seat belts are fitted with an inertia
reel permitting automatic adjustment of
the length of the strap to your size. The
seat belt is stowed automatically when not
in use.
The inertia reels have an automatic
locking device at the time of a collision,
during sudden braking or if the vehicle
turns over. You can release the device by
pulling the strap firmly and then releasing
it so that it reels in slightly.
Before and after use, ensure that the seat
belt is reeled in correctly.
After folding or moving a seat or rear
bench seat, ensure that the seat belt is
positioned and reeled in correctly. Installation
The lower part of the strap must be
positioned as low as possible on the
pelvis.
The upper part must be positioned in the
hollow of the shoulder.
In order to be effective, a seat belt must:
-
b
e tightened as close to the body as
possible,
-
b
e pulled in front of you with a smooth
movement, checking that it does not
twist,
-
b
e used to restrain only one person,
-
n
ot show any signs of cuts or fraying,
-
n
ot be converted or modified to avoid
affecting its performance.
5
Safety