2018 Peugeot 308 wing mirrors
[x] Cancel search: wing mirrorsPage 41 of 324

39
Remote control and key
Remote control function
The remote control includes a simple key that
allows the central locking or unlocking of the
vehicle using the door lock and starting and
switching off the engine.
Under normal operating conditions, it is
preferable to use the remote control.battery, etc. For more information on the Back-
up procedures
, refer to the corresponding
section.
Integral key
The key built into the remote control can be
used for the following operations (depending
on version):
-
u
nlocking/locking/deadlocking the vehicle.
-
a
ctivation/deactivation of the mechanical
child lock.
-
a
ctivation/deactivation of the front
passenger airbag.
-
b
ack-up door locking.
-
s
witching on the ignition and starting/
switching off the engine.
The remote control can be used for the
following functions, depending on version:
-
u
nlocking/locking/deadlocking the vehicle,
-
r
emote switching on of the lighting,
-
a
ctivation/deactivation of the alarm,
-
l
ocating the vehicle,
-
v
ehicle immobiliser.
Back-up procedures allow the vehicle to be
locked or unlocked in the event of a failure of
the remote control, the central locking, the Without Keyless Entr y and Star ting With Keyless Entr y and Star ting
F
T
o unfold or fold the key, press the button. F
T
o eject the key or put it back in place, pull
and hold the button.
Unlocking/locking is confirmed by rapid
flashing of the direction indicators for
approximately two seconds.
At the same time, depending on your
version, the door mirrors unfold/fold.
If fitted to your vehicle, the alarm is
deactivated when the vehicle is unlocked.
2
Access
Page 53 of 324

51
PEUGEOT i-Cockpit
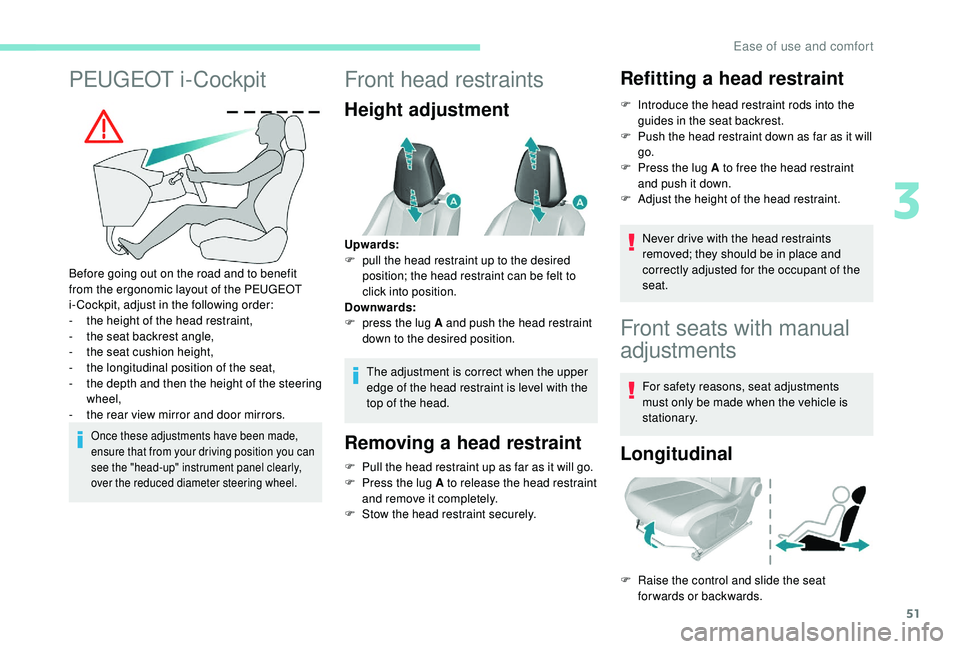
Before going out on the road and to benefit
from the ergonomic layout of the PEUGEOT
i-Cockpit, adjust in the following order:
-
t
he height of the head restraint,
-
t
he seat backrest angle,
-
t
he seat cushion height,
-
t
he longitudinal position of the seat,
-
t
he depth and then the height of the steering
wheel,
-
t
he rear view mirror and door mirrors.
Once these adjustments have been made,
ensure that from your driving position you can
see the "head-up" instrument panel clearly,
over the reduced diameter steering wheel.
Front head restraints
Height adjustment
The adjustment is correct when the upper
edge of the head restraint is level with the
top of the head.
Removing a head restraint
F Pull the head restraint up as far as it will go.
F P ress the lug A to release the head restraint
and remove it completely.
F
S
tow the head restraint securely.
Refitting a head restraint
F Introduce the head restraint rods into the guides in the seat backrest.
F
P
ush the head restraint down as far as it will
go.
F
P
ress the lug A to free the head restraint
and push it down.
F
A
djust the height of the head restraint.
Never drive with the head restraints
removed; they should be in place and
correctly adjusted for the occupant of the
seat.
Upwards:
F
p
ull the head restraint up to the desired
position; the head restraint can be felt to
click into position.
Downwards:
F
p
ress the lug A and push the head restraint
down to the desired position.
Front seats with manual
adjustments
For safety reasons, seat adjustments
must only be made when the vehicle is
stationary.
Longitudinal
F Raise the control and slide the seat forwards or backwards.
3
Ease of use and comfort
Page 156 of 324

154
Malfunction
Blind Spot Detection
This system is designed to improve safety
when driving and is in no circumstances
a substitute for the use of the interior
rear view mirror and door mirrors. It is
the driver's responsibility to constantly
check the traffic, to assess the distances
and relative speeds of other vehicles
and to anticipate their movements before
deciding whether to change lane.
The Blind Spot Detection system does not
avoid the need for vigilance on the part of
the driver.
Operation
The function is activated and
deactivated in the Vehicle/Driving
menu, then the Driving functions tab
of the touch screen.
The state of the system stays in memory when
switching off the ignition.
The system is automatically deactivated
when towing with a towing device
approved by PEUGEOT.
Sensors fitted in the front and rear bumpers
monitor the blind spots.
The alert is given by a warning lamp which
comes on in the door mirror on the side in
question as soon as a vehicle – car, lorry,
bicycle – is detected and the following
conditions are fulfilled:
-
a
ll the vehicles are moving in the same
direction and on adjacent lanes,
-
t
he speed of your vehicle is between 7 and
87
mph (12 and 140 km/h),
-
y
ou overtake a vehicle with a speed
difference of less than 6
mph (10 km/h),
-
w
hen a vehicle overtakes you with a speed
difference of less than 16
mph (25 km/h),
-
t
he traffic is flowing normally,
In the event of a fault with the system, you are
alerted by the illumination of these warning
lamps in the instrument panel, accompanied by
the display of a message and an audible signal.
Have the system checked by a PEUGEOT
dealer or a qualified workshop.
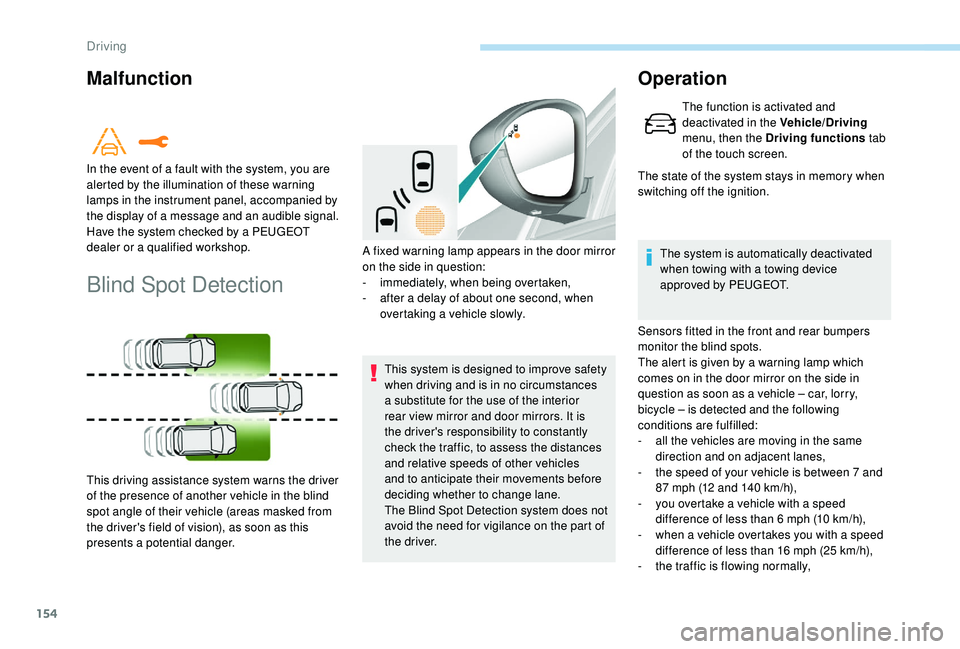
This driving assistance system warns the driver
of the presence of another vehicle in the blind
spot angle of their vehicle (areas masked from
the driver's field of vision), as soon as this
presents a potential danger.
A fixed warning lamp appears in the door mirror
on the side in question:
-
i
mmediately, when being overtaken,
-
a
fter a delay of about one second, when
overtaking a vehicle slowly.
Driving
Page 157 of 324

155
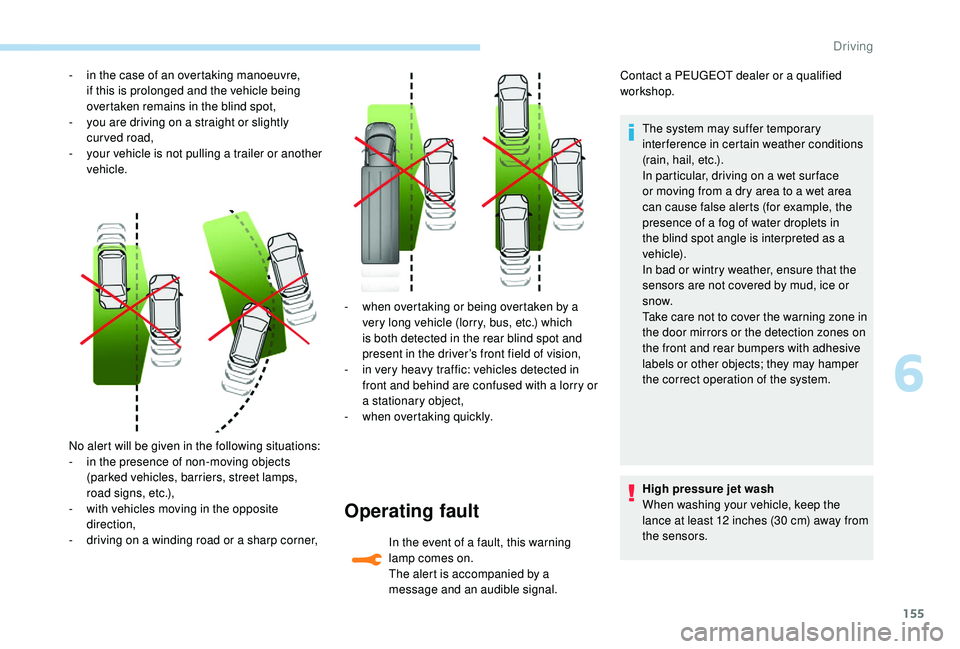
No alert will be given in the following situations:
- i n the presence of non-moving objects
(parked vehicles, barriers, street lamps,
road signs, etc.),
-
w
ith vehicles moving in the opposite
direction,
-
d
riving on a winding road or a sharp corner, -
w
hen overtaking or being overtaken by a
very long vehicle (lorry, bus, etc.) which
is both detected in the rear blind spot and
present in the driver’s front field of vision,
-
i
n very heavy traffic: vehicles detected in
front and behind are confused with a lorry or
a stationary object,
-
w
hen overtaking quickly.
Operating fault
In the event of a fault, this warning
lamp comes on.
The alert is accompanied by a
message and an audible signal.Contact a PEUGEOT dealer or a qualified
workshop.
The system may suffer temporary
interference in certain weather conditions
(rain, hail, etc.).
In particular, driving on a wet sur face
or moving from a dry area to a wet area
can cause false alerts (for example, the
presence of a fog of water droplets in
the blind spot angle is interpreted as a
vehicle).
In bad or wintry weather, ensure that the
sensors are not covered by mud, ice or
snow.
Take care not to cover the warning zone in
the door mirrors or the detection zones on
the front and rear bumpers with adhesive
labels or other objects; they may hamper
the correct operation of the system.
-
i
n the case of an overtaking manoeuvre,
if this is prolonged and the vehicle being
overtaken remains in the blind spot,
-
y
ou are driving on a straight or slightly
curved road,
-
y
our vehicle is not pulling a trailer or another
vehicle.
High pressure jet wash
When washing your vehicle, keep the
lance at least 12 inches (30 cm) away from
the sensors.
6
Driving
Page 160 of 324

158
Reversing camera
The reversing camera cannot, in any
circumstances, replace the need for
vigilance on the part of the driver.They are represented as lines marked
"on the ground" and do not indicate the
position of tall obstacles (for example:
other vehicles, etc.) relative to the vehicle.
Some distortion of the image is normal.
It is normal to have a part of the number
plate showing in the bottom of the screen.
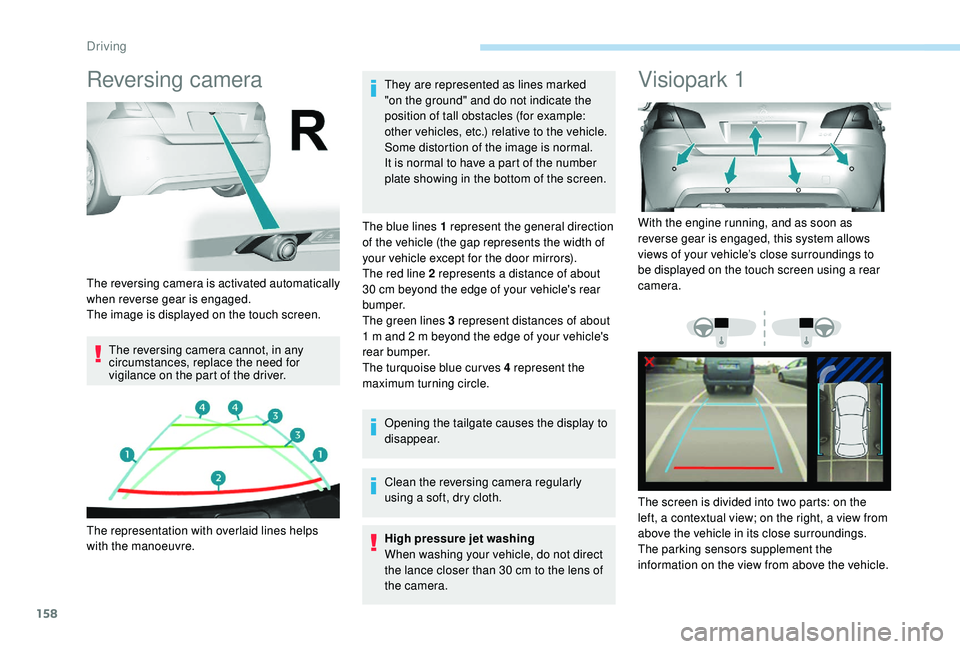
The blue lines 1 represent the general direction
of the vehicle (the gap represents the width of
your vehicle except for the door mirrors).
The red line 2 represents a distance of about
30 cm beyond the edge of your vehicle's rear
b u m p e r.
The green lines 3 represent distances of about
1 m and 2 m beyond the edge of your vehicle's
rear bumper.
The turquoise blue curves 4 represent the
maximum turning circle.
Opening the tailgate causes the display to
disappear.
Clean the reversing camera regularly
using a soft, dry cloth.
High pressure jet washing
When washing your vehicle, do not direct
the lance closer than 30
cm to the lens of
the camera.
Visiopark 1
The reversing camera is activated automatically
when reverse gear is engaged.
The image is displayed on the touch screen.
The representation with overlaid lines helps
with the manoeuvre. With the engine running, and as soon as
reverse gear is engaged, this system allows
views of your vehicle’s close surroundings to
be displayed on the touch screen using a rear
camera.
The screen is divided into two parts: on the
left, a contextual view; on the right, a view from
above the vehicle in its close surroundings.
The parking sensors supplement the
information on the view from above the vehicle.
Driving
Page 162 of 324

160
The function will be deactivated:
- I f a trailer is attached or a bicycle
carrier is fitted on a towbar (vehicle
fitted with a towbar installed in line with
the manufacturer's recommendations).
-
A
bove about 6 mph (10 km/h).
-
O
n opening the tailgate.
-
W
hen shifting out of reverse (the image
remains displayed for 7
seconds).
-
B
y pressing the red cross in the top
left-hand corner of the touch screen.
Check the cleanliness of the camera lens
regularly.
Clean the reversing camera regularly
using a soft, dry cloth.
AUTO mode
Standard view Zoom view"Zoom view".
"AUTO m o de".
This mode is activated by default.
Using sensors in the rear bumper, the
automatic view changes from a rear view
(standard) to a view from above (zoom), as an
obstacle is approached at the level of the red
line (less than 30
cm) during a manoeuvre.The blue lines 1 represent the width of your
vehicle, with the mirrors unfolded; the direction
changes depending on the position of the
steering wheel.
The red line 2 represents a distance of 30
cm
from the rear bumper; the two blue lines 3 and
4 represent 1
m and 2 m, respectively.
This view is available with AUTO mode or in the
view selection menu.
The area behind the vehicle is displayed on the
screen. The camera records the vehicle's surroundings
during the manoeuvre in order to create a
view from above the rear of the vehicle in its
near surroundings, allowing the vehicle to be
manoeuvred around obstacles nearby.
This view is available with AUTO mode or in the
view selection menu.
Driving