2018 Peugeot 308 mirror
[x] Cancel search: mirrorPage 4 of 324

2
.
.
Instrument panel 8
W arning and indicator lamps 9
I
ndicators 23
Distance recorders
2
7
Lighting dimmer
2
8
rip computer
2
8
Monochrome screen C
3
0
Touch screen
3
2
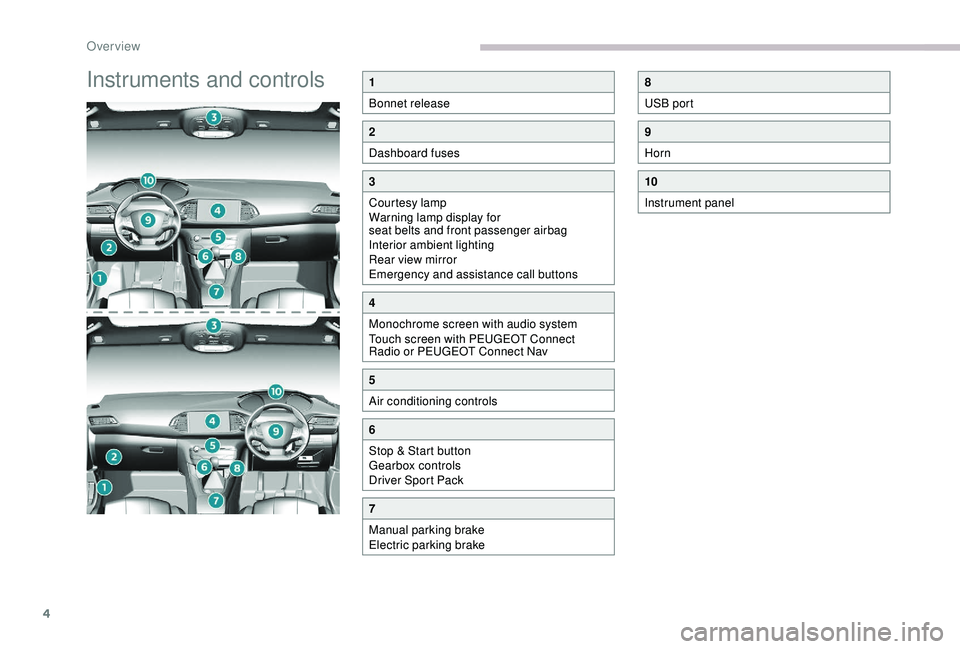
Instruments and controls
4
S
etting the time and date
3
8
Remote control and key
3
9
Keyless Entry and Starting
4
1
Locking/unlocking from the inside
4
3
Back-up procedures
4
4
Doors
4
6
Boot
47
Alarm
48
Electric windows
5
0
PEUGEOT i- Cockpit
5
1
Front head restraints
5
1
Front seats
5
1
Steering wheel adjustment
5
5
Mirrors
5
5
Rear seats (hatchback)
5
6
Rear seats (SW)
5
7
Interior fittings
5
8
Boot fittings (hatchback)
6
2
Boot fittings (SW)
6
2
Heating and Ventilation
6
4
Manual air conditioning
6
6
Manual air conditioning (Touch screen)
6
6
Dual-zone automatic air conditioning (Touch screen) 67Recirculation of interior air 69
Front demist – defrost 7 0
Rear screen demist – defrost
7
0
Panoramic roof
7
1
Courtesy lamps
7
2
Footwell lighting
73
I
nterior ambient lighting
73 E
xterior lighting control stalk
7
4
Automatic illumination of headlamps
7
6
Automatic headlamp dipping
7
6
Guide-me-home lighting
7
8
Exterior welcome lighting
7
8
Direction indicators
7
9
Door mirror spotlamps
7
9
Headlamp adjustment
7
9
Wiper control stalk
8
0
Changing a wiper blade
8
2
Automatic windscreen wipers
8
3
General safety recommendations
8
4
Hazard warning lamps
8
4
Emergency or assistance call
8
5
Horn 86
Electronic stability control (ESC)
8
6
Seat belts
9
0
Airbags
92
Child seats
9
5
Child seat at the front
9
6
Deactivating the front passenger airbag
9
9
ISOFIX mountings and child seats
1
02
Child lock 1 07
InstrumentsAccess
Over view
Ease of use and comfort Lighting and visibility
Safety
Eco-driving
Contents
Page 6 of 324

4
Instruments and controls1
Bonnet release
2
Dashboard fuses
3
Courtesy lamp
Warning lamp display for
seat belts and front passenger airbag
Interior ambient lighting
Rear view mirror
Emergency and assistance call buttons
4
Monochrome screen with audio system
Touch screen with PEUGEOT Connect
Radio or PEUGEOT Connect Nav
5
Air conditioning controls
6
Stop & Start button
Gearbox controls
Driver Sport Pack
7
Manual parking brake
Electric parking brake
8
USB port
9
Horn
10
Instrument panel
Over view
Page 35 of 324

33
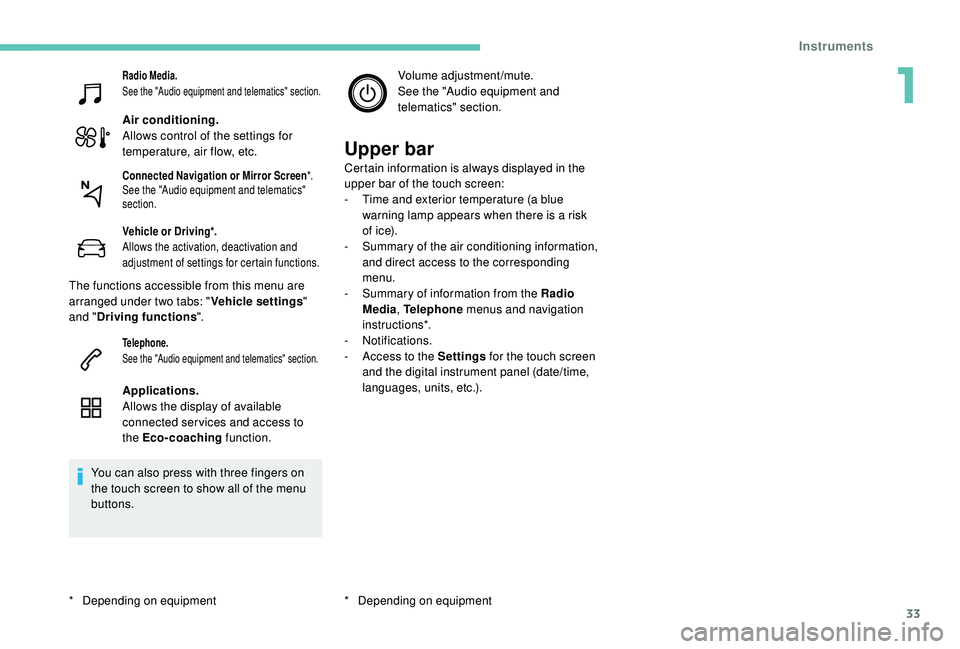
Radio Media.
See the "Audio equipment and telematics" section.
Air conditioning.
Allows control of the settings for
temperature, air flow, etc.
Vehicle or Driving*.
Allows the activation, deactivation and
adjustment of settings for certain functions.
The functions accessible from this menu are
arranged under two tabs: "Vehicle settings"
and " Driving functions ".
Telephone.
See the "Audio equipment and telematics" section.
Applications.
Allows the display of available
connected ser vices and access to
the Eco-coaching function.
You can also press with three fingers on
the touch screen to show all of the menu
buttons. Volume adjustment/mute.
See the "Audio equipment and
telematics" section.
Upper bar
Certain information is always displayed in the
upper bar of the touch screen:
-
T
ime and exterior temperature (a blue
warning lamp appears when there is a risk
of i c e).
-
S
ummary of the air conditioning information,
and direct access to the corresponding
menu.
-
S
ummary of information from the Radio
Media , Telephone menus and navigation
instructions*.
-
Notifications.
-
A
ccess to the Settings for the touch screen
and the digital instrument panel (date/time,
languages, units, etc.).
*
D
epending on equipmentConnected Navigation or Mirror Screen *.
See the "Audio equipment and telematics"
section.
* Depending on equipment
1
Instruments
Page 41 of 324

39
Remote control and key
Remote control function
The remote control includes a simple key that
allows the central locking or unlocking of the
vehicle using the door lock and starting and
switching off the engine.
Under normal operating conditions, it is
preferable to use the remote control.battery, etc. For more information on the Back-
up procedures
, refer to the corresponding
section.
Integral key
The key built into the remote control can be
used for the following operations (depending
on version):
-
u
nlocking/locking/deadlocking the vehicle.
-
a
ctivation/deactivation of the mechanical
child lock.
-
a
ctivation/deactivation of the front
passenger airbag.
-
b
ack-up door locking.
-
s
witching on the ignition and starting/
switching off the engine.
The remote control can be used for the
following functions, depending on version:
-
u
nlocking/locking/deadlocking the vehicle,
-
r
emote switching on of the lighting,
-
a
ctivation/deactivation of the alarm,
-
l
ocating the vehicle,
-
v
ehicle immobiliser.
Back-up procedures allow the vehicle to be
locked or unlocked in the event of a failure of
the remote control, the central locking, the Without Keyless Entr y and Star ting With Keyless Entr y and Star ting
F
T
o unfold or fold the key, press the button. F
T
o eject the key or put it back in place, pull
and hold the button.
Unlocking/locking is confirmed by rapid
flashing of the direction indicators for
approximately two seconds.
At the same time, depending on your
version, the door mirrors unfold/fold.
If fitted to your vehicle, the alarm is
deactivated when the vehicle is unlocked.
2
Access
Page 43 of 324

41
With the remote control
F Press this button to lock the vehicle fully.
F
W
ithin five seconds, press this button again
to deadlock the vehicle.
Deadlocking is confirmed by fixed
illumination of the direction indicators for
approximately two seconds.
Depending on your version, the door
mirrors fold at the same time.
With the key
F Turn the key to the rear in the driver's door lock to lock the vehicle completely.
F
T
urn the key to the rear again within five
seconds to deadlock the vehicle.
Keyless Entry and
Starting
Unlocking/locking is confirmed by rapid
flashing of the direction indicators for
approximately two seconds.
At the same time, depending on your
version, the door mirrors unfold/fold.
If fitted to your vehicle, the alarm is
deactivated when the vehicle is unlocked.
Complete unlocking
Selective unlocking
This system allows the unlocking, locking
and starting of the vehicle, while carrying
the electronic key in the recognition zone " A"
around the vehicle. F
W
ith the electronic key on your person
and in recognition zone A , pass your hand
behind the door handle of a front door to
unlock the vehicle, then pull the handle to
open the door.
When selective unlocking of the drivers door is
activated:
F
E
lectronic key in the driver side zone, pass
your hand behind the driver’s door handle
to just unlock the driver’s door, pull on the
handle to open the door.
F
E
lectronic key in the passenger side zone,
pass your hand behind the front passenger
door handle to unlock the whole vehicle, pull
on the handle to open the door.
2
Access
Page 45 of 324

43
If one of the doors or the boot is still open
or if the electronic key for the K eyless
Entry and Starting system has been left
inside the vehicle, the central locking does
not take place.
If the vehicle is unlocked inadvertently and
if no action is taken at the doors or boot,
the vehicle will automatically lock itself
again after about 30
seconds.
If fitted to your vehicle, the alarm is not
reactivated.
The automatic folding and unfolding of
the door mirrors can be deactivated by a
PEUGEOT dealer or a qualified workshop.
As a safety measure (children on board),
never leave the vehicle without taking the
electronic key for the
K
eyless Entry and
Starting system with you, even for a short
period.
Be aware of the risk of theft when the
electronic key for the
K
eyless Entry and
Starting system is in one of the defined
zones with the vehicle unlocked. In order to preser ve the battery in the
electronic key and the vehicle's battery,
the "hands-free" functions are put into
long-term standby after 21 days without
use. To restore these functions, press
one of the remote control buttons or start
the engine with the electronic key in the
reader.
For more information on Star ting -
switching off the engine with "
Keyless
Entr y and Star ting ", refer to the
corresponding section.
Locking/unlocking from
the inside
Automatic central locking
of the doors
The doors can lock automatically while driving
(speed above 6 mph [10 km/h]).
To activate or deactivate this
function, press and hold the button
until a message appears in the
screen. After unlocking, if no door is opened
within 30
seconds, the doors lock again
automatically.
F
P
ress the button.
This locks and unlocks the doors and the boot.
If the vehicle is deadlocked or locked with
the remote control or the door handles,
the button is not operational. In this case,
use the key or remote control to unlock.
When carrying large objects with the boot
open, you can press this button to lock
just the doors.
When locking from inside, the door mirrors
do not fold.
2
Access
Page 53 of 324

51
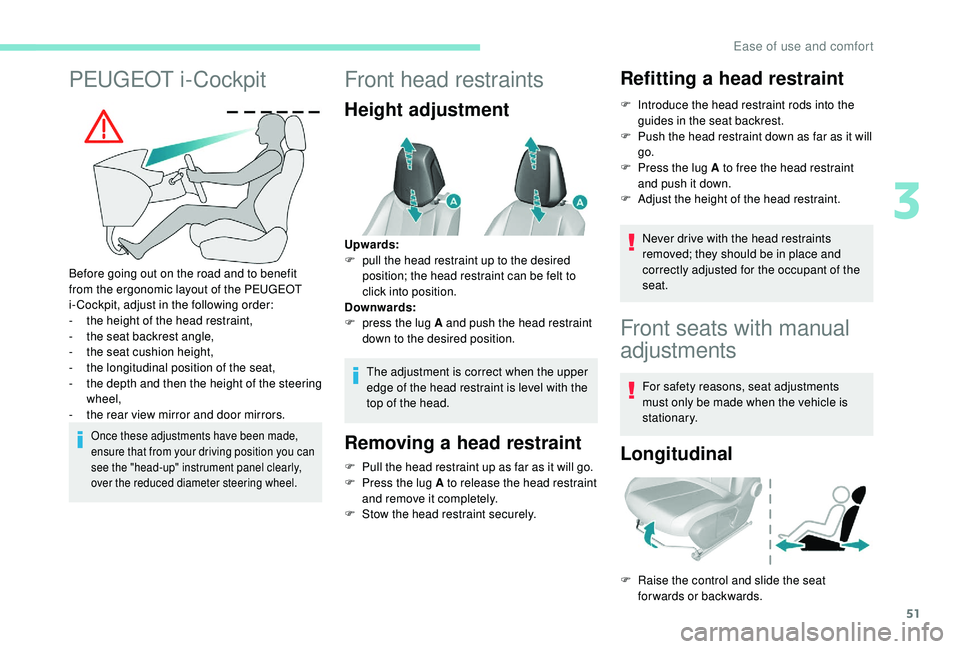
PEUGEOT i-Cockpit
Before going out on the road and to benefit
from the ergonomic layout of the PEUGEOT
i-Cockpit, adjust in the following order:
-
t
he height of the head restraint,
-
t
he seat backrest angle,
-
t
he seat cushion height,
-
t
he longitudinal position of the seat,
-
t
he depth and then the height of the steering
wheel,
-
t
he rear view mirror and door mirrors.
Once these adjustments have been made,
ensure that from your driving position you can
see the "head-up" instrument panel clearly,
over the reduced diameter steering wheel.
Front head restraints
Height adjustment
The adjustment is correct when the upper
edge of the head restraint is level with the
top of the head.
Removing a head restraint
F Pull the head restraint up as far as it will go.
F P ress the lug A to release the head restraint
and remove it completely.
F
S
tow the head restraint securely.
Refitting a head restraint
F Introduce the head restraint rods into the guides in the seat backrest.
F
P
ush the head restraint down as far as it will
go.
F
P
ress the lug A to free the head restraint
and push it down.
F
A
djust the height of the head restraint.
Never drive with the head restraints
removed; they should be in place and
correctly adjusted for the occupant of the
seat.
Upwards:
F
p
ull the head restraint up to the desired
position; the head restraint can be felt to
click into position.
Downwards:
F
p
ress the lug A and push the head restraint
down to the desired position.
Front seats with manual
adjustments
For safety reasons, seat adjustments
must only be made when the vehicle is
stationary.
Longitudinal
F Raise the control and slide the seat forwards or backwards.
3
Ease of use and comfort
Page 57 of 324

55
Steering wheel adjustment
F When stationary, lower the control lever to release
the steering wheel adjustment mechanism.
F
A
djust the height and reach to suit your driving
position.
F
P
ull the control lever to lock the steering wheel
adjustment mechanism.
As a safety precaution, these operations
should only be carried out while the
vehicle is stationary.
Mirrors
Door mirrors
Each fitted with an adjustable mirror glass
permitting the lateral rearward vision necessary
for overtaking or parking.
They can also be folded for parking in narrow
spaces.
Demisting – Defrosting
Demisting - defrosting of the door
mirrors operates with the engine
running, by switching on the heated
rear screen.
For more information on Rear
screen demist – defrost , refer to the
corresponding section.
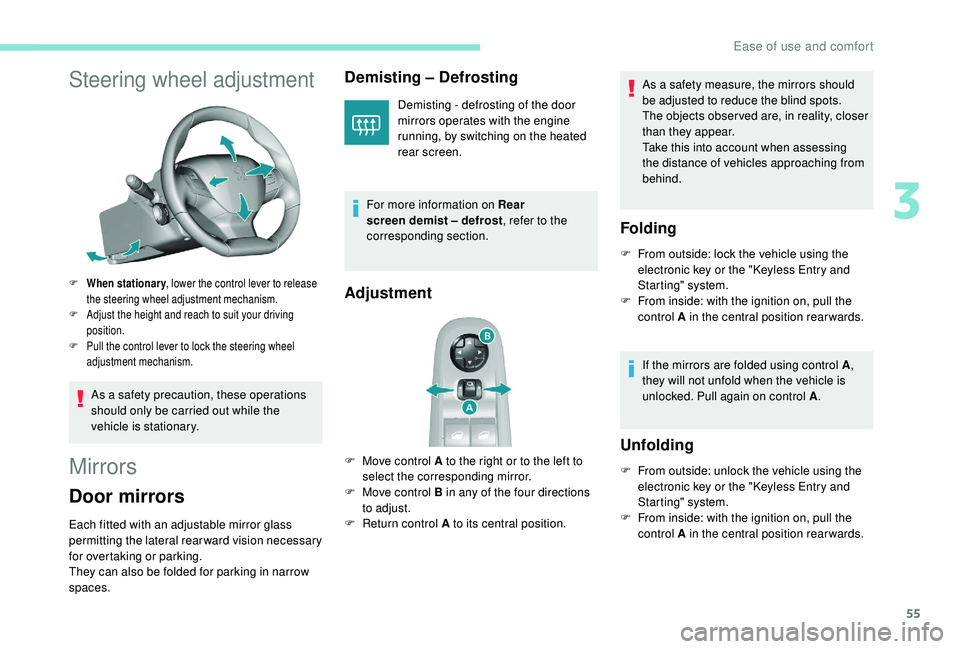
Adjustment
F Move control A to the right or to the left to select the corresponding mirror.
F
M
ove control B in any of the four directions
to adjust.
F
R
eturn control A to its central position. As a safety measure, the mirrors should
be adjusted to reduce the blind spots.
The objects obser ved are, in reality, closer
than they appear.
Take this into account when assessing
the distance of vehicles approaching from
behind.
Folding
F From outside: lock the vehicle using the
electronic key or the " K eyless Entry and
Starting" system.
F
F
rom inside: with the ignition on, pull the
control A in the central position rearwards.
If the mirrors are folded using control A ,
they will not unfold when the vehicle is
unlocked. Pull again on control A .
Unfolding
F From outside: unlock the vehicle using the
electronic key or the " K eyless Entry and
Starting" system.
F
F
rom inside: with the ignition on, pull the
control A in the central position rearwards.
3
Ease of use and comfort