2018 Peugeot 308 low oil pressure
[x] Cancel search: low oil pressurePage 9 of 324
7
Limit the causes of excess
consumption
Spread loads throughout the vehicle; place
the heaviest items in the bottom of the boot,
as close as possible to the rear seats.
Limit the loads carried in the vehicle and
reduce wind resistance (roof bars, roof rack,
bicycle carrier, trailer, etc.). Preferably, use a
roof box.
Remove roof bars and roof racks after use.
At the end of winter, remove snow tyres and
refit your summer tyres.
Observe the recommendations
on maintenance
Check the tyre pressures regularly, when cold,
referring to the label in the door aperture,
driver's side.
Carry out this check in particular:
-
b
efore a long journey,
-
a
t each change of season,
-
a
fter a long period out of use.
Do not forget the spare wheel and the tyres on
any trailer or caravan. Have your vehicle ser viced regularly (engine
oil, oil filter, air filter, cabin filter, etc.) and
obser ve the schedule of operations in the
manufacturer's service schedule.
When filling the tank, do not continue after the
3
rd cut-off of the nozzle to avoid over flow.
At the wheel of your new vehicle, it is only
after the first 1,900
miles (3,000 kilometres)
that you will see the fuel consumption settle
down to a consistent average. With a BlueHDi Diesel engine, if the SCR
system is faulty, your vehicle becomes
polluting. Visit a PEUGEOT dealer or a
qualified workshop as soon as possible to
bring your vehicle’s nitrogen oxides emissions
back in line with the regulations.
For vehicles fitted with it, avoid using the
Dynamic Pack for too long, in order to limit
your fuel consumption.
.
Eco-driving
Page 196 of 324
194
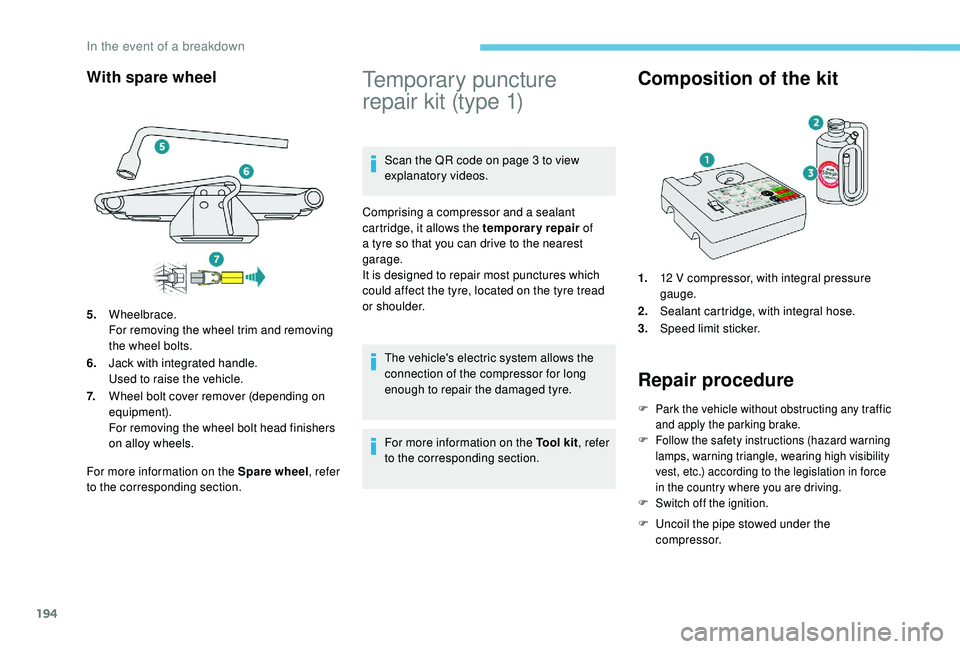
With spare wheel
For more information on the Spare wheel, refer
to the corresponding section.
Temporary puncture
repair kit (type 1)
Scan the QR code on page 3 to view
explanatory videos.
Comprising a compressor and a sealant
cartridge, it allows the temporary repair of
a tyre so that you can drive to the nearest
garage.
It is designed to repair most punctures which
could affect the tyre, located on the tyre tread
or shoulder.
The vehicle's electric system allows the
connection of the compressor for long
enough to repair the damaged tyre.
For more information on the Tool kit , refer
to the corresponding section.
Composition of the kit
1. 12 V compressor, with integral pressure
gauge.
2. Sealant cartridge, with integral hose.
3. Speed limit sticker.
Repair procedure
F Park the vehicle without obstructing any traffic
and apply the parking brake.
F
F
ollow the safety instructions (hazard warning
lamps, warning triangle, wearing high visibility
vest, etc.) according to the legislation in force
in the country where you are driving.
F
S
witch off the ignition.
F Uncoil the pipe stowed under the compressor.
5.
Wheelbrace.
For removing the wheel trim and removing
the wheel bolts.
6. Jack with integrated handle.
Used to raise the vehicle.
7. Wheel bolt cover remover (depending on
equipment).
For removing the wheel bolt head finishers
on alloy wheels.
In the event of a breakdown
Page 197 of 324
195
Avoid removing any foreign bodies which
have penetrated into the tyre.
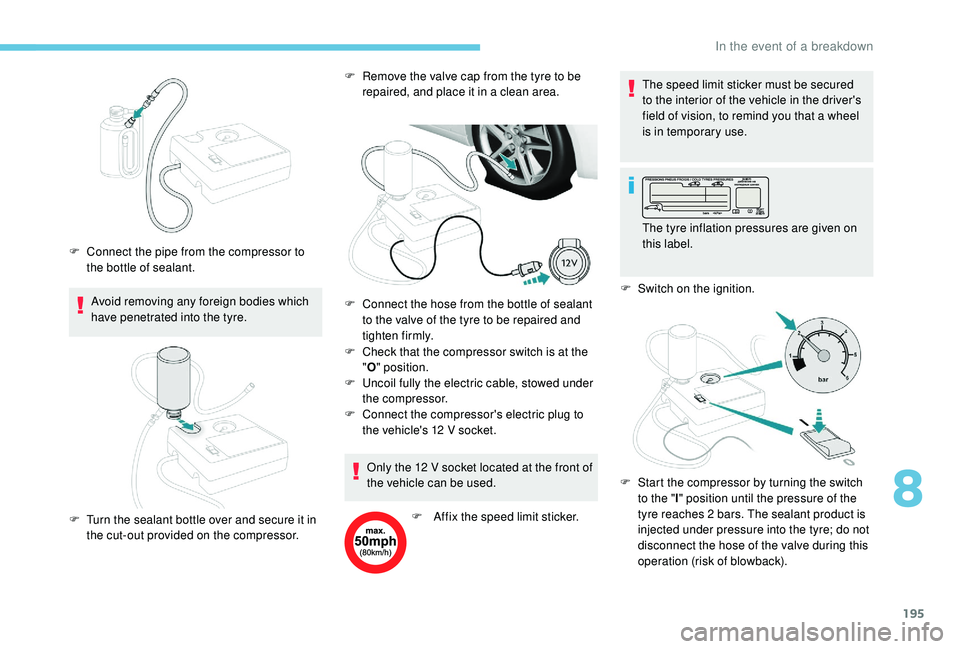
F
C
onnect the pipe from the compressor to
the bottle of sealant. F
R
emove the valve cap from the tyre to be
repaired, and place it in a clean area.
F
C
heck that the compressor switch is at the
" O " position.
F
U
ncoil fully the electric cable, stowed under
the compressor.
F
C
onnect the compressor's electric plug to
the vehicle's 12
V socket.
F
T
urn the sealant bottle over and secure it in
the cut-out provided on the compressor. F
C onnect the hose from the bottle of sealant
to the valve of the tyre to be repaired and
tighten firmly.
Only the 12
V socket located at the front of
the vehicle can be used.
F
A
ffix the speed limit sticker.The speed limit sticker must be secured
to the interior of the vehicle in the driver's
field of vision, to remind you that a wheel
is in temporary use.
The tyre inflation pressures are given on
this label.
F S witch on the ignition.
F
S
tart the compressor by turning the switch
to the " l" position until the pressure of the
tyre reaches 2
bars. The sealant product is
injected under pressure into the tyre; do not
disconnect the hose of the valve during this
operation (risk of blowback).
8
In the event of a breakdown
Page 198 of 324
196
After about 7 minutes, if a pressure of
2 bars is not reached, this indicates
that the tyre is not repairable; contact a
PEUGEOT dealer or a qualified workshop
for assistance.
F
P
lace the switch in the " O" position.
F
D
isconnect the compressor's electric plug
from the vehicle's 12
V socket.
F
R
efit the cap on the valve.
F
R
emove the kit.
F
R
emove and then store the bottle of sealant.
Take care, the sealant product is harmful
if swallowed and causes irritation to the
eyes.
Keep this product out of the reach of
children.
The use-by date is marked on the bottle.
After use, do not discard the bottle by the
roadside, take it to a PEUGEOT
dealer or
an authorised waste disposal site.
Do not forget to obtain a new bottle of
sealant, available from a PEUGEOT
dealer or a qualified workshop. Do not exceed the speed of 50
mph
(80
k
m/h) when driving with a tyre repaired
using this type of kit.
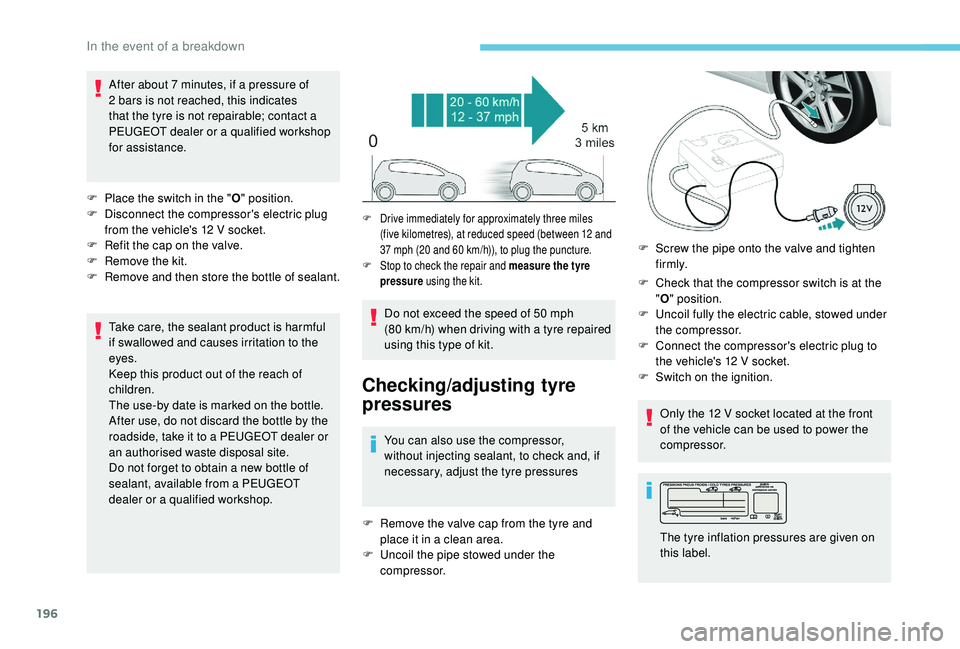
Checking/adjusting tyre
pressures
You can also use the compressor,
without injecting sealant, to check and, if
necessary, adjust the tyre pressures
F
R
emove the valve cap from the tyre and
place it in a clean area.
F
U
ncoil the pipe stowed under the
compressor. F
C
heck that the compressor switch is at the
" O " position.
F
U
ncoil fully the electric cable, stowed under
the compressor.
F
C
onnect the compressor's electric plug to
the vehicle's 12 V socket.
F
S
witch on the ignition.
Only the 12 V socket located at the front
of the vehicle can be used to power the
compressor.
F Drive immediately for approximately three miles (five kilometres), at reduced speed (between 12 and
37
mph (20 and 60 km/h)), to plug the puncture.
F
S
top to check the repair and measure the tyre
pressure using the kit.
F Screw the pipe onto the valve and tighten
f i r m l y.
The tyre inflation pressures are given on
this label.
In the event of a breakdown
Page 200 of 324
198
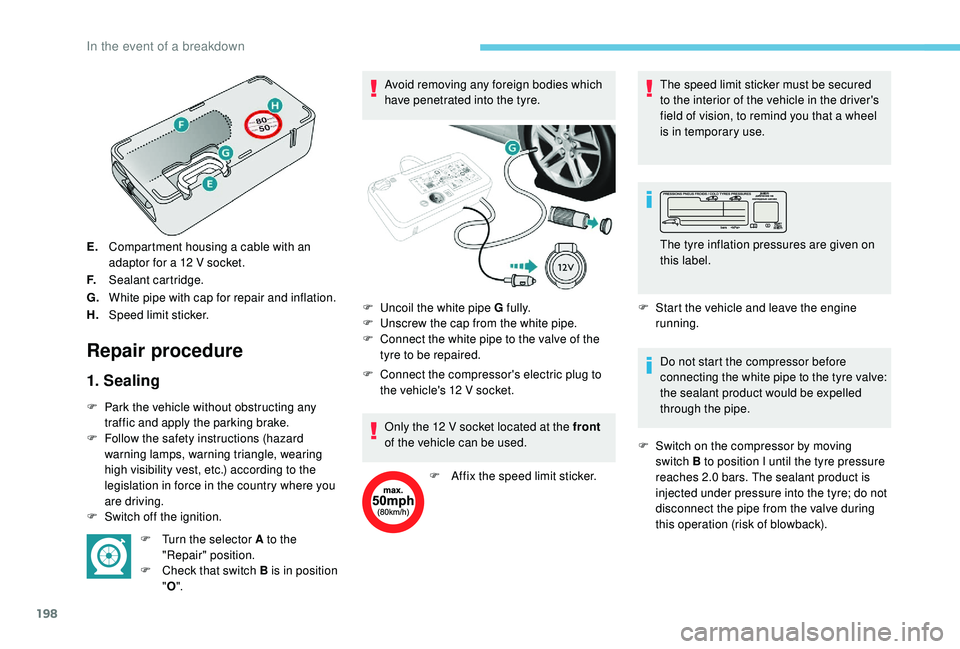
E.Compartment housing a cable with an
adaptor for a 12
V socket.
F. Sealant cartridge.
G. White pipe with cap for repair and inflation.
H. Speed limit sticker.
Repair procedure
1. Sealing
F Park the vehicle without obstructing any
traffic and apply the parking brake.
F
F
ollow the safety instructions (hazard
warning lamps, warning triangle, wearing
high visibility vest, etc.) according to the
legislation in force in the country where you
are driving.
F
S
witch off the ignition. F
T
urn the selector A to the
"Repair" position.
F
C
heck that switch B is in position
" O ". Avoid removing any foreign bodies which
have penetrated into the tyre.
F
C
onnect the compressor's electric plug to
the vehicle's 12 V socket.
Only the 12 V socket located at the front
of the vehicle can be used.
F
A
ffix the speed limit sticker.The speed limit sticker must be secured
to the interior of the vehicle in the driver's
field of vision, to remind you that a wheel
is in temporary use.
F
S
tart the vehicle and leave the engine
running.
Do not start the compressor before
connecting the white pipe to the tyre valve:
the sealant product would be expelled
through the pipe.
F
S
witch on the compressor by moving
switch B to position I until the tyre pressure
reaches 2.0
bars. The sealant product is
injected under pressure into the tyre; do not
disconnect the pipe from the valve during
this operation (risk of blowback).
F
U
ncoil the white pipe G fully.
F
U
nscrew the cap from the white pipe.
F
C
onnect the white pipe to the valve of the
tyre to be repaired. The tyre inflation pressures are given on
this label.
In the event of a breakdown
Page 201 of 324
199
If after approximately seven minutes this
pressure is not reached, this indicates
that the tyre is not repairable; contact a
PEUGEOT dealer or a qualified workshop
for assistance.
F
R
emove the kit and screw the cap back on
the white pipe. Take care to avoid staining
your vehicle with traces of fluid. Keep the kit
to hand.
Take care, the sealant product is harmful
if swallowed and causes irritation to the
eyes.
Keep this product out of the reach of
children.2. Inflation
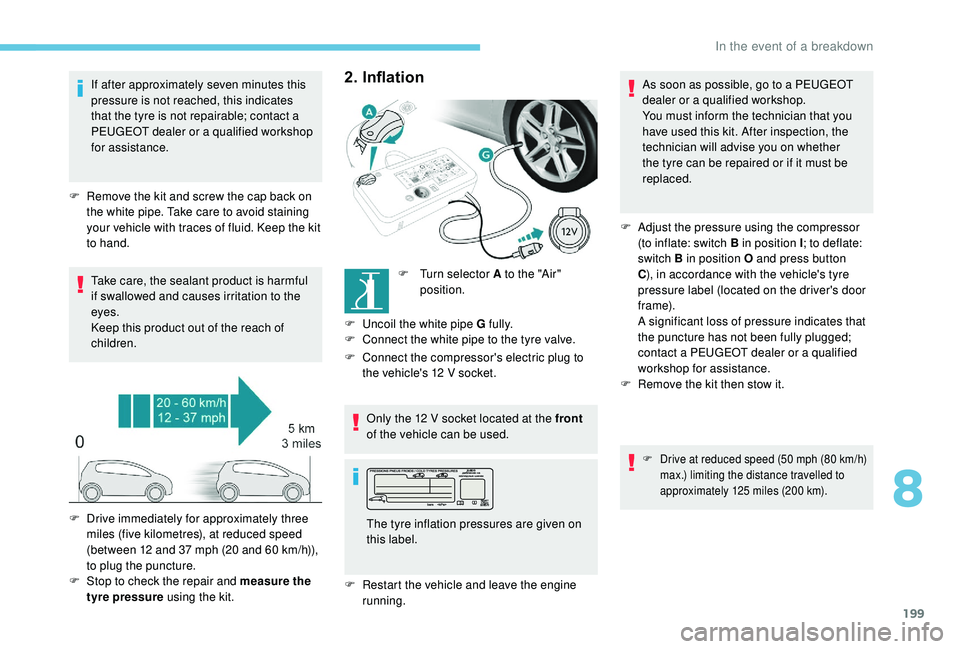
F Turn selector A to the "Air" position.
F
U
ncoil the white pipe G fully.
F
C
onnect the white pipe to the tyre valve.
F
C
onnect the compressor's electric plug to
the vehicle's 12
V socket.
Only the 12
V socket located at the front
of the vehicle can be used.
F
R
estart the vehicle and leave the engine
running.
F
D
rive immediately for approximately three
miles (five kilometres), at reduced speed
(between 12 and 37
mph (20 and 60
km/h)),
to plug the puncture.
F
S
top to check the repair and measure the
tyre pressure using the kit. The tyre inflation pressures are given on
this label. As soon as possible, go to a PEUGEOT
dealer or a qualified workshop.
You must inform the technician that you
have used this kit. After inspection, the
technician will advise you on whether
the tyre can be repaired or if it must be
replaced.
F
A
djust the pressure using the compressor
(to inflate: switch B in position I ; to deflate:
switch B in position O and press button
C ), in accordance with the vehicle's tyre
pressure label (located on the driver's door
f r a m e).
A significant loss of pressure indicates that
the puncture has not been fully plugged;
contact a PEUGEOT dealer or a qualified
workshop for assistance.
F
R
emove the kit then stow it.
F Drive at reduced speed (50 mph (80 km/h)
max.) limiting the distance travelled to
approximately 125
miles (200 km).
8
In the event of a breakdown
Page 313 of 324
235
AABS .................................................................87
Accessories ...................................... 47, 84, 113
Active lane keeping assistance
......20, 15 0, 15 6
Active Safety Brake......................... 16, 14 6, 148
AdBlue
® ...................................... 1 6, 25, 188,189
Additive, Diesel ........................... 14 -15, 18 6,187
Adjusting headlamps
................................ 79-80
Adjusting head restraints
................................ 51
Adjusting seat
............................................ 51- 5 3
Adjusting the air distribution
.....................67- 6 9
Adjusting the air flow
................................. 6
6-69
Adjusting the date
................... 30 -32, 38, 18, 31
Adjusting the lumbar support
.......................... 52
A
djusting the seat angle
................................. 52
Adjusting the temperature
........................66-69
Adjusting the time
.................... 30 -32, 38, 17, 31
Advice on driving
................................... 109,110
Airbags
...............................
..........18, 92, 94, 99
Airbags, curtain
......................................... 93-94
Airbags, front ....................................... 93 -94, 99
Airbags, lateral
.......................................... 93-94
Air conditioning
............................... 6, 65, 65 - 66
Air conditioning, automatic
.......................67- 6 9
Air conditioning, manual
................ 6
6-67, 69-70
Air vents
.......................................................... 64
Alarm
......................................................... 48-49
Anti-lock braking system (ABS)
................86 - 87
Anti-pinch
.................................................. 5
0, 71
Anti-slip regulation (ASR)
............................... 87
Anti-theft/Immobiliser
..................................... 44
Apple CarPlay connection
........................12, 16
Armrest
................
............................................ 58
Armrest, front
............................................ 59-60
Armrest, rear
...............................
....................61
Assistance, emergency braking
.......86 - 87, 148
Assistance call
...............................
...........85-86
Audio streaming (Bluetooth)
...................9, 9, 24
BBattery ............................. 181, 18 6, 215, 217, 218
Battery, charging .................................... 216,217
Battery, remote control
.............................44-46
Bicycle carrier
...............................
..................47
Blanking screen (snow shield)
...............173 ,175
Blind, panoramic roof
...................................... 71
Blind spot detection
...................................... 15 6
Blind spot sensors
................................. 15 4,15 5
BlueHDi
.......................................... 25, 188, 220
Bluetooth (hands-free)
.......... 9
-10, 13 -14, 25 -2 6
Bluetooth (telephone)
..................... 1
3 -15, 25 -27
Bonnet
........................................................... 183
Boot
........................................................... 40, 47
Boot lamp
........................................................ 62
Brake discs
............................................. 187,188
Brake lamps
...............................
............209,210
Brakes
.............................................. 10, 187,188
Braking, automatic emergency
.......16, 14 6, 148
Braking, dynamic emergency
.................114 ,117
Braking assistance system
.............................86
Brightness
....................................................... 16
Bulbs
............................................................. 205
Bulbs (changing)
....................205,206, 209,210
CCable, audio ................................................ 9, 23
Cable, Jack ................................................. 9, 23
Cap, fuel filler
...............................
...........170,171
Capacity, fuel tank
.................................. 170,171
CD
......................................................... 9, 23 -24
CD, MP3
................................................ 9, 23 -24
Central locking
.................................... 4
0, 42- 43
Changing a bulb
..................... 20
5,206, 209,210
Changing a fuse
..................................... 21
1,214
Changing a wheel
................... 19
3,19 4, 201, 202
Changing a wiper blade
............................ 81
- 82
Changing the remote control battery
........45-46 Checking the engine oil level
....................
24-25
Checking the levels
................................
18 4,18 6
Checking tyre pressures (using the kit)
..............................
19 4, 19 6, 20 0
Checks
...........................................
183, 18 6,188
Checks, routine
......................................
18 6,188
Child lock
.......................................................
107
Children
.........................................................
104
Children (safety)
............................................
107
Child seats
.................... 9
1, 95 - 9 6, 10 0,101, 107
Child seats, conventional
..............................
10 0
Child seats, ISOFIX .......................
102, 104,105
Closing the boot
........................................
4
0, 47
Closing the doors
..........................
40, 42- 43, 46
Commercial version
......................................
233
Configuration, vehicle
......................... 3
0-34, 36
Connection, Bluetooth
....... 1
0, 13 -15, 19, 25 -27
Connection, MirrorLink
........................
11 -12 , 17
Connection, Wi-Fi network
.............................
20
Control, back-up boot release ........................
47
Control, back-up door opening .................
44-45
Control, electric windows
................................
50
Control, heated seats
......................................
53
Controls, steering mounted
...................
12 2,126
Control stalk, lighting
......................................
74
Control stalk, wipers
...........................
8
0 - 81, 8 3
Courtesy lamps ...............................................
72
Cover, load space .....................................
61- 63
Cruise control ....13 0, 132,13 3, 13 5,141, 14 4,14 5
Cruise control, adaptive
................................13 9
Cruise control, adaptive with Stop function
..................132,13 3, 13 8,141, 14 4
Cruise control by speed limit recognition
...............................
............132,13 3
Cup holder
.......................................................58
.
Alphabetical index