2018 Peugeot 308 run flat
[x] Cancel search: run flatPage 5 of 324

3
.
bit.ly/helpPSA
.
Driving recommendations 109
Anti-theft protection 1 10
Starting/Switching off the engine
1
10
Manual parking brake
1
14
Electric parking brake
1
14
Hill start assist
1
17
5-speed manual gearbox
1
18
6-speed manual gearbox
1
18
EAT6 automatic gearbox
1
19
EAT8 automatic gearbox
1
22
Driver Sport Pack
1
26
Gear shift indicator
1
27
Stop & Start
1
28
Memorising speeds
1
30
Speed Limit recognition and
recommendation
131
Speed limiter
1
33
Cruise control
1
35
Adaptive cruise control
1
38
Active Safety Brake with Distance Alert
and Intelligent emergency braking
assistance
1
46
Fatigue detection system
1
49
Active Lane Keeping Assistance
1
50
Blind Spot Detection
1
54
Parking sensors
1
56
Reversing camera
1
58
Visiopark 1
1
58
Park Assist
1
61
Tyre under-inflation detection
1
66Fuel tank
1 70
Diesel misfuel prevention 1 71
Compatibility of fuels
1
72
Snow chains
1
73
Very cold climate screen
1
73
Towing device
1
74
Towing device with quickly detachable
towball (hatchback)
1
75
Towing device with quickly detachable
towball (SW)
1
78
Energy economy mode
1
81
Load reduction mode
1
81
Fitting roof bars
1
82
Bonnet
1
82
Engines
183
Checking levels
1
84
Checks
18 6
AdBlue
® (BlueHDi engines) 1 88
Tool kit
1
93
Temporary puncture repair kit
1
94
Spare wheel
20
1
Changing a bulb
2
05
Changing a fuse
2
11
12
V battery
2
15
To w i n g
2 18
Running out of fuel (Diesel)
2
20Engine technical data and towed loads
2
21
Petrol engines
2
22
Diesel engines
2
27
Dimensions
2
31
Identification markings
2
33
Driving
Practical information
In the event of a breakdown Technical data
Alphabetical index
Access to additional videos
Audio equipment and telematics
Bluetooth audio system
PEUGEOT Connect Radio
PEUGEOT Connect Nav
.
Contents
Page 183 of 324

181
F Press the trigger fully in and remove the towball by pulling it toward you.
F
O
n the towball, push the latch to the left and
hold it in this position.
F
A
t the same time, push the trigger for wards
to unlock the mechanism (position B ).
F
I
nstall and clip the protective plug in the
carrier located below the rear bumper.
F
S
tow the towball in its bag.
Energy economy mode
System which manages the duration of use of
certain functions to conser ve a sufficient level
of charge in the battery.
After the engine has stopped, you can still use
functions such as the audio and telematics
system, windscreen wipers, dipped beam
headlamps,
courtesy lamps, etc. for a
maximum combined duration of about forty
minutes.
Switching to this mode
A message appears in the instrument panel
screen indicating that the vehicle has switched
to economy mode and the active functions are
put on standby.
If a telephone call is being made at this
time, it will be maintained for around
10
minutes with the Bluetooth hands-free
kit of your audio system.
Exiting the mode
These functions will be automatically restored
the next time the vehicle is used.
In order to restore the use of these functions
immediately, start the engine and let it run:
-
f
or less than ten minutes, to use the
equipment for approximately five minutes, A flat battery prevents the engine from
starting.
For more information on the 12
V batter y
,
refer to the corresponding section.
Load reduction mode
System which manages the use of certain
functions according to the level of charge
remaining in the battery.
When the vehicle is being driven, the load
reduction function temporarily deactivates
certain functions, such as air conditioning,
heated rear screen, etc.
The deactivated functions are reactivated
automatically as soon as conditions permit. -
f
or more than ten minutes, to use the
equipment for up to approximately thirty
minutes.
Let the engine run for the duration specified to
ensure that the battery charge is sufficient.
Do not repeatedly and continuously restart the
engine in order to charge the battery.
7
Practical information
Page 200 of 324

198
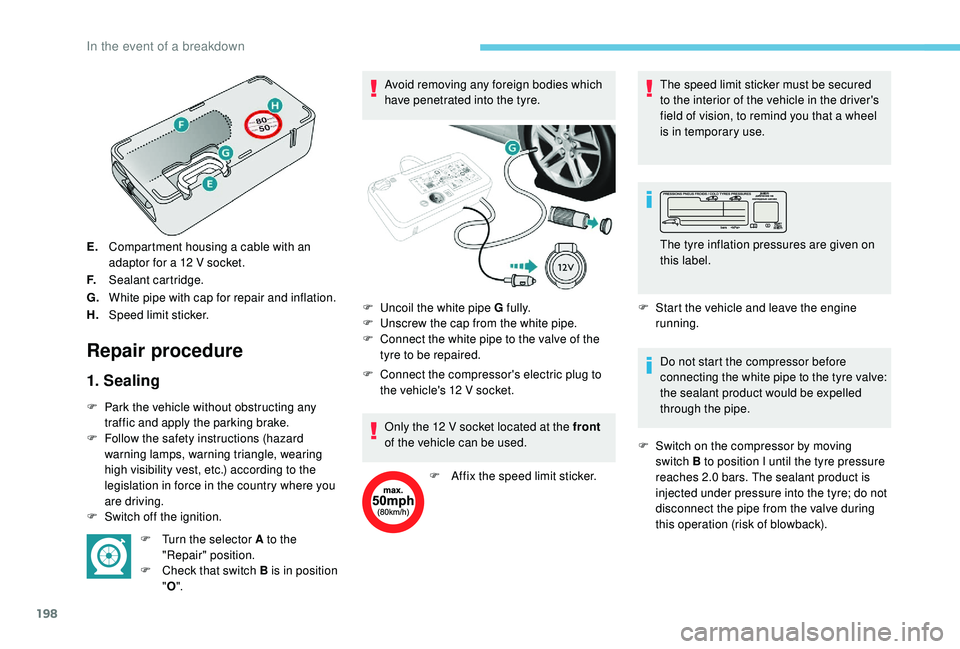
E.Compartment housing a cable with an
adaptor for a 12
V socket.
F. Sealant cartridge.
G. White pipe with cap for repair and inflation.
H. Speed limit sticker.
Repair procedure
1. Sealing
F Park the vehicle without obstructing any
traffic and apply the parking brake.
F
F
ollow the safety instructions (hazard
warning lamps, warning triangle, wearing
high visibility vest, etc.) according to the
legislation in force in the country where you
are driving.
F
S
witch off the ignition. F
T
urn the selector A to the
"Repair" position.
F
C
heck that switch B is in position
" O ". Avoid removing any foreign bodies which
have penetrated into the tyre.
F
C
onnect the compressor's electric plug to
the vehicle's 12 V socket.
Only the 12 V socket located at the front
of the vehicle can be used.
F
A
ffix the speed limit sticker.The speed limit sticker must be secured
to the interior of the vehicle in the driver's
field of vision, to remind you that a wheel
is in temporary use.
F
S
tart the vehicle and leave the engine
running.
Do not start the compressor before
connecting the white pipe to the tyre valve:
the sealant product would be expelled
through the pipe.
F
S
witch on the compressor by moving
switch B to position I until the tyre pressure
reaches 2.0
bars. The sealant product is
injected under pressure into the tyre; do not
disconnect the pipe from the valve during
this operation (risk of blowback).
F
U
ncoil the white pipe G fully.
F
U
nscrew the cap from the white pipe.
F
C
onnect the white pipe to the valve of the
tyre to be repaired. The tyre inflation pressures are given on
this label.
In the event of a breakdown
Page 201 of 324

199
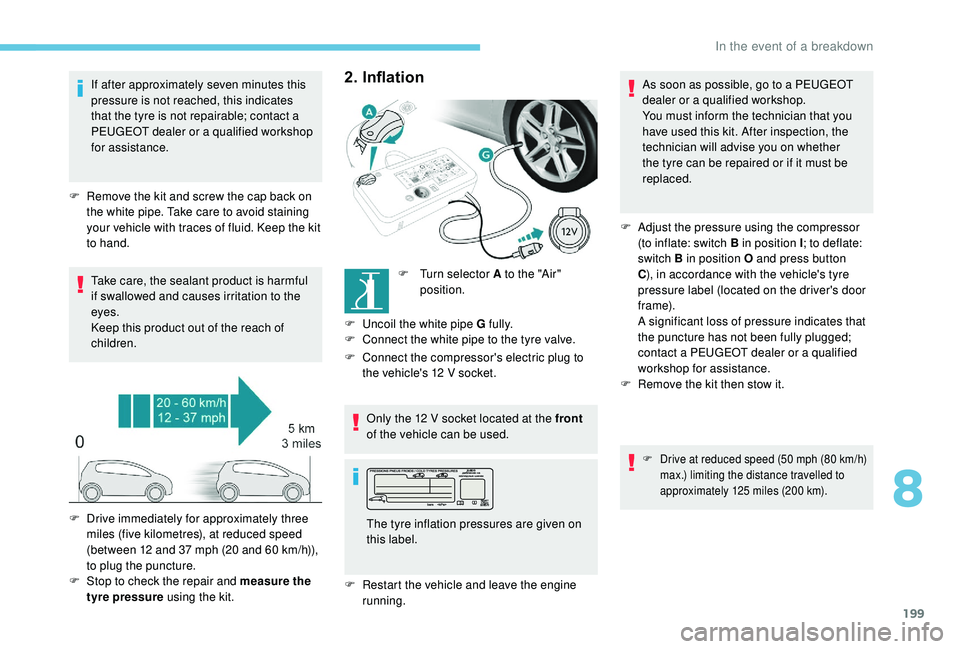
If after approximately seven minutes this
pressure is not reached, this indicates
that the tyre is not repairable; contact a
PEUGEOT dealer or a qualified workshop
for assistance.
F
R
emove the kit and screw the cap back on
the white pipe. Take care to avoid staining
your vehicle with traces of fluid. Keep the kit
to hand.
Take care, the sealant product is harmful
if swallowed and causes irritation to the
eyes.
Keep this product out of the reach of
children.2. Inflation
F Turn selector A to the "Air" position.
F
U
ncoil the white pipe G fully.
F
C
onnect the white pipe to the tyre valve.
F
C
onnect the compressor's electric plug to
the vehicle's 12
V socket.
Only the 12
V socket located at the front
of the vehicle can be used.
F
R
estart the vehicle and leave the engine
running.
F
D
rive immediately for approximately three
miles (five kilometres), at reduced speed
(between 12 and 37
mph (20 and 60
km/h)),
to plug the puncture.
F
S
top to check the repair and measure the
tyre pressure using the kit. The tyre inflation pressures are given on
this label. As soon as possible, go to a PEUGEOT
dealer or a qualified workshop.
You must inform the technician that you
have used this kit. After inspection, the
technician will advise you on whether
the tyre can be repaired or if it must be
replaced.
F
A
djust the pressure using the compressor
(to inflate: switch B in position I ; to deflate:
switch B in position O and press button
C ), in accordance with the vehicle's tyre
pressure label (located on the driver's door
f r a m e).
A significant loss of pressure indicates that
the puncture has not been fully plugged;
contact a PEUGEOT dealer or a qualified
workshop for assistance.
F
R
emove the kit then stow it.
F Drive at reduced speed (50 mph (80 km/h)
max.) limiting the distance travelled to
approximately 125
miles (200 km).
8
In the event of a breakdown
Page 202 of 324

200
Removing the pipe and
cartridge
Be careful of fluid discharge.
The expiry date of the fluid is indicated on
the cartridge.
The sealant cartridge is designed for
single use; it must be replaced even if only
partly used.
After use, do not discard the cartridge into
the environment, take it to an authorised
waste disposal site or a PEUGEOT dealer.
Do not forget to obtain a new sealant
cartridge, available from PEUGEOT
dealers or from a qualified workshop.
Checking/adjusting tyre
pressures
You can also use the compressor,
without injecting sealant, to check and, if
necessary, adjust the tyre pressures.F
T
urn selector A to the "Air"
position.
F
U
ncoil the white pipe G fully.
F
C
onnect the pipe to the tyre
valve.
F
C
onnect the compressor's electric plug to
the vehicle's 12 V socket.
Only the 12 V socket located at the front
of the vehicle can be used.
F
S
tart the vehicle and leave the engine
running.
F
T
urn the pipe assembly 2 to the left until it
comes into contact with the unit.
F
D
isconnect the connector 1 from the
cartridge by turning it a quarter turn anti-
clockwise.
F
P
ull the pipe assembly 2 out slightly, then
disconnect the connector 3 from the air
intake pipe by turning it a quarter turn anti-
clockwise. F
R
emove the pipe assembly 2
.
F
K
eep the compressor vertical.
F
U
nscrew the cartridge 4 from the bottom.
To fit the new cartridge and new pipe, carry out
these operations in reverse order.
The tyre inflation pressures are given on
this label.
In the event of a breakdown
Page 217 of 324

215
12 V battery
Procedure for starting the engine using another
battery or charging a discharged battery.
General points
Lead-acid starter batteries
Batteries contain harmful substances
such as sulphuric acid and lead.
They must be disposed of in accordance
with regulations and must not, in any
circumstances, be discarded with
household waste.
Take used remote control batteries and
vehicle batteries to a special collection
point.
Protect your eyes and face before
handling the battery.
All operations on the battery must be
carried out in a well ventilated area and
away from naked flames and sources of
sparks, so as to avoid the risk of explosion
or fire.
Wash your hands afterwards. Versions equipped with Stop & Start are
fitted with a 12
V lead-acid battery of
specific technology and specification.
Its replacement should be carried out
only by a PEUGEOT dealer or a qualified
workshop.
Before doing any work
Immobilise the vehicle: apply the parking
brake, put the gearbox in neutral, then
switch off the ignition.
Check that all electrical equipment is
switched off.
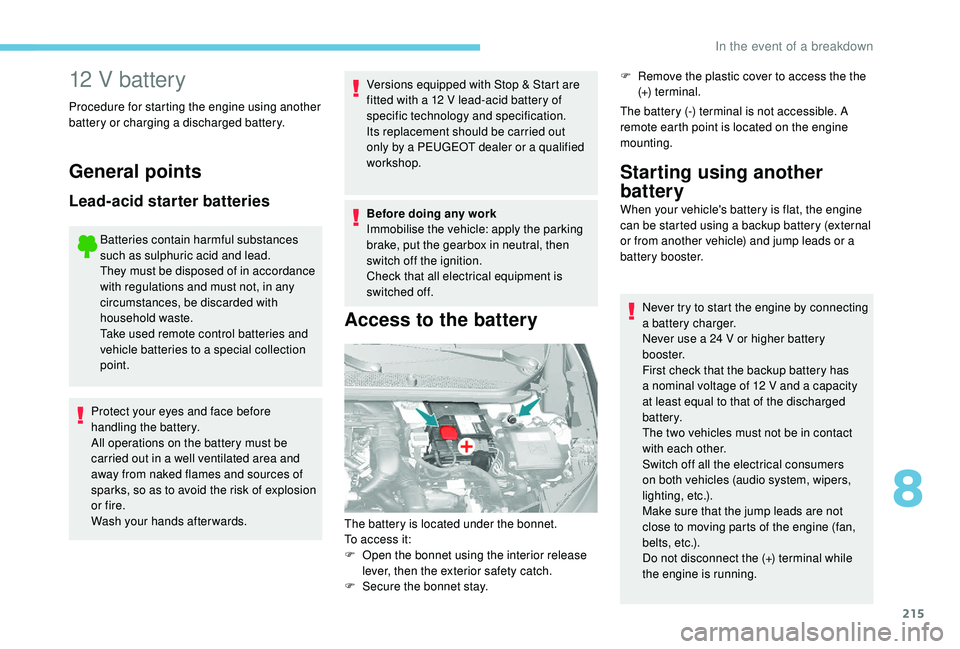
Access to the battery
F Remove the plastic cover to access the the (+) terminal.
The battery (-) terminal is not accessible. A
remote earth point is located on the engine
mounting.
The battery is located under the bonnet.
To access it:
F
O
pen the bonnet using the interior release
lever, then the exterior safety catch.
F
S
ecure the bonnet stay.
Starting using another
battery
When your vehicle's battery is flat, the engine
can be started using a backup battery (external
or from another vehicle) and jump leads or a
battery booster. Never try to start the engine by connecting
a battery charger.
Never use a 24
V or higher battery
b o o s t e r.
First check that the backup battery has
a nominal voltage of 12
V and a capacity
at least equal to that of the discharged
battery.
The two vehicles must not be in contact
with each other.
Switch off all the electrical consumers
on both vehicles (audio system, wipers,
lighting, etc.).
Make sure that the jump leads are not
close to moving parts of the engine (fan,
belts, etc.).
Do not disconnect the (+) terminal while
the engine is running.
8
In the event of a breakdown
Page 218 of 324

216
F Start the engine of the vehicle with the good battery and leave it running for a few
minutes.
F
O
perate the starter on the broken down
vehicle and let the engine run.
If the engine does not start straight away,
switch off the ignition and wait a few moments
before trying again.
F
W
ait for it to return to idle.
F
D
isconnect the jump lead cables in reverse
order .
F
R
efit the plastic cover to the (+) terminal, if
your vehicle has one.
F
A
llow the engine to run for at least
30
minutes, by driving or with the vehicle
stationary, so that the battery reaches an
adequate state of charge.
Some functions, including Stop & Start,
are not available if the battery is not
sufficiently charged.Charging the battery using
a battery charger
For optimum ser vice life of the battery, it is
essential to maintain an adequate state of
charge.
In some circumstances it may be necessary to
charge the battery:
-
I
f you use your vehicle essentially for short
journeys.
-
I
f the vehicle is to be taken off the road for
several weeks.
Contact a PEUGEOT dealer or a qualified
workshop.
If you wish to charge your vehicle's battery
yourself, use only a charger compatible
with lead-acid batteries with a nominal
voltage of 12
V.
Follow the instructions provided by the
manufacturer of the charger.
Never reverse polarities.
It is not necessary to disconnect the
battery.
F
S
witch off the ignition.
F
S
witch off all electrical consumers (audio
system, lighting, wipers, etc.).
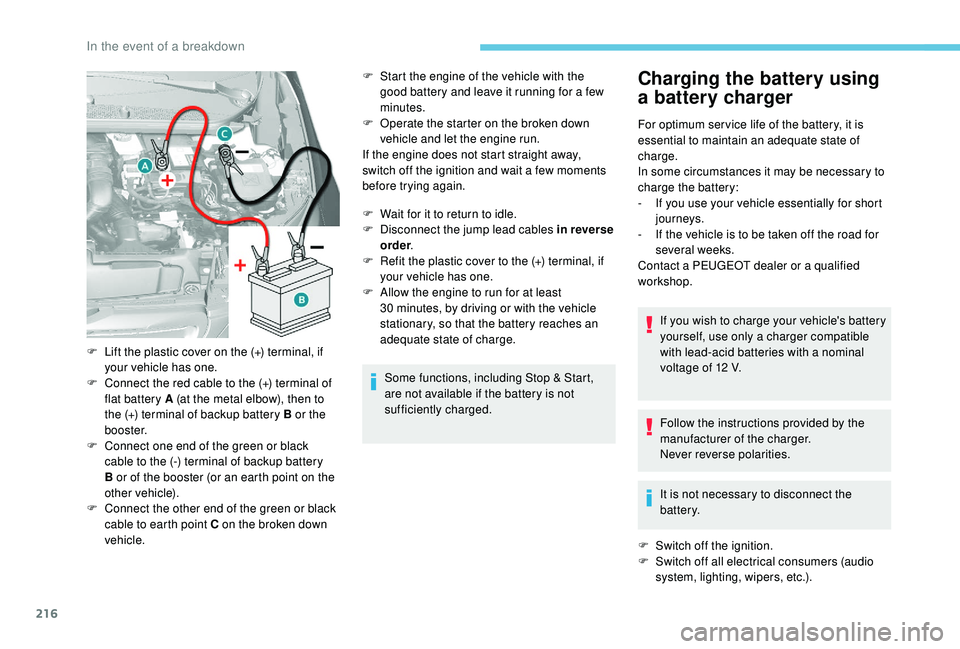
F
L
ift the plastic cover on the (+) terminal, if
your vehicle has one.
F
C
onnect the red cable to the (+) terminal of
flat battery A (at the metal elbow), then to
the (+) terminal of backup battery B or the
b o o s t e r.
F
C
onnect one end of the green or black
cable to the (-) terminal of backup battery
B or of the booster (or an earth point on the
other vehicle).
F
C
onnect the other end of the green or black
cable to earth point C on the broken down
vehicle.
In the event of a breakdown
Page 316 of 324

238
Player, Apple® .......................................9 , 10, 24
Player, MP3 CD ............................... ................23
Player, USB
............................................. 7, 9, 23
Port, USB
.................................... 58, 60, 7, 9, 23
Pre-heater, Diesel
........................................... 17
Pressures, tyres
.................... 188, 197, 205, 233
Pre-tensioning seat belts
................................ 91
Priming pump
................................................ 2
20
Priming the fuel system
................................ 220
Profiles
...................................................... 16, 30
Protecting children
...................
93, 95 -96, 99, 101, 102, 104, 105, 107
Puncture
........................................ 19 4, 19 6, 20 0
RRadio ......................................... 4-5, 6, 9, 21, 24
Radio, digital (Digital Audio Broadcasting – DAB)
............................6, 8, 22
Range, AdBlue
.......................................... 25 -26
RDS
................
........................................ 7, 2 1 - 2 2
Rear screen, demisting
..............................70 -71
Recharging the battery
..........................216,217
Recirculation, air
....................................... 67- 6 9
Reduction of electrical load
..........................181
Regeneration of the particle filter
.................187
Reinitialisation of the under- inflation detection system
...........................167
Reinitialising the remote control
............... 45
-46
Reminder, key in ignition
...............................11
2
Remote control
.......................................... 39-44
Removing a wheel
........................202, 204,205
Removing the mat
........................................... 59
Replacing bulbs
..................... 20
5,206, 209,210
Replacing fuses
..................................... 211,213
Replacing the air filter
............................ 18
6,187
Replacing the oil filter
................................... 18
7
Replacing the passenger compartment filter ...............................18 6,187
Reservoir, headlamp wash
........................... 18
6
Reservoir, screenwash
.................................18 6
Resetting the service indicator
.................23 -24
Resetting the trip recorder
.........................27-2 8
Reversing camera
...............................
..........15 8
Reversing lamp
...................................... 209,210
Roof bars
....................................................... 182
Running out of fuel (Diesel)
..........................220
SSafety, children ...3, 95 -96, 99, 101, 104, 105, 107Saturation of the particle filter (Diesel) ......... 18 7
SCR (Selective Catalytic Reduction) ............188
Screen, cold climate
...............................17
3 ,174
Screen, instrument panel
..........................28-29
Screen, monochrome
...............................30-32
Screen, multifunction (with audio system)
...................................... 30 -32, 4
Screen menu map
........................................... 12
Screenwash
.................................................... 81
Screenwash, rear
............................................ 81
Seat, rear bench
....................................... 56-58
Seat belts
..................................... 11, 9 0 - 91, 10 0
Seats, electric
........................................... 52-53
Seats, front
...............................
..................51- 5 3
Seats, heated
.................................................. 53
Seats, rear
................................................. 56-58
Selector, gear
......................................... 12 2,126
Serial number, vehicle
..................................233
Service indicator
............................................. 23
Servicing
..................................................... 6
, 23
Settings, equipment
............................30-34, 36
Settings, system
........................................ 16, 30
Sidelamps
............................... 7
6, 206, 208,210
Side repeater
................................................ 208Ski flap
..............................
..............................
61
Snow chains
..........................................
1 6 7, 17 3
Socket, 12 V accessory .....................
58, 60, 62
Socket, 220 V ..................................................
60
Socket, 230 V
...............................
...................
58
Socket, auxiliary
...................................... 8
, 9, 23
Socket, Jack
......................................
58, 8, 9, 23
Sockets, audio
................................................ 60
Spe
ed limiter
..................................
13
0, 132,13 5
Speed limit recognition
.......................... 13
1,132
Spotlamps, door mirror
...................................
79
Starting a Diesel engine
............................... 17
2
Starting the engine
................................. 11
0 ,111
Starting the vehicle
..................
1
2 -14 , 1 8 -1 9 , 112 ,113 , 11 9 ,12 6
Starting using another battery ..............
113 , 2 15
Station, radio ............................... ......4, 6, 21-22
Stay, bonnet
..................................................183
Steering mounted controls, audio
........ 2
-3, 3, 3
Stop & Start .................................
20, 30, 66, 70, 128, 130, 171, 183, 186, 215, 217
Stopping the vehicle ................
12 -14 , 1 8 -1 9 , 112 ,113 , 11 9 ,12 6
Storage
...................................................... 58-62
Storage wells
.................................................. 62
Storing driving positions
................................. 53
S
towing rings
.................................................. 62
Sunshine sensor
............................................. 65
Switching off the engine
.........................11 0 ,111
Synchronising the remote control
.............45-46
Alphabetical index