2018 PEUGEOT 108 lock
[x] Cancel search: lockPage 4 of 180

2
.
.
Instrument panels 8
D isplays 9
Warning and indicator lamps
9
I
ndic ators
18
Trip computer
1
8
Adjusting the time
2
0Keys
22
"
K
eyless Entry and Starting" system
2
3
Doors 26
Boot
27
Front electric windows
2
8
Quarter windows
2
9
Electric fabric roof
2
9
Advice on care
3
1
Front seats
3
2
Rear seats
3
4
Mirrors
35
Steering wheel adjustment
3
6
Ventilation
3
6
Heating
3
7
Manual air conditioning
3
7
Automatic air conditioning
3
8
Front demist – defrost
4
0
Rear screen demist – defrost
4
1
Courtesy lamp
4
1
Boot lighting
4
1
Interior fittings
4
2
Rear shelf
4
4
Boot fittings
4
5Lighting control stalk
4
6
Automatic headlamp illumination
4
8
Direction indicators
4
8
Headlamp adjustment
4
9
Wiper control stalk
4
9
Changing a
wiper blade
5
0
General safety recommendations 5 1
H o r n 51
Hazard warning lamps
5
2
ESC system
5
2
Seat belts
5
4
Airbags
56
Child seats
5
9
Deactivating the front passenger airbag
6
0
ISOFIX mountings and child seats
6
6
i-Size child seats
7
0
Child lock
7
1
InstrumentsAccess
Over view
Ease of use and comfort Lighting and visibility
Safety
Eco-driving
Instruments and controls 4
E co-driving
6
Contents
Page 6 of 180

4
Instruments and controls1
Door mirrors
Electric windows
Central locking
2
Bonnet release
3
Dashboard fuses
4
Instrument panel
Rev counter
Central display
Warning and indicator lamps
Indicators
Trip computer
5
Courtesy lamp
Fabric electric roof opening control
Speed Limit recognition and
recommendation
Active City Brake
Rear view mirror
Sun visor
6
Touch screen
Radio
Setting the time
7
Heating, ventilation
Manual air conditioning
Automatic air conditioning
Front demist/defrost
Rear screen demisting/defrosting
8
12 V accessory socket
USB port
Auxiliary Jack socket
9
Manual gearbox
ETG gearbox
Gear efficiency indicator
Hill start assist
10
Manual parking brake
11
Front passenger airbag
12
Side vents
13
Glove box
Deactivating the front passenger airbag
Reinitialisation of the under-inflation
detection system
Over view
Page 15 of 180

13
Warning/indicator lampStateCause Actions/Observations
Orange warning/indicator lamps
Anti-lock
braking system
(ABS)Fixed.
The anti-lock braking system has
a
fault.The vehicle retains conventional braking.
Drive carefully at moderate speed, then carry out (3).
Emission
control system Fixed.
The emission control system is
faulty. Quickly carry out (3).
Engine fault Fixed.
A major fault that does not have a specific
w arning lamp has been detected.Carry out (2) without fail.
Low fuel level Fixed, accompanied
by an audible signal. When it first comes on there remains
approximately 5
litres of fuel in the
tank (reserve). Refuel without delay to avoid running out of fuel.
Never drive until completely empty
, this could
damage the emissions and injection systems.
Under-inflation Fixed. The pressure in one or more tyres is
too low. Check the pressure of the tyres as soon as possible.
Reinitialise the detection system after adjusting the
pressure.
Dynamic
stability control
(DSC)/Traction
control (TRC) Flashing.
DSC/ TRC is activated if there is
a
loss of grip or trajectory.
Fixed. The DSC/ TRC systems are faulty. Carry out (3).
1
Instruments
Page 18 of 180

16
Warning/indicator lampStateCause Actions/Observations
Lane Depar ture
Warning System Flashing (orange),
accompanied by an
audible signal. A lane is being crossed, left side. Turn the steering wheel in the opposite direction to
return to the correct trajectory.
Rear foglamp Fixed. The lamp is on.
Green warning/indicator lamps
Lane Depar ture
Warning SystemFixed.
The button has been pressed. The lane departure warning system is activated.
Lane Depar ture
Warning System Fixed.
The button has been pressed. The system is operational: it has detected the lines on
the right and/or left sides.
Stop & Star t Fixed.
When the vehicle stops (red lights, traffic
jams, etc.) the Stop & Start system puts
the engine into STOP mode.The lamp goes off and the engine restarts
automatically in START mode, as soon as you want
to move off.
Keyless Entr y
and Star ting
System Fixed.
The conditions for starting the
engine are met.
Flashing slowly. The vehicle is in "ACC" mode.
The accessories (audio system, 12
V
socket, …) can be used.
Flashing rapidly. The steering column is not unlocked. Go into " OFF" mode, then into " ON" mode and gently
turn the steering wheel to unlock the steering column.
Instruments
Page 22 of 180

20
Trip computer, some
definitions
Range
(miles or km)
The distance which can still be travelled with
the fuel remaining in the tank (at the average
fuel consumption seen over the last few miles
(kilometres) travelled).This value may fluctuate if a
change
of driving style or terrain results in
a
significant change in the current fuel
consumption.
When the level of fuel is low, the message "Lo
FUEL" is displayed.
While the level of the fuel is low, the range
cannot be recalculated.
Current fuel consumption
(mpg or l/100 km or km/l)
C alculated over the last few seconds.
Average fuel consumption
(mpg or l/100 km or km/l)
C alculated since the last time the trip recorder
was reset to zero.
Average speed
(mph or km/h)
Calculated since the last time the trip recorder
was reset to zero.
Stop & Start time counter
(minutes/seconds or hours/minutes)
If your vehicle is fitted with the Stop & Start, a
time counter adds up the time spent in STOP
mode during a
journey.
It resets to zero every time the ignition is
switched on.
Adjusting the time
Radio
The time is adjusted using the " MENU" dial:
- p ress the dial to access the menus and to
confirm a
selection,
-
t
urn the dial to select a function, an item in
a
list.
At any time you can return to the previous step
using the " Back" button.
F
P
ress the dial to access the menus.
F
T
urn the dial to select " CLOCK".
F
P
ress the dial to confirm. The hours digits
flash.
F
T
urn the dial to adjust the hours.
F
P
ress the dial to confirm. The minutes digits
flash.
F
T
urn the dial to adjust the minutes.
F
P
ress the dial to confirm and leave the
menu.
Instruments
Page 24 of 180

22
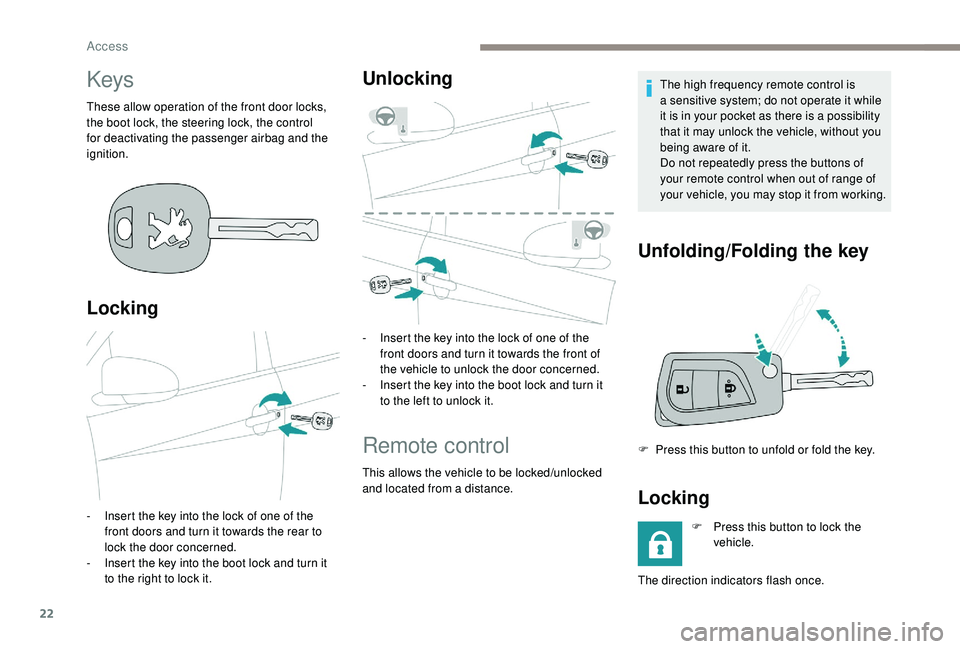
Keys
These allow operation of the front door locks,
the boot lock, the steering lock, the control
for deactivating the passenger airbag and the
ignition.
Locking
- Insert the key into the lock of one of the front doors and turn it towards the rear to
lock the door concerned.
-
I
nsert the key into the boot lock and turn it
to the right to lock it.
Unlocking
- Insert the key into the lock of one of the front doors and turn it towards the front of
the vehicle to unlock the door concerned.
-
I
nsert the key into the boot lock and turn it
to the left to unlock it.
Remote control
This allows the vehicle to be locked/unlocked
and located from a distance. The high frequency remote control is
a
sensitive system; do not operate it while
it is in your pocket as there is a possibility
that it may unlock the vehicle, without you
being aware of it.
Do not repeatedly press the buttons of
your remote control when out of range of
your vehicle, you may stop it from working.
Unfolding/Folding the key
F Press this button to unfold or fold the key.
Locking
F Press this button to lock the vehicle.
The direction indicators flash once.
Access
Page 25 of 180

23
If you find that a door is not properly
c losed after locking, close it again and
then relock the vehicle.
Unlocking
F Press this button to unlock the vehicle.
The direction indicators flash twice.
Locating your vehicle
F Press this button to locate your locked vehicle in a car park.
This is signalled by the lighting up of the
direction indicators for a
few seconds.
Changing the remote
control battery
Battery type: CR 2016/3 volts.
F U nclip the cover by inserting a small
screwdriver in the slot.
F
R
emove the cover.
F
R
emove the dead battery from its
compartment.
F
F
it the new battery into its compartment
observing the original fitting direction.
F
C
lip the cover into place.Do not throw remote control batteries
away, they contain metals which are
harmful to the environment.
Take them to a
PEUGEOT dealer or to
any other approved collection point.
" Keyless Entry and
Starting" system
System that allows the unlocking, locking
and starting of the vehicle while keeping the
electronic key on your person.
Electronic key
For security, the detection zones in which
the electronic key is operational have
a
radius of about 70 cm around each
opening button.
This electronic key can also be used as
a
remote control.
It includes a built-in emergency key.
For more information on the remote control ,
refer to the corresponding section.
2
Access
Page 26 of 180

24
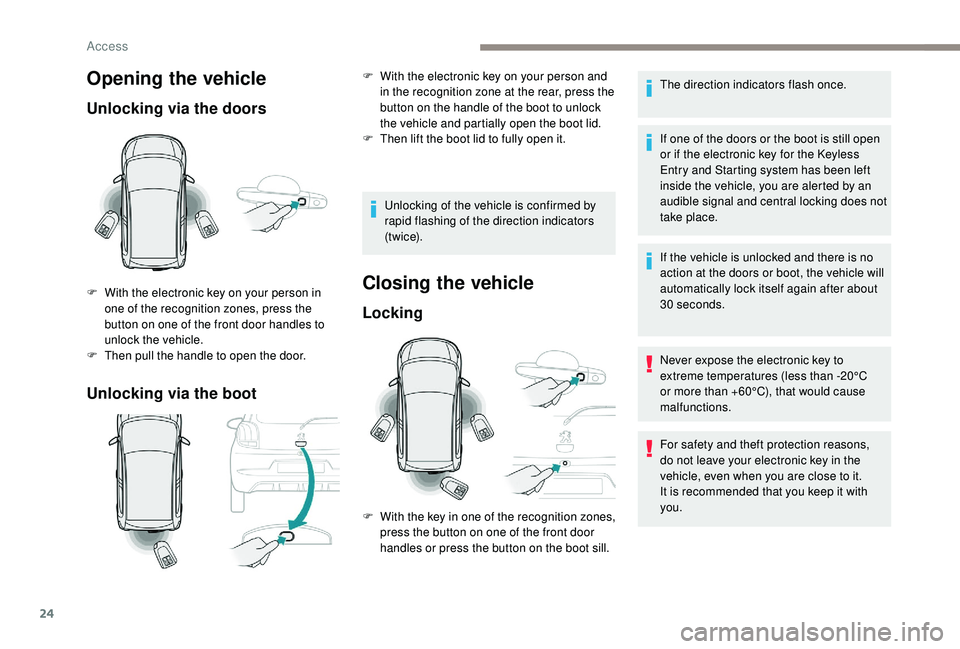
Opening the vehicle
Unlocking via the doors
Unlocking via the boot
F With the electronic key on your person in one of the recognition zones, press the
button on one of the front door handles to
unlock the vehicle.
F
T
hen pull the handle to open the door. Unlocking of the vehicle is confirmed by
rapid flashing of the direction indicators
(t w i c e).Closing the vehicle
Locking
The direction indicators flash once.
If one of the doors or the boot is still open
or if the electronic key for the
K
eyless
Entry and Starting system has been left
inside the vehicle, you are alerted by an
audible signal and central locking does not
take place.
If the vehicle is unlocked and there is no
action at the doors or boot, the vehicle will
automatically lock itself again after about
30
seconds.
Never expose the electronic key to
extreme temperatures (less than -20°C
or more than +60°C), that would cause
malfunctions.
F
W
ith the electronic key on your person and
in the recognition zone at the rear, press the
button on the handle of the boot to unlock
the vehicle and partially open the boot lid.
F
T
hen lift the boot lid to fully open it.
F
W
ith the key in one of the recognition zones,
press the button on one of the front door
handles or press the button on the boot sill. For safety and theft protection reasons,
do not leave your electronic key in the
vehicle, even when you are close to it.
It is recommended that you keep it with
you.
Access