2018 PEUGEOT 108 stop start
[x] Cancel search: stop startPage 81 of 180
79
If you stop the vehicle but keep the engine
running, you must always move the gear
selector to the neutral position N.
A continuous audible signal sounds if you
turn the ignition switch to " OFF" while the
vehicle is in 2nd, 3rd, 4th or 5th gear.
If this happens, turn the ignition switch
to " ON ", move the gear selector to the
position N , return it to position E , M or R,
then turn the ignition switch to " OFF".
If the vehicle is on a
slope, use the brake
to stop the vehicle from moving and place
the gear selector to position N , E or R.
In all cases, you must apply the parking
brake to immobilise the vehicle.
Before doing anything in the engine
compartment, make sure that the gear
selector is in neutral N and the parking
brake is applied.Operating limits
When on a slope or when hill start assist is
a ctivated, never keep the vehicle stationary
using the accelerator: you could damage the
clutch.
In these situations, an audible signal sounds.
F
I
n that case, move the gear selector to
position N .
F
W
ait 15 minutes before moving off again, to
allow the clutch to cool down.
Operating faults
With the ignition on, lighting of this
warning lamp indicates a gearbox
fault.
Contact a
PEUGEOT dealer or
a
qualified workshop.
If N flashes in the instrument panel together
with an audible signal for a
long period of time:
-
m
ake sure that the ignition switch is
correctly set to the " ON" position,
-
m
ove the gear selector to N , then return it to
E , M or R .
If 1
flashes in the instrument panel:
-
m
ove the gear selector to E or M , then
return it to N .
If R flashes in the instrument panel:
-
m ove the gear selector to R , then return it to N.
Gear shift indicator
System which reduces fuel consumption by
recommending the most appropriate gear.
Operation
Depending on the driving situation and the
equipment of your vehicle, the system can
recommend you to change gear.
Gear shift recommendations are for information
only. In fact, the road layout, the traffic density
and safety remain the deciding factors when
choosing the best gear. The driver therefore
remains responsible for deciding whether or not
to follow the indications issued by the system.
This function cannot be deactivated.
Example:
-
Y
ou are in third gear.
-
Y
ou press the accelerator pedal.
-
T
he system may suggest that you engage
a
higher gear.
6
Driving
Page 82 of 180
80
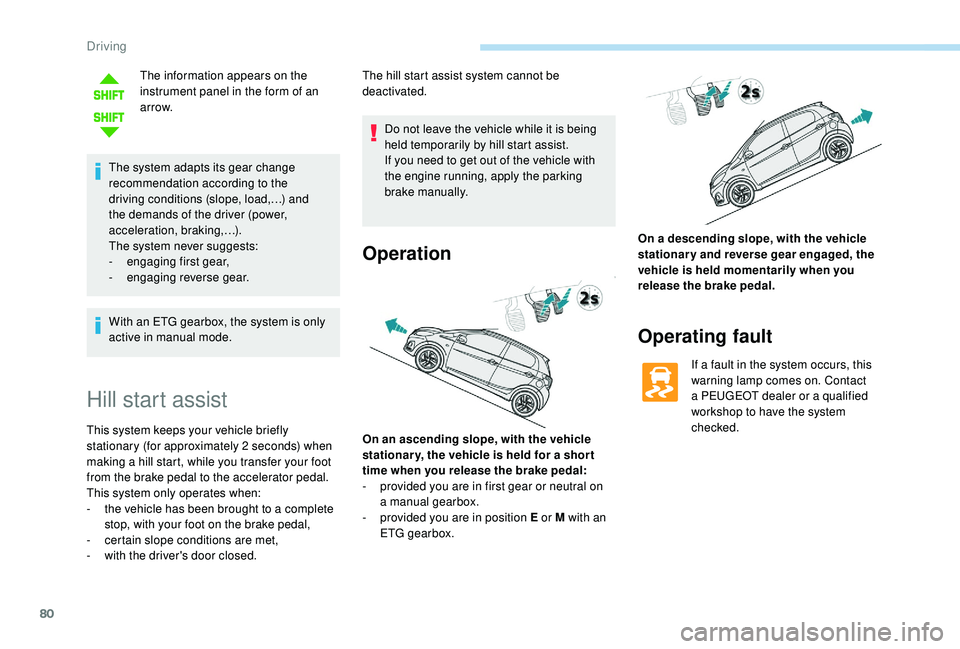
The information appears on the
instrument panel in the form of an
ar row.
The system adapts its gear change
recommendation according to the
driving conditions (slope, load,…) and
the demands of the driver (power,
acceleration, braking,…).
The system never suggests:
-
e
ngaging first gear,
-
enga
ging reverse gear.
With an ETG gearbox, the system is only
active in manual mode.
Hill start assist
This system keeps your vehicle briefly
stationary (for approximately 2 seconds) when
making a
hill start, while you transfer your foot
from the brake pedal to the accelerator pedal.
This system only operates when:
-
t
he vehicle has been brought to a complete
stop, with your foot on the brake pedal,
-
c
ertain slope conditions are met,
-
w
ith the driver's door closed. The hill start assist system cannot be
deactivated.
Do not leave the vehicle while it is being
held temporarily by hill start assist.
If you need to get out of the vehicle with
the engine running, apply the parking
brake manually.
Operation
On an ascending slope, with the vehicle
stationar y, the vehicle is held for a shor t
time when you release the brake pedal:
-
p
rovided you are in first gear or neutral on
a
manual gearbox.
-
p
rovided you are in position E or M with an
ETG gearbox. On a
descending slope, with the vehicle
stationary and reverse gear engaged, the
vehicle is held momentarily when you
release the brake pedal.
Operating fault
If a fault in the system occurs, this
w arning lamp comes on. Contact
a
PEUGEOT dealer or a qualified
workshop to have the system
checked.
Driving
Page 83 of 180
81
Operation
Going into engine STOP mode
This indicator lamp comes on in the
instrument panel and the engine
goes into standby automatically:
-
w
hen the vehicle is stationary, you put the
gearbox into neutral and release the clutch
pedal.
Stop & Starttime counters
A partial time counter counts the periods in
STOP mode during a journey. For your convenience during parking
manoeuvres, STOP mode is not available
for a
few seconds after coming out of
reverse gear.
Stop & Start does not change features
of the vehicle such as braking, power
steering…
Never refuel with the engine in STOP
mode; you must switch off the ignition.
Special cases: STOP mode not
available
Stop & Start
The Stop & Start system puts the engine
temporarily into standby – STOP mode – during
traffic stops (red lights, traffic jams, etc.). The
engine restarts automatically – START mode
– as soon as you want to move off. Restarting
occurs instantly, quickly and silently.
Per fect for urban use, the Stop & Start system
reduces fuel consumption and exhaust
emissions as well as the noise level when
stationary. -
t
he engine is needed to maintain
a comfortable temperature in the passenger
compartment,
-
d
emisting is active,
-
s
ome special conditions (battery charge,
engine temperature, braking assistance,
vehicle stopped on a
steep slope, high
altitude…) where the engine is needed to
assure control of a
system.
Going into engine START mode
This indicator lamp goes off and the
engine restarts automatically:
-
w
hen you fully depress the clutch pedal.
Special case: START invoked
automatically
START mode is invoked automatically if:
- y
ou open the driver's door,
-
y
ou open the bonnet,
-
y
ou unfasten the driver's seat belt,
-
s
ome temporary conditions apply (battery
charge, engine temperature, braking
assistance, vehicle on a
steep slope,
adjustment of the air conditioning, …) where
it is necessary for control of a
system or of
the vehicle.
It is displayed in the trip computer as soon as
the Stop & Start acts.
Press one of the "
DISP" buttons to return to the
previous display.
A global time counter counts the periods in
STOP mode since the last reset to zero.
When it is displayed, press for more than two
seconds on one of the " DISP" buttons to reset
to zero.
STOP mode does not activate, mainly when:
-
t
he driver's door is open,
-
t
he driver's seat belt is not fastened,
6
Driving
Page 84 of 180
82
Operating fault
In the event of a fault with the
s ystem, this warning lamp flashes in
the instrument panel.
Have it checked by a
PEUGEOT dealer or
a
qualified workshop.
Maintenance
Before doing anything under the bonnet,
deactivate the Stop & Start system to
avoid any risk of injury resulting from an
automatic change to START mode.
The Stop & Start system requires a
12 V
battery of specific technology and
specification.
All work on this type of battery must be
carried out only by a
PEUGEOT dealer or
a
qualified workshop.
For more information on the 12
V batter y,
refer to the corresponding section. Driving on flooded roads
Before driving in a
flooded area, it is
strongly recommended that you deactivate
the Stop & Start system.
For more information on Driving advice ,
particularly on flooded roads, refer to the
corresponding section.
Deactivation/Manual
reactivation
Press this button at any time to deactivate the
system.
Deactivation is confirmed by the
illumination of this indicator lamp in
the instrument panel.
If the system has been deactivated in STOP
mode, the engine restarts immediately.
Press this button again.
The system is active again; this is confirmed by
the indicator lamp going off in the instrument
panel.
The system reactivates automatically every
time the engine is started by the driver.
Speed Limit recognition
and recommendation
This system allows certain road signs detected
by the camera to be displayed on the touch
screen (especially the maximum authorised
speed).
Examples of signs recognised:
Specific speed limits, such as those for heavy
goods vehicles, are not displayed.
The display of the speed limit in the touch
screen is updated as you pass a
speed limit
sign intended for cars (light vehicles).
Driving
Page 87 of 180
85
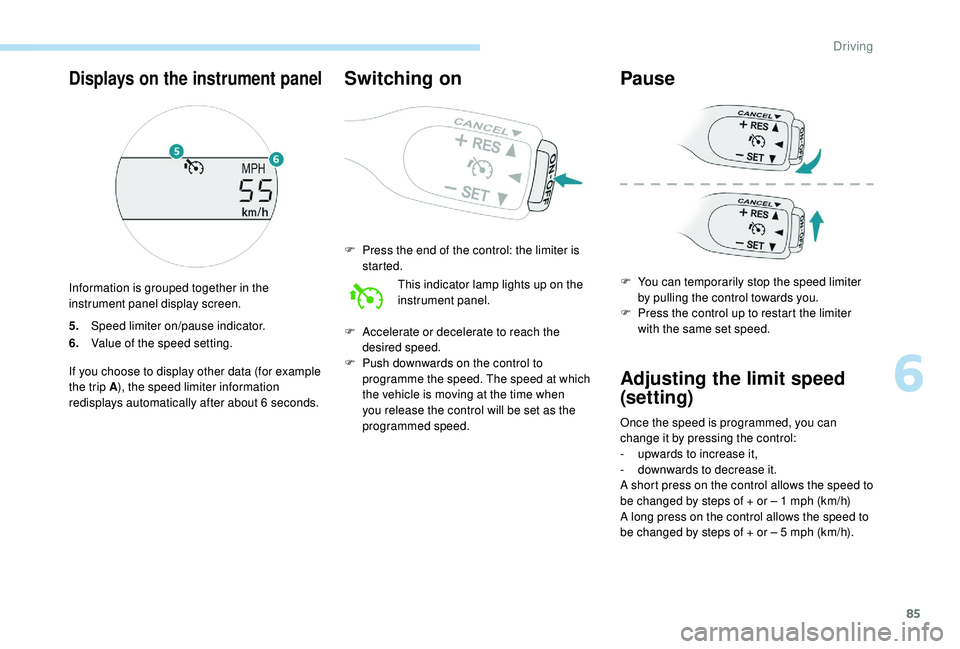
5.Speed limiter on/pause indicator.
6. Value of the speed setting.
If you choose to display other data (for example
the trip A ), the speed limiter information
redisplays automatically after about 6
seconds.
Switching on
F Press the end of the control: the limiter is started.
This indicator lamp lights up on the
instrument panel.
F
A
ccelerate or decelerate to reach the
desired speed.
F
P
ush downwards on the control to
programme the speed. The speed at which
the vehicle is moving at the time when
you release the control will be set as the
programmed speed.
Pause
F You can temporarily stop the speed limiter by pulling the control towards you.
F
P
ress the control up to restart the limiter
with the same set speed.
Adjusting the limit speed
(set ting)
Once the speed is programmed, you can
change it by pressing the control:
-
u
pwards to increase it,
-
d
ownwards to decrease it.
A short press on the control allows the speed to
be changed by steps of + or – 1
mph (km/h)
A long press on the control allows the speed to
be changed by steps of + or – 5
mph (km/h).
Displays on the instrument panel
Information is grouped together in the
instrument panel display screen.
6
Driving
Page 89 of 180
87
Conditions of activation
Active City Brake functions if the following
conditions are met:
•
T
he engine is running.
•
T
he vehicle is moving for ward.
•
For triggering the pre-collision warning :
-
t
he speed is between 9 and 87 mph
(15
and 140 km/h),
-
t
he difference in speed between your
vehicle and the one in front is more than
about 9
mph (15 km/h).
•
For help in braking :
-
t
he speed is between about 19 and
50
mph (30 and 80 km/h),
-
t
he difference in speed between your
vehicle and the one in front is more than
about 19
mph (30 km/h).
•
For automatic pre-collision braking :
-
t
he speed is between about 6 and
50
mph (10 and 80 km/h),
-
t
he difference in speed between your
vehicle and the one in front is more than
about 6
mph (10 km/h)
•
t
he braking assistance systems (ABS,
EBFD, EBA) are not faulty.
•
T
he trajectory control systems (TRC, DSC)
hare not deactivated or faulty.
•
T
he vehicle is not making a sharp turn.
•
T
he system has not triggered in the last ten
seconds.
Operation
Three functional stages are possible:
• P re-collision warning : if risk of a
collision
with a
vehicle is detected, a warning lamp
comes on, accompanied by an audible
signal, to warn the driver to take avoiding
action. The triggering thresholds of the
warning can be set.
•
Br
aking assistance : increases the braking
started by the driver, but only if a
risk of
collision is detected.
•
A
utomatic pre-collision braking : if
your vehicle is approaching the vehicle
in front of you too quickly, the system
will automatically engage the brakes to
reduce the speed of impact. The collision
can be automatically avoided if the speed
difference between your vehicle and the
one in front of you is not more than 18
mph
(30
km/h).Then you are alerted by the display
of this warning indicator in the
instrument panel, accompanied by
an audible signal.
The brake lamps of your vehicle are lit to warn
other users.
The automatic braking can lead to the complete
stop of the vehicle if the situation requires. Unless the driver de-clutches quickly
enough during automatic braking,
triggering of the system may cause the
engine to stall.
6
Driving
Page 90 of 180
88
Setting the thresholds for
triggering the alertDeactivation/reactivation
Press this button for more than 3 seconds.
T his warning lamp comes on in the
instrument panel and the message
"PCS OFF" is displayed. Press this button again to reactivate the
system.
This indicator lamp lights up on the
instrument panel.
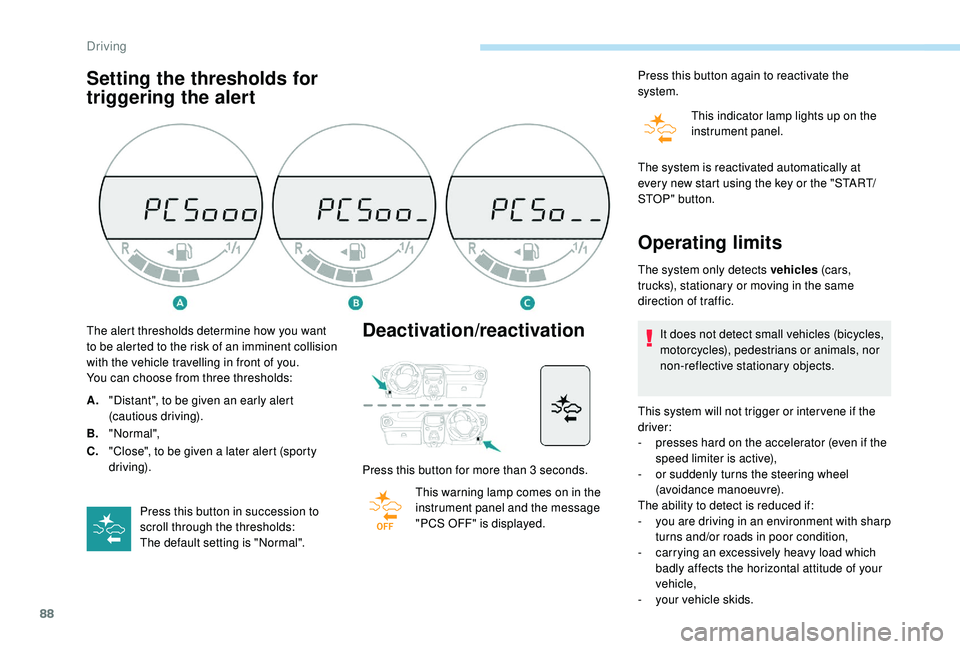
The alert thresholds determine how you want
to be alerted to the risk of an imminent collision
with the vehicle travelling in front of you.
You can choose from three thresholds:
A. "Distant", to be given an early alert
(cautious driving).
B. "Normal",
C. "Close", to be given a
later alert (sporty
driving).
Press this button in succession to
scroll through the thresholds:
The default setting is "Normal". The system is reactivated automatically at
every new start using the key or the "START/
STOP " button.
Operating limits
The system only detects vehicles
(c ar s,
trucks), stationary or moving in the same
direction of traffic.
It does not detect small vehicles (bicycles,
motorcycles), pedestrians or animals, nor
non-reflective stationary objects.
This system will not trigger or inter vene if the
driver:
-
p
resses hard on the accelerator (even if the
speed limiter is active),
-
o
r suddenly turns the steering wheel
(avoidance manoeuvre).
The ability to detect is reduced if:
-
y
ou are driving in an environment with sharp
turns and/or roads in poor condition,
-
c
arrying an excessively heavy load which
badly affects the horizontal attitude of your
vehicle,
-
y
our vehicle skids.
Driving
Page 98 of 180

96
Fuel tank
The capacity of the tank is about 35 litres.
Low fuel level
When the fuel in the tank reaches
a low level, this warning lamp
comes on in the instrument panel,
accompanied by an audible warning.
The message "LO FUEL" is displayed instead
of the range.
You have about 5
litres of fuel left.
In certain driving conditions and depending on
the engine in your vehicle, your range may be
less than 30
miles (50 km).
If you run out of fuel, the emission
control warning lamp may come on
in the instrument panel. It will go out
automatically after several engine starts.
Refuelling
Refuelling must be done with the engine and
ignition off (ignition switch to " LOCK" or
" OFF "). Opening the filler cap may create a
noise
caused by an inrush of air. This is entirely
normal and results from the sealing of the fuel
system.
To refuel in complete safety:
F
Y
ou must stop the engine and turn off
the ignition (switch to LOCK or OFF
mode) .
F
P
ull the control on the lower part of the
dashboard, driver's side, to unlock the fuel
filler flap.
F
O
pen the fuel filler flap.
A label inside the fuel flap reminds you of the
type of fuel to use.
Additions of fuel must be of at least 5 litres, in
order to be registered by the fuel gauge. F
U
nscrew the cap and place it on its support
(on the flap).
F
I
ntroduce the filler nozzle and push it in as
far as possible before starting to refuel (risk
of blowback).
F
K
eep it in this position during the whole
filling operation.
Once you have finished refuelling:
F
S
crew the cap back on again until you hear
a click. When you release the cap, it will
turn slightly in the opposite direction.
F
P
ush the fuel flap to close it.
When filling the tank, do not continue
beyond the 3
rd cut off of the nozzle; this
could cause malfunctions.
Your vehicle is fitted with a
catalytic converter,
which helps to reduce the level of harmful
emissions in the exhaust gases.
The filler neck is narrower, allowing only
unleaded petrol nozzles to be introduced.
Practical information