2018 MITSUBISHI OUTLANDER PHEV ESP
[x] Cancel search: ESPPage 343 of 538

Demister switch
E00703901249
When this switch is pressed, the mode
changes to the “
” mode. The indication
lamp (A) will come on. The selected mode (B) is shown in the display. (Refer to “Mode
selection” on page 8-03.)
NOTEl When the demister switch is pressed, the air
conditioning system automatically operates and outside air (as opposed to recirculated air) is selected. This automatic switching control is carried out to prevent misting of
the windows even if “Disable automatic air conditioning control” or “Disable automaticair selection control” is set. (Refer to “Cus-
tomizing the air conditioning switch” on page 8-09, “Customizing the air selection”
on page 8-08.)NOTEl To ensure a clear view, the engine may start
when the demister switch is pressed even
while the EV priority mode is activated.
Refer to “EV switch” on page 7-25.Operating the system in auto-
matic mode
E00704102649
In normal conditions, use the system in the
AUTO mode and follow these procedures: 1. Push the AUTO switch.
2. Set the temperature control switch to the
desired temperature.
The mode selection, blower speed ad- justment, recirculated/outside air selec-tion, temperature adjustment, and air
conditioner ON/OFF status are all con- trolled automatically.
NOTEl If the blower speed selection switch, air con-
ditioning switch, MODE switch, or air selec- tion switch is operated while the system is
operating in the AUTO mode, the activated function overrides the corresponding func-
tion of automatic control. All other functions
remain under automatic control.Operating the system in man-
ual mode
E00704201308
Blower speed and ventilator mode will be
controlled manually by setting the blower speed selection switch and the MODE switchto the desired positions.
To return to automatic operation, press the AUTO switch.
Demisting of the windscreen
and door windows
E00704302016
CAUTIONl For safety, make sure you have a clear view
through all the windows.
Automatic climate control air conditioner
8-11OGGE18E1For pleasant driving8
Page 346 of 538

NOTElTo listen to the audio system while the Plug-
in Hybrid EV system is not operating, put the operation mode of the power switch in
ACC.
If the operation mode of the power switch is
left in ACC, the accessory power will auto- matically turn off after a certain period oftime and you will no longer be able to use
the audio system. The accessory power comes on again if the operation mode of the
power switch is operated with is in the ACC.
Refer to “ACC power auto-cutout function” on page 7-13.
l If a cellular phone is used inside the vehicle,
it may create noise from the audio equip-
ment. This does not mean that anything is wrong with your audio equipment. In such acase, use the cellular phone at a place as far
away as possible from the audio equipment.
l If foreign objects or water get into the audio
equipment, or if smoke or a strange odour comes from it, immediately turn off the au-
dio system. We recommend you to have it checked. Never try to repair it by yourself.
Avoid continuous usage without inspection
by a qualified person.Important Points on Usage
E00735500023
iPod/iPhone Playback Func- tion*
l This product supports audio playback
from iPod/iPhone devices, however dif-fering versions mean that playback can-
not be guaranteed.
l Please be aware that depending on the
iPod/iPhone model or version, operation
may differ.
How to Clean
E00735700025
l If the product becomes dirty, wipe with
a soft cloth.
l If very dirty, use a soft cloth dipped in
neutral detergent diluted in water, and then wrung out. Do not use benzene,
thinners, or other chemical wipes. This
may harm the surface.
Trademarks
E00735801238
l Product names and other proper names
are the trademarks or registered trade- marks of their respective owners.
l Furthermore, even if there is no specific
denotation of trademarks or registered
trademarks, these are to be observed in
their entirety.
“Made for iPod”, “Made for iPhone”
mean that an electronic accessory has
been designed to connect specifically to iPod or iPhone, respectively, and has
been certified by the developer to meet Apple performance standards.
iPhone, iPod, iPod classic, iPod nano,
and iPod touch are trademarks of Apple
Inc., registered in the U.S. and other countries.
Apple is not responsible for the opera- tion of this device or its compliance with
safety and regulatory standards.
NOTEl iPod and iTunes licensing allows individual
users to privately reproduce and play back
non- copyrighted material as well as material
that may be legally copied and reproduced.
Infringement of copyright is prohibited.
LW/MW/FM radio/CD player*
8-14OGGE18E1For pleasant driving8
Page 376 of 538

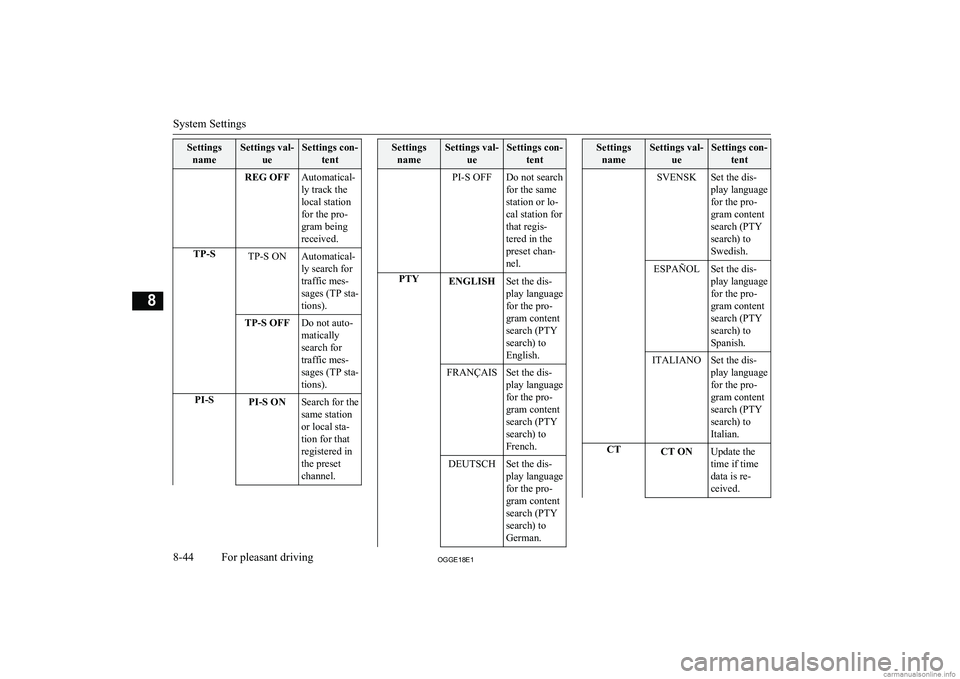
SettingsnameSettings val- ueSettings con-tentREG OFFAutomatical-
ly track the
local station
for the pro-
gram being
received.TP-STP-S ONAutomatical-
ly search for
traffic mes-
sages (TP sta-
tions).TP-S OFFDo not auto-
matically
search for
traffic mes-
sages (TP sta-
tions).PI-SPI-S ONSearch for the
same station
or local sta-
tion for that
registered in
the preset
channel.Settings nameSettings val- ueSettings con-tentPI-S OFFDo not search
for the same
station or lo-
cal station for
that regis-
tered in the
preset chan-
nel.PTYENGLISHSet the dis-
play language
for the pro-
gram content
search (PTY
search) to
English.FRANÇAISSet the dis-
play language
for the pro-
gram content
search (PTY
search) to
French.DEUTSCHSet the dis-
play language
for the pro-
gram content
search (PTY
search) to
German.Settings nameSettings val- ueSettings con-tentSVENSKSet the dis-
play language
for the pro-
gram content
search (PTY
search) to
Swedish.ESPAÑOLSet the dis-
play language
for the pro-
gram content
search (PTY
search) to
Spanish.ITALIANOSet the dis-
play language
for the pro-
gram content
search (PTY
search) to
Italian.CTCT ONUpdate the
time if time
data is re-
ceived.
System Settings
8-44OGGE18E1For pleasant driving8
Page 379 of 538

TroubleshootingE00738401075
Please check these items if a message appears on the display, or if you think something is not working properly.If This Message Appears...
A message is displayed on this product according to the situation.
ModeMessageCauseResponseCDCHECK DISCThe disc is inserted upside down.Insert with the label side up.The disc has condensation on it.Wait a while before inserting again.DISC ERRORThe disc is damaged.Clean the read surface of the disc.The disc is dirty.INTERNAL EThe drive has malfunctioned for some reason.Check that there is no problem with the disc, and insert
the disc again. If the problem persists, consult a
MITSUBISHI MOTORS Authorized Service Point.HEAT ERRORThe temperature inside the product is high.Remove the disc, and wait for the internal temperature
to return to normal.USBFILE ERRORFiles that cannot be played are selected.Select files that can be played.
→ “Audio Files (MP3/WMA/AAC)” on page 8-19USB BUS PWRThere is high or low electrical current or voltage.Turn the power OFF and wait a short while. If the prob-
lem persists, consult a MITSUBISHI MOTORS Author- ized Service Point.LSI ERRORThere is an internal malfunction for some reason.UNSUPPORTED FORMATUnsupported audio files have been played.Confirm audio files that can be played.
→ “Audio Files (MP3/WMA/AAC)” on page 8-19UNSUPPORTED DEVICEAn unsupported USB device has been connected.Please connect a USB memory device.iPodNO SONGAn iPod/iPhone not containing any tracks has been
connected.Connect an iPod/iPhone containing tracks.
Troubleshooting
8-47OGGE18E1For pleasant driving8
Page 380 of 538

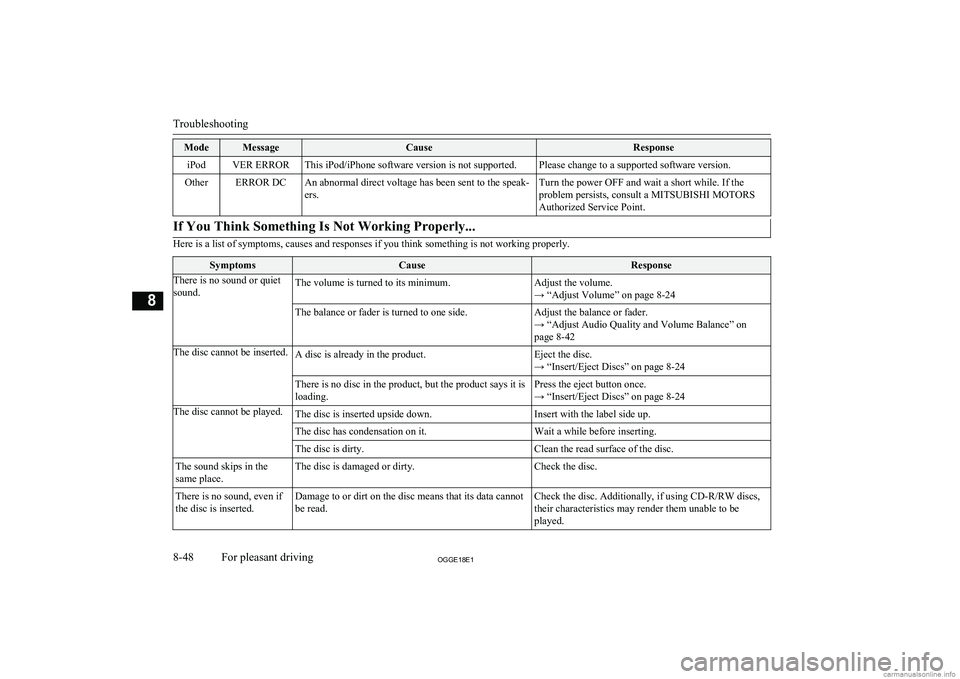
ModeMessageCauseResponseiPodVER ERRORThis iPod/iPhone software version is not supported.Please change to a supported software version.OtherERROR DCAn abnormal direct voltage has been sent to the speak-
ers.Turn the power OFF and wait a short while. If the
problem persists, consult a MITSUBISHI MOTORS Authorized Service Point.If You Think Something Is Not Working Properly...
Here is a list of symptoms, causes and responses if you think something is not working properly.
SymptomsCauseResponseThere is no sound or quiet
sound.The volume is turned to its minimum.Adjust the volume.
→ “Adjust Volume” on page 8-24The balance or fader is turned to one side.Adjust the balance or fader.
→ “Adjust Audio Quality and Volume Balance” on
page 8-42The disc cannot be inserted.A disc is already in the product.Eject the disc.
→ “Insert/Eject Discs” on page 8-24There is no disc in the product, but the product says it is
loading.Press the eject button once.
→ “Insert/Eject Discs” on page 8-24The disc cannot be played.The disc is inserted upside down.Insert with the label side up.The disc has condensation on it.Wait a while before inserting.The disc is dirty.Clean the read surface of the disc.The sound skips in the
same place.The disc is damaged or dirty.Check the disc.There is no sound, even if
the disc is inserted.Damage to or dirt on the disc means that its data cannot
be read.Check the disc. Additionally, if using CD-R/RW discs, their characteristics may render them unable to beplayed.
Troubleshooting
8-48OGGE18E1For pleasant driving8
Page 386 of 538

Speaker enrollment function
E00727400209
The Bluetooth ®
2.0 interface can use the
speaker enrollment function to create a voice model for one person per language.
This makes it easier for the Bluetooth ®
2.0
interface to recognise voice commands said
by you.
You can turn a voice model registered with the speaker enrollment function on and off
whenever you want.
Speaker enrollment
E00727501294
It takes about 2 to 3 minutes to complete the speaker enrollment process.
To ensure the best results, run through the
process while in the driver’s seat, in an envi- ronment that is as quiet as possible (whenthere is no rain or strong winds and the vehi-cle windows are closed). Please turn off your
phone while in speaker enrollment to prevent
interruption of the process.
Use the following procedure for speaker en- rollment. 1. Stop your vehicle in a safe area, firmly
apply the parking brake and push the
electrical parking switch.
NOTEl Speaker enrollment is not possible unless the
vehicle is parked. Make sure you park the
vehicle in a safe area before attempting speaker enrollment.
2. Press the SPEECH button.
3. Say “Voice training”.
4. The voice guide will say “This operation
must be performed in a quiet environ- ment while the vehicle is stopped. See
the owner’s manual for the list of re- quired training phrases. Press and re-
lease the SPEECH button when you are ready to begin. Press the HANG-UP but-
ton to cancel at any time”.
Press the SPEECH button to start the
speaker enrollment process.
NOTEl If you do not start the speaker enrollment
process within 3 minutes of pressing the SPEECH button, the speaker enrollment function will time out.
The voice guide will say “Speaker Enroll-
ment has timed out”. The system will then beep and the voice recognition mode will be
deactivated.
5. The voice guide will prompt for phrase
1. Repeat the corresponding phrase lis-
ted in table “Enrollment commands” on
page 8-69.
The system will register your voice and
then move on to the registration of the next command. Continue the process un-
til all phrases have been registered.NOTEl To repeat the most recent voice training
command, press and release the SPEECH button.
l If you press the HANG-UP button anytime
during the process, the system will beep and
stop the speaker enrollment process.
6. When all enrollment commands have
been read out, the voice guide will say “Speaker enrollment is complete”. The
system will then end the speaker enroll-
ment process and return to the main
menu.
NOTEl Completing the speaker enrollment process
will turn on the voice model automatically.
l The commands “Help” and “Cancel” will
not work in this mode.
Bluetooth ®
2.0 interface*
8-54OGGE18E1For pleasant driving8
Page 388 of 538

NOTElIf 7 devices have already been paired, the
voice guide will say “Maximum devicespaired” and then the system will end the
pairing process. To register a new device, delete one device and then repeat the pairing
process.
(Refer to “Selecting a device: Deleting a de- vice” on page 8-58.)
6. The voice guide will say “Please say a 4-
digit pairing code.” Say a 4-digit num- ber.
When the confirmation function is on, the system will confirm whether the
number said is acceptable. Answer
“Yes.”
Answer “No” to return to pairing code selection.
NOTEl Some Bluetooth ®
devices require a specific
pairing code. Please refer to the device man-
ual for pairing code requirements.NOTEl The pairing code entered here is only used
for the Bluetooth ®
connection certification.
It is any 4-digit number the user would like
to select.
Remember the pairing code as it needs to be
keyed into the Bluetooth ®
device later in the
pairing process.
Depending on the connection settings of the
Bluetooth ®
device, this code may have to be
entered each time you connect the Blue-
tooth ®
device to the Bluetooth ®
2.0 inter-
face. For the default connection settings, re-
fer to the instructions for the device.
7. The voice guide will say “Start pairing
procedure on the device. See the device manual for instructions.” Enter in the
Bluetooth ®
device the 4-digit number
you have registered in Step 6.
NOTEl According to the corresponding device to
Bluetooth ®
, it might take a few minute to
pair the Bluetooth ®
device with the Blue-
tooth ®
2.0 interface.
l If the Bluetooth ®
2.0 interface cannot recog-
nize the Bluetooth ®
device, the voice guide
will say “Pairing has timed out” and the pairing process will be cancelled.
Confirm that the device you are pairing sup-
ports Bluetooth ®
, and try pairing it again.NOTEl If you enter the wrong number, the voice
guide will say “Pairing failed” and the pair-
ing process will be cancelled.
Confirm the number is right, and try pairing it again.
8. The voice guide will say “Please say the
name of the device after the beep.” You
can assign a desired name for the Blue-
tooth ®
device and register it as a device
tag. Say the name you want to register
after the beep.
NOTEl When the confirmation function is on, after
repeating the device tag you have said, the
voice guide will ask “Is this correct?” An-
swer “Yes.”
To change the device tag, answer “No” and then say the device tag again.
9. The voice guide will say “Pairing com-
plete,” and the pairing process will end.
Pairing procedure - Type 2*
1. Stop your vehicle in a safe area, firmly
apply the parking brake and push the electrical parking switch.
Bluetooth ®
2.0 interface*
8-56OGGE18E1For pleasant driving8
Page 389 of 538

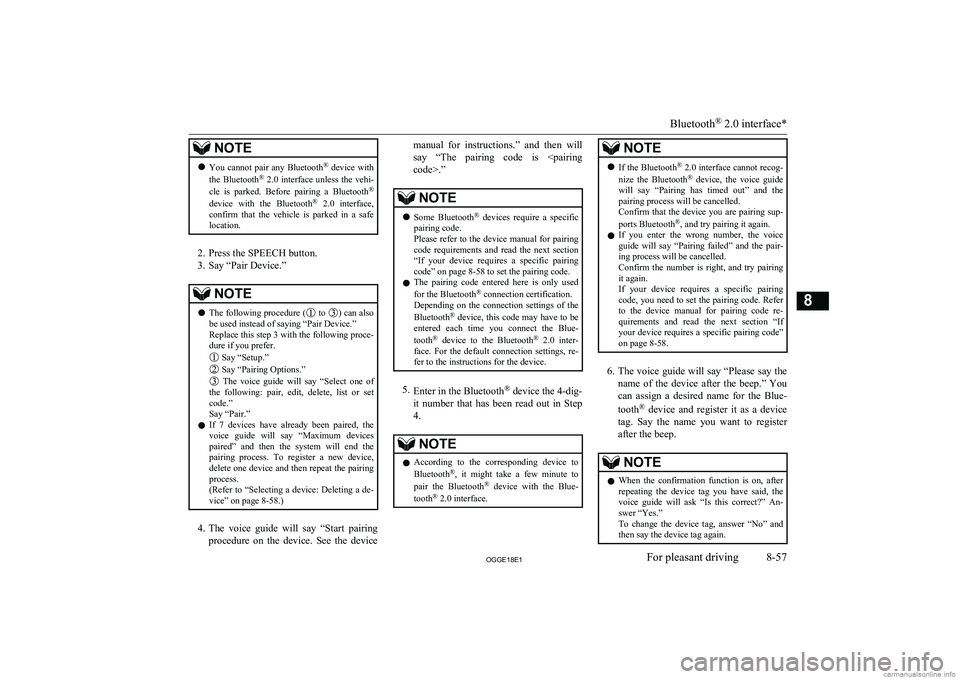
NOTElYou cannot pair any Bluetooth ®
device with
the Bluetooth ®
2.0 interface unless the vehi-
cle is parked. Before pairing a Bluetooth ®
device with the Bluetooth ®
2.0 interface,
confirm that the vehicle is parked in a safe
location.
2. Press the SPEECH button.
3. Say “Pair Device.”
NOTEl The following procedure ( to ) can also
be used instead of saying “Pair Device.”
Replace this step 3 with the following proce- dure if you prefer.
Say “Setup.”
Say “Pairing Options.”
The voice guide will say “Select one of
the following: pair, edit, delete, list or set
code.”
Say “Pair.”
l If 7 devices have already been paired, the
voice guide will say “Maximum devicespaired” and then the system will end the
pairing process. To register a new device, delete one device and then repeat the pairing
process.
(Refer to “Selecting a device: Deleting a de- vice” on page 8-58.)
4. The voice guide will say “Start pairing
procedure on the device. See the device
manual for instructions.” and then will
say “The pairing code is
devices require a specific
pairing code.
Please refer to the device manual for pairing
code requirements and read the next section
“If your device requires a specific pairing code” on page 8-58 to set the pairing code.
l The pairing code entered here is only used
for the Bluetooth ®
connection certification.
Depending on the connection settings of the
Bluetooth ®
device, this code may have to be
entered each time you connect the Blue-
tooth ®
device to the Bluetooth ®
2.0 inter-
face. For the default connection settings, re- fer to the instructions for the device.
5. Enter in the Bluetooth ®
device the 4-dig-
it number that has been read out in Step 4.
NOTEl According to the corresponding device to
Bluetooth ®
, it might take a few minute to
pair the Bluetooth ®
device with the Blue-
tooth ®
2.0 interface.NOTEl If the Bluetooth ®
2.0 interface cannot recog-
nize the Bluetooth ®
device, the voice guide
will say “Pairing has timed out” and the pairing process will be cancelled.
Confirm that the device you are pairing sup-
ports Bluetooth ®
, and try pairing it again.
l If you enter the wrong number, the voice
guide will say “Pairing failed” and the pair- ing process will be cancelled.
Confirm the number is right, and try pairing it again.
If your device requires a specific pairing code, you need to set the pairing code. Refer
to the device manual for pairing code re- quirements and read the next section “If
your device requires a specific pairing code” on page 8-58.
6. The voice guide will say “Please say the
name of the device after the beep.” You
can assign a desired name for the Blue-
tooth ®
device and register it as a device
tag. Say the name you want to register
after the beep.
NOTEl When the confirmation function is on, after
repeating the device tag you have said, the
voice guide will ask “Is this correct?” An-
swer “Yes.”
To change the device tag, answer “No” and then say the device tag again.
Bluetooth ®
2.0 interface*
8-57OGGE18E1For pleasant driving8