2018 MITSUBISHI OUTLANDER PHEV warning light
[x] Cancel search: warning lightPage 6 of 538
![MITSUBISHI OUTLANDER PHEV 2018 Owners Manual (in English) 1. Multi Around Monitor* p. 7-106Audio* p. 8-13
[For DISPLAY AUDIO, Smartphone Link Display Audio and
MITSUBISHI Multi Communication System (MMCS), refer to
the separate owner’s manual.]
2. Hazard w MITSUBISHI OUTLANDER PHEV 2018 Owners Manual (in English) 1. Multi Around Monitor* p. 7-106Audio* p. 8-13
[For DISPLAY AUDIO, Smartphone Link Display Audio and
MITSUBISHI Multi Communication System (MMCS), refer to
the separate owner’s manual.]
2. Hazard w](/manual-img/19/34890/w960_34890-5.png)
1. Multi Around Monitor* p. 7-106Audio* p. 8-13
[For DISPLAY AUDIO, Smartphone Link Display Audio and
MITSUBISHI Multi Communication System (MMCS), refer to
the separate owner’s manual.]
2. Hazard warning flasher switch p. 6-60
3. ECO mode switch p. 6-61
4. Front passenger’s airbag indicator p. 5-29
5. Passenger’s ventilators p. 8-02
6. Accessory socket* p. 8-74 Cigarette lighter* p. 8-73
7. Electric tailgate power switch* p. 4-20
8. Key slot p. 7-15
9. 220-240 V AC power supply switch* p. 8-75
10. Blind Spot Warning (BSW) switch* p. 7-79
11. Heated steering wheel switch* p. 6-69
12. Heated windscreen switch* p. 6-68
13. Cup holder p. 8-82
14. Selector lever (Joystick type) p. 7-16
15. 220-240 V AC power supply* p. 8-75
16. Floor console box p. 8-81 Arm rest
Accessory socket p. 8-74
USB input terminal p. 8-69
17. Fuel tank filler door release lever p. 2-14
18. Bonnet release lever p. 11-04
19. Rear window demister switch p. 6-67 Wiper de-icer switch* p. 6-67
20. Air conditioner p. 8-04
21. Seat belt reminder p. 5-11
Instruments and controls
1-04OGGE18E1Overview1LHD
Page 47 of 538

WARNINGlTo reduce the risk of electric shock or fire
due to electric leak, always use an earthed
outlet protected by a residual current de-
tector, rated for amperage equal to or greater than the value specified by MITSUBISHI MOTORS , and that is con-
nected to a dedicated branch circuit. If
the circuit is shared, and another electri- cal device is being used at the same time
as the vehicle is charging, the circuit may heat abnormally, the breaker may trip
and the circuit may cause adverse inter- ference on the household electrical appli-
ances such as TVs and audio systems.
l It is possible to charge even in rain or
snow. However, be sure to pay attention to the following:
• Do not touch normal charge port, nor-
mal charge connector, outlet and plug with wet hands.
• Keep away from water when connect-
ing the normal charge port, normal
charge connector, outlet and plug.
• Do not perform the charging in the out
of doors when heavy rain, heavy snow, strong winds, and when bad weather is
expected.
• Do not charge if there is possibility a
lightning strike. When thunder rum- bling begins suddenly during normal
charging, do not touch the vehicle and the EV charging cable and turn off the
breaker.WARNINGl If water goes into the normal charge port
or the normal charge connector, it couldcause a short circuit, a fire and an electric shock.
Be sure to completely close the charging
lid and the inner lid and do not leave the EV charging cable in an outdoors.
l If the connected part of the charging plug
has been buried in snow while charging, turn off the hand switch or the breaker
connected with the outlet first, then re- move the snow and disconnect the charg-
ing plug. If your vehicle body has been buried in snow while charging, remove
the snow and then disconnect the charge connector.
l When you perform the normal charging
at away from home, some normal charg-
ers may not correspond to your vehicle. Consult an administrator or a maker of
the normal charger that it corresponds to your vehicle before using it. Also perform
normal charging according to the operat-
ing procedure indicated on the body of
normal charger.
l Do not open the charging lid for anything
other than charging and using the exter-
nal power feed.CAUTIONl Do not attempt to perform a jump start on
the auxiliary battery at the same time that the
drive battery is being charged. Doing so may
damage the vehicle or charging cable and
could cause injury.
Refer to “Emergency starting” on page 9-02.NOTEl If you open the charging lid with the opera-
tion mode of the power switch is ON, a buz- zer sounds approximately 10 minutes inter-mittently to alert the charging cannot be star- ted. If you close the charging lid or put theoperation mode in OFF, the buzzer stops.
l If you insert the charge connector to the
charge port with the operation mode is ON,
a buzzer sounds continuously approximately
10 minutes to alert the charging cannot be started.
If you pull the charge connector out or put the operation mode in OFF, the buzzer stops.
l Repeatedly performing only quick charging
may reduce the battery capacity.
In usual charge, normal charging is recom-
mended.
l To maintain the capacity of the drive battery,
the following is recommended:
• If you repeatedly perform only the quick
charging, fully charge the vehicle in nor- mal charging every 2 weeks.
Basic knowledge for charging
3-05OGGE18E1Charging3
Page 52 of 538

Handling and storing the con-trol box
E08301201093
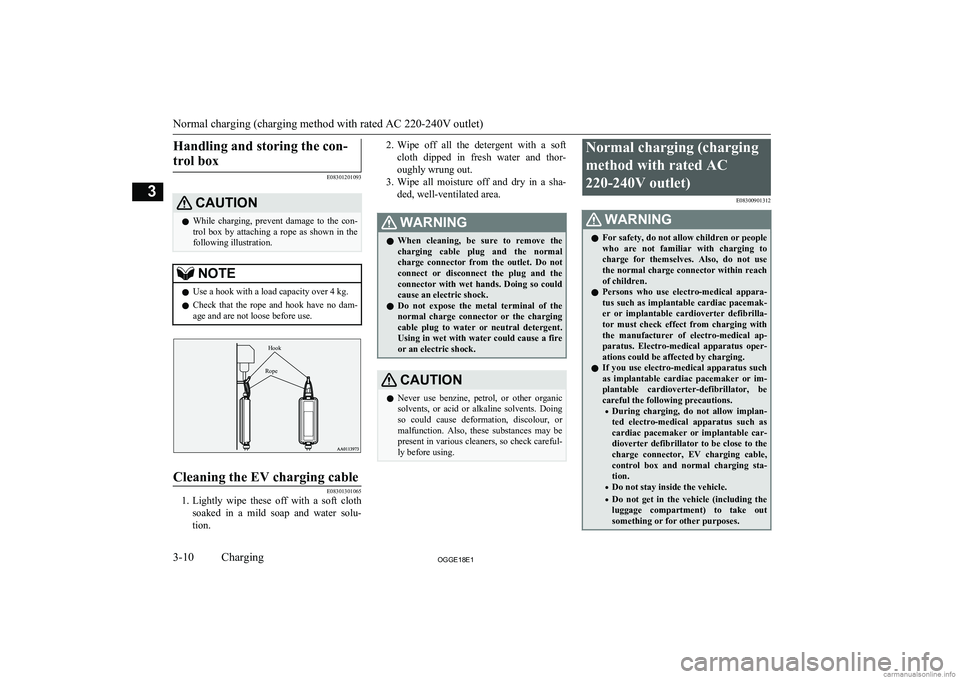
CAUTIONl While charging, prevent damage to the con-
trol box by attaching a rope as shown in the
following illustration.NOTEl Use a hook with a load capacity over 4 kg.
l Check that the rope and hook have no dam-
age and are not loose before use.HookRope
Cleaning the EV charging cable
E08301301065
1. Lightly wipe these off with a soft cloth
soaked in a mild soap and water solu- tion.
2. Wipe off all the detergent with a soft
cloth dipped in fresh water and thor- oughly wrung out.
3. Wipe all moisture off and dry in a sha-
ded, well-ventilated area.WARNINGl When cleaning, be sure to remove the
charging cable plug and the normalcharge connector from the outlet. Do not
connect or disconnect the plug and the
connector with wet hands. Doing so could cause an electric shock.
l Do not expose the metal terminal of the
normal charge connector or the chargingcable plug to water or neutral detergent.
Using in wet with water could cause a fire or an electric shock.CAUTIONl Never use benzine, petrol, or other organic
solvents, or acid or alkaline solvents. Doing so could cause deformation, discolour, or
malfunction. Also, these substances may be
present in various cleaners, so check careful- ly before using.Normal charging (charging
method with rated AC220-240V outlet) E08300901312WARNINGlFor safety, do not allow children or people
who are not familiar with charging to
charge for themselves. Also, do not use
the normal charge connector within reach of children.
l Persons who use electro-medical appara-
tus such as implantable cardiac pacemak-
er or implantable cardioverter defibrilla- tor must check effect from charging with
the manufacturer of electro-medical ap- paratus. Electro-medical apparatus oper- ations could be affected by charging.
l If you use electro-medical apparatus such
as implantable cardiac pacemaker or im- plantable cardioverter-defibrillator, be
careful the following precautions.
• During charging, do not allow implan-
ted electro-medical apparatus such as
cardiac pacemaker or implantable car- dioverter defibrillator to be close to the
charge connector, EV charging cable,
control box and normal charging sta-
tion.
• Do not stay inside the vehicle.
• Do not get in the vehicle (including the
luggage compartment) to take outsomething or for other purposes.
Normal charging (charging method with rated AC 220-240V outlet)
3-10OGGE18E1Charging3
Page 72 of 538

KeysE00300104175
The key fits all locks.
without MITSUBISHI Remote Control
with MITSUBISHI Remote Control
1- Keyless operation key
2- Keyless operation key (with electric tail-
gate switch)
3- Emergency keyWARNINGl When taking a key on flights, do not press
any switches on the key while on the plane. If a switch is pressed on the plane,
the key emits electromagnetic waves, which could adversely affect the plane’s flight operation.
When carrying a key in a bag, be careful that no switches on the key can be easily
pressed by mistake.NOTEl The key is a precision electronic device with
a built-in signal transmitter. Please observe
the following in order to prevent a malfunc- tion.
• Do not leave in a place that is exposed to
direct sunlight, for example on the dash- board.
• Do not disassemble or modify.
• Do not excessively bend the key or sub-
ject it to strong impacts.
• Do not expose to water.
• Keep away from magnetic key rings.
• Keep away from audio systems, personal
computers, TVs, and other equipment that generates a magnetic field.NOTE• Keep away from devices that emit strong
electromagnetic waves, such as cellular
phones, wireless devices and high fre- quency equipment (including medical de-
vices).
• Do not clean with ultrasonic cleaners or
similar equipment.
• Do not leave the key where it may be ex-
posed to high temperature or high humidi- ty.
l The plug-in hybrid EV system is designed so
that it will not start if the ID code registered
in the immobilizer computer and the key’s ID code do not match. Refer to the “Elec-
tronic immobilizer” section for details and key usage.
l [For vehicles equipped with the security
alarm system]
Pay attention to the following if the security
alarm is set to “Active”.
Refer to “Security alarm system” on page 4-27.
• If the security alarm is in the system
armed mode, the alarm will sound if the
doors are opened after being unlocked with the key, the inside lock knob or the
central door lock switch.
• Even if the security alarm is set to “Ac-
tive”, the system preparation mode is not entered if the keyless entry system or thekeyless operation function was not used to
lock the vehicle.
Keys
4-02OGGE18E1Locking and unlocking4
Page 105 of 538

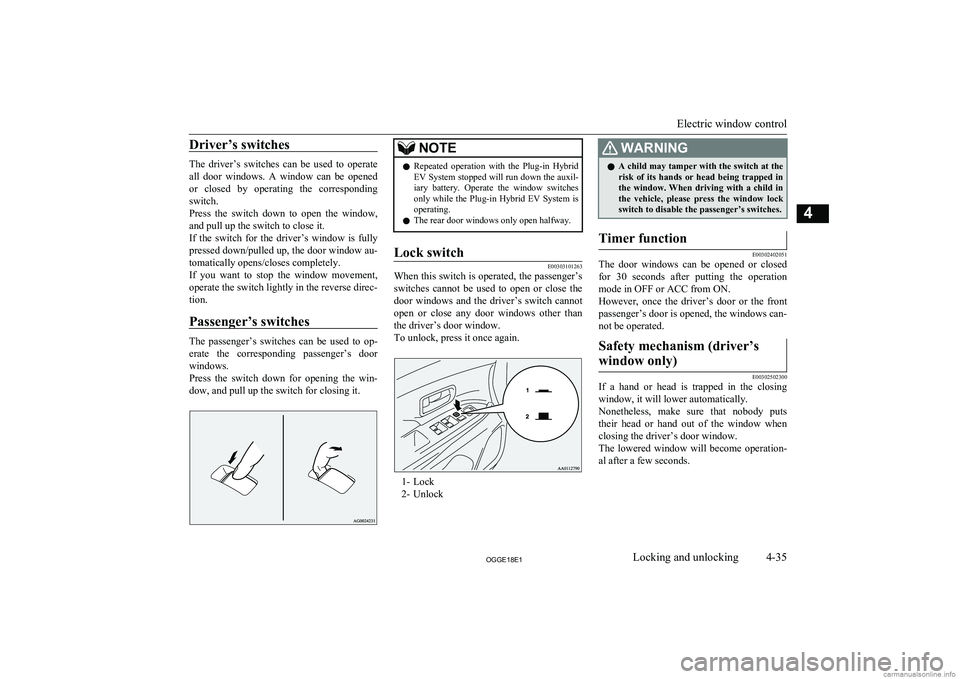
Driver’s switches
The driver’s switches can be used to operate
all door windows. A window can be opened or closed by operating the correspondingswitch.
Press the switch down to open the window, and pull up the switch to close it.
If the switch for the driver’s window is fully
pressed down/pulled up, the door window au- tomatically opens/closes completely.
If you want to stop the window movement,
operate the switch lightly in the reverse direc-
tion.
Passenger’s switches
The passenger’s switches can be used to op-
erate the corresponding passenger’s door
windows.
Press the switch down for opening the win- dow, and pull up the switch for closing it.
NOTEl Repeated operation with the Plug-in Hybrid
EV System stopped will run down the auxil- iary battery. Operate the window switches
only while the Plug-in Hybrid EV System is operating.
l The rear door windows only open halfway.Lock switch
E00303101263
When this switch is operated, the passenger’s
switches cannot be used to open or close the door windows and the driver’s switch cannot
open or close any door windows other than
the driver’s door window.
To unlock, press it once again.
1- Lock
2- Unlock
WARNINGl A child may tamper with the switch at the
risk of its hands or head being trapped in
the window. When driving with a child in the vehicle, please press the window lockswitch to disable the passenger’s switches.Timer function
E00302402051
The door windows can be opened or closed
for 30 seconds after putting the operation mode in OFF or ACC from ON.
However, once the driver’s door or the front
passenger’s door is opened, the windows can-
not be operated.
Safety mechanism (driver’s
window only)
E00302502300
If a hand or head is trapped in the closing window, it will lower automatically.
Nonetheless, make sure that nobody puts
their head or hand out of the window when
closing the driver’s door window.
The lowered window will become operation-
al after a few seconds.
Electric window control
4-35OGGE18E1Locking and unlocking4
Page 118 of 538

WARNINGlAlways adjust the belt to a snug fit.
l Always wear the lap portion of the belt
over your hips.3-point type seat belt (with
emergency locking mechanism)
E00404902918
This type of belt requires no length adjust- ment. Once worn, the belt adjusts itself to the
movement of the wearer, but in the event of a sudden or strong shock, the belt automatical-
ly locks to hold the wearer’s body.
NOTEl You can check if the belt locks by pulling it
forward quickly.
l If the seat belt buckles in the rear seating po-
sition are not found, you will find them un-
der the rear seat cushion. Refer to “Making a
luggage area” on page 5-06 for how to put
the seat belt buckles at the proper position.
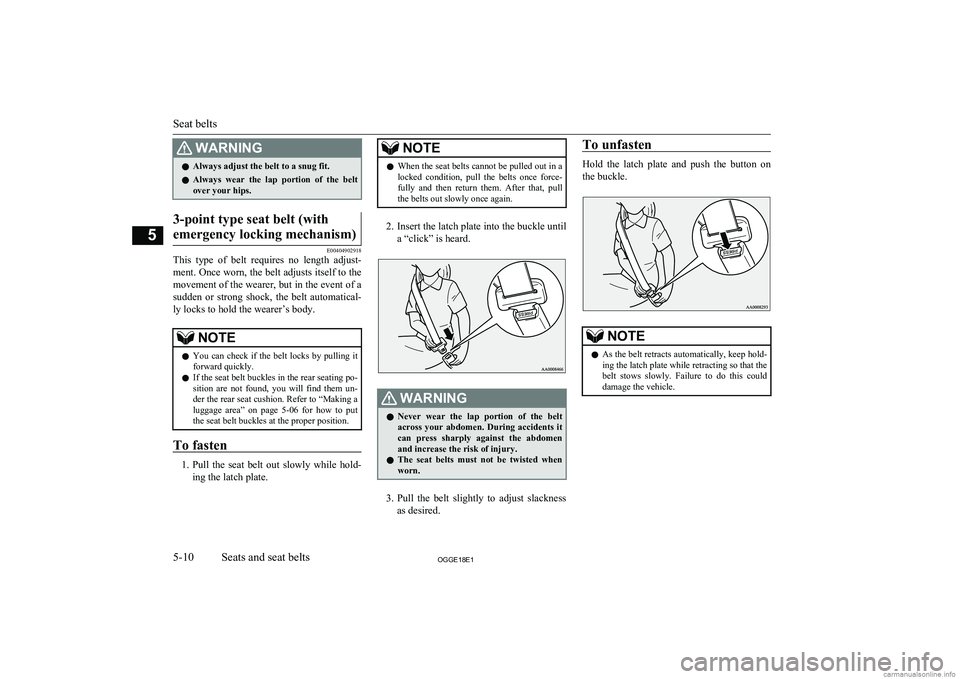
To fasten
1. Pull the seat belt out slowly while hold-
ing the latch plate.
NOTEl When the seat belts cannot be pulled out in a
locked condition, pull the belts once force-
fully and then return them. After that, pull
the belts out slowly once again.
2. Insert the latch plate into the buckle until
a “click” is heard.
WARNINGl Never wear the lap portion of the belt
across your abdomen. During accidents it
can press sharply against the abdomen and increase the risk of injury.
l The seat belts must not be twisted when
worn.
3. Pull the belt slightly to adjust slackness
as desired.
To unfasten
Hold the latch plate and push the button on
the buckle.
NOTEl As the belt retracts automatically, keep hold-
ing the latch plate while retracting so that the
belt stows slowly. Failure to do this could damage the vehicle.
Seat belts
5-10OGGE18E1Seats and seat belts5
Page 121 of 538

Rear-centre 3-point type seatbelt
E00405201184
The rear-centre 3-point type seat belt must be
worn correctly as illustrated.
WARNINGl Be sure to securely connect the both latch
plate (A and B). Failing to do so could sig-
nificantly reduce the amount of protection
and cause serious injures in a collision or a sudden stop.NOTEl If the seat belt buckles in the rear seating po-
sition are not found, you will find them un-
der the rear seat cushion.
Refer to “Making a luggage area” on page 5-06 for how to put the seat belt buckles at
the proper position.To fasten
1. Pull out the buckle (C) from the seat-
back.
2. Pull out the small latch plate (A) and
then pull out the latch plate (B) by tilting
it as shown in the illustration.
NOTEl Pulling out the latch plate by force may
damage the headliner.
3. Pull the seat belt and insert the small
latch plate (A) into the buckle (C).
4. Insert the latch plate (B) into the buckle
(D).
5. Pull the belt slightly to adjust slackness
as desired.
To unfasten
1. Hold the latch plate and push the button
on the buckle.
NOTEl As the belt retracts automatically, keep hold-
ing the latch plate while retracting so that the
belt stows slowly. Failure to do this could damage the vehicle.
l To release the buckle (C), press the button
(E) with a narrow-tipped object (latch plate
or mechanical key etc.).
Seat belts
5-13OGGE18E1Seats and seat belts5AA0111461
Page 135 of 538

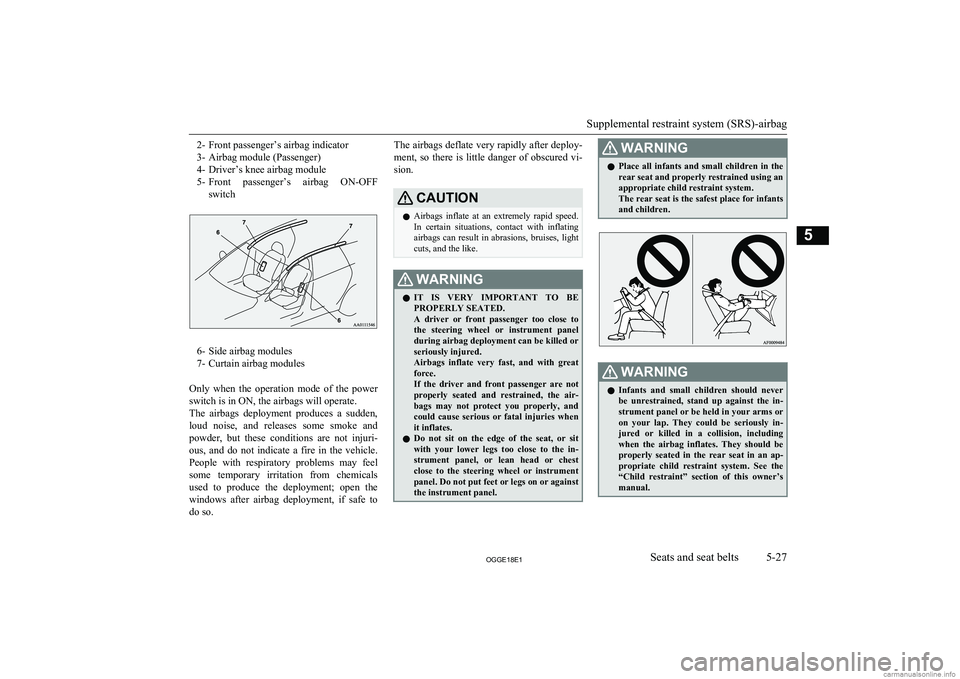
2- Front passenger’s airbag indicator
3- Airbag module (Passenger)
4- Driver’s knee airbag module
5- Front passenger’s airbag ON-OFF
switch
6- Side airbag modules
7- Curtain airbag modules
Only when the operation mode of the power switch is in ON, the airbags will operate.The airbags deployment produces a sudden,
loud noise, and releases some smoke and powder, but these conditions are not injuri- ous, and do not indicate a fire in the vehicle.
People with respiratory problems may feel
some temporary irritation from chemicals used to produce the deployment; open the
windows after airbag deployment, if safe to
do so.
The airbags deflate very rapidly after deploy-
ment, so there is little danger of obscured vi-sion.CAUTIONl Airbags inflate at an extremely rapid speed.
In certain situations, contact with inflatingairbags can result in abrasions, bruises, light
cuts, and the like.WARNINGl IT IS VERY IMPORTANT TO BE
PROPERLY SEATED.
A driver or front passenger too close to the steering wheel or instrument panel
during airbag deployment can be killed or seriously injured.
Airbags inflate very fast, and with great force.
If the driver and front passenger are not
properly seated and restrained, the air-
bags may not protect you properly, and could cause serious or fatal injuries whenit inflates.
l Do not sit on the edge of the seat, or sit
with your lower legs too close to the in-
strument panel, or lean head or chest close to the steering wheel or instrument panel. Do not put feet or legs on or againstthe instrument panel.WARNINGl Place all infants and small children in the
rear seat and properly restrained using an
appropriate child restraint system.
The rear seat is the safest place for infants
and children.WARNINGl Infants and small children should never
be unrestrained, stand up against the in-strument panel or be held in your arms or on your lap. They could be seriously in-jured or killed in a collision, including when the airbag inflates. They should be
properly seated in the rear seat in an ap- propriate child restraint system. See the
“Child restraint” section of this owner’s
manual.
Supplemental restraint system (SRS)-airbag
5-27OGGE18E1Seats and seat belts5