2018 MITSUBISHI OUTLANDER PHEV ESP
[x] Cancel search: ESPPage 117 of 538

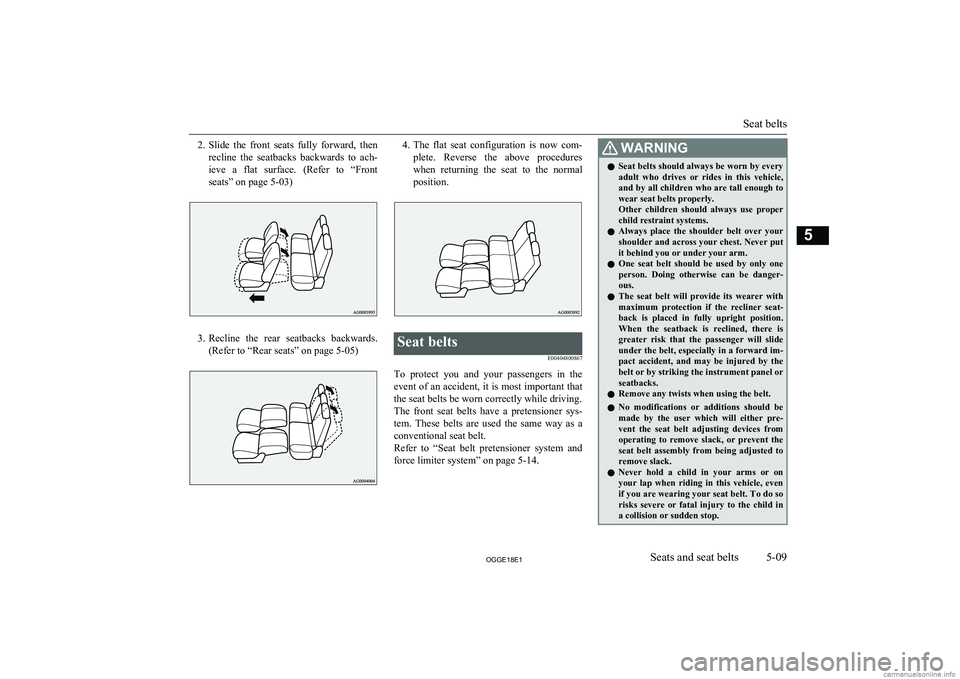
2.Slide the front seats fully forward, then
recline the seatbacks backwards to ach- ieve a flat surface. (Refer to “Front
seats” on page 5-03)
3. Recline the rear seatbacks backwards.
(Refer to “Rear seats” on page 5-05)
4. The flat seat configuration is now com-
plete. Reverse the above procedures
when returning the seat to the normal
position.Seat belts
E00404800867
To protect you and your passengers in theevent of an accident, it is most important thatthe seat belts be worn correctly while driving.
The front seat belts have a pretensioner sys- tem. These belts are used the same way as a
conventional seat belt.
Refer to “Seat belt pretensioner system and force limiter system” on page 5-14.
WARNINGl Seat belts should always be worn by every
adult who drives or rides in this vehicle,
and by all children who are tall enough to wear seat belts properly.
Other children should always use proper child restraint systems.
l Always place the shoulder belt over your
shoulder and across your chest. Never put
it behind you or under your arm.
l One seat belt should be used by only one
person. Doing otherwise can be danger-
ous.
l The seat belt will provide its wearer with
maximum protection if the recliner seat-
back is placed in fully upright position.
When the seatback is reclined, there is greater risk that the passenger will slide
under the belt, especially in a forward im-
pact accident, and may be injured by the
belt or by striking the instrument panel or seatbacks.
l Remove any twists when using the belt.
l No modifications or additions should be
made by the user which will either pre- vent the seat belt adjusting devices fromoperating to remove slack, or prevent the
seat belt assembly from being adjusted to
remove slack.
l Never hold a child in your arms or on
your lap when riding in this vehicle, even
if you are wearing your seat belt. To do so risks severe or fatal injury to the child in
a collision or sudden stop.
Seat belts
5-09OGGE18E1Seats and seat belts5
Page 123 of 538

Pretensioner system
E00405802523
When the operation mode of the power
switch is in ON, if there is a frontal impact or a side impact severe enough to injure the
driver and/or front passenger, the pretension- er system will retract their respective seat
belts instantaneously, thus maximizing the seat belt’s effectiveness.
WARNINGl To obtain the best results from your pre-
tensioner seat belt, make sure you have adjusted your seat correctly and wear your seat belt properly.CAUTIONl Installation of audio equipment or repairs in
the vicinity of the pretensioner seat belts or
floor console must be performed in line with MITSUBISHI MOTORS guidelines. It is
important to do so because the work could affect the pretensioner systems.
l If you need to scrap the vehicle, please con-
sult a MITSUBISHI MOTORS Authorized
Service Point.
It is important to do so because unexpected activation of the pretensioner seat belts
could cause injuries.NOTEl The pretensioner seat belts will be activated
if the vehicle suffers a severe impact, even if the seat belts are not worn.
l The pretensioner seat belts are designed to
work only once. After the pretensioner seat
belts have been activated, we recommend you have it replaced by a MITSUBISHI
MOTORS Authorized Service Point.SRS warning
E00405900360
The same warning lamp/display is shared by
the SRS airbags and the pretensioner seat
belts.
Refer to “SRS warning lamp/display” on page 5-36.
Force limiter system
E00406000209
In the event of a collision, each force limitersystem will effectively absorb the load ap- plied to the seat belt to minimize the impact
to the passenger.
Child restraint
E00406403507
When transporting children in your vehicle,some type of child restraint system should al-
ways be used according to the size of the child. This is required by law in most coun-
tries.
The regulations concerning driving with chil-
dren in the front seat may differ from country
to country. You are advised to comply with the relevant regulations.WARNINGl When possible, put children in the rear
seat. Accident statistics indicate that chil- dren of all sizes and ages are safer when
properly restrained in the rear seat rather than in the front seat.
l Holding a child in your arms is no substi-
tute for a restraint system. Failure to use
a proper restraint system can result in se- vere or fatal injury to the child.
l Each child restraint device or fixing is to
be used only by one child.
l When attaching a child restraint system
to the rear seat, prevent the front seat- backs from touching the child restraintsystem.
Otherwise, the child could be seriously in-
jured in the event of hard braking or a
collision.
Child restraint
5-15OGGE18E1Seats and seat belts5
Page 135 of 538

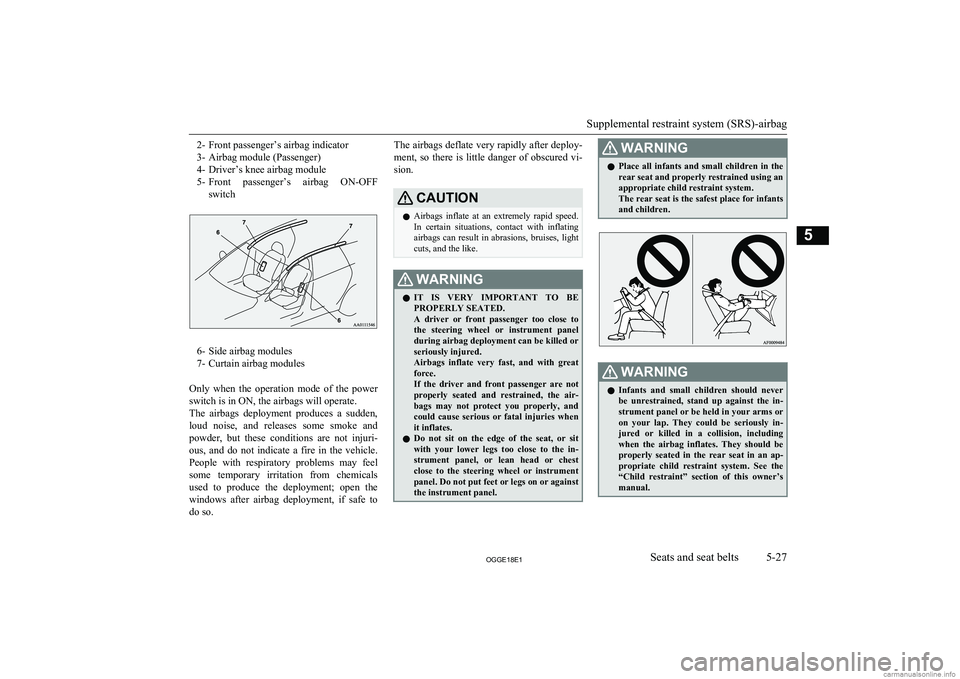
2- Front passenger’s airbag indicator
3- Airbag module (Passenger)
4- Driver’s knee airbag module
5- Front passenger’s airbag ON-OFF
switch
6- Side airbag modules
7- Curtain airbag modules
Only when the operation mode of the power switch is in ON, the airbags will operate.The airbags deployment produces a sudden,
loud noise, and releases some smoke and powder, but these conditions are not injuri- ous, and do not indicate a fire in the vehicle.
People with respiratory problems may feel
some temporary irritation from chemicals used to produce the deployment; open the
windows after airbag deployment, if safe to
do so.
The airbags deflate very rapidly after deploy-
ment, so there is little danger of obscured vi-sion.CAUTIONl Airbags inflate at an extremely rapid speed.
In certain situations, contact with inflatingairbags can result in abrasions, bruises, light
cuts, and the like.WARNINGl IT IS VERY IMPORTANT TO BE
PROPERLY SEATED.
A driver or front passenger too close to the steering wheel or instrument panel
during airbag deployment can be killed or seriously injured.
Airbags inflate very fast, and with great force.
If the driver and front passenger are not
properly seated and restrained, the air-
bags may not protect you properly, and could cause serious or fatal injuries whenit inflates.
l Do not sit on the edge of the seat, or sit
with your lower legs too close to the in-
strument panel, or lean head or chest close to the steering wheel or instrument panel. Do not put feet or legs on or againstthe instrument panel.WARNINGl Place all infants and small children in the
rear seat and properly restrained using an
appropriate child restraint system.
The rear seat is the safest place for infants
and children.WARNINGl Infants and small children should never
be unrestrained, stand up against the in-strument panel or be held in your arms or on your lap. They could be seriously in-jured or killed in a collision, including when the airbag inflates. They should be
properly seated in the rear seat in an ap- propriate child restraint system. See the
“Child restraint” section of this owner’s
manual.
Supplemental restraint system (SRS)-airbag
5-27OGGE18E1Seats and seat belts5
Page 142 of 538

The side airbags and curtainairbags MAY NOT DEPLOY
when...
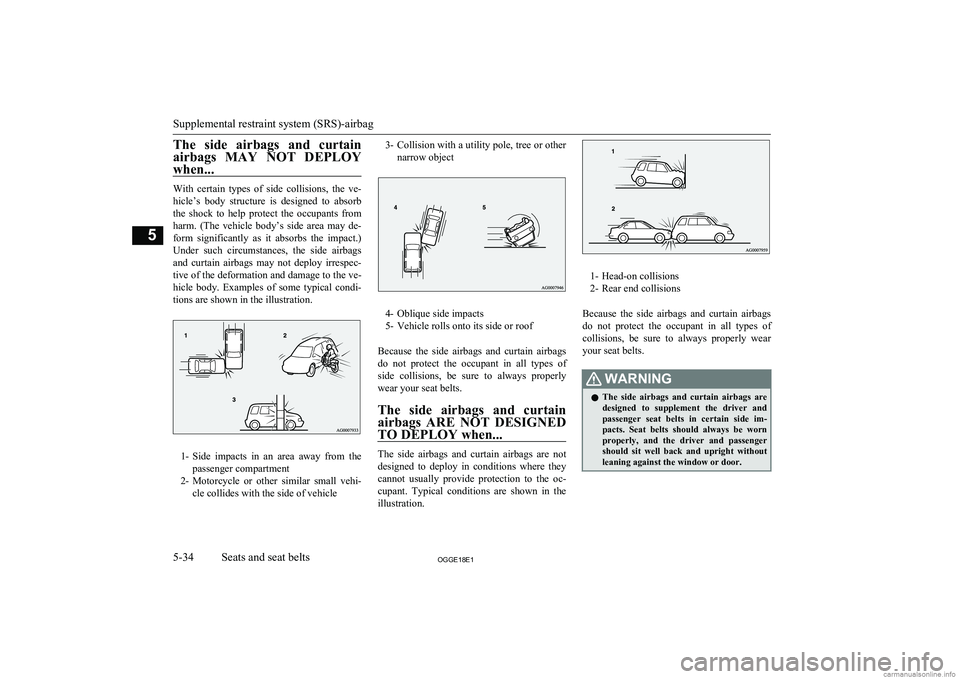
With certain types of side collisions, the ve- hicle’s body structure is designed to absorb
the shock to help protect the occupants fromharm. (The vehicle body’s side area may de-
form significantly as it absorbs the impact.) Under such circumstances, the side airbags and curtain airbags may not deploy irrespec-tive of the deformation and damage to the ve-
hicle body. Examples of some typical condi- tions are shown in the illustration.
1- Side impacts in an area away from the
passenger compartment
2- Motorcycle or other similar small vehi-
cle collides with the side of vehicle
3- Collision with a utility pole, tree or other
narrow object
4- Oblique side impacts
5- Vehicle rolls onto its side or roof
Because the side airbags and curtain airbags do not protect the occupant in all types of side collisions, be sure to always properlywear your seat belts.
The side airbags and curtain
airbags ARE NOT DESIGNED TO DEPLOY when...
The side airbags and curtain airbags are notdesigned to deploy in conditions where they
cannot usually provide protection to the oc- cupant. Typical conditions are shown in the
illustration.
1- Head-on collisions
2- Rear end collisions
Because the side airbags and curtain airbags do not protect the occupant in all types of collisions, be sure to always properly wearyour seat belts.
WARNINGl The side airbags and curtain airbags are
designed to supplement the driver and
passenger seat belts in certain side im- pacts. Seat belts should always be wornproperly, and the driver and passenger
should sit well back and upright without
leaning against the window or door.
Supplemental restraint system (SRS)-airbag
5-34OGGE18E1Seats and seat belts5
Page 146 of 538

InstrumentsE00500102447
1- Energy usage indicator ® p. 6-02
2- Multi information display ® p. 6-02
Information screen display list
® p. 6-22
3- Speedometer (km/h or mph + km/h)
4- Rheostat illumination button ® p. 6-02
Energy usage indicator
E00537800031
Eco/Power zone
Indicates the total power of the motors and
engine during driving.
Charge zone
Indicates the charging power generated by the regenerative brake.
The more the needle moves, the more electric
energy is charged.
The needle of the energy usage indicator may
not enter the charge zone when the drive bat-tery is close to full charge.Meter illumination control
E00531301174
Each time you press the rheostat illumination
button, there is a sound and the brightness of the instruments changes.
1- Brightness level
2- Rheostat illumination buttonNOTEl You can adjust to 8 different levels respec-
tively for when the position lamps are illu- minated and when they are not.
l When the lamp switch is in a position other
than the “OFF” position, the meter illumina-
tion switches automatically to the adjusted brightness, depending on the brightness out- side the vehicle.
l The brightness level of the instruments is
stored when the operation mode of the pow- er switch is put in OFF.
l If you press and hold the button for about 2
seconds or more when the position lamps are illuminated, the brightness level changes to
the maximum level. Pressing and holding the button for about 2 seconds or more again
returns the brightness level to the previous
level.
On vehicles equipped with the MITSUBISHI Multi-Communication Sys-
tem (MMCS), the map screen colour of MITSUBISHI Multi-Communication Sys-
tem (MMCS) may not be switched to night-
time setting when the meter illumination brightness level is at the maximum.Multi information display
E00519902887
Always stop the vehicle in a safe place beforeoperating.
Instruments
6-02OGGE18E1Instruments and controls6 Eco/Power zoneCharge zone
Page 156 of 538

1.When you lightly press the multi infor-
mation display switch a few times, the information display switches to the serv-
ice reminder display screen.
2. Press and hold the multi information dis-
play switch for about 2 seconds or more to display “
” and make it flash. (If
there is no operation for about 10 sec- onds with flashing, the display returns tothe previous screen.)
3. Lightly press the multi information dis-
play switch while the icon is flashing to
change the display from “---” to
“CLEAR”. After this, the time until the
next periodic inspection will be dis- played.CAUTIONl The customer is responsible for making sure
that periodic inspection and maintenance are
performed.
Inspections and maintenance must be per- formed to prevent accidents and malfunc- tions.NOTEl “---” display cannot be reset when the opera-
tion mode is in ON.NOTEl When “---” is displayed, after a certain dis-
tance and a certain period of time, the dis-
play is reset and the time until the next peri- odic inspection is displayed.
l If you accidentally reset the display, we rec-
ommend you to consult a MITSUBISHI
MOTORS Authorized Service Point.System check screen
E00531001070
When the operation mode is put in ON, the
system check screen is displayed for about 4
seconds. If there is no fault, the information
screen (when the operation mode is ON) is displayed.
If there is a fault, the screen changes to warn-
ing display.
Refer to “Warning display list” on page
6-23.
NOTEl The system check screen display varies de-
pending on the customer’s equipment.
Multi information display
6-12OGGE18E1Instruments and controls6
Page 194 of 538

This lamp will also illuminate when the oper-
ation mode of the power switch is put in ON,
and goes off after the Plug-in Hybrid EV System has started. If it does not go off after
the Plug-in Hybrid EV System has started, we recommend you to have the vehicle
checked.CAUTIONl Prolonged driving with this lamp on may
cause further damage to the emission control system. It could also affect fuel economyand drivability.
l If the lamp does not illuminate when the op-
eration mode is put in ON, we recommend
you to have the system checked.
l If the lamp illuminates while the Plug-in Hy-
brid EV System is operating, avoid driving
at high speeds and have the system inspected by a MITSUBISHI MOTORS Authorized
Service Point as soon as possible.NOTEl The engine electronic control module ac-
commodating the onboard diagnostic system has various fault data (especially about the
exhaust emission) stored.
This data will be erased if a auxiliary battery
cable is disconnected which will make a rap- id diagnosis difficult. Do not disconnect a
auxiliary battery cable when the check engine
warning lamp is ON.
Auxiliary battery charge warn-
ing lamp
E00502702287
This warning lamp will illu-
minate when there is a fault with the charging system of
the auxiliary battery.
Normally, when the opera-
tion mode of the power
switch is put in ON, this warning lamp will illuminate. Then, when the Plug-in Hybrid
EV System is started and the ready indicator
illuminates, the warning lamp will go out.
CAUTIONl If the warning lamp stays on after the ready
indicator illuminates, there may be a prob- lem with the charging system for the auxili-
ary battery.
• Immediately park your vehicle in a safe
place and we recommend you to have it
checked.
• Do not charge the auxiliary battery.Plug-in Hybrid EV System
warning lamp
E00537300049
This warning lamp will illu-
minate when there is a fault at the Plug-in Hybrid EV
System.
Refer to “Service precau- tions” on page 11-02.
Normally, this warning lamp illuminates when the operation mode of the power switch
is put in ON, and goes off after a few sec-
onds.
CAUTIONl If the warning lamp illuminates and “EV
SYSTEM SERVICE REQUIRED STOP SAFELY” warning is displayed on the multi information display while the Plug-in Hy-
brid EV System is running, park your vehi-
cle in a safe place as soon as possible and contact a MITSUBISHI MOTORS Author-
ized Service Point to have the system checked.
Warning lamps
6-50OGGE18E1Instruments and controls6
Page 199 of 538

WARNINGlThe headlamp beams (high/low) may not
be switched automatically under certain
circumstances. Do not overestimate the system. It is the responsibility of the driv-
er to switch the headlamp beams (high/
low) manually to suit each driving condi- tion.
Refer to “Dipper (High/Low beam
change)” on page 6-54How to use the AHB
E00551500087
1. Rotate the lamp switch to the “” posi-
tion or “AUTO” position when the Plug-
in Hybrid EV System is operating.
NOTEl If the headlamps are on when the lamp
switch is in the “AUTO” position, the AHB works.2. Press the AHB switch.
The AHB is activated and the indicator
will illuminate.
If the AHB switch is pressed again, the AHB will be deactivated and the AHB
indicator will go off.
NOTEl You can switch the headlamp beams (high/
low) manually by operating the lever even if the AHB is working.
Refer to “Dipper (High/Low beam change)”
on page 6-54
If the lever is operated manually, the AHB indicator will go off and the AHB will be
deactivated.
Refer to “Manual switching” on page 6-55.
l The AHB is not deactivated when you pull
the lever slightly (operation of the headlamp flasher).
Manual switching
Switching to low beam
1. Pull the lever towards you.
2. The AHB indicator will go off.
3. The AHB switch is pressed again, the
AHB will activated.
Switching to high-beam 1. Pull the lever towards you.
2. The AHB indicator will go off and the
high-beam indicator illuminates.
3. The AHB switch is pressed again, the
AHB will activated.
Automatic switching conditionsE00551600059
The high-beam headlamps illuminate whenall of the following conditions are met:
l Your vehicle speed exceeds approxi-
mately 40 km/h (25 mph).
Combination headlamps and dipper switch
6-55OGGE18E1Instruments and controls6