2018 MERCEDES-BENZ SLC ROADSTER start stop button
[x] Cancel search: start stop buttonPage 178 of 298
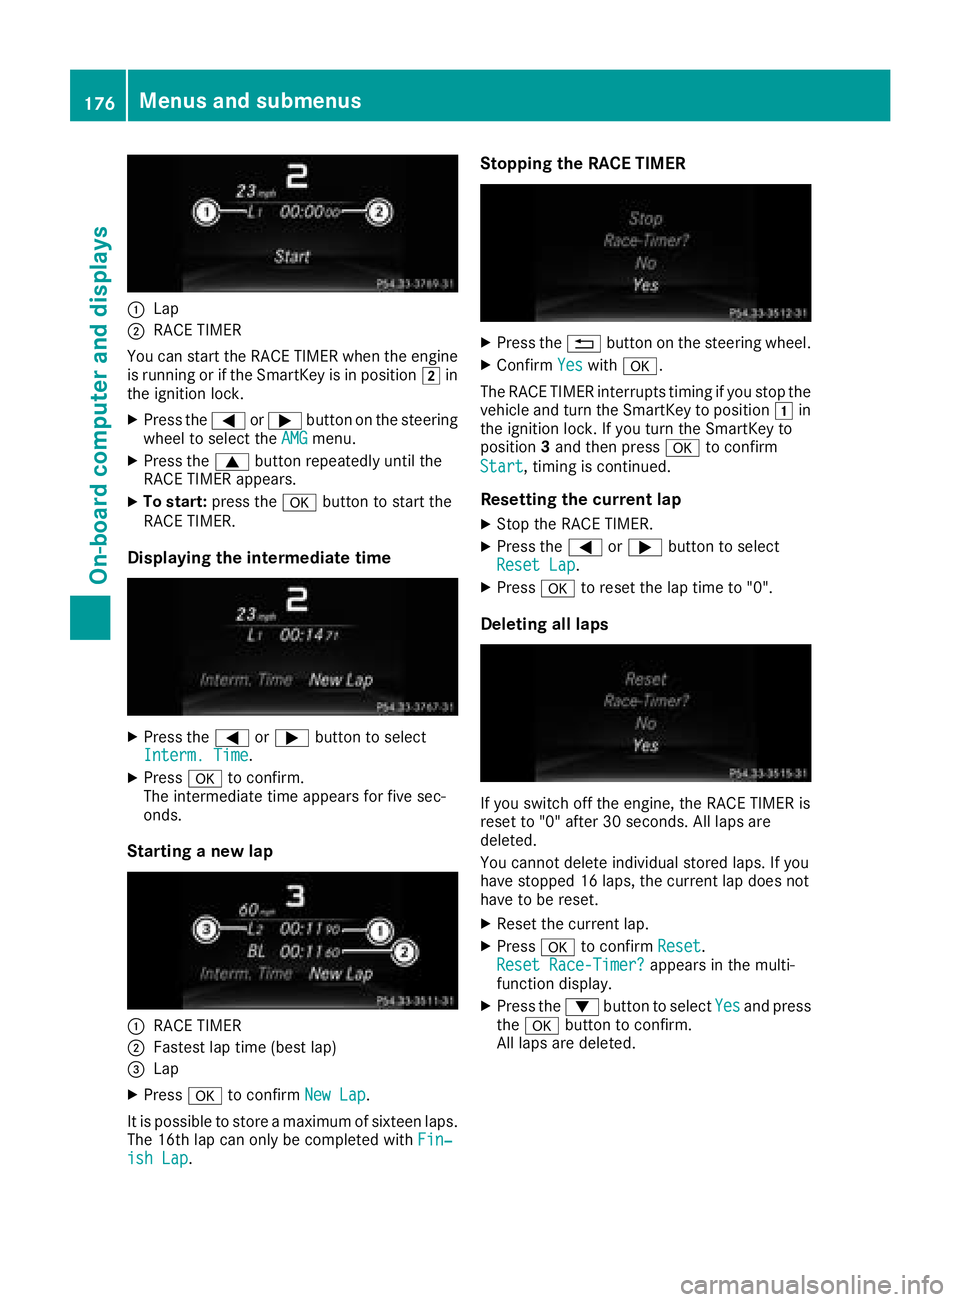
:Lap
;RACE TIMER
You can start the RACE TIMER when the engine
is running or if the SmartKey is in position 2in
the ignition lock.
XPress the =or; button on the steering
wheeltos elect theAMGmenu.
XPress the 9button repeatedly until the
RACE TIMER appears.
XTo start: press the abutton to start the
RACE TIMER.
Displaying the intermediate time
XPress the =or; button to select
Interm. Time.
XPress ato confirm.
The intermediate time appears for five sec-
onds.
Starting anew lap
:RACE TIMER
;Fastest lap time (best lap)
=Lap
XPress ato confirm New Lap.
It is possible to store amaximum of sixteen laps.
The 16th lap can only be completed with Fin‐
ish Lap.
Stopping the RACE TIMER
XPress the%button on the steering wheel.
XConfirm Yeswitha.
The RACE TIMER interrupts timing if you stop the
vehicle and turn the SmartKey to position 1in
the ignition lock. If you turn the SmartKey to
position 3and then press ato confirm
Start
,t iming is continued.
Resetting the current lap
XStop the RACE TIMER.
XPress the =or; button to select
Reset Lap.
XPress ato reset the lap time to "0".
Deleting all laps
If you switch off the engine, the RACE TIMER is
reset to "0" after 30 seconds. All lapsa re
deleted.
You cannot delete individual stored laps. If you
have stopped 16 laps, the current lap does not
have to be reset.
XRese tthe current lap.
XPress ato confirm Reset.
Reset Race-Timer?appears in the multi-
function display.
XPress the :button to select Yesand press
the a button to confirm.
All lapsa re deleted.
176Menus and submenus
On-board computer and displays
Page 238 of 298
Workinginthe engine compartment poses a
risk of injury.
Where possible, let the engine cool down and touch only the componentsd escribed in the
following.
GWARNING
The cooling system is pressurized, particularly
when the motor is warm. If you open the cap,
you could be scalded if hot coolant sprays out.
There is arisk of injury.
Let the engine cool down before you open the
cap. Wear gloves and eye protection. Slowly
open the cap to relieve pressure.
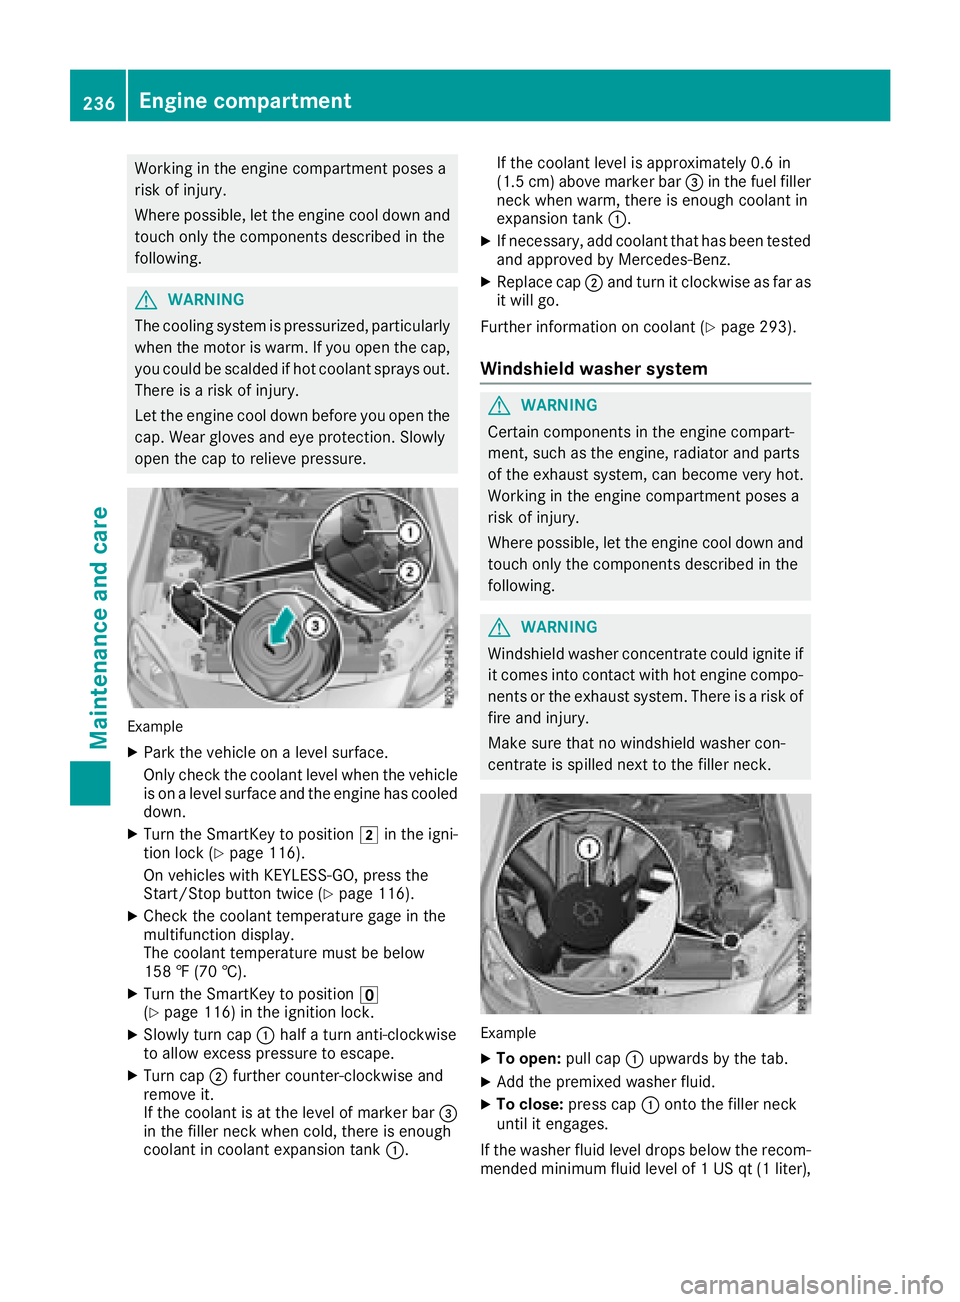
Example
XPark the vehicle on alevel surface.
Only check the coolant level when the vehicle
is on alevel surface and the engine has cooled
down.
XTurn the SmartKey to position 2in the igni-
tion lock (Ypage 116).
On vehicles with KEYLESS-GO, press the
Start/Stop button twice (
Ypage 116).
XCheck the coolant temperature gage in the
multifunction display.
The coolant temperature must be below
158 ‡(70 †).
XTurn the SmartKey to position u
(Ypage 116) in the ignition lock.
XSlowly turn cap :half aturn anti-clockwise
to allow excessp ressure to escape.
XTurn cap;further counter-clockwise and
remove it.
If the coolant is at the level of marker bar =
in the filler neck when cold, there is enough
coolant in coolant expansion tank :.If the coolant level is approximately 0.6 in
(1.5 cm
)above marker bar =in the fuel filler
neck when warm, there is enough coolant in
expansion tank :.
XIf necessary, add coolant that has been tested
and approved by Mercedes-Benz.
XReplace cap;and turn it clockwise as far as
it will go.
Further information on coolant (
Ypage 293).
Windshield washer system
GWARNING
Certain component sinthe engine compart-
ment,s uch as the engine, radiator and parts
of the exhaust system, can become very hot.
Workin ginthe engine compartment poses a
risk of injury.
Where possible, let the engine cool down and touch only the componentsd escribed in the
following.
GWARNING
Windshield washer concentrate could ignite if it comes into contact with hot engine compo-
nents or the exhaust system. There is arisk of
fire and injury.
Make sure that no windshield washer con-
centrate is spilled next to the filler neck.
Example
XTo open: pull cap:upwards by the tab.
XAdd the premixed washer fluid.
XTo close: press cap :ontothe filler neck
until it engages.
If the washer fluid level drops below the recom-
mended minimum fluid level of 1USqt(1l iter),
236Engine compartment
Maintenance and care
Page 248 of 298
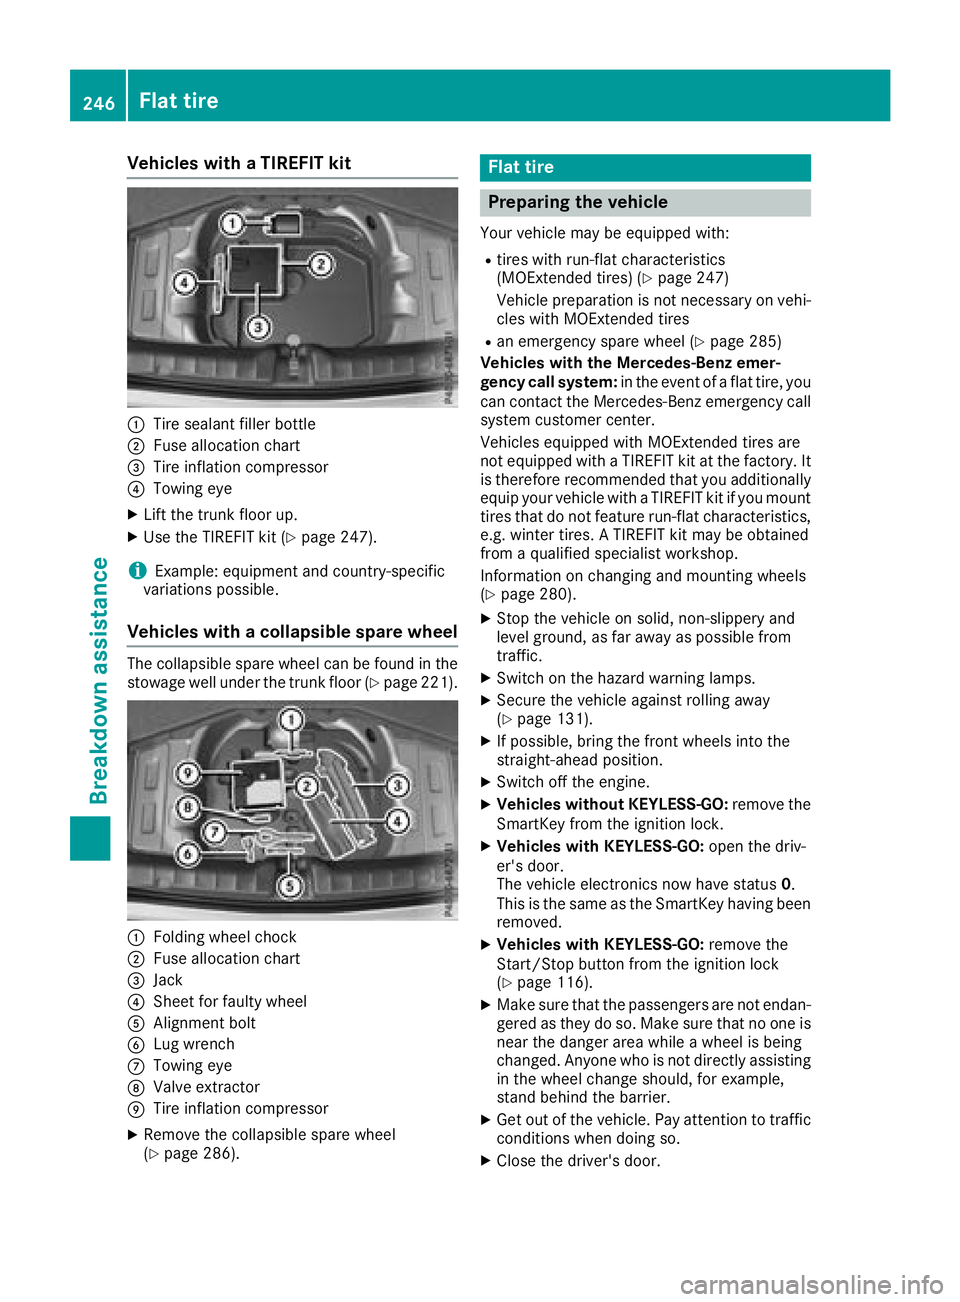
Vehicles withaTIREFI Tkit
:Tire sealant fille rbottle
;Fus ealloc ation chart
=Tire inflation compressor
?Towing eye
XLiftthe trunk floor up.
XUse the TIREFIT kit (Ypage 247).
iExample :equipment and country-specific
variations possible.
Vehicles with acolla psibl espare wheel
The collapsibl espare whee lcan be found in the
stowag ewellu nder the trunk floor (Ypage 221).
:Folding whee lchock
;Fus ealloc ation chart
=Jack
?Shee tfor faulty wheel
AAlignment bolt
BLugw rench
CTowing eye
DValve extractor
ETire inflation compressor
XRemove the collapsibl espare wheel
(Ypage 286).
Flat tire
Preparin gthe vehicle
Your vehicl emaybe equipped with:
Rtire sw ithr un-fla tcharacteristics
(MOExtended tires) (Ypage 247)
Vehicl epreparation is not necessary on vehi-
cle sw ithM OExtende dtires
Ran emergency spare whee l(Ypage 285)
Vehicles with the Mercedes-Benz emer-
genc ycalls ystem: in the event of aflatt ire ,you
can contact the Mercedes-Benz emergency call
system customerc enter.
Vehicles equipped with MOExtende dtiresa re
not equipped with aTIREFIT kit at the factory .It
is therefore recommende dthaty ouadditionally
equi pyourvehicl ewithaT IREFIT kit if yo umount
tire sthatd onot feature run-fla tcharacteristics,
e.g .winter tires. ATIREFIT kit maybeo btained
from aquali fied specialist workshop.
Informatio nonchanging and mounting wheels
(
Ypage 280).
XStop the vehicl eonsolid,non-slippery and
level ground ,asfar away as possibl efrom
traffic.
XSwitch on the hazard warning lamps.
XSecure the vehicl eagain st rolling away
(Ypage 131).
XIf possible, bring the front wheels into the
straight-ahea dposition.
XSwitch off the engine.
XVehicles withou tKEYLESS -GO:remove the
SmartKey from the ignition lock.
XVehicles with KEYLESS-GO: open the driv-
er' sd oor.
T he vehicl eelectronics now have status 0.
Thi sist he same as the SmartKey having been
removed.
XVehicles with KEYLESS-GO: remove the
Start/Stop button from the ignition lock
(
Ypage 116).
XMake sure thatt he passengersare not endan-
gered as they do so. Make sure thatnoo ne is
nea rthe danger are awhile awheel is being
changed .Anyone wh oisnot directlya ssisting
in the whee lchange should, for example,
stand behind the barrier.
XGe toutof the vehicle. Paya ttentiontotraffic
conditions when doing so.
XClose the driver'sd oor.
246Flat tire
Breakdo wn assis tance
Page 258 of 298
Towingand tow-starting
Important safety notes
GWARNING
When towing or tow-startin ganotherv ehicle
and its weight is greate rthant he permissible
gross weight of your vehicle, the:
Rthe towing ey ecould detach itself
Rthe vehicle/trailer combinatio ncould roll-
over.
There is ariskofana ccident.
When towing or tow-startin ganotherv ehicle,
its weight shoul dnot be greate rthant he per-
missibl egross weight of your vehicle.
Detail sonthe permissibl egross vehicl eweigh t
of your vehicl ecan be found on the vehicl eide n-
tification plate (
Ypage 289).
!When Activ eBrake Assist, Distance Pilot
DISTRONICort he HOLD functio nisa ctivated,
the vehicl ebrakes automaticall yincertain
situations.
To avoi ddamag etothe vehicle, deactivate
these system sinthe following or similar sit-
uations:
Rwhen towing the vehicle
Rin the car wash
!Onlys ecurethe tow rop eortow ba ratthe
towing eyes. Otherwise, the vehicl ecould be
damaged.
!Do not us ethe towing ey efor recovery, this
could damage the vehicle. If in doubt, recover
the vehicl ewithac rane.
!When towing ,pulla wa yslowly and
smoothly. If the tractiv epower is too high, the
vehicles could be damaged.
!Do not tow with sling-typ eequipment .This
could damage the vehicle.
!When towing away vehicles with KEYLESS-
GO ,use the key instea dofthe Start/Stop
button. The automatic transmission mayo th-
erwis eshift to position jwhen yo uopent he
driver's or front-passenge rdoor, which could
damage the transmission.
!Make sure thatt he electricparkin gb rake is
released .Ifthe electri cparkin gbrake is faulty,
visit aquali fied specialis tworkshop.
!The vehicl ecan be towed amaximum of
30 miles (50km). The towing spee dof30mph
(50 km/h )mustn ot be exceeded.
If the vehicl ehasto be towed mor ethan
30 miles (50km), the entire vehicl emustb e
raised and transported.
!If yo utow or tow-start anotherv ehicle, its
weight must not exceed the maximum per-
missibl egross vehicl eweigh tofy ourvehicle.
It is better to have the vehicl etransporte dthan
to have it towed away.
The automatic transmission must be in position
i when the vehicl eisbeing towed away.
The battery must be connected and charged.
Otherwise, you:
Rcanno tturnt he SmartKeytop osition 2in
the ignition lock.
Rcanno tshift the automatic transmission to
position i.
Deactivate the automatic locking featur ebef
o
re
the vehicl eistowed (Ypage 173).Y oucould
otherwis ebelocked ou twhenp ushing or towing
the vehicle.
Installing/removin gthe towin geye
Installing the towin geye
GWARNING
The exhaust tai lpipem aybe ver yhot. There is
ar iskofb urns when removing the rea rcover.
Do not touch the exhaust pipe .Tak ep articular
car ew henr emoving the rea rcover.
256Towin gand tow-starting
Breakdow nassistance
Page 259 of 298
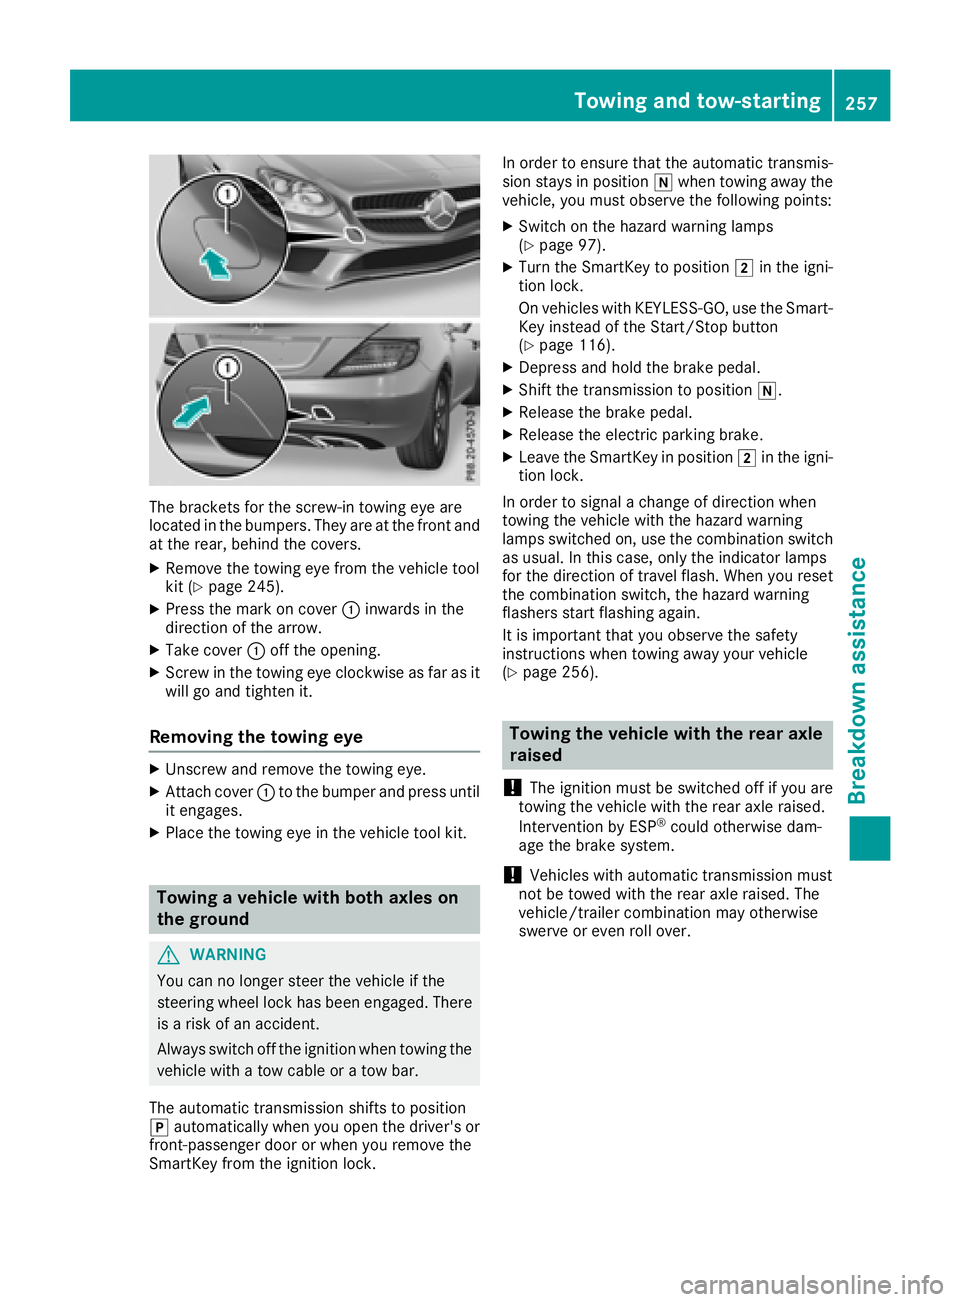
The bracketsfor the screw-in towing eye are
located in the bumpers. They are at the front and
at the rear, behind the covers.
XRemove the towing eye from the vehicle tool
kit (Ypage 245).
XPress the mark on cover :inwards in the
direction of the arrow.
XTake cover :off the opening.
XScrew in the towing eye clockwise as far as it
will go and tighten it.
Removing the towing eye
XUnscrew and remove the towing eye.
XAttach cover :to the bumper and press until
it engages.
XPlace the towing eye in the vehicle tool kit.
Towing avehicle with both axles on
the ground
GWARNING
You can no longer steer the vehicle if the
steerin gwheel lock has been engaged. There
is ar isk of an accident.
Always switch off the ignition when towing the
vehicle with atow cable or atow bar.
The automatic transmission shifts to position
j automatically when you open the driver's or
front-passenger door or when you remove the
SmartKey from the ignition lock. In order to ensure that the automatic transmis-
sion stays in position
iwhen towing away the
vehicle, you must observe the following points:
XSwitch on the hazard warning lamps
(Ypage 97).
XTurn the SmartKey to position 2in the igni-
tion lock.
On vehicles with KEYLESS-GO, use the Smart-
Key instead of the Start/Stop button
(
Ypage 116).
XDepress and hold the brake pedal.
XShift the transmission to position i.
XRelease the brake pedal.
XRelease the electric parking brake.
XLeave the SmartKey in position2in the igni-
tion lock.
In order to signal achange of direction when
towing the vehicle with the hazard warning
lamps switched on, use the combination switch
as usual. In this case, only the indicator lamps
for the direction of travel flash. When you reset
the combination switch, the hazard warning
flashers start flashing again.
It is important that you observe the safety
instructions when towing away your vehicle
(
Ypage 256).
Towing the vehicle with the rear axle
raised
!
The ignition must be switched off if you are
towing the vehicle with the rear axle raised.
Intervention by ESP
®could otherwise dam-
age the brake system.
!Vehicles with automatic transmission must
not be towed with the rear axle raised. The
vehicle/trailer combination may otherwise
swerve or even roll over.
Towing and tow-starting257
Breakdown assistance
Z
Page 283 of 298
An arrow on the sidewall of the tire indicates its
correct direction of rotation.
Storingwheels
Store wheels thata renot being used in acool,
dry and preferably dark place .Protect the tires
from oil, grease, gasoline and diesel.
Mounting awheel
Preparin gthe vehicle
XStop the vehicl eonsolid,non-slippery and
level ground.
XApply the electri cparking brake manually.
XBring the front wheels into the straight-ahead
position.
XShift the transmission to position j.
XSwitch off the engine.
XVehicles withoutKEYLESS -GO:remove the
SmartKeyf rom the ignition lock.
XVehicles with KEYLESS-GO: open the driv-
er' sd oor.
The vehicl eelectronics now have status 0.
Thi sist he same as the SmartKeyh aving been
removed.
XVehicles with KEYLESS-GO: remove the
Start/Stop button from the ignition lock
(
Ypage 116).
XIf included in the vehicl eequipment ,remove
the tire-change tool kit from the vehicle.
XSafeguar dthe vehicl eagain st rolling away.
iDue to difference sinvehicleequipment ,not
al lv ehicles ar eequippe dwithat ire-change
tool kit. For informatio nonwhich tool sare
required to performaw heelchange on your
vehicle, consult an authorize dMercedes-
Benz Center.
Necessary tire-changing tool scan include, for
example:
RJack
RWheel chock
RLugw rench
Securin gthe vehicle to preven titfrom
rolling away
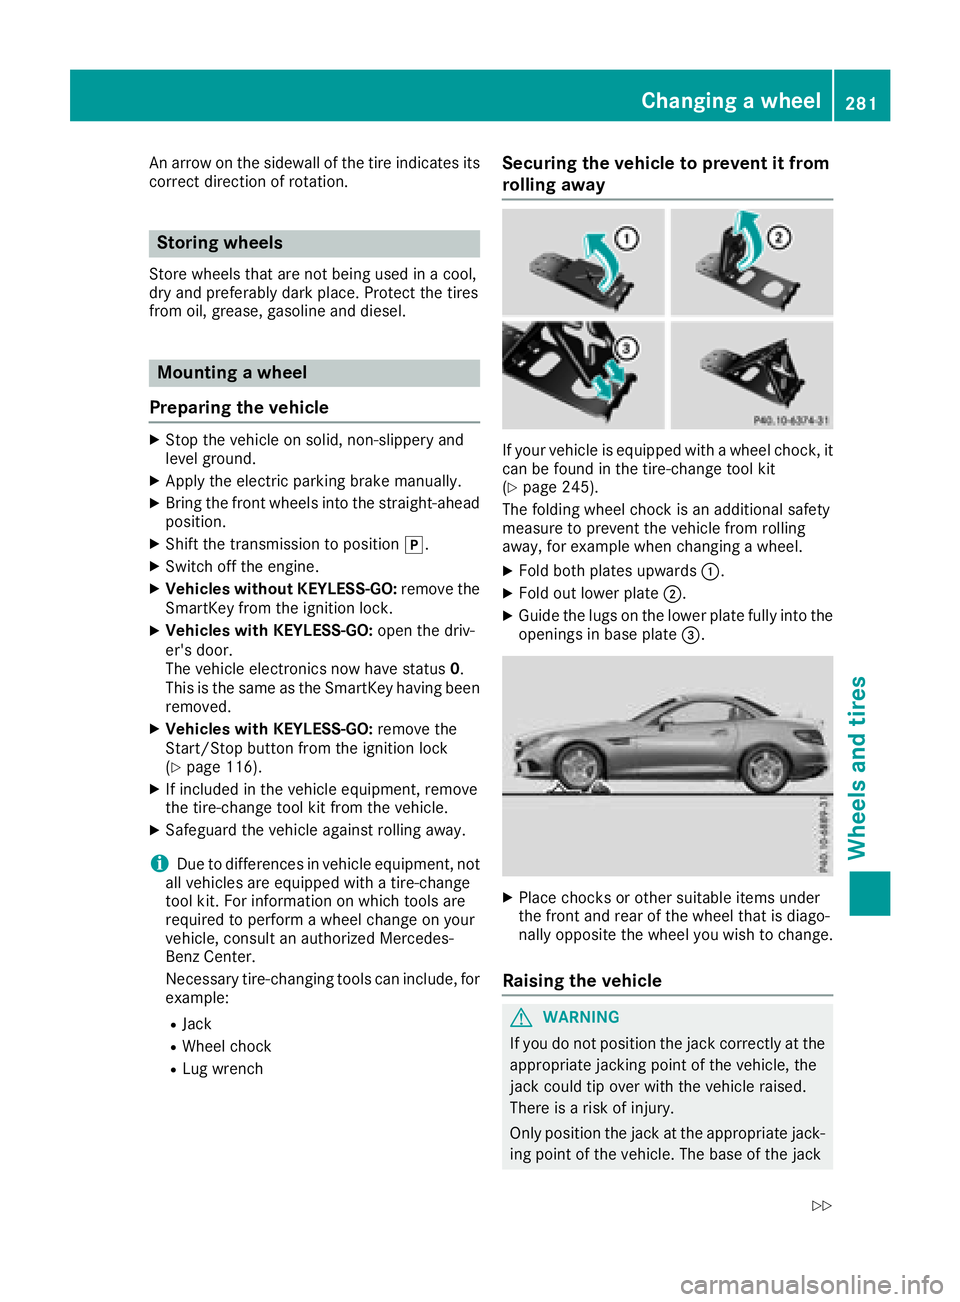
If your vehicl eisequippe dwithaw heelchock, it
can be found in the tire-change tool kit
(
Ypage 245).
The folding whee lchoc kisana dditional safety
measure to prevent the vehicl efrom rolling
away ,for exampl ewhenc hanging awheel .
XFoldb othp late su pwar ds:.
XFoldo utlowe rplate ;.
XGuid ethe lugs on the lowe rplate full yinto the
openings in base plate =.
XPlace chocks or others uitabl eitems under
the front and rea rofthe whee lthati sdiago -
nally opposite the whee lyou wish to change.
Raisin gthe vehicle
GWARNING
If yo udon ot positio nthe jack correctl yatthe
appropriate jacking point of the vehicle, the
jack could tip overw itht he vehicl eraised.
There is ariskofi njury.
Onlyp ositiont he jack at the appropriate jack-
ing point of the vehicle. The base of the jack
Changin gawheel281
Wheel sand tires
Z