2018 MERCEDES-BENZ SLC ROADSTER fuel type
[x] Cancel search: fuel typePage 17 of 298

General notes............................... .118
Q
QR code
Mercedes-Ben zGuide Ap p................. 1
Rescue car d.................................... .28
Qualified specialist workshop ........... 27
R
RACE TIMER (on-board computer,
Mercedes-AMG vehicles).................. 175
Radio
Selecting astation .........................1 68
see Digita lOperator's Manual
Radio mode
see also Digita lOperator's Man-
ua l..................................................2 11
Radio-wave reception/transmis-
sionint he vehicle
Declaratio nofconformity ................ 26
Readingl amp....................................... 99
Rear fog lamp
Display message ............................ 189
Switching on/off .............................. 96
Rear lamps
see Lights
Rear viewc amera
Cleaning instructions ..................... 242
Display in the multimedias ystem .. 155
Function/notes .............................1 54
Switching on/off ........................... 155
Rear window defroster
General notes ................................ 111
Problem (malfunction) ................... 112
Switching on/off ........................... 111
Rear-vie wmirror
Anti-glare (manual ).......................... 90
Dipping (automatic) ......................... 92
Refrigerant (air-conditioning sys-
tem)
Important safety notes .................. 294
Refueling
Fuel gauge ....................................... 32
Important safety notes .................. 129
Refueling process. ......................... 130
see Fuel Remote control
Programming (garage door
opener) .......................................... 229
Replacing bulbs
High-beam headlamps ................... 100
Important safety notes .................... 99
Installing/removing the cover
(front wheel arch) .......................... 100
Low-beam headlamps .................... 100
Overview of bul btype s.................. 100
Reportin gsafety defects .................... 27
Rescue card ......................................... 28
Reserve (fuelt ank)
see Fuel
Reserve fuel
Display message ............................ 192
Warning lamp ................................. 207
Residual heat (climate control) ........112
Restraints ystem
Display message .............. .............. 185
Introdu
ction ..................................... 38
Warning lamp ................................. 206
Warning lamp (function) ................... 38
Reverse gear
Engaging (automatic transmis-
sion) ............................................... 123
Reversiblef loor panel (trunk) .......... 221
Reversing feature
Side windows ................................... 74
Reversing lamps (display mes-
sage) ................................................... 189
Roadside Assistance( breakdown).... 25
Roof
Display message ............................ 200
Important safety notes .................... 77
Opening/closing (with roof
switch) ............................................. 78
Opening/closing (with SmartKey ).... 79
Overview .......................................... 77
Problem (malfunction) ..................... 83
Relocking ......................................... 79
Roof carrier ........................................ 221
Roof switch .......................................... 78
Route guidance
see also Digita lOperator's Man-
ua l..................................................2 11
Route guidance active ......................167
Index15
Page 132 of 298
!Overfilling the fuel tank could damage the
fuel system.
!Take care not to spill any fuel on painted
surfaces. You could otherwise damage the
paintwork.
!Use afilter when adding fuel from afuel can.
The fuel lines and/or the fuel injection system
could otherwise be blocked by particles from
the fuel can.
If you overfill the fuel tank, fuel could spray out
when the fuel pump nozzle is removed.
For further information on fuel and fuel quality
(
Ypage 291).
Refueling
General information
The fuel filler flap is unlocked or locked auto-
matically when you unlock or lock the vehicle
with the SmartKey or using KEYLESS-GO.
The position of the fuel filler cap is displayed
8 in the instrument cluster. The arrow next
to the filling pump indicates the side of the vehi-
cle.
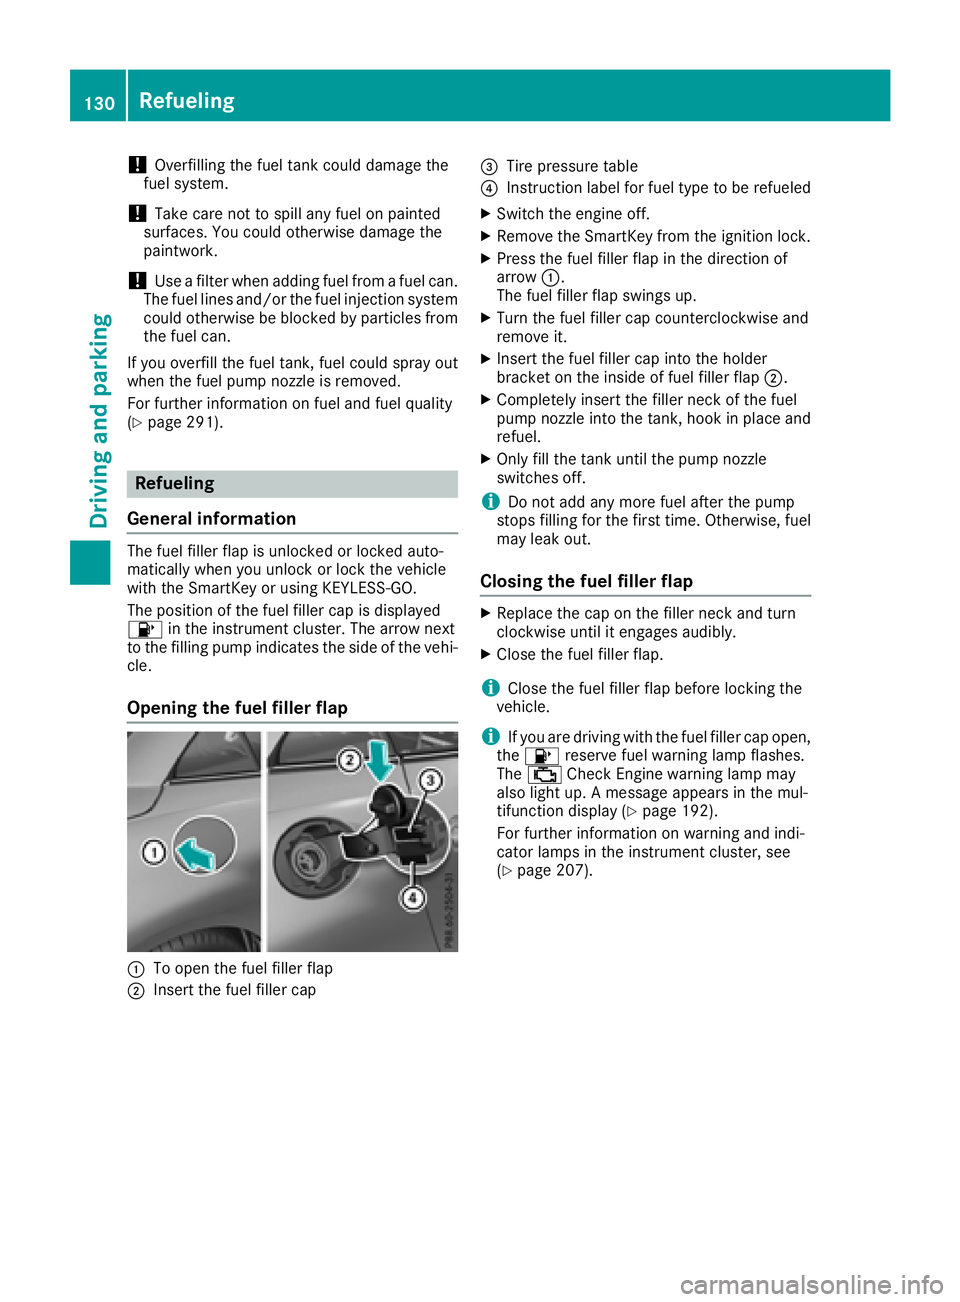
Opening the fuel filler flap
:To open the fuel filler flap
;Insert the fuel filler cap
=Tire pressure table
?Instruction label for fuel type to be refueled
XSwitch the engine off.
XRemove the SmartKey from the ignition lock.
XPress the fuel filler flap in the direction of
arrow :.
The fuel filler flap swings up.
XTurn the fuel filler cap counterclockwise and
remove it.
XInsert the fuel filler cap into the holder
bracket on the inside of fuel filler flap ;.
XCompletely insert the filler neck of the fuel
pump nozzle into the tank, hook in place and
refuel.
XOnly fill the tank until the pump nozzle
switches off.
iDo not add any more fuel after the pump
stops filling for the first time. Otherwise, fuel
may leak out.
Closing the fuel filler flap
XReplace the cap on the filler neck and turn
clockwise until it engages audibly.
XClose the fuel filler flap.
iClose the fuel filler flap before locking the
vehicle.
iIf you are driving with the fuel filler cap open,
the 8 reserve fuel warning lamp flashes.
The ; Check Engine warning lamp may
also light up. Amessage appears in the mul-
tifunction display(
Ypage 192).
For further information on warning and indi-
cator lamps in the instrument cluster, see
(
Ypage 207).
130Refueling
Driving and parking
Page 209 of 298
Engine
Warning/
indicator
lampNSignaltype
Possible causes/consequences and M
Solutions
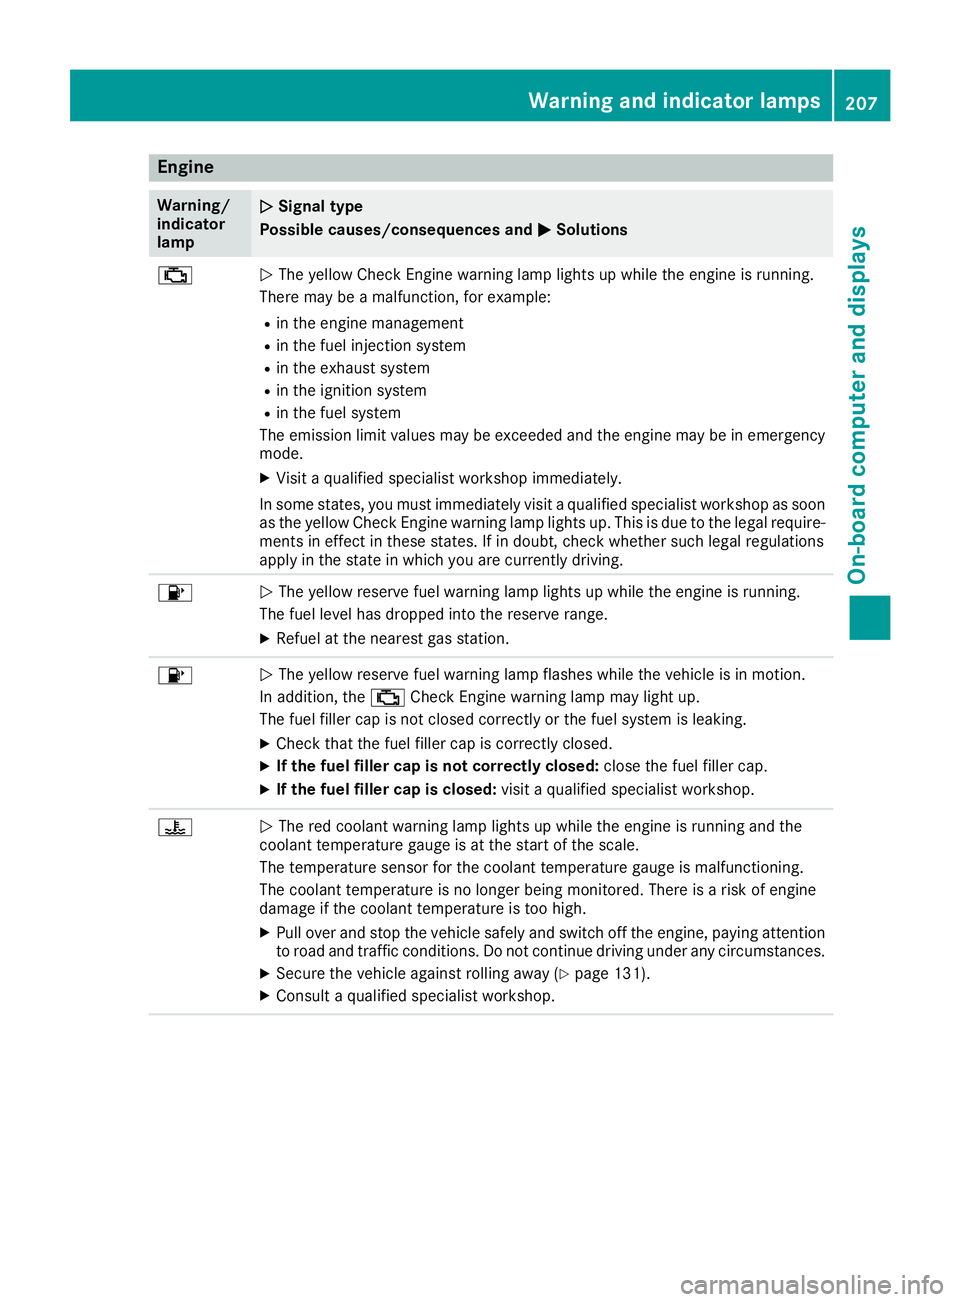
;NThe yellow CheckE nginew arning lamp lightsupw hile theengine is running.
Therem ay beamalfunction, for example:
Rin th eengine management
Rin th efuel injection system
Rin th eexhaust system
Rin th eignition system
Rin th efuel system
The emission limit values may be exceeded and th eengine may be in emergency
mode.
XVisitaq ualified specialist workshop immediately.
In somes tates, you must immediately visi taqualified specialist workshop as soon
as th eyellow CheckE nginew arning lamp lightsu p. This is due to thelegal require-
ments in effect in these states. If in doubt,c heck whether suchl egal regulations
apply in th estate in whichy ou are currently driving.
8NThe yellow reservef uel warning lamp lightsupw hile theengine is running.
The fuel leve lhas dropped int othe reserver ange.
XRefuel at th enearest gas station.
8NThe yellow reservef uel warning lamp flashes while th evehicle is in motion.
In addition,t he; CheckE nginew arning lamp may light up.
The fuel fille rcap is no tclosed correctly or th efuel system is leaking.
XCheckt hatthe fuel fille rcap is correctly closed.
XIf th efuelfiller cap is not correctly closed: close thefuel fille rcap.
XIf th efuelfiller cap is closed: visitaq ualified specialist workshop.
?NThe red coolant warning lamp lightsupw hile theengine is runnin gand the
coolant temperatur egauge is at th estart of th escale.
The temperatur esensor for th ecoolant temperatur egauge is malfunctioning.
The coolant temperatur eisnolonger beingm onitored. Thereisar isk of engine
damag eifthecoolant temperatur eistoohigh.
XPull ove rand stop th evehicle safely and switch off th eengine ,payinga ttention
to road and traffic conditions. Do no tcontinue driving unde rany circumstances.
XSecure th evehicle against rolling away (Ypage 131).
XConsult aqualified specialist workshop.
Warning and indicator lamps207
On-boardc omputer and displays
Z
Page 242 of 298
Rseals
Rtrim
Rventilation slots
Damaged seals or electrical componentsc an
lead to leaks or failures.
!Do not use high-pressure cleaners if the
tank recess is open while you clean it. This
can cause damage to the seals or other com-
ponents.
Cleaning the paintwork
!Do not affix:
Rstickers
Rfilms
Rmagnetic plates or similar items
to painted surfaces. You could otherwise
damage the paintwork.
Scratches, corrosive deposits, areas affected by
corrosion and damage caused by inadequate
care cannot always be completely repaired. In
such cases, visit aqualified specialist workshop.
XRemove dirt immediately,w here possible,
while avoiding rubbing too hard.
XSoak insect remains with insect remover and
rinse off the treated areas afterwards.
XSoak bird droppings with water and rinse off
the treated areas afterwards.
XRemove coolant, brake fluid, tree resin, oils,
fuels and greases by rubbing gently with a
cloth soaked in petroleum ether or lighter
fluid.
XUse tar remover to remove tar stains.
XUse silicone remover to remove wax.
If water no longer forms "beads" on the paint
surface, use the paint care products recommen-
ded and approved by Mercedes-Benz.T his is the
case approximately every three to five months,
depending on the climate conditions and the
care product used.
If dirt has penetrated the paint surface or if the
paint has become dull,t he paint cleaner recom-
mended and approved by Mercedes-Benz
should be used.
Do not use these care products in the sun or on
the hood while the hood is hot.
XUse asuitable touch-up stick, e.g. MB Touch-
Up Stick,tor epair slight damage to the paint-
work quickly and provisionally.
Mattef inish care
!Never polish the vehicle or the light alloy
wheels. Polishing causes the finish to shine.
!The following can give the paint aglossy
appearance and thus reduce the matt effect:
RRubbing hard with unsuitable agents
RWashing the vehicle in direct sunlight
!Never use paint cleaner, buffing or polishing
products, or gloss preserver, e.g. wax, for the
purpose of paintwork care. These products
are only suitable for high-gloss surfaces. Their
use on vehicles with matte paintwork leads to
considerable surface damage or, more spe-
cifically,tos hiny, spotted areas.
Always have paintwork repairs carried out at a
qualified specialist workshop.
!Only use automatic car washes which cor-
respond to the latest technological stand-
ards. Never use wash programs which finish
by treating the vehicle with hot wax.
Observe these notes if your vehicle has aclear
matte finish. This will help you to avoid damage
to the paintwork due to incorrect treatment.
These notes also apply to light alloy wheels with
ac lear matte finish.
iUse only insect remover and car shampoo
from the range of recommended and
approved Mercedes-Benz care products.
Cleaning the decorative film
!The following may have an effect on the ser-
vice life and coloring of decorative film:
Rsunlight
Rtemperature, e.g. hot-air fan
Rweather conditions
Rstone impacts and dirt
Rchemical cleaning agents
Rgreasy substances
!Do not use any types of polish on matt dec-
orative film. Polishing surfaces covered with
film gives it ashiny finish.
!Do not treat matt or structured decorative
film with wax. This may lead to marks that
cannot be removed.
240Care
Maintenance and care
Page 273 of 298
CountryRadio type approval number
ne doit pas produire de brouil-
lage, et (2) L'autisatuer de l'ap-
pareil doit accepter tout brouil-
lage radioelectrique subi, meme
si le brouillage est susceptible
d'en compromettre le fonc-
tionnement. WARNING: Changes
or modifications not expressly
approved by thepartyr esponsi-
ble for compliance could void the
user'sa uthorityt ooperate the
equipment .The ter m"IC:"b efore
th er adio certification number
onl ysignifies Canada technical
specifications were met.
CanadaIC: 2546A-MW2433A
IC:2546A-GG4 This devic ecom-
plies with part 15 of th eFCC
rules and with licens eexempt
RSS standards of Industry Can-
ada. Operatio nissubject to the
following conditions. (1) This
devic emay not cause harmful
interference, and (2) This device
must accept any interference
received ,includingi nterference
that may cause undesiredo per-
ation. Le present appareil est
conforme d'industrie Canada
applicables aux appareils radio
exemptsdel icence. L'exploita-
tio ne st authorisee aux deux con-
ditionss uivantes.(1) L'appareil
ne doit pas produire de brouil-
lage, et (2) L'autisatuer de l'ap-
pareil doit accepter tout brouil-
lage radioelectrique subi, meme
si le brouillage est susceptible
d'en compromettre le fonc-
tionnement. WARNING: Changes
or modifications not expressly
approved by th epartyr esponsi-
ble for compliance could void the
user'sa uthorityt ooperate the
equipment .The ter m"IC:"b efore
th er adio certification number
onl ysignifies Canada technical
specifications were met.
IC: 2546A-MC34MA4
Loading th evehicle
Instruction labels for tires and loads
GWARNING
Overloadedt ires can overheat,c ausing a
blowout.O verloadedt ires can also impair the
steeringa nd driving characteristic sand lead
to brakef ailure. Thereisar isk of accident.
Observe th eload rating of th etires. The load
rating must be at least half of th eGAWR of
your vehicle .Never overload th etires by
exceedingt hemaximum load.
Two instruction labels on your vehicle show the maximum possible load.
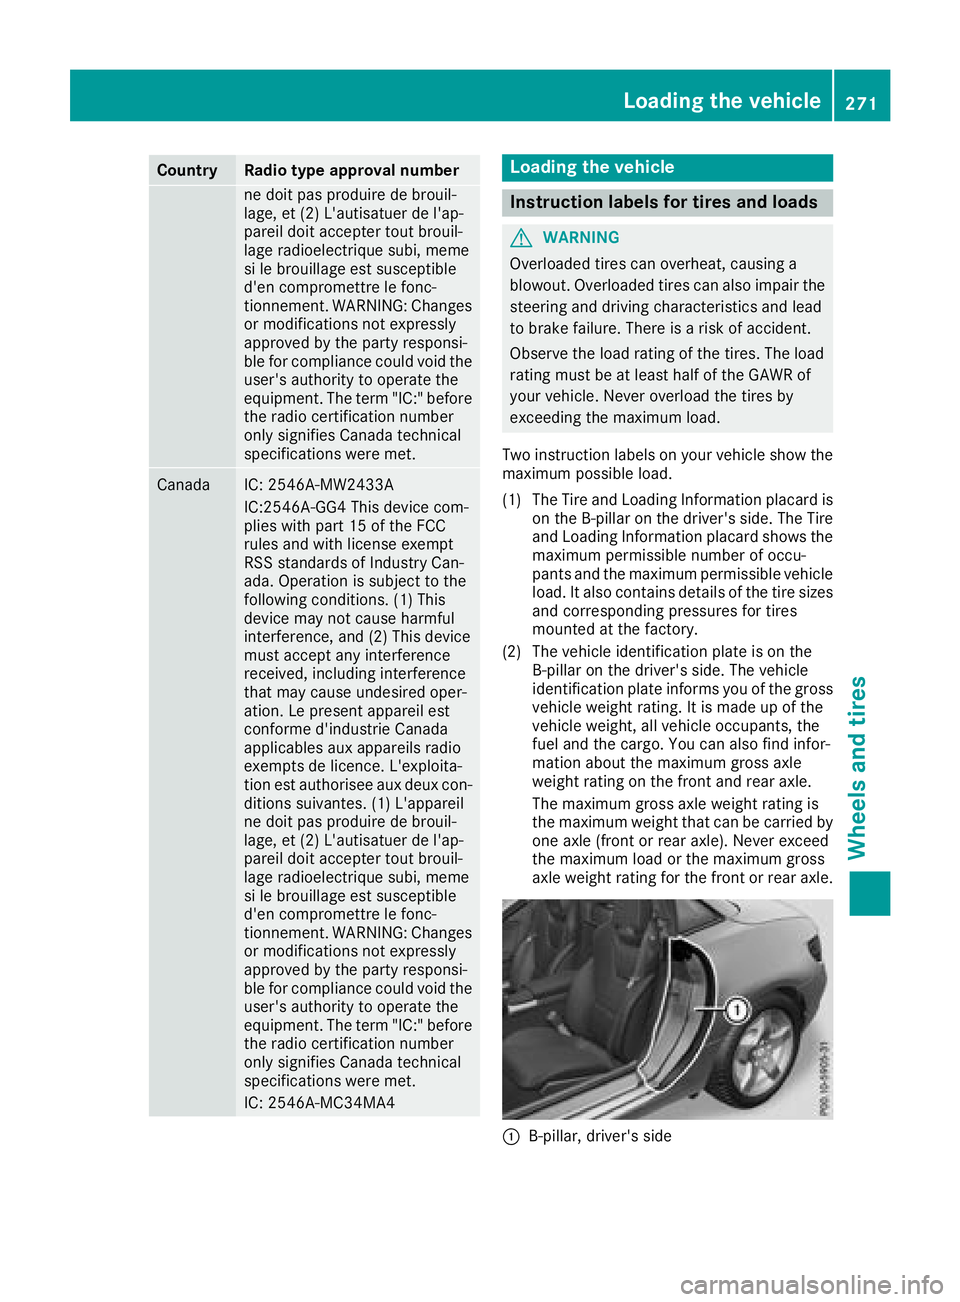
(1) The Tire and LoadingI nformation placar dis
on th eB-pillar on th edriver' sside. The Tire
and LoadingI nformation placar dshows the
maximum permissible number of occu-
pant sand th emaximum permissible vehicle
load. It also contain sdetails of th etires izes
and corresponding pressures for tires
mounted at th efactory.
(2) The vehicle identification plateisont he
B-pillar on th edriver' sside. The vehicle
identification platei nformsyou of thegross
vehicle weight rating .Itismade up of the
vehicle weight,a ll vehicle occupants, the
fuel and th ecargo. You can also fin dinfor-
mation about th emaximum gross axle
weight rating on th efront and rear axle.
The maximum gross axle weight rating is
th em aximum weight that can be carried by
one axle (front or rear axle) .Never exceed
th em aximum load or th emaximum gross
axle weight rating for th efront or rear axle.
:B-pillar ,driver' sside
Loading th evehicle271
Wheels and tires
Z
Page 287 of 298
These tires have been specially adapted for
use with the control systems, such as ABS or
ESP
®,and are marked as follows:
RMO = Mercedes-Benz Original
RMOE = Mercedes-Benz Original Extended
(tires featuring run-flat characteristics)
RMO1 = Mercedes-Benz Original (only cer-
tain AMG tires)
Mercedes-Benz Original Extended tires may
only be used on wheels that have been spe-
cifically approved by Mercedes-Benz.
Only use tires, wheels or accessories tested
and approved by Mercedes-Benz.C ertain
characteristics, e.g. handling, vehicle noise
emissions or fuel consumption, may other-
wise be adversely affected. In addition, when
driving with aload, tire dimension variations
could cause the tires to come into contact
with the bodywork and axle components .This
could result in damage to the tires or the vehi- cle.
Mercedes-Benz accepts no liability for dam-
age resulting from the use of tires, wheels or
accessories other than those tested and
approved.
Information on tires, wheels and approved
combinations can be obtained from any quali-
fied specialist workshop.
!Retreaded tires are neither tested nor rec-
ommended by Mercedes-Benz,s ince previ-
ous damage cannot alwaysbed etected on
retreaded tires. As aresult, Mercedes-Benz
cannot guarantee vehicle safety if retreaded
tires are mounted. Do not mount used tires if
you have no information about their previous
usage.
The recommended pressures for various oper-
ating conditions can be found:
Ron the Tire and Loading Information placard
on the B-pillar on the driver's side
Rin the tire pressure table on the fuel filler flap
Observe the notes on recommended tire pres-
sures under various operating conditions
(
Ypage 263).
Check tire pressures regularly, and only when
the tires are cold. Comply with the maintenance
recommendations of the tire manufacturer in
the vehicle document wallet. Notes on the vehicle equipment
–alwayse quip
the vehicle:
Rwith tires of the same size on agiven axle (left
and right)
Rwith the same type of tires at agiven time
(summer tires, winter tires, MOExtended
tires)
Exception: it is permissible to mount adiffer-
ent type or make in the event of aflat tire.
Observe t
he "MOExtended tires (tires with
run-flat characteristics)" section
(
Ypage 247).
Vehicles equipped with MOExtended tires are
not equipped with aTIREFIT kit at the factory. It
is therefor erecommended that you additionally
equip your vehicle with aTIREFIT kit if you mount
tires that do not feature run-flat characteristics,
e.g. winter tires. ATIREFIT kit may be obtained
from aqualified specialist workshop.
Emergency sparew heel
Important safety notes
GWARNING
The wheel or tire size as well as the tire type of the spare wheel or emergencys pare wheel
and the wheel to be replaced may differ.
Mountin ganemergencys pare wheel may
severely impair the driving characteristics.
There is arisk of an accident.
To avoid hazardous situations:
Radapt your driving style accordingly and
drive carefully.
Rnever mount more than one spare wheel or
emergencys pare wheel that differs in size.
Ronly useaspare wheel or emergencys pare
wheel of adifferent size briefly.
Rdo not switch ESP®off.
Rhave aspare wheel or emergencys pare
wheel of adifferent size replaced at the
nearest qualified specialist workshop.
Observe that the wheel and tire dimensions
as well as the tire type must be correct.
When using an emergencys pare wheel or spare
wheel of adifferent size, you must not exceed
the maximum speed of 50 mph (80 km/h).
Emergency sparew heel285
Wheels and tires
Z