2018 MERCEDES-BENZ SLC ROADSTER fuel cap
[x] Cancel search: fuel capPage 11 of 298
Driving on wetroads ...................... 138
Exhaus tcheck ............................... 134
Fuel ................................................ 134
Genera l.......................................... 134
Hydroplaning ................................. 138
Icy roa dsurfaces ........................... 138
Limited braking efficiency on sal-
ted roads ....................................... 137
Snow chains .................................. 262
Subjecting brakes to aloa d. .......... 136
We troa ds urface ........................... 136
DVD video
Operating (on-boar dcomputer) ..... 169
seea lsoD igita lOperator'sM an-
ua l.................................................. 211
DYNAMIC SELECT button .................. 121
E
EASY-ENTRY feature
Activating/deactivating ................. 174
Function/note s................................ 89
EASY-EXIT feature
Crash-responsiv e............................. 90
Function/note s................................ 89
Switching on/off. .......................... 174
EBD (electronicb rake forcedistri-
bution)
Displa ymessage ............................ 181
Function/note s................................ 63
EC Od isplay
Function/note s............................. 135
On-board compute r....................... 166
EC Os tart/stopf unction
Automati cengine start .................. 119
Automati cengine switch-off .......... 119
Deactivating/activating ................. 120
Genera linformation ....................... 119
Important safety notes .................. 119
Introduction ................................... 118
Electronic Stability Program
see ESP
®(Electronic Stability Program)
Emergency
Automati cmeasures afte ranacci-
dent ................................................. 53
Emergencyr elease
Driver's doo r.................................... 72
Trunk ............................................... 74 Vehicl
e............................................. 72
Emergencys pare wheel
Genera lnotes ................................ 286
Important safety notes .................. 285
Removing ....................................... 286
Storage location ............................ 286
Stowing .......................................... 286
Technical data ............................... 286
EmergencyT ensioningDevices
Activation ......................................... 50
Emission scontrol
Service and warranty information .... 24
Engine
Check Engine warning lamp ........... 207
Displa ymessage ............................ 190
ECO start/stop function ................ 118
Engine number ............................... 290
Irregula rrunning ............................ 120
Jump-starting ................................. 253
Starting problems .......................... 120
Starting the engine with the
SmartKey ....................................... 118
Starting with KEYLESS-GO ............. 118
Switching off .................................. 131
Tow-starting (vehicle )..................... 258
Engine electronics
Notes. ............................................ 288
Problem (malfunction) ................... 120
Engine oil
Adding ........................................... 235
Ad
ditives ........................................ 293
Checking the oill evel ..................... 234
Checking the oill evel using the
dipstick .......................................... 234
Displa ymessage ............................ 191
Filling capacity ............................... 293
Generaln otes ................................ 292
Notesa boutoilgrade s................... 292
Notesono illevel/consumption .... 234
Temperature (on-board computer,
Mercedes-AMGS LC 43) ................ 175
Entering an address
see also Digital Operator's Man-
ual.................................................. 211
ESP
®(ElectronicS tability Pro-
gram)
AMG menu (on-board computer) ... 175
Characteristics ................................. 61
Index9
Page 12 of 298
Deactivating/activating (except
SLC 43 AMG)................................... 61
Deactivating/activating
(Mercedes-AMG SLC 43) ................. 62
Display message ............................ 179
Function/note s................................ 60
Generaln otes .................................. 60
Important safety information ........... 60
Warning lamp ................................. 205
ETS/4ETS (ElectronicT raction Sys-
tem) ...................................................... 60
Exhaustc heck................................... 134
Exhaustp ipe (cleaning instruc-
tions) .................................................. 243
Exterior lighting
Setting options ................................ 95
see Lights
Exterior mirrors
Adjusting ......................................... 91
Dipping (automatic) ......................... 92
Folding in when locking (on-board
computer) ...................................... 174
Folding in/out (automatically )......... 91
Folding in/out (electrically) ............. 91
Outofp osition (troubleshooting )..... 92
Storing settings (memory func-
tion) ................................................. 93
Storing the parking position ............. 92
Eyeglassesc ompartment ................. 220
F
Favorites
Overview ........................................ 213
Filler cap
see Refueling
Fillin gcapacitie s(Technical data) ... 290
First-aidk it......................................... 244
Flat tire
MOExtended tire s.......................... 247
Preparing the vehicl e..................... 246
TIREFIT kit ...................................... 247
see Emergency spare wheel
Floormats ........................................... 232
Frequencies
Mobil ephone ................................. 288
Two-way radio ................................ 288 Fuel
Additives ........................................ 292
Consumption statistics .................. 166
Displaying the current consump-
tion ................................................ 166
Displaying the rang e...................... 166
Driving tip s.................................... 134
Fue lgauge ....................................... 32
Grade (gasoline )............................ 291
Important safety notes .................. 291
Problem (malfunction) ................... 131
Refueling ........................................ 129
Tank content/reserve fue l............. 291
Fue lfille rflap
Opening ......................................... 130
Fue llevel
Calling up the rang e(on-board
computer) ...................................... 166
Fue ltank
Capacity ........................................ 291
Problem (malfunction) ................... 131
Fus eallocatio nchart (vehicl etool
kit) ...................................................... 245
Fuses
Allocation chart ............................. 258
Before changing ............................. 258
Fusebox in the engine compart-
ment .............................................. 259
Fus ebox in the trunk ..................... 259
Important safety notes .................. 258G
Garaged ooro pener
Clearing the memory ..................... 231
Generaln otes ................................ 228
Important safety notes .................. 228
Opening/closing the garag edoor..2 30
Problems whe nprogramming ........2 30
Programming (button in the rear-
view mirror) ................................... 229
Synchronizing the rolling code ....... 229
Gear indicator (on-board com-
puter, Mercedes-AMG SLC 43) ......... 175
Genuine parts ...................................... 23
Glove box ...........................................2 19
10Index
Page 19 of 298
SmartKeyChanging the battery ....................... 68
Changing the programming .............6 6
Checkin gthe battery ...................... .68
Display message ............................ 201
Doorc entral locking/unlocking ....... 65
Important safety note s.................... 65
Loss. ................................................ 69
Mechanical key ................................ 67
Opening/closing the roof. ............... 79
Overview .......................................... 65
Positions (ignition lock) ................. 116
Problem (malfunction) ..................... 69
Starting the engine ........................ 118
SMS
see also Digital Operator's Man-
ual.................................................. 211
Snowc hains...................................... 262
Sockets
Center console .............................. 223
Generaln otes ................................ 223
Sound
Switching on/off. .......................... 212
Special seat belt retractor .................. 54
Specialist workshop ............................ 27
Speed, controlling
see Cruise control
Speedometer
Digital ............................................ 167
In the Instrument cluster ................. 32
Segments ...................................... 163
Selecting the display uni t............... 172
Sport handlin gmode
Activating/deactivating
(Mercedes-AMGS LC 43) ................. 62
Warning lamp ................................. 206
Standin glamps
Displa ymessage ............................ 189
Switching on/off. ............................. 96
Start/stopf unction
see ECO start/stop function
Startin g(engine )................................ 117
Steering
Displa ymessage ............................ 200
Steering wheel
Adjusting (electrically) ..................... 89
Adjusting (manually) ........................ 88
Butto noverview ............................... 33 Buttons (on-board computer) ......... 164
Important safety notes .................... 88
Storing settings (memory func-
tion) ................................................. 93
Steering whee lpaddle shifters ........ 126
Stopwatch (RACETIMER) ................... 175
Stowag eareas ................................... 219
Stowag ecom partments
Armrest (under )............................. 219
Cente
r console .............................. 220
Cu ph olders ................................... 221
Door ............................................... 220
Eyeglasses compartment ............... 220
Glove box ....................................... 219
Important safety information ......... 219
Rear wall ........................................ 220
Stowag enet ................................... 220
Stowag enet....................................... 220
Summert ires..................................... 262
Sun visor ............................................ 222
Surround lighting (on-board com-
puter) .................................................. 173
Switchin gair-recirculatio nmode
on/off ................................................. 112
Switchin gonmediam ode
Via the device list .......................... 217
T
Tachometer ........................................ 163
Tail lamps
Displa ymessage ............................ 189
see Lights
Tank content
Fuelgauge ....................................... 32
Technical data
Capacities ...................................... 290
Emergency spare wheel. ................ 286
Information .................................... 288
Tires/wheels ................................. 284
Vehicl edata. .................................. 295
TELEAID
Call priority .................................... 227
Emergency cal l.............................. 225
Generaln otes ................................ 224
MB info cal lbutton ........................ 226
Roadsid eAssistance button .......... 226
Self-test ......................................... 224
Index17
Page 132 of 298
!Overfilling the fuel tank could damage the
fuel system.
!Take care not to spill any fuel on painted
surfaces. You could otherwise damage the
paintwork.
!Use afilter when adding fuel from afuel can.
The fuel lines and/or the fuel injection system
could otherwise be blocked by particles from
the fuel can.
If you overfill the fuel tank, fuel could spray out
when the fuel pump nozzle is removed.
For further information on fuel and fuel quality
(
Ypage 291).
Refueling
General information
The fuel filler flap is unlocked or locked auto-
matically when you unlock or lock the vehicle
with the SmartKey or using KEYLESS-GO.
The position of the fuel filler cap is displayed
8 in the instrument cluster. The arrow next
to the filling pump indicates the side of the vehi-
cle.
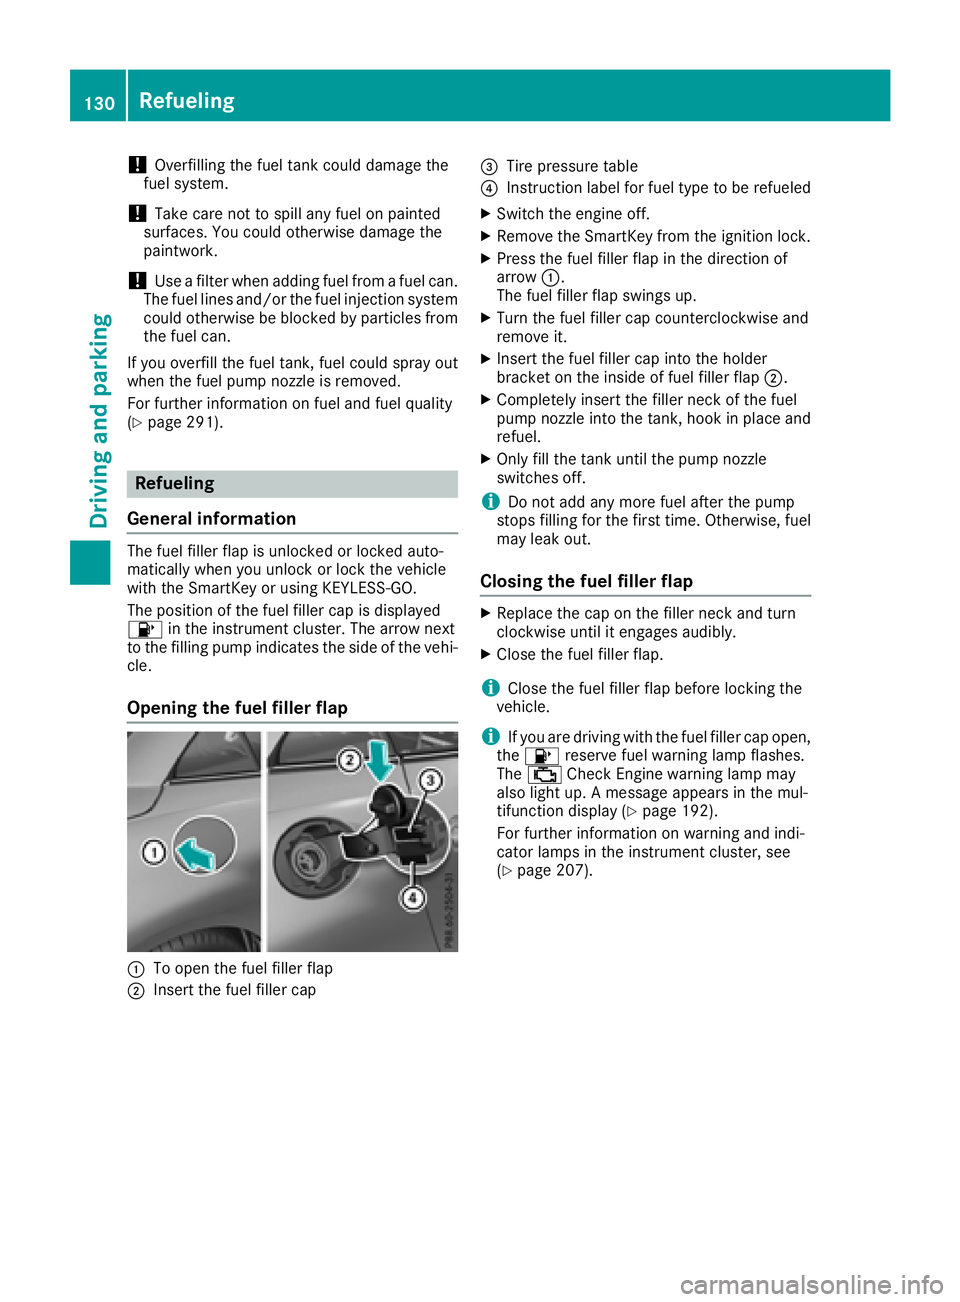
Opening the fuel filler flap
:To open the fuel filler flap
;Insert the fuel filler cap
=Tire pressure table
?Instruction label for fuel type to be refueled
XSwitch the engine off.
XRemove the SmartKey from the ignition lock.
XPress the fuel filler flap in the direction of
arrow :.
The fuel filler flap swings up.
XTurn the fuel filler cap counterclockwise and
remove it.
XInsert the fuel filler cap into the holder
bracket on the inside of fuel filler flap ;.
XCompletely insert the filler neck of the fuel
pump nozzle into the tank, hook in place and
refuel.
XOnly fill the tank until the pump nozzle
switches off.
iDo not add any more fuel after the pump
stops filling for the first time. Otherwise, fuel
may leak out.
Closing the fuel filler flap
XReplace the cap on the filler neck and turn
clockwise until it engages audibly.
XClose the fuel filler flap.
iClose the fuel filler flap before locking the
vehicle.
iIf you are driving with the fuel filler cap open,
the 8 reserve fuel warning lamp flashes.
The ; Check Engine warning lamp may
also light up. Amessage appears in the mul-
tifunction display(
Ypage 192).
For further information on warning and indi-
cator lamps in the instrument cluster, see
(
Ypage 207).
130Refueling
Driving and parking
Page 194 of 298
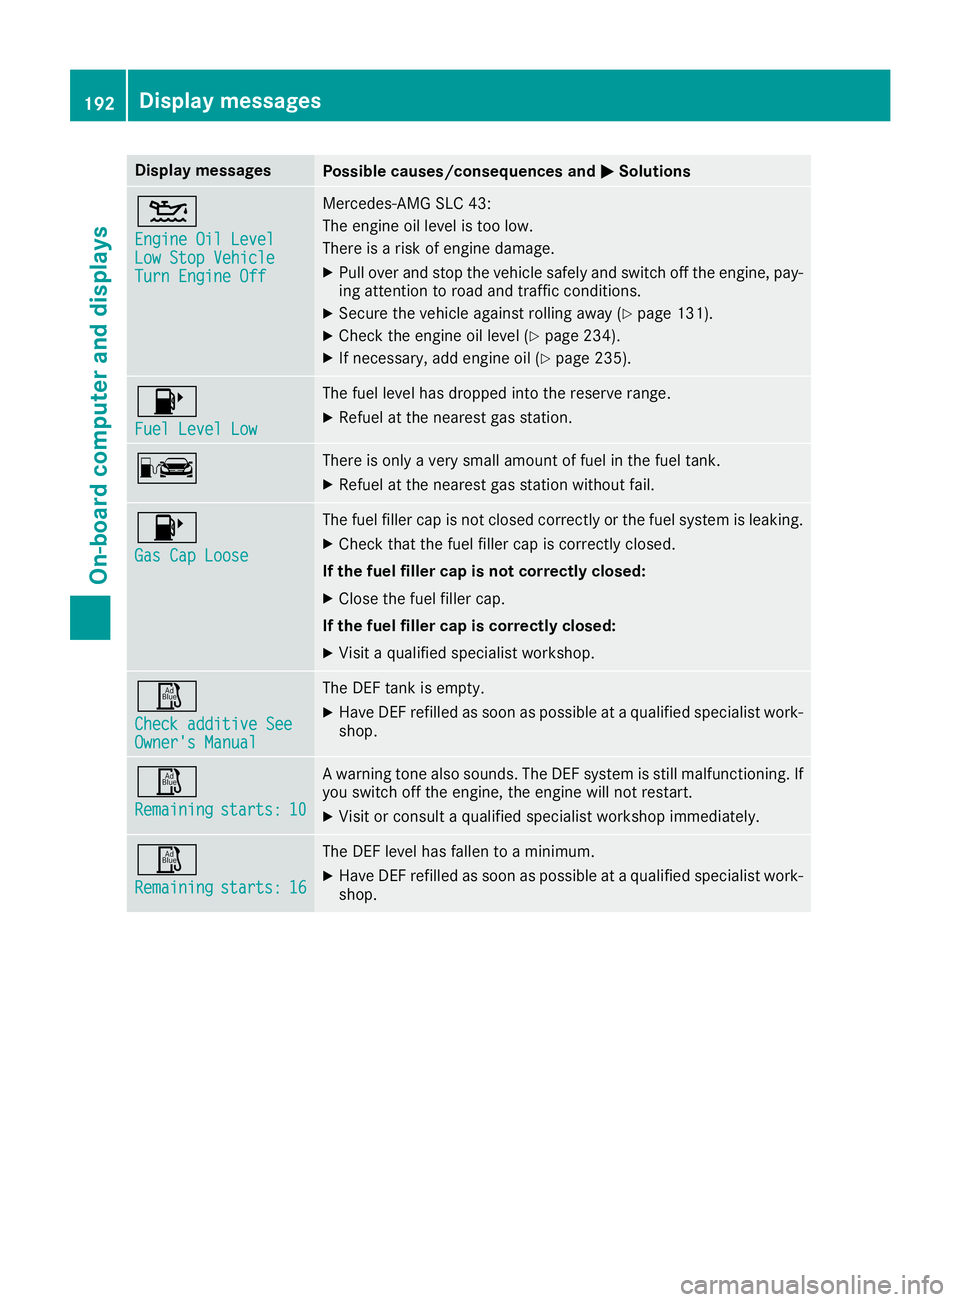
Display messagesPossible causes/consequences andMSolutions
4
Engine Oil LevelLow StopVehicl eTurnEngine Off
Mercedes-AMG SL C43:
The engin eoil level is to olow.
There is ariskofe ngined amage.
XPull ove rand stop th evehicl esafely and switch off th eengine, pay-
ing attention to roa dand traffic conditions.
XSecur ethe vehicl eagainst rollin gaway (Ypage 131).
XChec kthe engin eoil level (Ypage 234).
XIf necessary, add engin eoil(Ypage 235).
8
Fue lLevel Low
The fuel level has dropped int othe reserv erange.
XRefue lattheneares tgas station .
CThere is only averys mall amount of fuel in th efuel tank.
XRefue lattheneares tgas station without fail .
8
Gas Cap Loose
The fuel filler cap is no tclosed correctl yorthefuel system is leaking .
XCheckthatthe fuel filler cap is correctl yclosed .
If th efuelfiller cap is not correctl yclosed :
XClosethe fuel filler cap .
If th efuelfiller cap is correctl yclosed :
XVisitaqualified specialist workshop .
Ø
Check additive SeeOwner'sManual
The DE Ftankise mpty.
XHaveDEFrefilled as soo naspossibleataq ualified specialist work-
shop.
Ø
Remainingstarts :10
Awarning tone also sounds. The DE Fsystem is still malfunctioning .If
you switch off th eengine, th eenginew ill no trestart.
XVisit or consult aqualified specialist workshop immediately.
Ø
Remainingstarts :16
The DEFlevel has fallen to aminimum .
XHaveDEFrefilled as soo naspossibleataq ualified specialist work-
shop.
192Display messages
On-boardc omputer andd isplays
Page 209 of 298
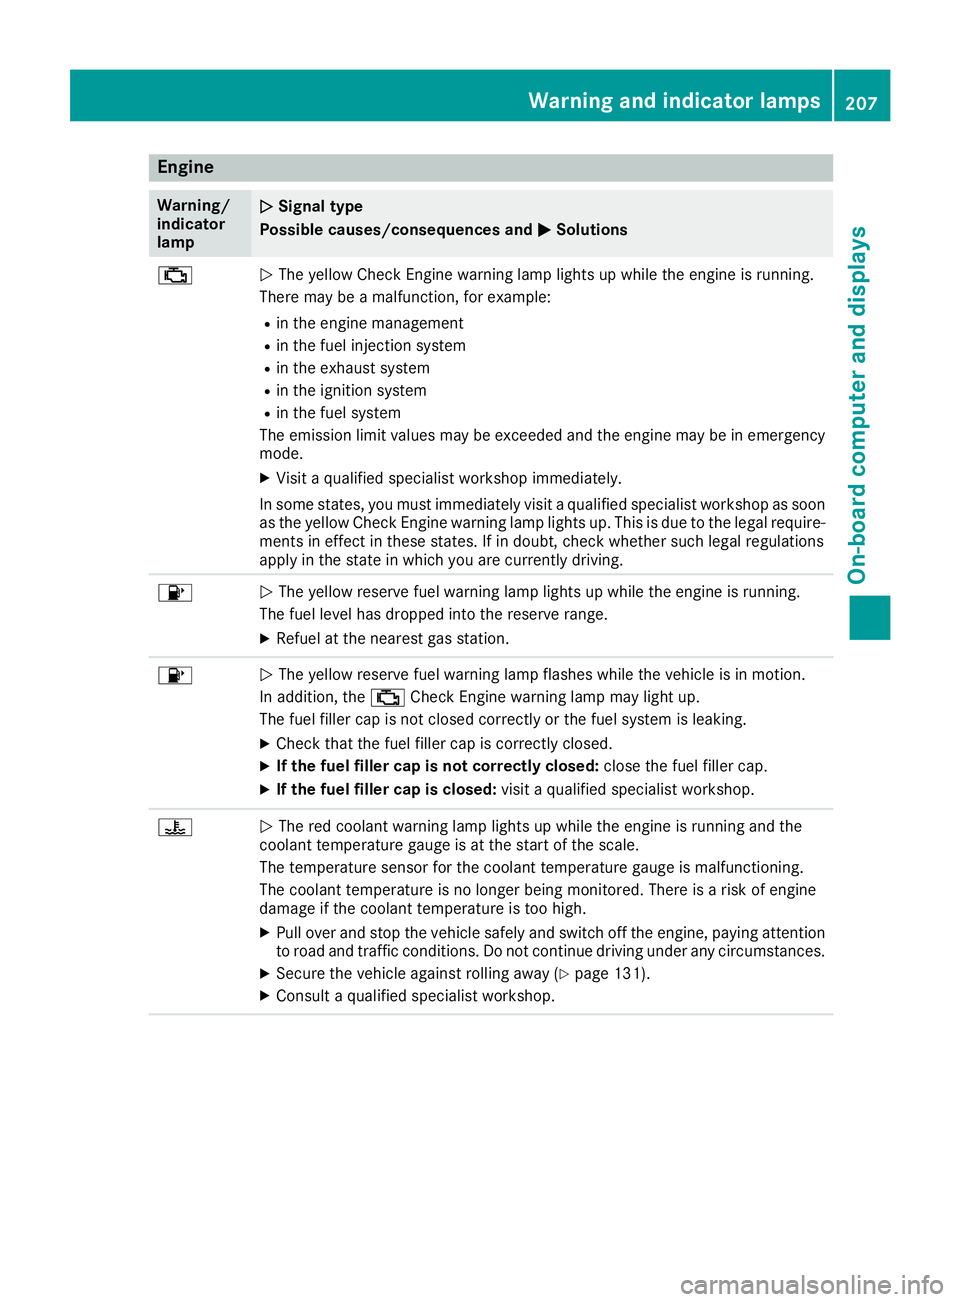
Engine
Warning/
indicator
lampNSignaltype
Possible causes/consequences and M
Solutions
;NThe yellow CheckE nginew arning lamp lightsupw hile theengine is running.
Therem ay beamalfunction, for example:
Rin th eengine management
Rin th efuel injection system
Rin th eexhaust system
Rin th eignition system
Rin th efuel system
The emission limit values may be exceeded and th eengine may be in emergency
mode.
XVisitaq ualified specialist workshop immediately.
In somes tates, you must immediately visi taqualified specialist workshop as soon
as th eyellow CheckE nginew arning lamp lightsu p. This is due to thelegal require-
ments in effect in these states. If in doubt,c heck whether suchl egal regulations
apply in th estate in whichy ou are currently driving.
8NThe yellow reservef uel warning lamp lightsupw hile theengine is running.
The fuel leve lhas dropped int othe reserver ange.
XRefuel at th enearest gas station.
8NThe yellow reservef uel warning lamp flashes while th evehicle is in motion.
In addition,t he; CheckE nginew arning lamp may light up.
The fuel fille rcap is no tclosed correctly or th efuel system is leaking.
XCheckt hatthe fuel fille rcap is correctly closed.
XIf th efuelfiller cap is not correctly closed: close thefuel fille rcap.
XIf th efuelfiller cap is closed: visitaq ualified specialist workshop.
?NThe red coolant warning lamp lightsupw hile theengine is runnin gand the
coolant temperatur egauge is at th estart of th escale.
The temperatur esensor for th ecoolant temperatur egauge is malfunctioning.
The coolant temperatur eisnolonger beingm onitored. Thereisar isk of engine
damag eifthecoolant temperatur eistoohigh.
XPull ove rand stop th evehicle safely and switch off th eengine ,payinga ttention
to road and traffic conditions. Do no tcontinue driving unde rany circumstances.
XSecure th evehicle against rolling away (Ypage 131).
XConsult aqualified specialist workshop.
Warning and indicator lamps207
On-boardc omputer and displays
Z
Page 238 of 298
Workinginthe engine compartment poses a
risk of injury.
Where possible, let the engine cool down and touch only the componentsd escribed in the
following.
GWARNING
The cooling system is pressurized, particularly
when the motor is warm. If you open the cap,
you could be scalded if hot coolant sprays out.
There is arisk of injury.
Let the engine cool down before you open the
cap. Wear gloves and eye protection. Slowly
open the cap to relieve pressure.
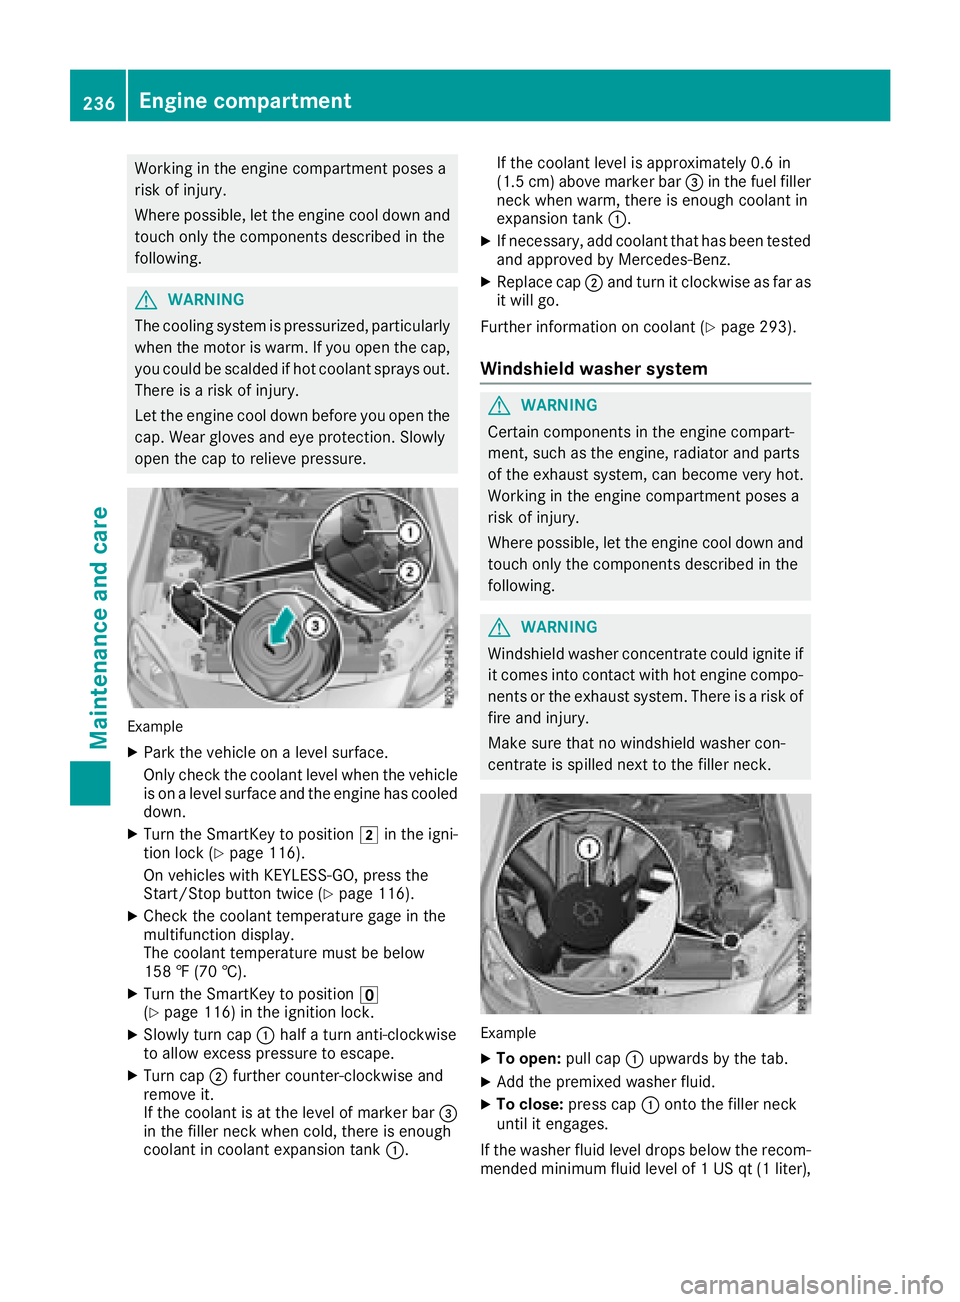
Example
XPark the vehicle on alevel surface.
Only check the coolant level when the vehicle
is on alevel surface and the engine has cooled
down.
XTurn the SmartKey to position 2in the igni-
tion lock (Ypage 116).
On vehicles with KEYLESS-GO, press the
Start/Stop button twice (
Ypage 116).
XCheck the coolant temperature gage in the
multifunction display.
The coolant temperature must be below
158 ‡(70 †).
XTurn the SmartKey to position u
(Ypage 116) in the ignition lock.
XSlowly turn cap :half aturn anti-clockwise
to allow excessp ressure to escape.
XTurn cap;further counter-clockwise and
remove it.
If the coolant is at the level of marker bar =
in the filler neck when cold, there is enough
coolant in coolant expansion tank :.If the coolant level is approximately 0.6 in
(1.5 cm
)above marker bar =in the fuel filler
neck when warm, there is enough coolant in
expansion tank :.
XIf necessary, add coolant that has been tested
and approved by Mercedes-Benz.
XReplace cap;and turn it clockwise as far as
it will go.
Further information on coolant (
Ypage 293).
Windshield washer system
GWARNING
Certain component sinthe engine compart-
ment,s uch as the engine, radiator and parts
of the exhaust system, can become very hot.
Workin ginthe engine compartment poses a
risk of injury.
Where possible, let the engine cool down and touch only the componentsd escribed in the
following.
GWARNING
Windshield washer concentrate could ignite if it comes into contact with hot engine compo-
nents or the exhaust system. There is arisk of
fire and injury.
Make sure that no windshield washer con-
centrate is spilled next to the filler neck.
Example
XTo open: pull cap:upwards by the tab.
XAdd the premixed washer fluid.
XTo close: press cap :ontothe filler neck
until it engages.
If the washer fluid level drops below the recom-
mended minimum fluid level of 1USqt(1l iter),
236Engine compartment
Maintenance and care
Page 252 of 298
HEnvironmentalnote
Hav ethe used tir esealantb ottle disposed of
professionally, e.g .ataqualifieds pecialist
workshop.
If tir epressure of 20 0kPa(2.0 ba r/29 psi )has
beena chieved after amaximu mperiod of ten
minutes:
XSwitch off the tire inflation compressor.
XUnscrew the filler hose from the valve of the
faulty tire.
XStow the tire sealant bottle and the tire infla- tion compressor.
XPull away immediately.
XStop after driving for approximately ten
minutes and check the tire pressure with the
tire inflation compressor.
The tire pressure must now be at least
130 kPa (1.3 bar/19 psi).
GWARNING
If the required tire pressure is not reached
after driving for ashort period, the tire is too
badly damaged. The tire sealant cannot repair
the tire in this instance. Damaged tires and a
tire pressure that is too low can significantly
impair the vehicle's braking and driving char-
acteristics. There is arisk of accident.
Do not continue driving. Contact aqualified
specialist workshop.
iIn cases such as the one mentioned above,
contact an authorized Mercedes-Benz Cen-
ter. Or call 1-800-FOR-MERCedes( in the
USA) or 1-800-387-0100 (in Canada).
XCorrect the tire pressure if it is still at least
130 kPa (1.3 bar/19 psi).S ee the Tire and
Loading Information placard on the driver's
side B-pillar or the tire pressure tabl einthe
fuel filler flapf or values.
XTo increase the tire pressure: switch on the
tire inflation compressor.
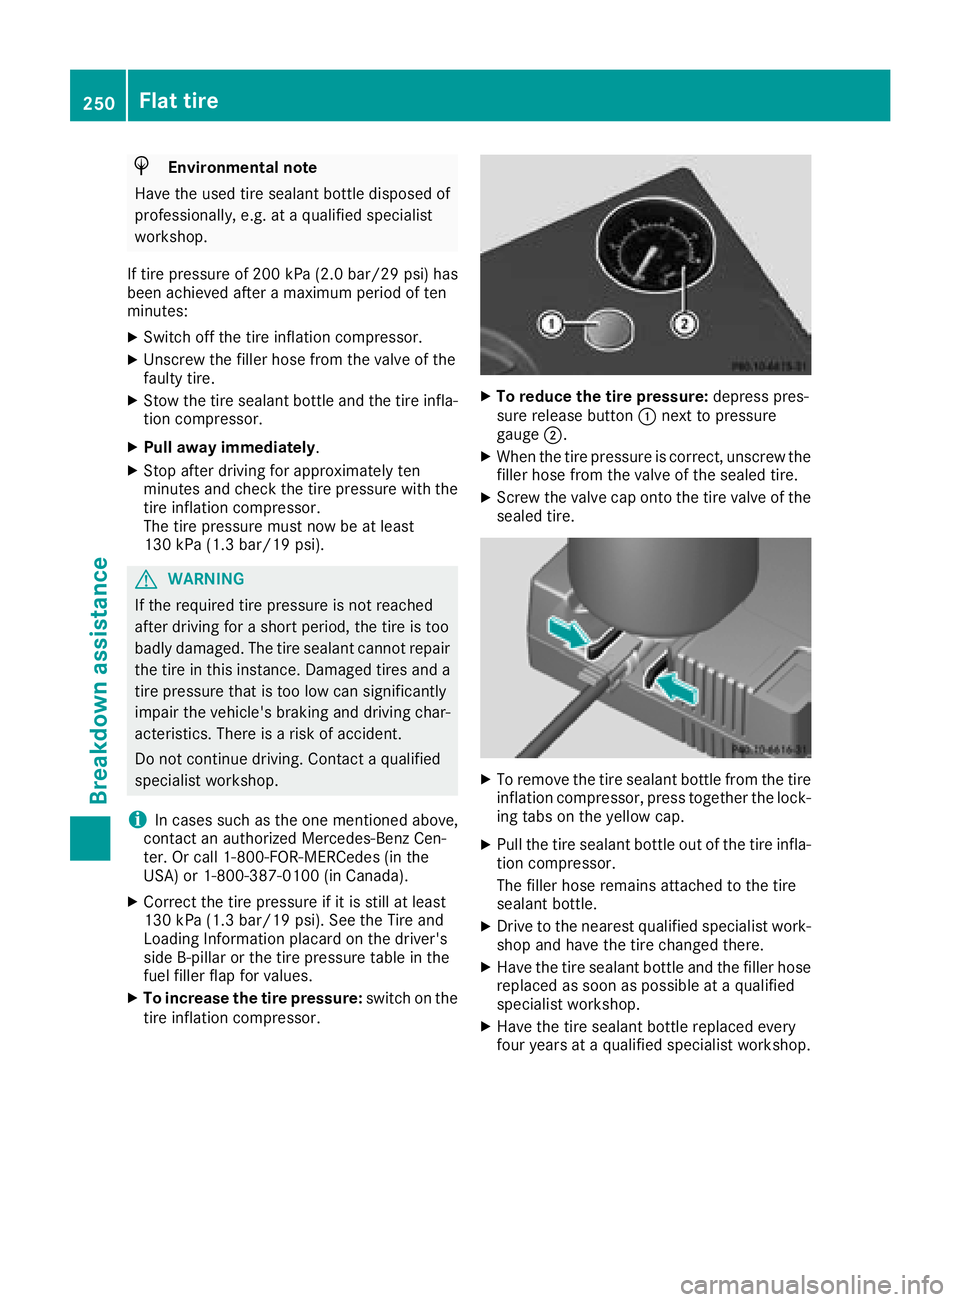
XTo reduce the tire pressure: depress pres-
sure release button :next to pressure
gauge ;.
XWhen the tire pressure is correct, unscrew the
filler hose from the valve of the sealed tire.
XScrew the valve cap onto the tire valve of the
sealed tire.
XTo remove the tire sealant bottle from the tire
inflation compressor, press together the lock-
ing tabs on the yellow cap.
XPullthe tire sealant bottle out of the tire infla-
tion compressor.
The filler hose remains attache dtothe tire
sealant bottle.
XDrive to the nearest qualified specialist work-
shop and have the tire change dthere.
XHave the tire sealant bottle and the filler hose
replaced as soon as possibleataq ualified
specialist workshop.
XHave the tire sealant bottle replaced every
four years at aqualified specialist workshop.
250Flat tire
Breakdowna ssistance