2018 MERCEDES-BENZ SLC ROADSTER window
[x] Cancel search: windowPage 79 of 298
ProblemPossible causes/consequences andMSolutions
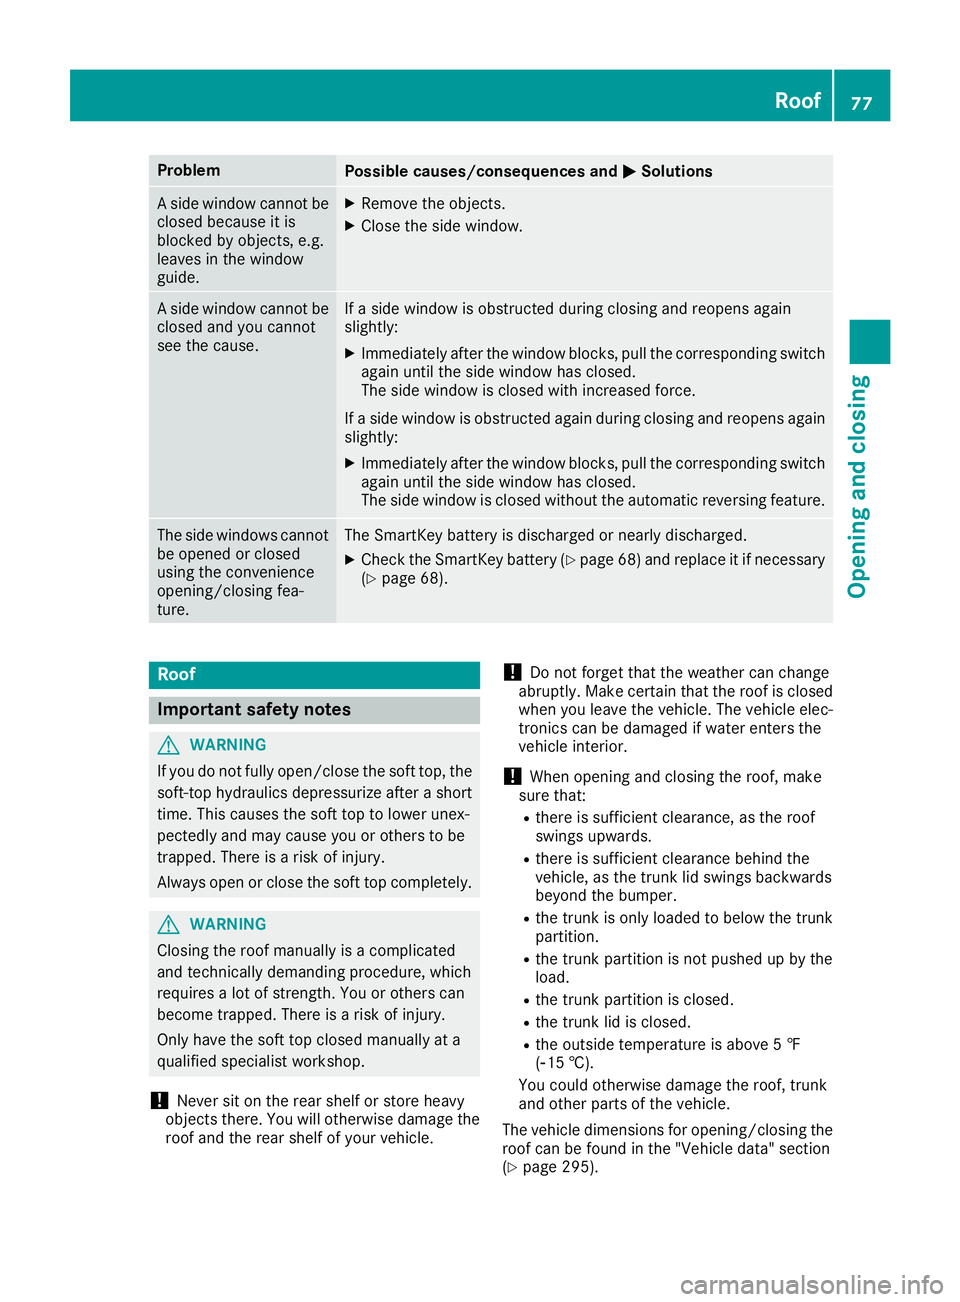
Aside window cannot be
closed because it is
blocked by objects, e.g.
leaves in the window
guide.XRemove the objects.
XClose the side window.
As ide window cannot be
closed and you cannot
see the cause.If as ide window is obstructed during closing and reopens again
slightly:
XImmediately after the window blocks, pull the correspondings witch
again until the side window has closed.
The side window is closed with increased force.
If as ide window is obstructed again during closing and reopens again
slightly:
XImmediately after the window blocks, pull the correspondings witch
again until the side window has closed.
The side window is closed without the automatic reversing feature.
The side windows cannot
be opened or closed
using the convenience
opening/closing fea-
ture.The SmartKey battery is discharged or nearly discharged.
XCheck the SmartKey battery (Ypage 68) and replace it if necessary
(Ypage 68).
Roof
Important safety notes
GWARNING
If you do not fully open/close the soft top, the
soft-top hydraulics depressurize after ashort
time. This causes the soft top to lower unex-
pectedly and may cause you or others to be
trapped. There is arisk of injury.
Always open or close the soft top completely.
GWARNING
Closing the roof manually is acomplicated
and technically demanding procedure, which
requires alot of strength. You or others can
become trapped. There is arisk of injury.
Only have the soft top closed manually at a
qualified specialist workshop.
!Never sit on the rear shelf or store heavy
object sthere. You will otherwise damage the
roof and the rear shelf of your vehicle.
!Do not forget that the weather can change
abruptly. Make certain that the roof is closed
when you leave the vehicle. The vehicle elec-
tronics can be damaged if water enters the
vehicle interior.
!When opening and closing the roof, make
sure that:
Rthere is sufficient clearance, as the roof
swings upwards.
Rthere is sufficient clearance behind the
vehicle, as the trunk lid swings backwards
beyond the bumper.
Rthe trunk is only loaded to below the trunk
partition.
Rthe trunk partition is not pushed up by the
load.
Rthe trunk partition is closed.
Rthe trunk lid is closed.
Rthe outside temperature is above 5‡
(Ò15 †).
You could otherwise damage the roof, trunk
and other parts of the vehicle.
The vehicle dimensions for opening/closing the
roof can be found in the "Vehicle data" section
(
Ypage 295).
Roof77
Opening and closing
Z
Page 80 of 298
Make sure that the roof and rear window are
clean and dry before opening the roof. Other-
wise, water or dirt could enter the vehicle inte-
rior or trunk.
Opening and closing using the roof
switch
Important safety notes
GWARNING
When opening or closing the roof, body parts
could be trapped by, for example, the roof
mechanism, trunk lid or side windows. There
is ar isk of injury.
When raising or lowering the roof, make sure
that no body parts are in the vicinity of moving
components. If someone becomes trapped,
release the button.
For safety reasons, you can only open or close
the roof when the vehicle is stationary.
!Operating the roof while pulling away:
RObserve the following traffic carefully.
RDo not drive faster than 25 mph (40 km/h).
RAvoid abrupt braking and swerving maneu-
vers.
Do not operate the roof when cornering, driv-
ing on uneven surfaces or during strong
winds. The vehicle may otherwise be dam-
aged.
iIf the traffic conditionsm ean that you have
to drive off while opening/closing the roof,
the procedure which was started while sta-
tionary can be continued at speeds of up to
approximately 25 mph (40 km/h).
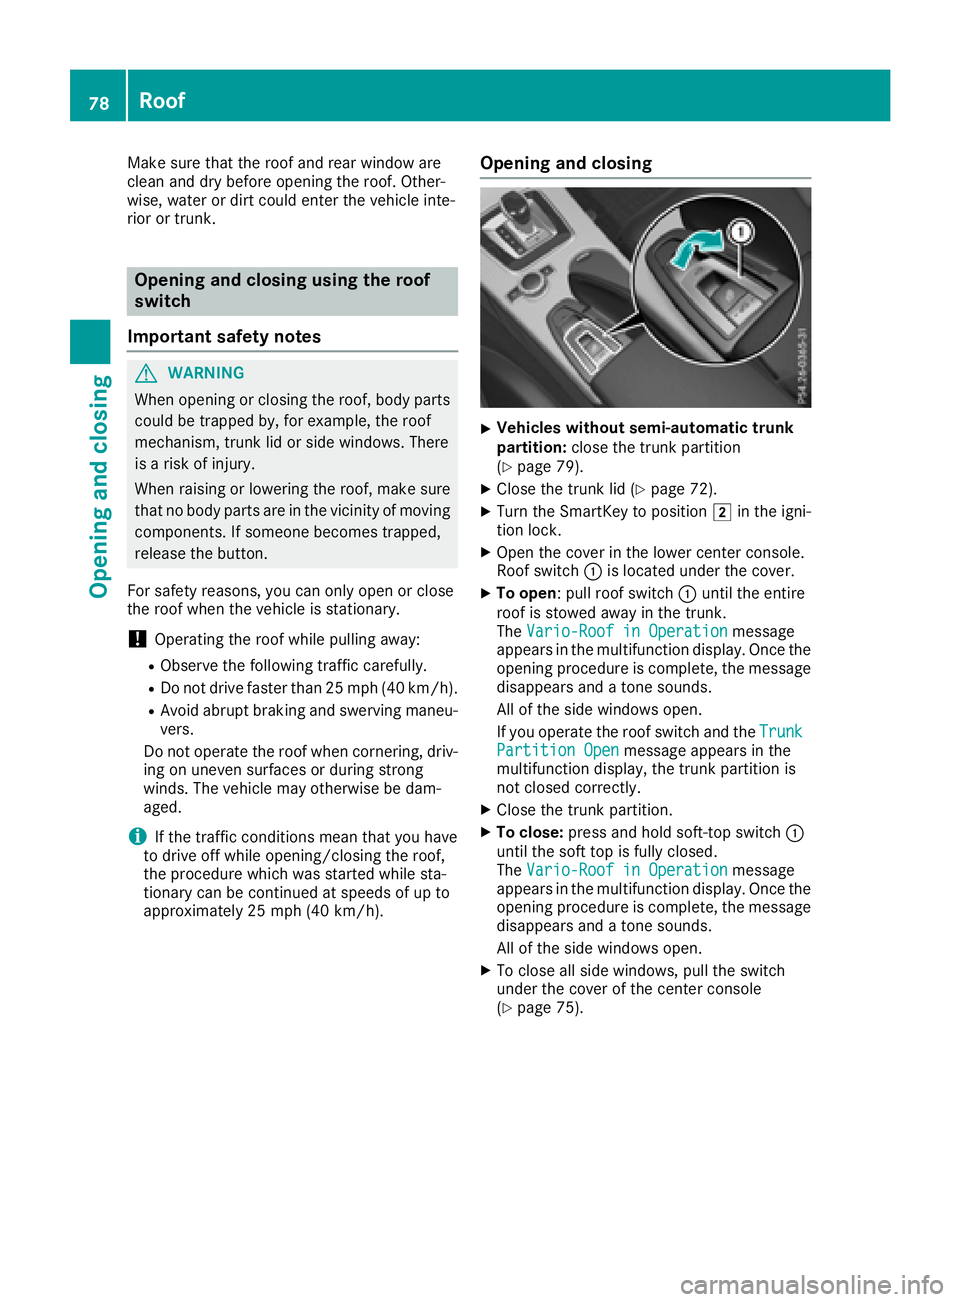
Opening and closing
XVehicles without semi-automatic trunk
partition: close the trunk partition
(
Ypage 79).
XClose the trunk lid (Ypage 72).
XTurn the SmartKey to position 2in the igni-
tion lock.
XOpen the cover in the lower center console.
Roof switch :is located under the cover.
XTo open:p ull roof switch :until the entire
roof is stowed away in the trunk.
The Vario-Roof in Operation
message
appears in the multifunction display.O nce the
opening procedure is complete, the message
disappears and atone sounds.
All of the side windows open.
If you operate the roof switch and the Trunk
Partition Openmessage appears in the
multifunction display,t he trunk partition is
not closed correctly.
XClose the trunk partition.
XTo close: press and hold soft-top switch :
until the soft top is fully closed.
The Vario-Roof in Operation
message
appears in the multifunction display.O nce the
opening procedure is complete, the message
disappears and atone sounds.
All of the side windows open.
XTo close all side windows, pull the switch
under the cover of the center console
(
Ypage 75).
78Roof
Opening and closing
Page 81 of 298
Opening/closing using the SmartKey
Important safetyn otes
GWARNING
When opening or closing the roof, body parts
could be trapped by, for example, the roof
mechanism, trun klid or side windows. There
is ar isk of injury.
When raising or lowering the roof, make sure
that no body parts are in the vicinity of moving
components. If someoneb ecomes trapped,
release the button.
Opening and closing
This function is only available on vehicles with
KEYLESS-GO or with roof comfort operation.
XClose the trun klid (Ypage 72).
XVehicles with comfort operation: point the
tip of the SmartKey at the driver's door han-
dle.
XVehicles with KEYLESS-GO: the SmartKey
must be within 6ft(2m)ofthe vehicle.
XTo open: press and hold the %button on
the SmartKey until the roof is fully opened.
The roof and the rear side windows open. The
fronts ide windows close.
XTo interrupt the opening procedure:
release the %button.
XTo open the front side windows: press the
% button on the SmartKey again.
XTo close: press and hold the &button on
the SmartKey until the roof is fully closed.
The roof and the side windows close.
XTo interrupt the closing procedure: release
the & button.
Locking the roof again
Important safetyn otes
GWARNING
If you do not fully open/close the soft top, the
soft-top hydraulics depressurizea fterashort
time. This causes the soft top to lower unex-
pectedly and may cause you or other stobe
trapped. There is arisk of injury.
Always open or close the soft top completely.
The roof is not locked if:
Rthe K symbol and the Vario-Roof inOperationmessage appear in the multifunc-
tion display
Rthe K symbol and the Open/CloseVario-RoofCompletelymessage appear in
the multifunction display and you hear awarn-
ing tone
Ryou hear awarning ton efor up to ten seconds
when pulling away or while driving
Locking
You can lock the roof again if it is not locked
fully.
XPull over and stop the vehicle safely as soon
as possible, paying attention to road and traf-
fic conditions.
XEnsure that the SmartKey is in position 2in
the ignition lock.
XPress the roof switch (Ypage 78).
Trunk partition
General notes
!To avoid damaging the roof or luggage when
folding back the roof, you should:
Ronly load the trun ktobelow the trun kpar-
tition
Rnot place any objects on or in frontoft he
trun kpartition
Rnot place any objects on the cover behind
the roll bars
Rnot allow the cargo to push the trun kpar-
tition upwards
The trun kpartition can be used to cover luggage
and loads in the trunk.
Roof79
Opening and closing
Z
Page 89 of 298
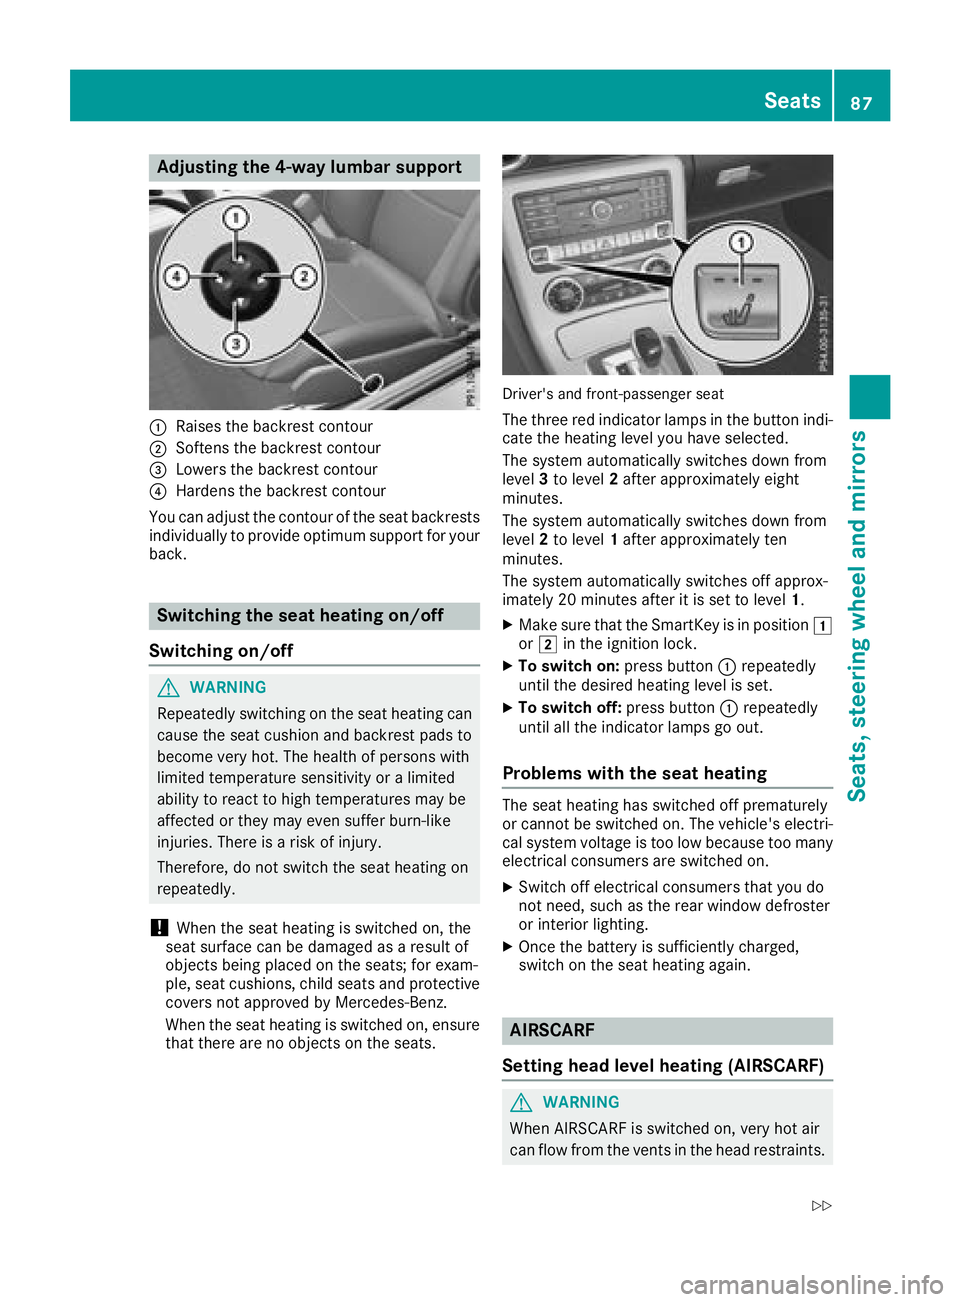
Adjusting the4-wa ylumbar support
:Raises th ebackrest contour
;Soften sthe backrest contour
=Lowers th ebackrest contour
?Harden sthe backrest contour
You can adjust th econtou roftheseat backrest s
individually to provid eoptimum support for your
back.
Switchin gthe seath eating on/off
Switchin gon/off
GWARNIN G
Repeatedly switching on th eseat heating can
caus ethe seat cushion and backrest pads to
become ver yhot.T he healt hofpersonswith
limite dtem perature sensitivit yoralimited
abilit ytor eac ttoh igh temperatures may be
affecte dortheym ay eve nsuffer burn-like
injuries. There is ariskofi njury.
Therefore ,donotswitch th eseat heating on
repeatedly.
!When th eseat heating is switched on ,the
seat surfac ecan be damaged as aresult of
objects bein gplaced on th eseats; for exam-
ple, seat cushions, child seat sand protective
cover snotapprove dbyMercedes-Benz .
When th eseat heating is switched on ,ens ure
that there are no objects on th eseats.
Driver's and front-passenger seat
The three red indicator lamp sinthebutto nindi-
cat ethe heating level you hav eselected.
The system automatically switches down from
level 3to level 2after approximately eigh t
minutes.
The system automatically switches down from
level 2to level 1after approximately te n
minutes.
The system automatically switches off approx -
imately 20 minute safter it is set to level 1.
XMakesuret ha tthe SmartKey is in position 1
or 2 in th eignition lock.
XTo switch on: press button: repeatedly
until th edesired heating level is set .
XTo switch off:press butto n: repeatedly
until all th eindicator lamp sgoout.
Problemsw ith theseath eating
The seat heating has switched off prematurel y
or canno tbeswitched on .The vehicle's electri-
cal system voltag eistoolow because to omany
electrical consumer sare switched on .
XSwitchoff electrical consumer sthaty ou do
no tn eed, suc hastherear window defroste r
or interior lighting .
XOnce thebattery is sufficientl ycharged,
switch on th eseat heating again .
AIRSCARF
Setting hea dlevel heating (AIRSCARF)
GWARNIN G
When AIRSCARF is switched on ,veryh ot air
can flo wfromt hevents in th ehead restraints .
Seats87
Seats,steering wheel and mirrors
Z
Page 90 of 298
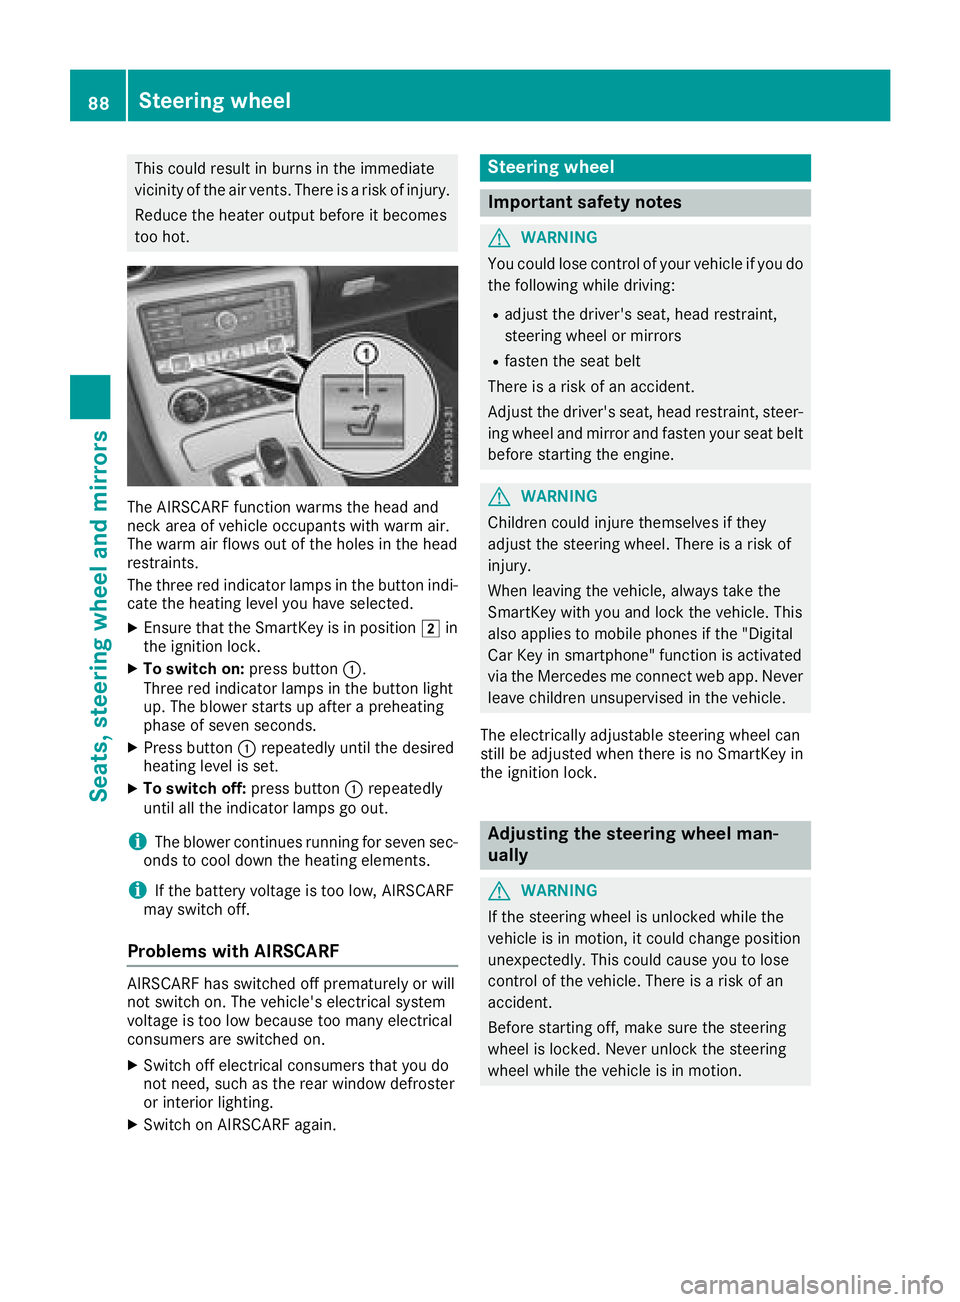
This could result in burns in the immediate
vicinityofthe air vents. There is arisk of injury.
Reduce the heater output before it becomes
too hot.
The AIRSCARF function warms the head and
neck area of vehicle occupantsw ith warm air.
The warm air flows out of the holes in the head
restraints.
The three red indicator lamps in the button indi-
cate the heating level you have selected.
XEnsure that the SmartKey is in position 2in
the ignition lock.
XTo switch on: press button:.
Three red indicator lamps in the button light
up. The blower start supafterapreheating
phase of seven seconds.
XPress button :repeatedly until the desired
heating level is set.
XTo switch off: press button:repeatedly
until all the indicator lamps go out.
iThe blower continues runnin gfor seven sec-
onds to cool down the heating elements.
iIf the battery voltage is too low, AIRSCARF
may switch off.
Problems with AIRSCARF
AIRSCARF has switched off prematurely or will
not switch on. The vehicle's electrical system
voltage is too low because too many electrical
consumersa re switched on.
XSwitch off electrical consumer sthat you do
not need, such as the rear window defroster
or interior lighting.
XSwitch on AIRSCARF again.
Steering wheel
Important safety notes
GWARNING
You could lose control of your vehicle if you do the following while driving:
Radjust the driver's seat, head restraint,
steerin gwheel or mirrors
Rfasten the seat belt
There is arisk of an accident.
Adjust the driver's seat, head restraint, steer-
ing wheel and mirror and fasten your seat belt before starting the engine.
GWARNING
Children could injure themselves if they
adjust the steerin gwheel. There is arisk of
injury.
When leaving the vehicle, alwayst ake the
SmartKey with you and lock the vehicle. This
also applies to mobile phones if the "Digital
Car Key in smartphone" function is activated
via the Mercedes me connect web app. Never leave children unsupervised in the vehicle.
The electrically adjustable steerin gwheel can
still be adjusted when there is no SmartKey in
the ignition lock.
Adjusting the steering wheel man-
ually
GWARNING
If the steerin gwheel is unlocked while the
vehicle is in motion,itc ould change position
unexpectedly. This could cause you to lose
control of the vehicle. There is arisk of an
accident.
Before starting off, make sure the steering
wheel is locked. Never unlock the steering
wheel while the vehicle is in motion.
88Steering wheel
Seats, steering wheel and mirrors
Page 93 of 298
Exteriormirrors
Adjusting th eexterio rmirrors
GWARNING
You coul dlose control of your vehicle if you do
th ef ollowingw hile driving:
Radjust thedriver'ss eat,head restraint,
steering wheel or mirrors
Rfasten th eseat belt
Thereisar isk of an accident.
Adjust th edriver'ss eat,head restraint ,steer-
ing wheel and mirror and fasten your seat belt before starting th eengine.
GWARNING
The exteriorm irror on thefront-pa ssenger
side reduces th esizeoft heimage .Visible
object sare actually closer than they appear.
This mean sthaty ou coul dmisjudge th edis-
tance from road userst ravelin gbehind, e.g.
when changing lane .Thereisar isk of an acci-
dent.
For this reason,a lways makesure of the
actual distanc efromt heroad userst raveling
behindbyg lancingovery our shoulder.
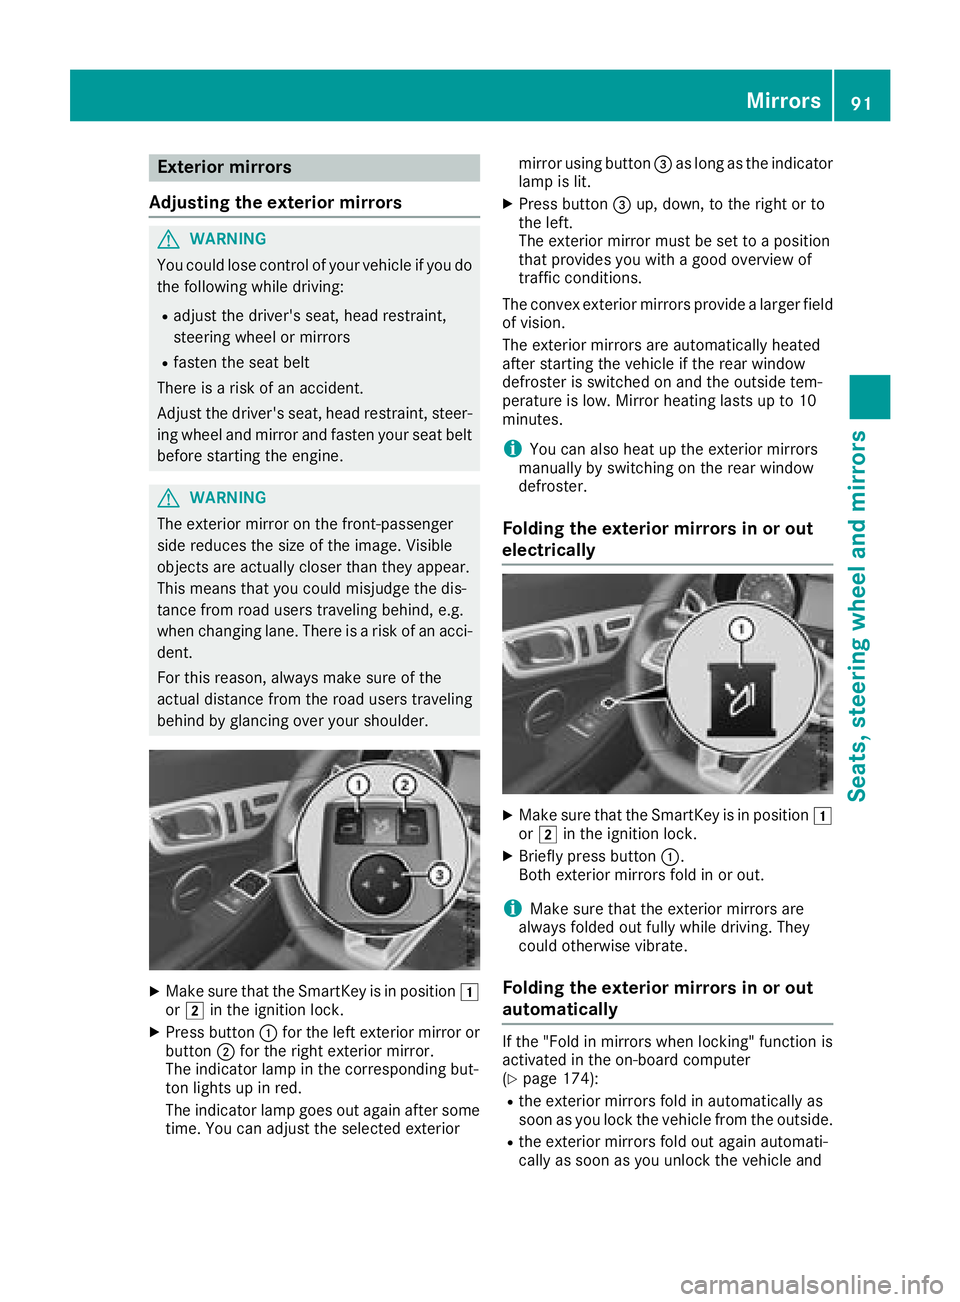
XMakes ure that th eSma rtKey is in position 1
or 2 in th eignition lock.
XPress button :for th eleft exteriorm irror or
button ;for th erigh texteriorm irror.
The indicator lamp in th ecorrespondingb ut-
to nl ightsupinr ed.
The indicator lamp goes out again after some time. You can adjust th eselecte dexterior mirror usingb
utton=as longast heindicator
lamp is lit.
XPress button =up, down,tot herigh tort o
th el eft.
The exteriorm irror must be set to aposition
that provide syou with agood overview of
traffic conditions.
The convex exteriorm irrorsprovide alarge rfield
of vision.
The exteriorm irrorsare automaticall yheated
after starting th evehicle if th erear window
defroster is switched on and th eoutside tem-
perature is low. Mirror heating lastsupto1 0
minutes.
iYou can also heat up th eexteriorm irrors
manually by switching on th erear window
defroster.
Foldin gthe exterio rmirror sinoro ut
electrically
XMakes ure that th eSma rtKey is in position 1
or 2 in th eignition lock.
XBriefly pres sbutton :.
Bot hexteriorm irrorsfold in or out.
iMakes ure that th eexteriorm irrorsare
always folded out fully while driving .They
coul dotherwise vibrate.
Foldin gthe exterio rmirror sinoro ut
automatically
If th e"Fol dinm irrorswhen locking" function is
activated in th eon-board computer
(
Ypage 174):
Rth ee xteriorm irrorsfold in automaticall yas
soon as you lockt hevehicle from th eoutside.
Rthee xteriorm irrorsfold out again automati-
cally as soon as you unlock th evehicle and
Mirrors91
Seats, steerin gwheel and mirrors
Z
Page 106 of 298
Overview of climatecontrol systems
General notes
Observe the settings recommended on the fol-
lowing pages. The windows could otherwise fog
up.
To preventt he windows from fogging up:
Rswitch off climate control only briefly
Rswitch on air-recirculation mode only briefly
Rswitch on the cooling with air dehumidifica-
tion function
Rswitch on the defrost windshield function
briefly, if required
Climate control regulates the temperature and
the humidity in the vehicle interior and filters
undesirable substances out of the air.
Climate control can only be operated when the
engin eisrunning. Optimum operation is only
achieved with the side windows and roof closed.
iWhen the weather is warm, ventilate the
vehicle for abrief period. This will speed up
the cooling process and the desired vehicle
interior temperature will be reached more
quickly.
iThe integrated filter filters out most parti-
cles of dust and soot and completely filters
out pollen. It also reduces gaseous pollutants
and odors. Aclogged filter reduces the
amount of air supplied to the vehicle interior.
For this reason, you should alwayso bserve
the interval for replacing the filter, which is
specified in the Maintenance Booklet. As it
depends on environmental conditions ,e.g.
heavy air pollution, the interval may be
shorter than stated in the Maintenance Book- let.
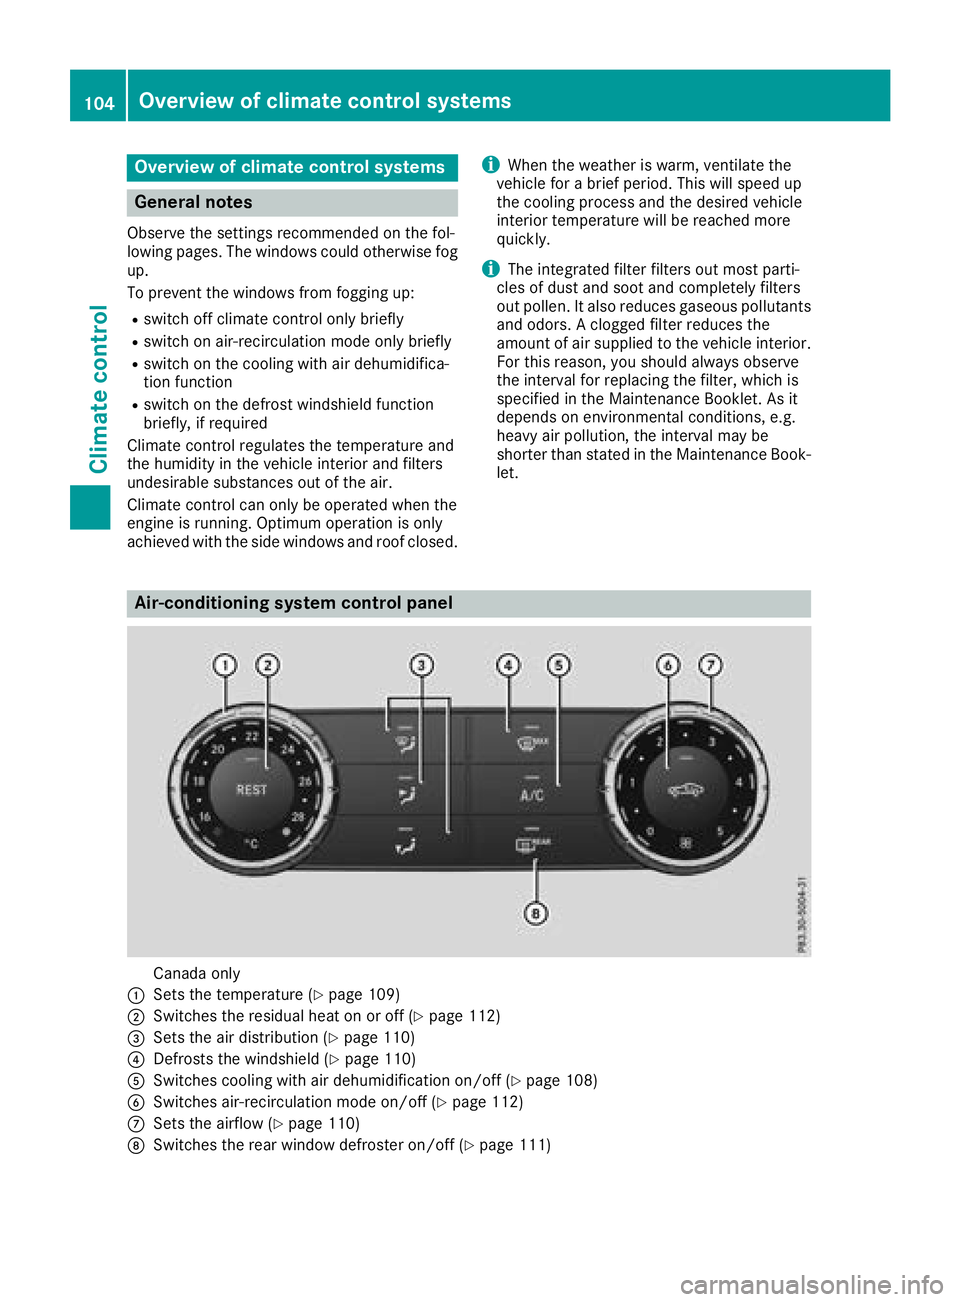
Air-conditioning system control panel
Canada only
:Setst he temperature (Ypage 109)
;Switches the residual heat on or off (Ypage 112)
=Setsthe air distribution (Ypage 110)
?Defrosts the windshield (Ypage 110)
ASwitches cooling with air dehumidification on/off (Ypage 108)
BSwitches air-recirculation mode on/off (Ypage 112)
CSetsthe airflow (Ypage 110)
DSwitches the rear window defroster on/off (Ypage 111)
104Overview of climatec ontrol systems
Climatecontrol
Page 107 of 298
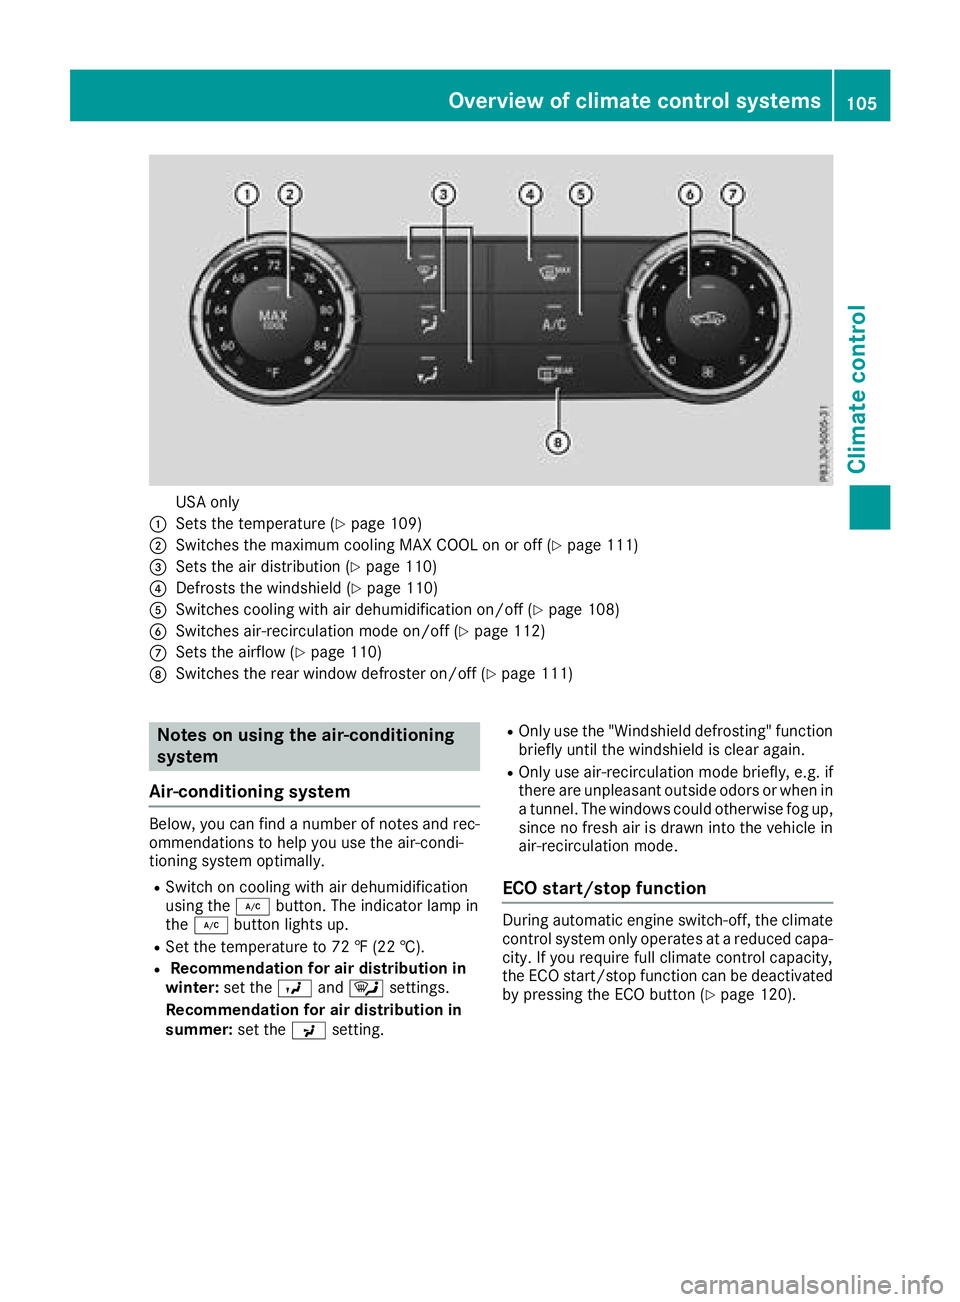
USA only
:Sets the temperature (Ypage 109)
;Switches the maximum cooling MAX COOL on or off (Ypage 111)
=Sets the air distribution (Ypage 110)
?Defrosts the windshield(Ypage 110)
ASwitches cooling with air dehumidification on/off (Ypage 108)
BSwitches air-recirculation mode on/off (Ypage 112)
CSets the airflow (Ypage 110)
DSwitches the rear window defroster on/off (Ypage 111)
Notes on using the air-conditioning
system
Air-conditioning system
Below, you can find anumber of notes and rec-
ommendations to help you use the air-condi-
tioning system optimally.
RSwitch on cooling with air dehumidification
using the ¿button. The indicator lamp in
the ¿ button lights up.
RSet the temperature to 72 ‡(22 †).
RRecommendation for air distribution in
winter: set theOand¯ settings.
Recommendation for air distribution in
summer: set thePsetting.
ROnly use the "Windshield defrosting" function
briefly until the windshieldisc lear again.
ROnly use air-recirculation mode briefly,e .g. if
there are unpleasant outside odors or when in
at unnel. The windows could otherwise fog up,
since no fresh air is drawn into the vehicle in
air-recirculation mode.
ECO start/stop function
During automatic engine switch-off, the climate
control system only operates at areduced capa-
city. If you require full climate control capacity,
the ECO start/stop function can be deactivated by pressing the ECO button (
Ypage 120).
Overview of climatec ontrol systems105
Climatecontrol