2018 MERCEDES-BENZ SLC ROADSTER window
[x] Cancel search: windowPage 45 of 298
If the driver or front passenger unfasten their
seat belts during the journey, the seat belt warn-
ing is activated again.
Air bags
Introduction
The installation point of an air bag can be rec-
ognized by the AIRBAG marking.
An air bag complements the correctly fastened
seat belt. It is no substitute for the seat belt. The
air bag providesa dditional protection in appli-
cable accident situations.
Not all air bags are deployed in an accident. The
different air bag systems function independ-
ently from one another (
Ypage 50).
However, no system available today can com-
pletelye liminate injuries and fatalities.
It is also not possible to rule out arisk of injury
cause dbyana ir bag due to the high speed at
which the air bag must be deployed.
Important safety notes
GWARNING
If you do not sit in the correct seat position,
the air bag cannot protect as intended and
could even cause additional injury when
deployed .This poses an increased risk of
injury or even fatal injury.
To avoid hazardous situations, always make
sure that all of the vehicle's occupants:
Rhave fastened their seat belts correctly,
including pregnant women
Rare sitting correctly and maintain the great-
est possible distance to the air bags
Rfollow the following instructions
Alway smake sure that there are no objects
between the air bag and the vehicle's occu-
pants.
RAdjust the seats properlyb efore beginning
you rjourney. Alway smake sure that the seat
is in an almostu pright position. The center of the head restraint must support the head at
aboute
ye level.
RMove the driver's and front-passenger seats
as far back as possible. The driver's seat posi-
tion must allow the vehicle to be driven safely.
ROnly hold the steering wheel on the outside.
This allows the air bag to be full ydeployed.
RAlway sleana gainst the backrest whiled riv-
ing. Do not leanf orward or leanagainst the
door or side window.Y ou may otherwise be in
the deployment area of the air bags.
RAlway skeep you rfeet in the footwell in front
of the seat. Do not put you rfeet on the dash-
board,f or example.Y our feet may otherwise
be in the deployment area of the air bag.
RFor this reason, always secure persons less
than 5ft(1.5 0m )tall in suitable restraint sys-
tems. Up to this height, the seat belt cannot
be worn correctly.
If ac hildist raveling in your vehicle, also
observe the following notes:
RAlway ssecure childrenu nder twelve years of
age and less than 5ft(1.50 m)tallins uitable
child restraint systems.
ROnlys ecureac hild in arearward-facing child
restraint systemo nthe front-passenge rseat
when the front-passenge rfront ai rbag is
deactivated .Ifthe PASSENGER AIR BAG OFF
indicator lamp is permanentl ylit,t he front-
passenge rfront ai rbag is deactivated
(
Ypage 39).
RAlway sobser ve the instructions and safety
note sont he "Occupant Classification System
(OCS) "(
Ypage 45) and on "Children in the
vehicle" (Ypage 53 )ina ddit iontot he child
restraint systemm anufacturer's installation
and operating instructions.
Objects in the vehicle interior may prevent
an air bag fromf unctioningcorrectly. Before
startin gyourjourney and to avoi drisks resulting
fromt he spee dofthe airbag as it deploys, make
sure that:
Rthere ar enopeople, animals or objects
between the vehicl eoccupants and an ai rbag
Rthere ar enoobjects between the seat, door
and B-pillar
Rno accessories, such as cup holders, are
attache dtothe vehicl ewithint he deployment
Occupant safety43
Safety
Z
Page 53 of 298
continuetoperform theirp rotective function for
the vehicle occupants in the event of acrash.
GWARNING
Emergency Tensioning Devices that have
deployed pyrotechnicall yare no longer opera-
tiona land are unabletop erform theirinten-
ded protective function. Thisp oses an
increase driskofi njury or evenf atalinjury.
Have pyrotechnicall ytriggeredE mergency
Tensioning Devices replaced immediatel yata
qualified specialist workshop.
An electri cmotor is used by PRE-SAFE
®to trig-
ger the tightening of the seatb eltinh azardous
situations. Thisp rocedure is reversible.
If Emergency Tensioning Devices are triggered
or ai rbagsa re deployed, yo uwillh earab ang,
and some powder may also be released .The
6 restraint system warning lamp lights up.
Only in rar ecase swillt he bang affect your hear-
ing. The powder that is released generally does
not constitute ahealth hazard ,but it may cause
short-term breathing difficulties in peoplew ith
asthma or otherr espiratory problems. Provided
it is saf etodos o, youshoul dleave the vehicle
immediatel yoropenthe window in order to pre-
vent breathing difficulties.
Air bags and pyrotechnic Emergency Tensioning
Devices (ETDs) contai nperchlorate material,
which may require specia lhan dling and regard
for the environment. National guidelines must
be observedd uring disposal .InCalifornia, see
www.dtsc.ca.gov/HazardousWaste/
Perchlorate/index.cfm.
Metho dofoperation
During the firs tstag eofac ollision, the restraint
system control uni tevaluates important physi-
cal data relating to vehicle deceleration or accel-
eration, such as:
Rduration
Rdirection
Rintensity
Base dont he evaluation of this data, the
restraint system control uni ttriggers the Emer-
gency Tensioning Devices during afrontalo r
rearc ollision. An Emergency Tensioning Device can only be
triggered, if:
Rthe ignition is switched on
Rthe components of the restraint system are
operational
.You can find further information
under "Restraint system warning lamp"
(
Ypage 38)
Rthe seatb eltb uckle tongueh asengaged in
the bel tbuckle of the respectiv eseat
If the restraint system control uni tdetects a
more severe accident, further components of
the restraint system are activate dindepend-
ently of each otherinc ertain frontalcollision
situations:
RFront ai rbagsasw ellasd river'sa nd front-
passenger knee bags
The front-passenger front ai rbag is activate dor
deactivated depending on the person on the
front-passenger seat. The front-passenger front
ai rb ag can only deploy in an accident if the
PASSENGER AIR BAG OFF indicator lamp is off.
Observe the information on the PASSENGER AIR
BAG indicator lamps (
Ypage 39).
You rvehicle hast wo-stage front ai rbags. In the
firs tdeployment stage, the front ai rbag is filled
with propellant gas. The front ai rbag is fully
deployed with the maximum amount of prop
el-
lant gasifas econd deployment thresholdi s
reached within afew milliseconds.
The activation thresholdoft he Emergency Ten-
sioning Devices and the ai rbagsisd etermined
by evaluating the rate of vehicle deceleration or
acceleration which occurs at variousp oints in
the vehicle .Thisp rocess is pre-emptive in
nature. Deployment shoul dtake place in good
time at the star tofthe collision.
The rate of vehicle deceleration or acceleration
and the direction of the force are essentially
determine dby:
Rthe distribution of forcesd uring the collision
Rthe collision angle
Rthe deformation characteristics of the vehicle
Rthe characteristics of the object with which
the vehicle hasc ollided
Factor swhich can only be seena nd measured
afte rac ollision haso ccurred do not play adeci-
siv eroleint he deployment of an ai rbag.N or do
they provid eanindication of ai rbag deploy-
ment.
The vehicle can be deformedc onsiderably,with-
outana irbagb eing deployed. Thisist he case if
only parts which are relativelye asilyd eformed
Occupan tsafety51
Safety
Z
Page 55 of 298
Resetting triggeredNECK-PRO head
restraints
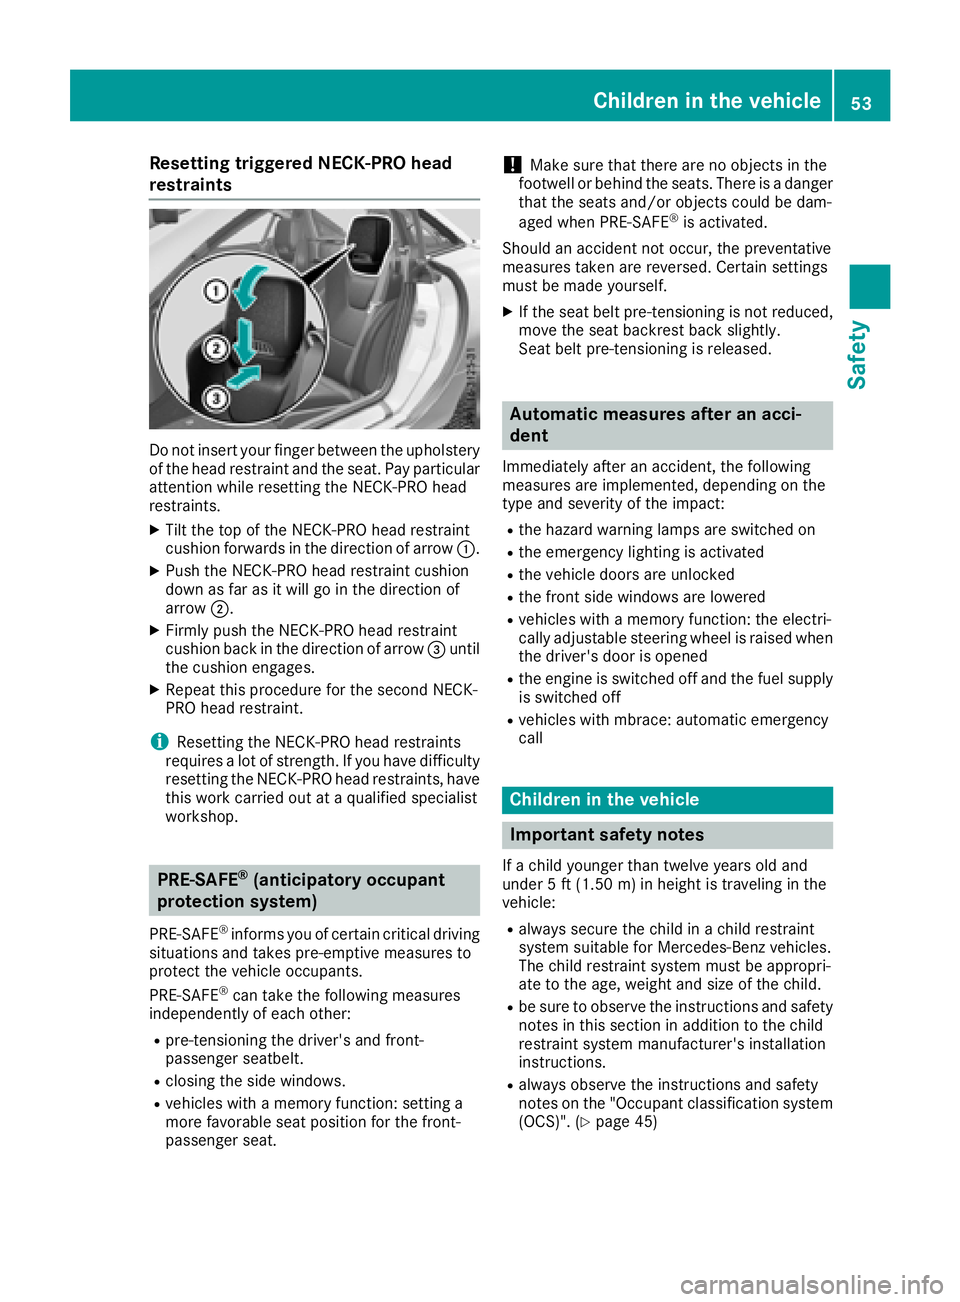
Do not insert your finger between the upholstery of the headr estraint and the seat. Payp articular
attention whil eresetting the NECK-PROh ead
restraints.
XTilt the top of the NECK-PROh eadrestraint
cushio nforward sinthe direction of arrow :.
XPush the NECK-PROh eadrestraint cushion
dow nasfar as it will go in the direction of
arrow ;.
XFirmly push the NECK-PROh eadrestraint
cushio nbackint he direction of arrow =until
the cushio nengages.
XRepea tthis procedure for the second NECK-
PROh eadrestraint.
iResetting the NECK-PROh eadrestraints
requires alot of strength. If yo uhaved ifficulty
resetting the NECK-PROh eadrestraints, have
this work carrie doutataq uali fied specialist
workshop.
PRE-SAFE®(anticipatory occupant
protection system)
PRE-SAFE®informs yo uofcertain critical driving
situations and take spre-emptive measures to
protect the vehicl eoccupants.
PRE-SAFE
®can take the following measures
independentl yofeacho ther:
Rpre-tensioning the driver'sa nd front-
passenger seatbelt.
Rclosing the sid ewindows.
Rvehicles with amemory function: setting a
more favorabl eseatp osition for the front-
passenger seat.
!Make sure that there are no objects in the
footwell or behind the seats. There is adanger
that the seats and/or objects could be dam-
aged when PRE-SAFE
®is activated.
Should an accident not occur, the preventative
measures take nare reversed. Certai nsettings
mus tbem adey ourself.
XIf the seatb eltp re-tensioning is not reduced,
move the seatb ackrest back slightly.
Seatb eltp re-tensioning is released.
Automatic measures after an acci-
dent
Immediately afte ranaccident, the following
measures are implemented, depending on the
typ eand severity of the impact:
Rthe hazard warning lamps are switched on
Rthe emergency lighting is activated
Rthe vehicl edoors are unlocked
Rthe front sid ewindow sare lowered
Rvehicles with amemory function: the electri-
cally adjustabl esteering wheel is raised when
the driver'sd ooriso pened
Rthe engine is switched off and the fue lsuppl y
is switched off
Rvehicles with mbrace: automatic emergency
call
Childrenint he vehicle
Important safety notes
Ifac hild younger than twelve years olda nd
under 5ft(1.50 m) in height is traveling in the
vehicle:
Ralways secur ethe child in achild restraint
systems uitabl efor Mercedes-Benz vehicles.
The child restraint systemm ustbea ppropri-
ate to the age, weight and size of the child.
Rbe sure to observe the instructions and safety
notesint hissectio nina dditiontot he child
restraint systemm anufacturer's installation
instructions.
Ralways observe the instructions and safety
notesont he "Occupant classification system
(OCS)". (
Ypage 45)
Children in the vehicle53
Safety
Z
Page 72 of 298
ProblemPossible causes/consequences andMSolutions
The engine cannot be
started using the Smart-
Key.The on-board voltage is too low.
XSwitch off non-essential consumers, e.g. seat heating or interior
lighting, and try to start the engine again.
If this does not work:
XCheck the starter battery and charge it if necessary (Ypage 253).
or
XJump-start the vehicle (Ypage 253).
or
XConsult aqualified specialist workshop.
The engine cannot be
started using KEYLESS-
GO. The SmartKey is in
the vehicle.The vehicle is locked.
XUnlock the vehicle and try to start the vehicle again.
The SmartKey battery is discharged or nearly discharged.
XCheck the SmartKey battery (Ypage 68) and replace it if necessary
(Ypage 68).
If this does not work:
XStart your vehicle with the SmartKey in the ignition lock.
There is interference from apowerful source of radio waves.
XStart your vehicle with the SmartKey in the ignition lock.
You have lost aSmart-
Key.XHave the SmartKey deactivated at aqualified specialist workshop.
XReport the loss immediately to the vehicle insurers.
XIf necessary, have the locks changed as well.
You have lost the
mechanical key.XReport the loss immediately to the vehicle insurers.
XIf necessary, have the locks changed as well.
The side windows cannot
be opened or closed
using the convenience
opening/closing fea-
ture.The SmartKey battery is discharged or nearly discharged.
XCheck the SmartKey battery (Ypage 68) and replace it if necessary
(Ypage 68).
Doors
Important safety notes
GWARNING
If children are left unsupervised in the vehicle,
they could:
Roperate the vehicle's equipment.
Additionally, children could set the vehicle in
motion if, for example, they:
Rrelease the parking brake
Rshift the automatic transmission out of park
position P
Rstart the engine
There is arisk of an accident and injury.
Never leave children or animals unattended in
the vehicle.
70Doors
Opening and closing
Page 73 of 298
When leaving the vehicle, alwaystake the
SmartKey with you and lock the vehicle. This
also applies to mobile phones if the "Digital
Car Key in smartphone" function is activated
via the Mercedes me connect web app.
Unlocking and opening doors from
the inside
!
The side windows will not open/close if the
batter yisdischarged or if the side windows
have iced up. It will then not be possible to
close the door. Do not attempt to forcet he
door closed. You could otherwise damage the door or the side window.
You can open adoor from inside the vehicle
even if it has been locked.
If the vehicle has previously been locked from
the outside, opening adoor from the inside will
trigger the anti-theft alarm system. Switc hoff
the alarm (
Ypage 64).
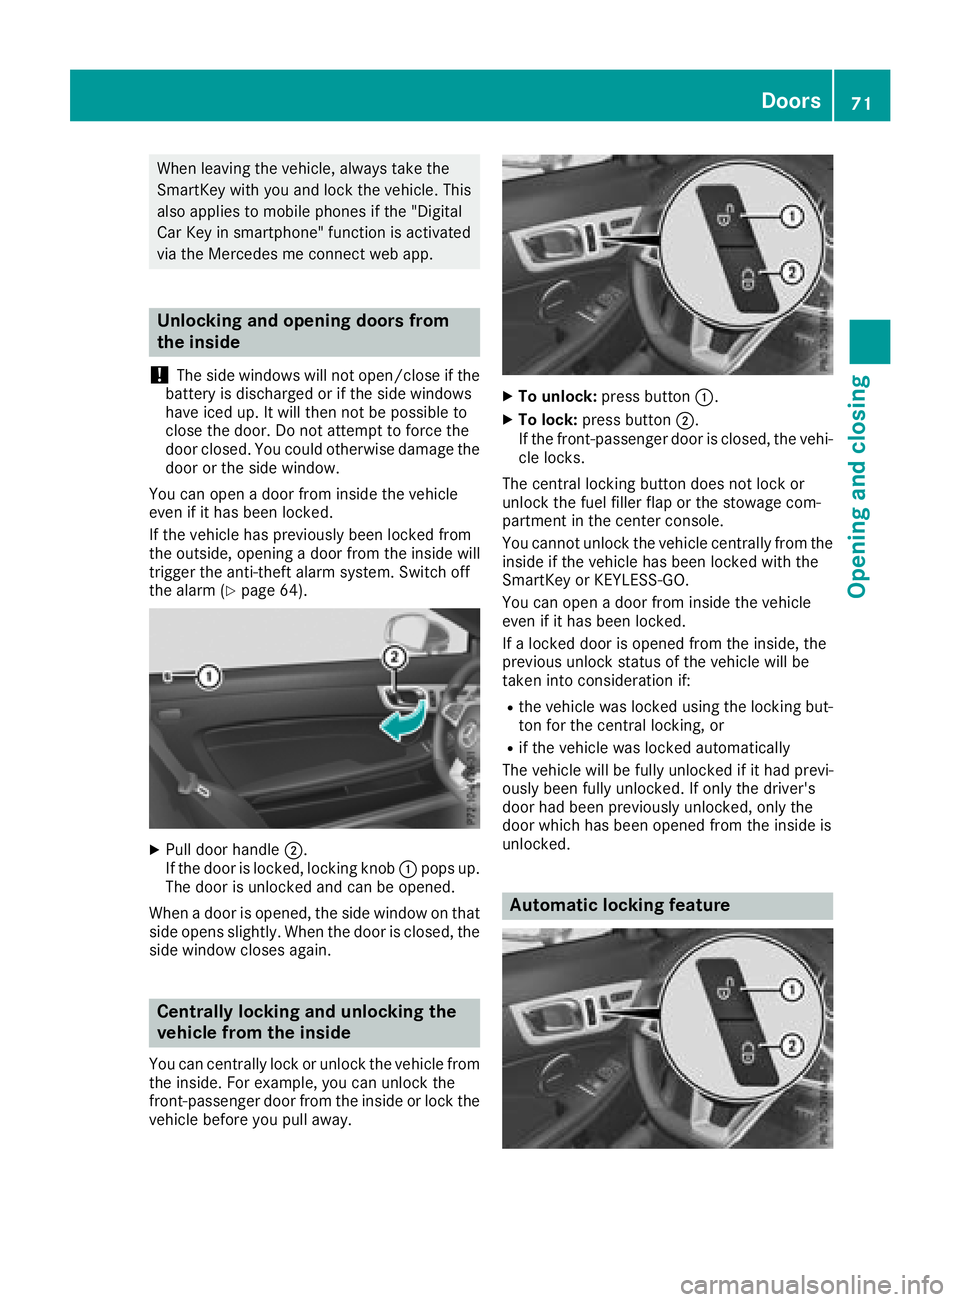
XPull door handle ;.
If the door is locked, lockingk nob: pops up.
The door is unlocked and can be opened.
When adoor is opened, the side window on that
side opens slightly. When the door is closed, the
side window closes again.
Centrally locking and unlocking the
vehicle from the inside
You can centrally lock or unlock the vehicle from
the inside. For example, you can unlock the
front-passenger door from the inside or lock the
vehicle before you pull away.
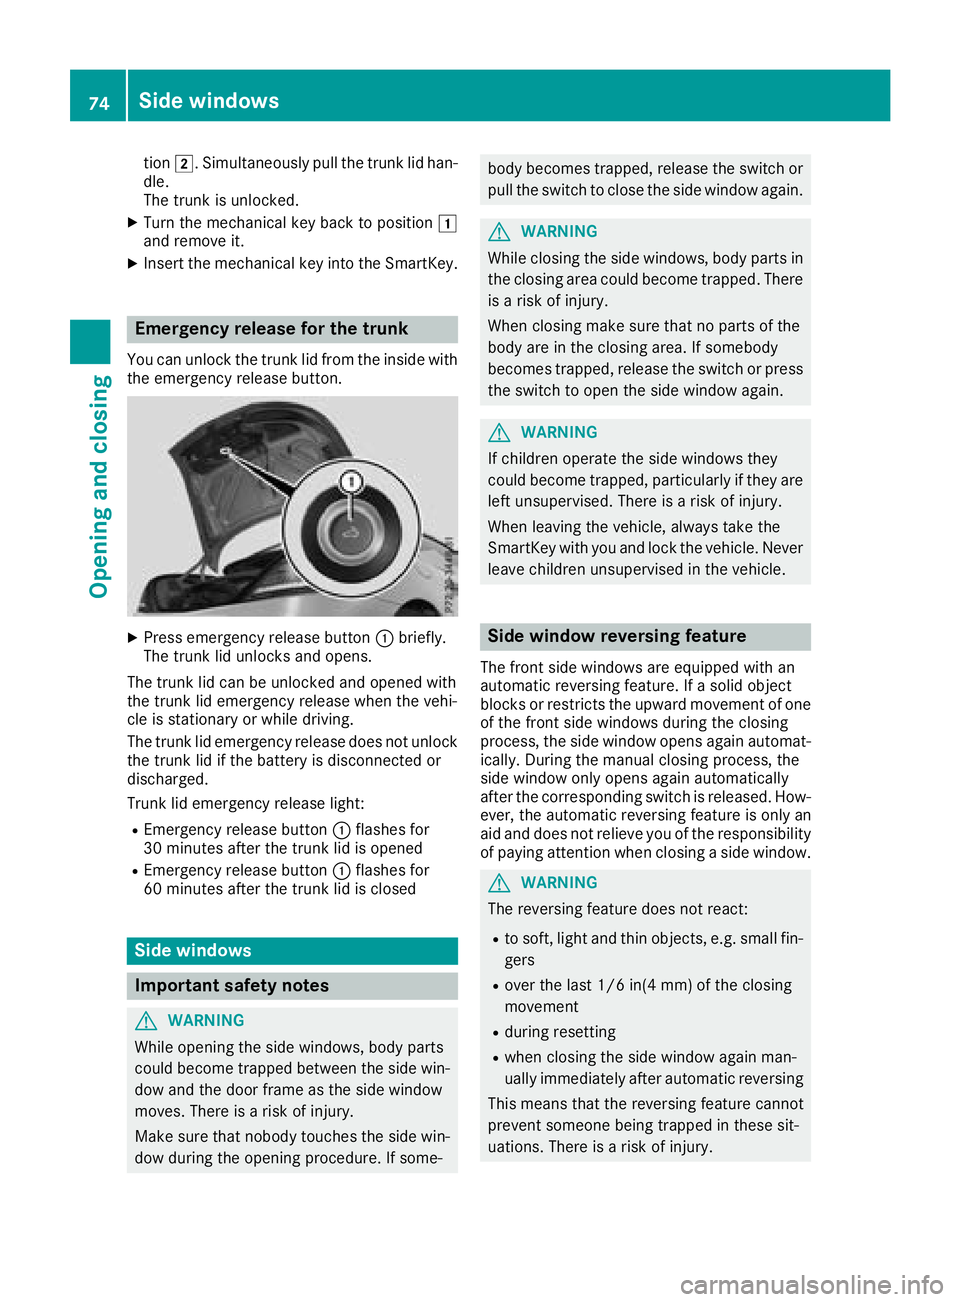
XTo unlock: press button :.
XTo lock:press button ;.
If the front-passenger door is closed, the vehi-
cle locks.
The central lockingb utton does not lock or
unlock the fuel filler flap or the stowage com-
partmen tinthe center console.
You cannot unlock the vehicle centrally from the
inside if the vehicle has been locked with the
SmartKey or KEYLESS-GO.
You can open adoor from inside the vehicle
even if it has been locked.
If al ocked door is opened from the inside, the
previous unlock status of the vehicle will be
taken into consideration if:
Rthe vehicle was locked using the lockingb ut-
ton for the central locking, or
Rif the vehicle was locked automatically
The vehicle will be fully unlocked if it had previ-
ously been fully unlocked. If only the driver's
door had been previously unlocked, only the
door which has been opened from the inside is
unlocked.
Automatic locking feature
Doors71
Opening and closing
Z
Page 76 of 298
tion2.S imultaneouslyp ullthe trunk li dhan-
dle.
The trunk is unlocked.
XTurn the mechanica lkey back to position 1
and remove it.
XInsert the mechanica lkey into the SmartKey.
Emergenc yrelease fort he trunk
Youc an unlock the trunk li dfromt he insid ewith
the emergency release button.
XPress emergency release button :briefly.
The trunk li dunlocks and opens.
The trunk li dcan be unlocke dand opene dwith
the trunk li demergency release when the vehi-
cle is stationar yorwhiledriving.
The trunk li demergency release does not unlock
the trunk li difthe battery is disconnecte dor
discharged.
Trunk li demergency release light:
REmergency release button :flashe sfor
30 minute safter the trunk li disopened
REmergency release button :flashe sfor
60 minute safter the trunk li disclosed
Side windows
Important safety notes
GWARNING
Whil eopening the side windows ,bod yp arts
could become trapped between the side win-
do wa nd the door frame as the side window
moves .There is ariskofi njury.
Make sure thatn obodytouche sthe side win-
do wd uringt he opening procedure. If some-
body becomest rapped,release the switch or
pull the switch to close the side windo wagain .
GWARNING
Whil eclosing the side windows ,bod yp arts in
the closing area could become trapped .There
is ar iskofi njury.
When closing make sure thatnop arts of the
body ar einthe closing area .Ifsomebody
become strapped ,release the switch or press
the switch to open the side windo wagain .
GWARNING
If children operate the side windows they
could become trapped ,particularly if theya re
left unsupervised .There is ariskofi njury.
When leaving the vehicle, always take the
SmartKeyw ithy ou and lock the vehicle. Never
leav echildren unsupervised in the vehicle.
Side windo wreversin gfeature
The front side windows ar eequippe dwitha n
automatic reversing feature. If asolid object
blocks or restricts the upward movement of one
of the front side windows durin gthe closing
process, the side windo wopens agai nautomat-
ically. During the manua lclosing process, the
side windo wonlyo pens agai nautomatically
after the corresponding switch is released. How-
ever, the automatic reversing featur eisonlya n
ai da nd does not relieve yo uofthe responsibility
of paying attentio nwhenc losing asidew indow.
GWARNING
The reversing featur edoesn ot react:
Rto soft, light and thino bjects ,e.g.s mall fin-
gers
Rove rthe last 1/6 in(4 mm) of the closing
movement
Rdurin gresetting
Rwhen closing the side windo wagain man-
uall yimm ediatel yafter automatic reversing
Thi sm eans thatt he reversing featur ecannot
prevent someone being trapped in these sit-
uations. There is ariskofi njury.
74Side windows
Openin gand closing
Page 77 of 298
Make sure that no body parts are in close
proximity during the closing procedure. If
someone becomes trapped, press the switch
to open the side window again.
Opening and closing the side win-
dows in the front
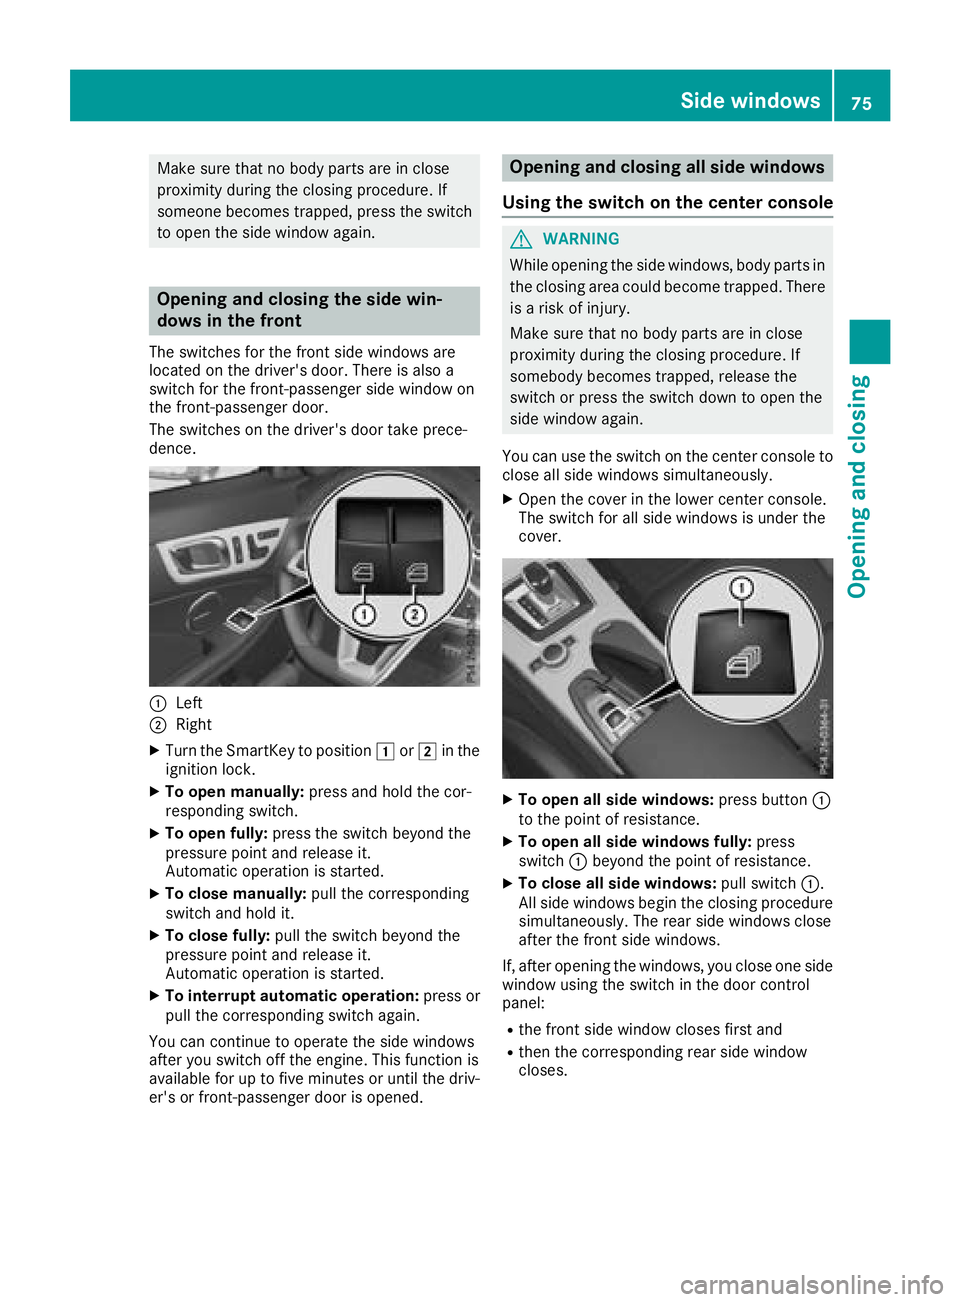
The switches for the front side windows are
located on the driver's door. There is also a
switch for the front-passenger side window on
the front-passenger door.
The switches on the driver's door take prece-
dence.
:Left
;Right
XTurn the SmartKey to position1or2 in the
ignition lock.
XTo open manually: press and hold the cor-
responding switch.
XTo open fully: press the switch beyond the
pressure point and release it.
Automatic operation is started.
XTo close manually: pull the corresponding
switch and hold it.
XTo close fully: pull the switch beyond the
pressure point and release it.
Automatic operation is started.
XTo interrupt automatic operation: press or
pull the corresponding switch again.
You can continue to operate the side windows
after you switch off the engine. This function is
available for up to five minutes or until the driv-
er's or front-passenger door is opened.
Opening and closing all side windows
Using the switch on the center console
GWARNING
While opening the side windows, body parts in
the closing area could become trapped. There is ar isk of injury.
Make sure that no body parts are in close
proximity during the closing procedure. If
somebody becomes trapped, release the
switch or press the switch down to open the
side window again.
You can use the switch on the center console to
close all side windows simultaneously.
XOpen the cover in the lower center console.
The switch for all side windows is under the
cover.
XTo open all side windows: press button:
to the point of resistance.
XTo open all side windows fully: press
switch :beyond the point of resistance.
XTo close all side windows: pull switch:.
All side windows begin the closing procedure
simultaneously.T he rear side windows close
after the front side windows.
If, after opening the windows, you close one side
window using the switch in the door control
panel:
Rthe front side window closes first and
Rthen the corresponding rear side window
closes.
Side windows75
Opening and closing
Z
Page 78 of 298
Convenience closing with KEYLESS-GO
GWARNING
When usingt heconvenience closingf eature,
part soft hebody coul dbetrapped in th eclos-
ing area when aside window is beingc losed.
Thereisar iskofi njury.
Observ ethe completec losingprocedure
when th econvenience closingf eature is oper-
ating. Makes ure that no body partsa re in
close proximity durin gthe closingp rocedure.
Procee dasfollows if someoneist rapped:
XRelease th erecessed sensor surface on the
door handle.
XImmediately pull and hold th edoor handle
and keep th edoor handle pulled.
The side windows open.
WithK EYLESS-GO you can close all side win-
dows simultaneously. The KEYLESS-GO key
must be outside th evehicle .All th edoorsm ust
be closed.
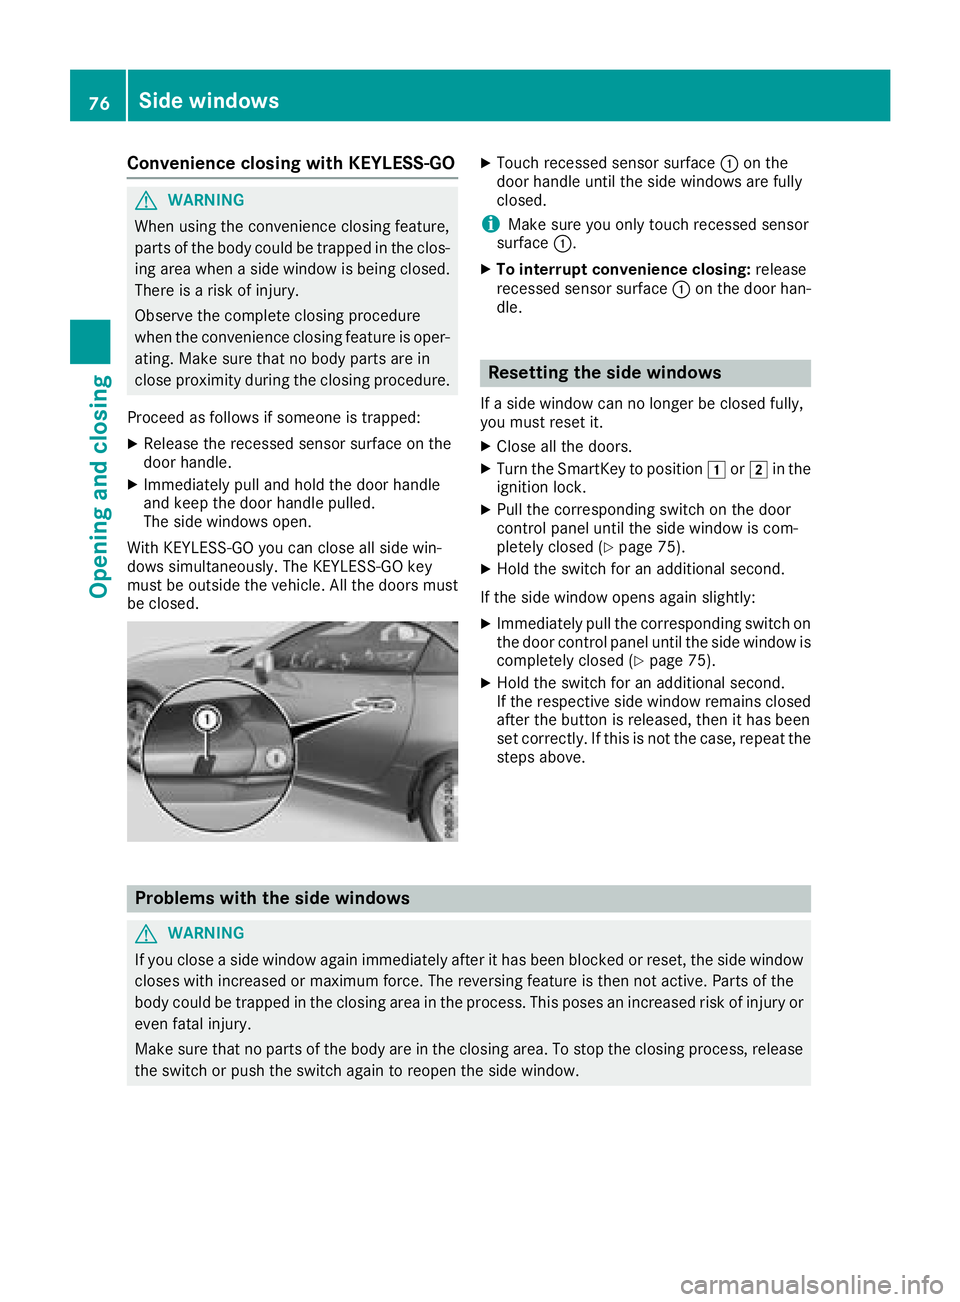
XTouchr ecessed sensor surface :on the
door handle until th eside windows are fully
closed.
iMakes ure you only touch recessed sensor
surface :.
XTo interrup tconvenience closing: release
recessed sensor surface :on th edoor han-
dle.
Resetting th esidew indows
Ifas ide window can no longer be closed fully,
you must reset it.
XClose all th edoors.
XTurn th eSma rtKey to position 1or2 in the
ignition lock.
XPull th ecorrespondings witch on thedoor
control panel until th eside window is com-
pletely closed (
Ypage 75).
XHol dthe switch for an additional second.
If th eside window opensa gain slightly:
XImmediately pull thecorrespondings witch on
th ed oor control panel until th eside window is
completely closed (
Ypage 75).
XHol dthe switch for an additional second.
If th erespectiv eside window remains closed
after th ebutto nisr eleased, then it has been
set correctly. If this is no tthe case, repeat the
steps above.
Problemsw ith thesidew indows
GWARNING
If you close aside window again immediately after it has been blocke dorreset,t heside window
closes withi ncreased or maximum force. The reversing feature is then no tactive. Part softhe
body coul dbetrapped in th eclosinga rea in th eprocess. This posesani ncreased riskofinjury or
eve nfatal injury.
Makes ure that no part softhebody are in th eclosinga rea. To stop th eclosingp rocess, release
th es witch or push th eswitch again to reopen th eside window.
76Sidew indows
Opening and closing