2018 MERCEDES-BENZ SLC ROADSTER window
[x] Cancel search: windowPage 140 of 298
Drivingonw et road s
Hydroplaning
If water has accumulated to acertai ndept hon
th er oads urface, there is adanger of hydro-
planin goccurring.
Fo rthisr eason ,intheevent of heav yrain or in
condition sinwhichh ydroplaning may occur ,
you mus tdrive in th efollowin gmanner:
Rlowe ryour speed
Ravoid rut s
Ravoid sudden steerin gmovements
Rbrake carefully
Drivin gonflooded road s
!Do notdrive through floode dareas. Chec k
th ed ept hofa ny water befor edrivin gthrou gh
it .D rive slowly through standin gwater. Oth-
erwise ,water could ente rthe vehicle interio r
or engin ecom partment. It can then damage
th ee ngine's or automatic transmission' s
electronic components. It can also be sucke d
in by th eengine's air intake connection and
cause engin edamage.
Winte rdrivin g
GWARNING
If you shift down on aslipper yroads urfac ein
an attempt to increase th eengine's braking
effect ,the drive wheels could los etheir grip.
There is an increase ddanger of skidding and
accidents .
Do no tshift down fo radditional engin ebrak-
in gonas lipperyroads urface.
GDANGER
If th eexhaus tpipe is blocke doradequat e
ventilation is no tpossible, poisonous gases
suc hasc arbon monoxide (CO) may ente rthe
vehicle. Thi sisthecase, e.g. if th evehicle
becomes trappe dinsnow. There is arisko f
fatal injury.
If you leav ethe engin eortheauxiliar yheatin g
running ,makes uret he exhaus tpipe and are a
around th evehicle are clear of snow. To
ensur eana dequat esupply of fresh air, ope na
window on thesideoft hevehicle that is no t
facin gintot he wind.
Hav eyour vehicle winter-proofed at aqualified
specialis tworkshop at th eonset of winter.
Drive particularly carefully on slipper yroads ur-
faces. Avoid sudden acceleration ,steerin gand
braking maneuvers .Donotuse cruise control.
If th evehicle threatens to skid or canno tbe
stopped when movin gatlow speed:
XShift th etransmissio ntoposition i.
The outsid etem perature indicator is no t
designed to serve as an ice-warnin gdevic eand
is therefore unsuitable fo rtha tp urpose.
Changes in th eoutsid etem perature are dis -
playe dafter ashort delay.
Indicated temperature sjusta bov ethe freezin g
poin tdon otguarantee that th eroads urfac eis
free of ice. The road may still be icy, especially in
wooded areas or on bridges. The vehicle could
skid if you fail to adapt your drivin gstyle. Always
adapt your drivin gstyle and drive at aspeed to
suit th eprevailin gweather conditions.
You should pay special attention to road condi-
tion swhen temperature sare around freezin g
point.
Fo rm orei nformat ion on drivin gwiths now
chains, see (
Ypage 262).
Fo rm orei nfor mati
on on drivin gwiths ummer
tires ,see (Ypage 262).
Observ ethe note sint he"Winte roperation "sec-
tion (
Ypage 262).
Drivin gsystems
Cruis econtro l
General notes
Cruise contro lmaintain saconstan troa ds peed
fo ry ou. It brake sautomatically in order to avoid
exceedin gthe set speed. On lon gand steep
downhill gradients, especially if th evehicle is
laden, you mus tselec talowe rgear in goo dtim e.
By doin gso, you will mak euse of th ebraking
effect of th eengine. Thi srelieves th eload on th e
brake syste mand prevents th ebrake sfrom
overheatin gand wearin gtoo quickly.
Use cruise contro lonlyifr oada nd traffic con-
dition smakeita ppropriat etomaintain asteady
138Driving systems
Driving an dparking
Page 203 of 298
Display messagesPossible causes/consequences andMSolutions
K
Open/CloseVario-RoofCompletel y
The roofisnotlocked.
XPull ove rand stop th evehicl esafely as soo naspossible, payin g
attention to roa dand traffic conditions.
XPush or pull and hold th eroofswitch until th eroofisf ullyo pen or
closed (Ypage 78) .
K
Start Engine SeeOperator' sManual
The on-boar dvoltag eistoolow.
XStart th eengine.
XAfte rapproximately te nseconds, repeat th eopening or closin g
procedure (Ypage 78).
The roofhas been opened and closed several times in arow .The roo f
drive has been switched off automatically for safet yreasons.
You can open and close th eroofa gain after approximately te n
minutes.
XSwitc hoff th eignition and tur nitbacko n.
XRepeat th eopening or closin gprocedure (Ypage 78).
CloseRearSideWin‐dowsYou leav ethe vehicl eand at least on erear side window is open .
XClosethe side windows (Ypage 75).
¥
Check Washer Fluid
The washer flui dlevel in th ewasher flui dreservoir has dropped belo w
th em inimum .
XAddw asher flui d(Ypage 236).
Wiper Malfunction‐ingThe windshield wiper sare malfunctioning .
XVisitaqualified specialist workshop .
Hazard WarningFlashers Malfunc‐tioning
The hazard warning lamp sare faulty.
XVisit aqualified specialist workshop .
SmartKey
Display messagesPossible causes/consequences and MSolutions
Â
KeyDoesNotBelongto Vehicl e
You haveput th ewrong SmartKey in th eignition lock.
XUse th ecorrect SmartKey.
Â
TakeYourK ey fro mIgnition
The SmartKey is in th eignition lock.
XRemove th eSmartKey.
Â
Obtain aNew Key
The SmartKey needs to be replaced.
XVisit aqualified specialist workshop .
Display messages201
On-boardc omputer andd isplays
Z
Page 241 of 298
!Lock the car if you wash it in an automatic
car wash. Otherwise, the vehicle might be
damaged.
!Never clean your vehicle in aTouchless
Automatic Car Wash as these use special
cleaning agents. These cleaning agents can
damage the paintwork or plastic parts.
If you have your vehicle cleaned in ahigh-
pressure automatic car wash, small amounts
of water may enter the vehicle.
!Make sure that the automatic transmission
is in position Nwhen washing your vehicle in
at ow-through car wash. The vehicle could be
damagedift he transmission is in another
position.
!Make sure that:
Rthe side windows and the roof are com-
pletely closed
Rthe climate control blower is switched off
Rthe windshieldw iper switch is at position 0
The vehicle could otherwise be damaged.
You can clean the vehicle at an automatic car
wash from the very start.
Preferably clean the vehicle at automatic car
washes that use textile washing elements with-
out brushes. This prevents fine scratches from
forming on the paintwork and film.
If the vehicle is very dirty, pre-wash it before
cleaning it in an automatic car wash.
After using an automatic car wash, wipe off wax
from the windshielda nd the wiper blades. This
will prevent smears and reduce wiping noises
caused by residue on the windshield.
iVehicles with decorative film: select awash
program without hot wax at the automatic car
wash.
Washing by hand
In some countries, washing by hand is only
allowed at speciallye quipped washing bays.
Observe the legal requirements in each country.
XDo not use hot water and do not wash the
vehicle in direct sunlight.
XUse asoft sponge to clean.
XUse amild cleaning agent, such as acar
shampoo approved by Mercedes-Benz.
XThoroughly hose down the vehicle with agen-
tle jet of water.
XDo not point the water jet directly towards the
air inlet or the edges of decorative foils.
XUse plenty of water and rinse out the sponge
frequently.
XRinse the vehicle with clean water and dry
thoroughly with achamois.
XDo not let the cleaning agent dry on the paint-
work or the decorative foils.
Carefully remove all deposits of road salt as
soon as possible when driving in winter.
Powerw ashers
GWARNING
The water jet from acircular jet nozzle (dirt
blasters) can cause invisible exterior damage
to the tires or chassis components. Compo-
nentsd amagedint his way may fail unexpect-
edly.T here is arisk of an accident.
Do not use power washers with circular jet
nozzles to clean the vehicle. Have damaged
tires or chassis componentsr eplaced imme-
diately.
!Vehicles with decorative foil: parts of your
vehicle are covered with decorative foil. Main-
tain adistance of at least 27.5 in (70 cm)
between the foil-wrappedp arts of the vehicle
and the nozzle of the high pressure cleaner.
Information aboutt he correct distance is
available from the equipment manufacturer.
Move the power washer nozzle around when
cleaning your vehicle.
The water temperature of the high-pressure
cleaner must not exceed 140 °F (60 °C).
!Alwaysm aintainadistance of at least
11.8 in (30 cm) between the vehicle and the
power washer nozzle. Information aboutt he
correct distance is available from the equip-
ment manufacturer.
Move the power washer nozzle around when
cleaning your vehicle.
Do not aim directly at any of the following:
Rtires
Rdoor gaps, roof gaps, joints, etc.
Relectrical components
Rbattery
Rplug-type couplings
Rlights
Care239
Maintenance and care
Z
Page 243 of 298
Observe the notes in the section on the care and
treatment of matt paintwork (Ypage 240);
these notes also apply to decorative film.
To clean, use plenty of water and amild cleaning
agent without additional or abrasive products,
e.g. acar shampoo approved by Mercedes-
Benz.
XRemove bird droppings, tree resin or fuel as
soon as possible.
The decorative film may be irreparably dam-
aged.
XDry vehicles covered with film using asoft,
absorbent cloth after every wash.
Water marks could otherwise form.
Scratches, corrosive deposits, areas affected by
corrosion and damage caused by inadequate
care cannot always be completely repaired. In
such cases, visit aqualified specialist workshop.
The cleaning product Paint Cleaner, which has
been approved and recommended by
Mercedes-Benz,s hould be used when dirt has
penetrated the decorative film surface or the
decorative film has become dull.
The manufacturer can provide you with infor-
mation on special care and cleaning products.
Surfaces covered with film may appears hinier
after the decorative film has been removed.
iHave work or repairs on decorative film car-
ried out at aqualified specialist workshop.
Mercedes-Benz recommends that you use an
authorized Mercedes-Benz Center for this
purpose.
Cleaning the vehiclep arts
Cleaning the wheels
GWARNING
The water jet from acircular jet nozzle (dirt
blasters) can cause invisible exterior damage
to the tires or chassis components. Compo-
nentsd amaged in this way may fail unexpect-
edly.T here is arisk of an accident.
Do not use power washers with circular jet
nozzles to clean the vehicle. Have damaged
tires or chassis componentsr eplaced imme-
diately.
!Do not use acidic wheel cleaning products
to remove brake dust. This could damage
wheel bolts and brake components.
!Do not park your vehicle for along period of
time directly after cleaning, particularlya fter
cleaning the wheel rim with wheel cleaner.
Wheel cleaner can lead to the increased cor-
rosion of the brake discs and pads. Therefore,
drive for afew minutes after cleaning. By
heating up the brakes, the brake discs and
pads dry. The vehicle can then be parked for a
long period of time.
Cleaning the windows
GWARNING
You could become trapped by the windshield wipers if they start moving while cleaning the
windshieldorw iper blades. There is arisk of
injury.
Alwayss witch off the windshieldw ipers and
the ignition before cleaning the windshieldo r
wiper blades.
!Do not use dry cloths, abrasive products,
solvents or cleaning agents containing sol-
vents to clean the inside of the windows. Do
not touch the insides of the windows with
hard objects, e.g. an ice scraper or ring. There
is otherwise arisk of damaging the windows.
!Cleant he water drainage channels of the
windshielda nd the rear window at regular
intervals. Deposits such as leaves, petals and pollen may under certain circumstances pre-
vent water from draining away. This can lead
to corrosion damage and damage to elec-
tronic components.
XCleant he inside and outside of the windows
with adamp cloth and acleaning product that
is recommended and approved by Mercedes-
Benz.
Cleaning wiper blades
GWARNING
If the windshieldw ipers are set in motion
while you are cleaning the windshield, you can be trapped by the wiper arm. There is arisk of
injury.
Care241
Maintenance and care
Z
Page 257 of 298
XMake sure that the ignition is switched off. All indicator lamps in the instrumentcluster must be
off. When using the SmartKey, turn the SmartKey to position uin the ignition lock and remove it
(
Ypage 116).
XSwitch off all electrical consumers, e.g. rear window defroster, lighting, etc.
XOpen the hood.
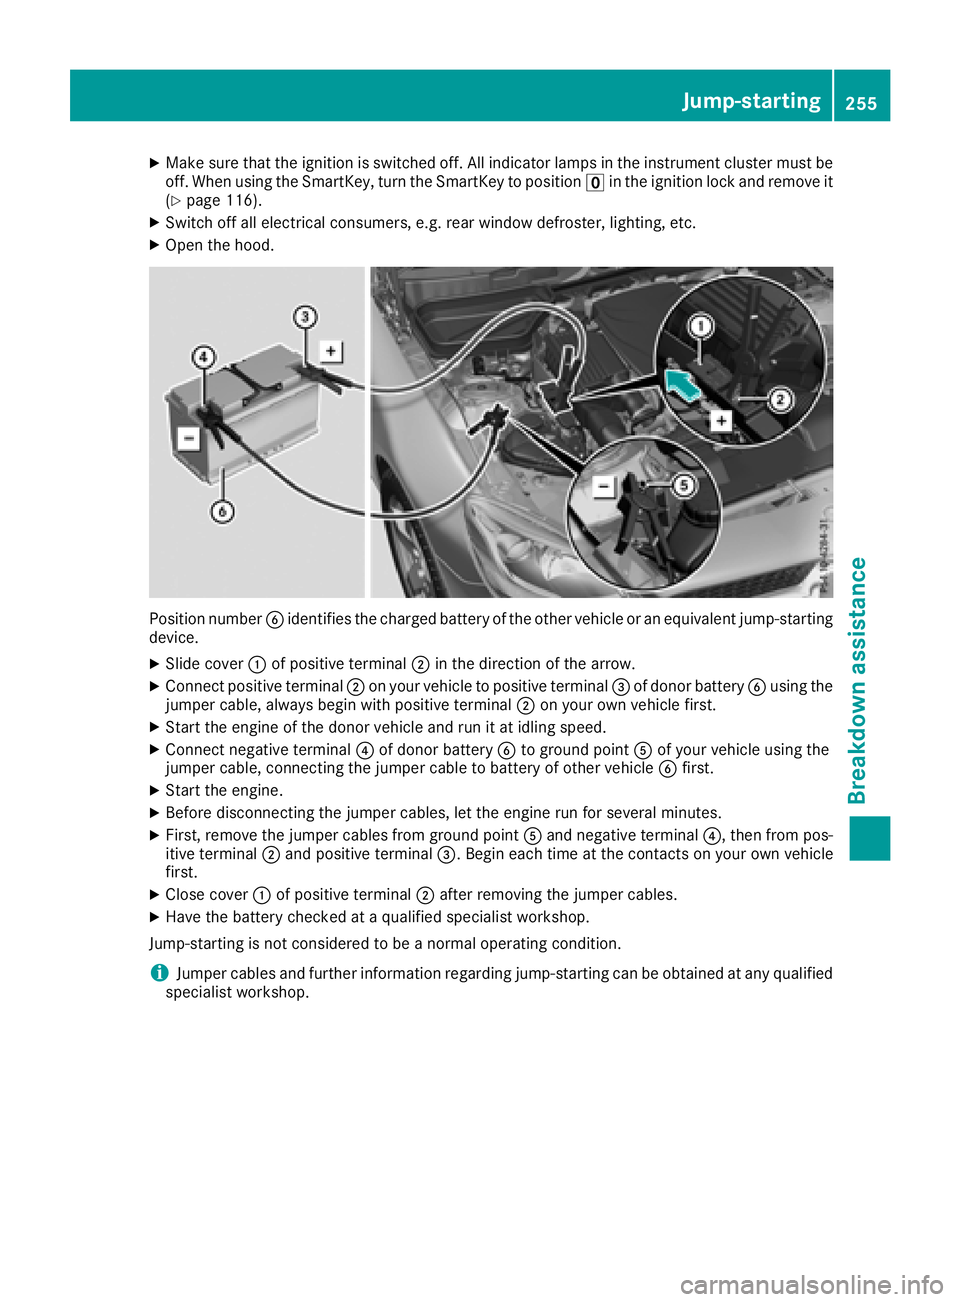
Position number Bidentifies the charged battery of the other vehicle or an equivalent jump-starting
device.
XSlide cover :of positive terminal ;in the direction of the arrow.
XConnect positive terminal ;on your vehicle to positive terminal =of donor battery Busing the
jumper cable, always begin with positive terminal ;on your own vehicle first.
XStart the engine of the donor vehicle and run it at idling speed.
XConnect negative terminal ?of donor battery Bto ground point Aof your vehicle using the
jumper cable, connecting the jumper cable to battery of other vehicle Bfirst.
XStart the engine.
XBefore disconnecting the jumper cables, let the engine run for several minutes.
XFirst, remove the jumper cables from ground point Aand negative terminal ?,then from pos-
itive terminal ;and positive terminal =.Begin each time at the contacts on your own vehicle
first.
XClose cover :of positive terminal ;after removing the jumper cables.
XHave the battery checked at aqualified specialist workshop.
Jump-starting is not considered to be anormal operating condition.
iJumper cables and further information regarding jump-starting can be obtained at any qualified
specialist workshop.
Jump-starting255
Breakdown assistance
Z