2018 MERCEDES-BENZ SLC ROADSTER engine
[x] Cancel search: enginePage 236 of 298
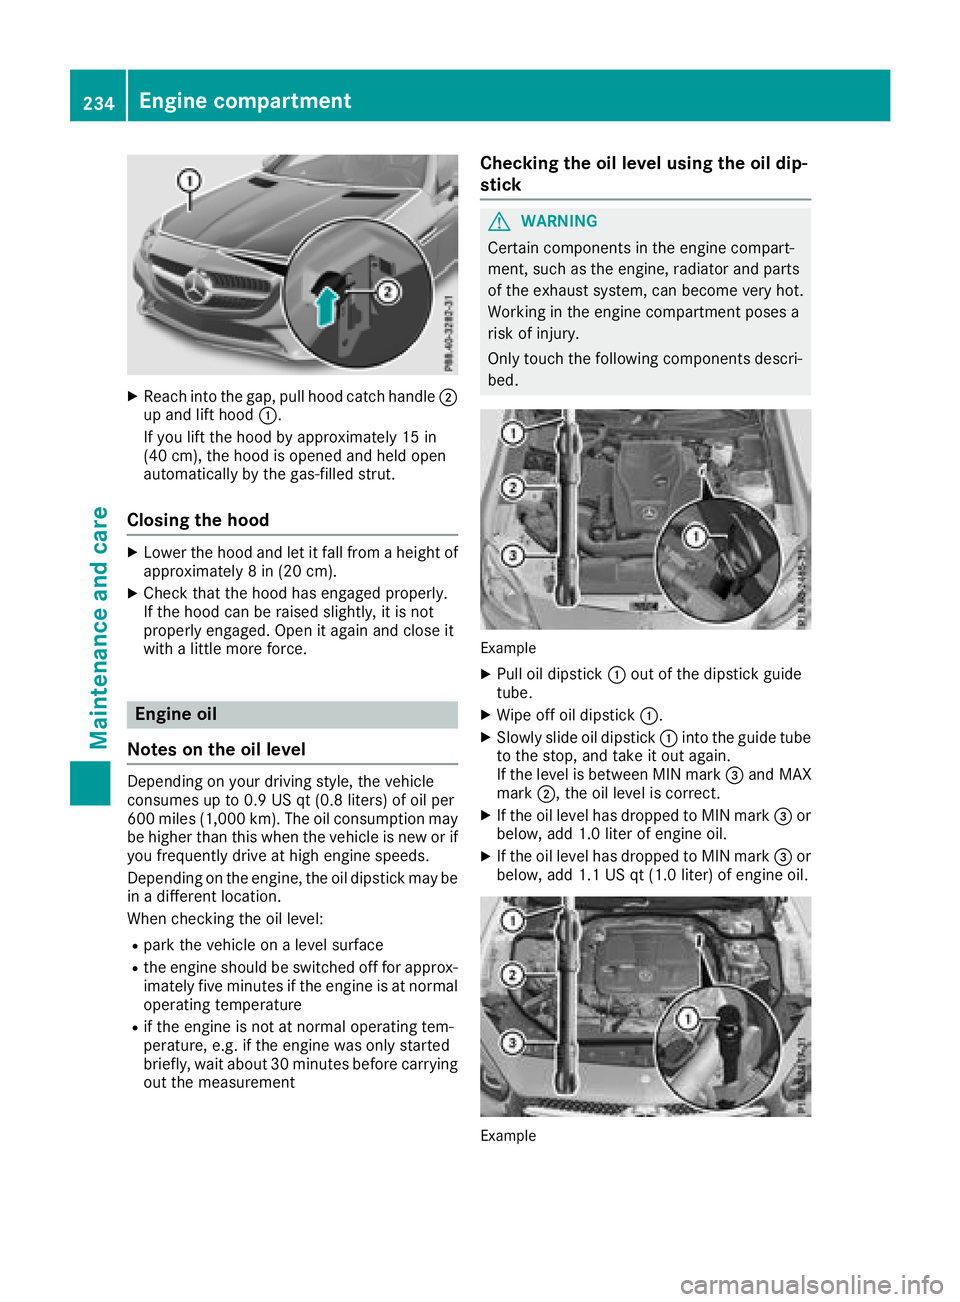
XReachintot he gap, pull hoo dcatch handle ;
up and lift hoo d:.
If you lift th ehoodbya pproximately 15 in
(40 cm), th ehoodiso pened and held open
automatically by th egas-filled strut .
Closingthehood
XLowe rthe hoo dand let it fall from aheight of
approximately 8in(20 cm).
XChec kthatthe hoo dhas engage dproperly.
If th ehoodc an be raised slightly, it is no t
properly engaged. Open it again and close it
wit hal ittlem oref orce .
Engine oil
Notes on th eoil level
Dependin gonyour driving style, th evehicl e
consumes up to 0. 9USqt(0.8 liters )ofoilpe r
60 0m iles (1,000 km). Th eoilcons umption may
be higher than th iswhen th evehicle is newori f
you frequently driveath igh engines peeds.
Dependin gontheengine, th eoil dipst ick may be
in ad ifferent location.
When checking th eoilleve l:
Rpark th evehicle onaleve lsurface
Rthee ngines hould be swit ched off for approx-
imately fiv eminute sift heengineisatn ormal
operatin gtem perature
Rifth ee ngineisn otat normal operatin gtem -
perature, e.g .iftheenginew as onlystarted
brie fly,wait about 30 minute sbefore carrying
out the measurement
Checking the oil level using the oil dip-
stick
GWARNING
Certain component sinthe engine compart-
ment ,such as the engine, radiator and parts
of the exhaust system, can become very hot.
Workin ginthe engine compartment poses a
risk of injury.
Only touch the following component sdescri-
bed.
Example
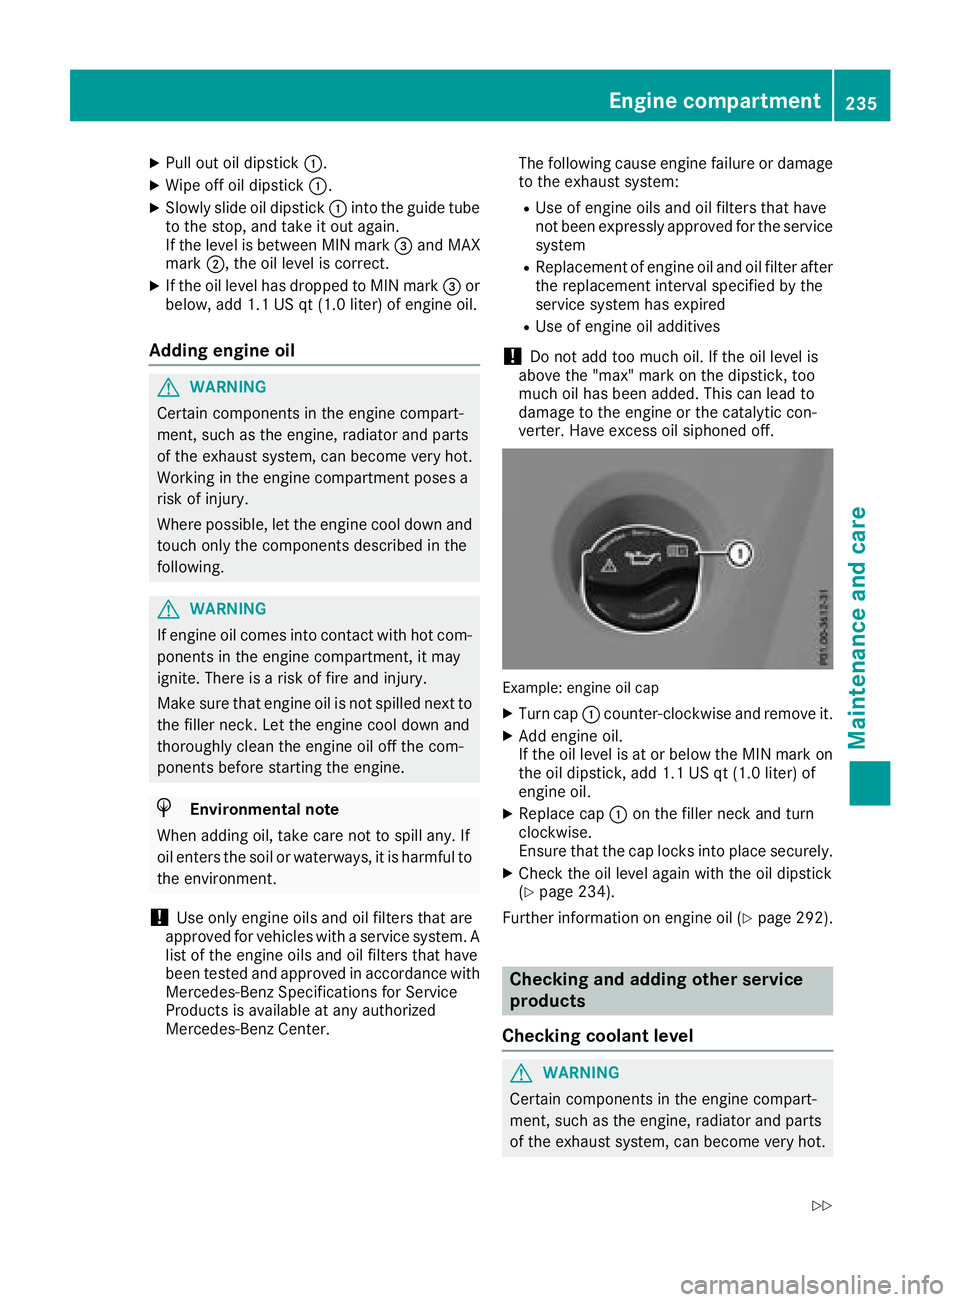
XPull oil dipstick :out of the dipstick guide
tube.
XWipe off oil dipstick :.
XSlowly slide oil dipstick :into the guide tube
to the stop, and take it out again.
If the level is between MIN mark =and MAX
mark ;,the oil level is correct.
XIf the oil level has dropped to MIN mark =or
below, add 1.0 liter of engine oil.
XIf the oil level has dropped to MIN mark =or
below, add 1.1 US qt (1.0 liter) of engine oil.
Example
234Engine compartment
Maintenance and care
Page 237 of 298
XPull out oil dipstick:.
XWipe off oil dipstick :.
XSlowly slide oil dipstick :into the guide tube
to the stop, and take it out again.
If the level is between MIN mark =and MAX
mark ;,the oil level is correct.
XIf the oil level has dropped to MIN mark =or
below, add 1.1 US qt (1.0 liter) of engine oil.
Adding engine oil
GWARNING
Certain components in the engine compart-
ment ,such as the engine, radiator and parts
of the exhaust system, can become very hot.
Workingint he engine compartment poses a
risk of injury.
Where possible, let the engine cool down and touch only the components described in the
following.
GWARNING
If engine oil comes into contact with hot com- ponentsint he engine compartment ,itmay
ignite. There is arisk of fire and injury.
Make sure that engine oil is not spilled next to
the filler neck.L et the engine cool down and
thoroughly clean the engine oil off the com-
ponentsb efore starting the engine.
HEnvironmenta lnote
When adding oil, take care not to spill any. If
oil enter sthe soil or waterways, it is harmful to
the environment.
!Use only engine oils and oil filters that are
approved for vehicles with aservice system. A
list of the engine oils and oil filters that have
been tested and approved in accordanc ewith
Mercedes-Benz Specifications for Service
Products is availableata ny authorized
Mercedes-Benz Center. The following cause engine failure or damage
to the exhaust system:
RUse of engine oils and oil filters that have
not been expressly approved for the service
system
RReplacement of engine oil and oil filter after
the replacement interval specified by the
service system has expired
RUse of engine oil additives
!Do not add too much oil. If the oil level is
above the "max" mark on the dipstick ,too
much oil has been added. This can lead to
damage to the engine or the catalytic con-
verter .Have excess oil siphoned off.
Example: engine oil cap
XTurn cap :counter-clockwise and remove it.
XAdd engine oil.
If the oil level is at or below the MIN mark on
the oil dipstick ,add 1.1 US qt (1.0 liter) of
engine oil.
XReplace cap :on the filler neck and turn
clockwise.
Ensure that the cap locks into place securely.
XCheck the oil level again with the oil dipstick
(Ypage 234).
Further information on engine oil (
Ypage 292).
Checking and adding other service
products
Checking coolant level
GWARNING
Certain components in the engine compart-
ment ,such as the engine, radiator and parts
of the exhaust system, can become very hot.
Engine compartment235
Maintenance and care
Z
Page 238 of 298
Workinginthe engine compartment poses a
risk of injury.
Where possible, let the engine cool down and touch only the componentsd escribed in the
following.
GWARNING
The cooling system is pressurized, particularly
when the motor is warm. If you open the cap,
you could be scalded if hot coolant sprays out.
There is arisk of injury.
Let the engine cool down before you open the
cap. Wear gloves and eye protection. Slowly
open the cap to relieve pressure.
Example
XPark the vehicle on alevel surface.
Only check the coolant level when the vehicle
is on alevel surface and the engine has cooled
down.
XTurn the SmartKey to position 2in the igni-
tion lock (Ypage 116).
On vehicles with KEYLESS-GO, press the
Start/Stop button twice (
Ypage 116).
XCheck the coolant temperature gage in the
multifunction display.
The coolant temperature must be below
158 ‡(70 †).
XTurn the SmartKey to position u
(Ypage 116) in the ignition lock.
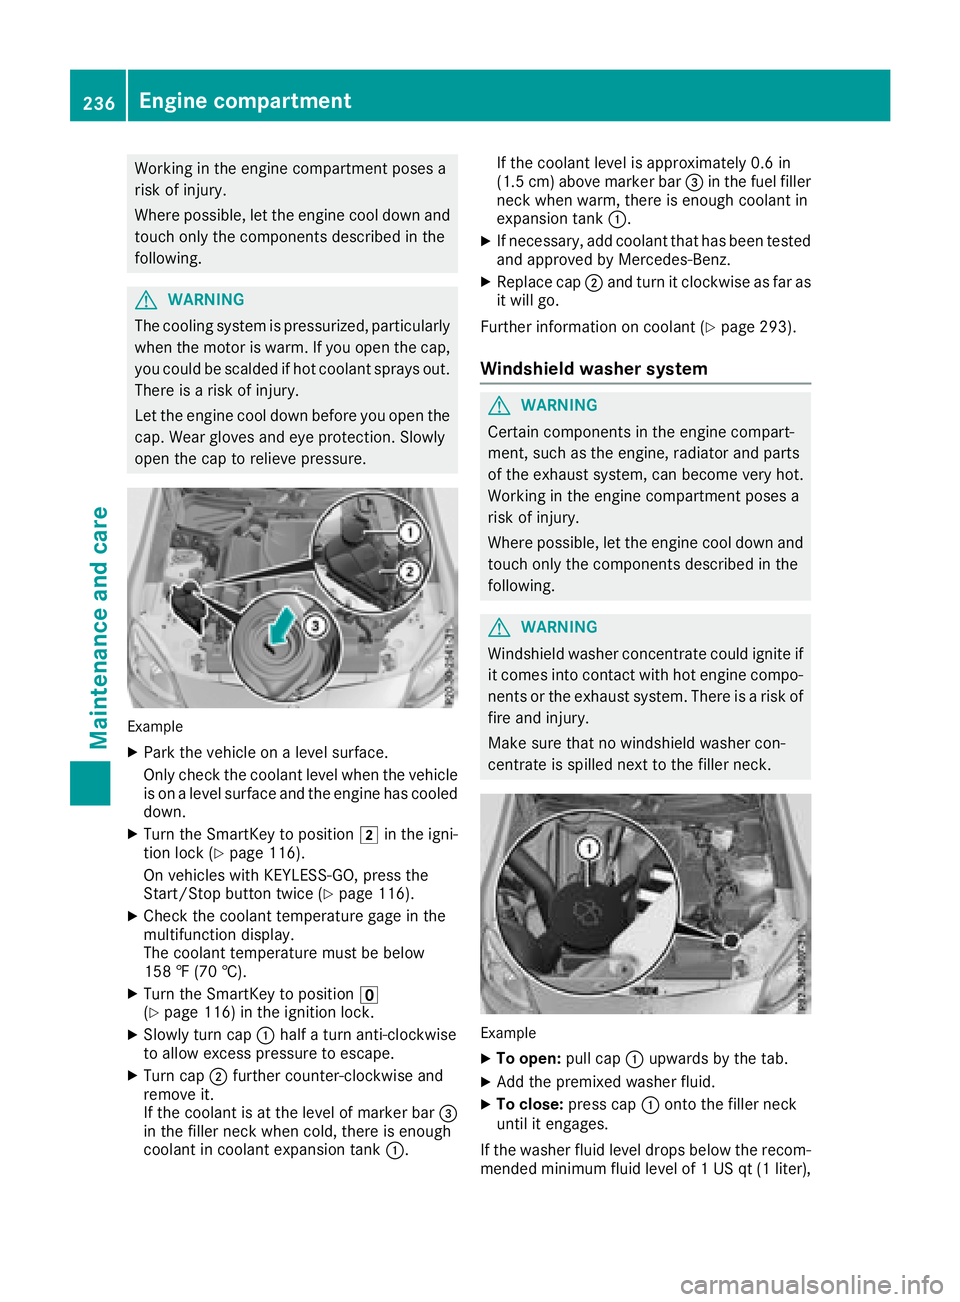
XSlowly turn cap :half aturn anti-clockwise
to allow excessp ressure to escape.
XTurn cap;further counter-clockwise and
remove it.
If the coolant is at the level of marker bar =
in the filler neck when cold, there is enough
coolant in coolant expansion tank :.If the coolant level is approximately 0.6 in
(1.5 cm
)above marker bar =in the fuel filler
neck when warm, there is enough coolant in
expansion tank :.
XIf necessary, add coolant that has been tested
and approved by Mercedes-Benz.
XReplace cap;and turn it clockwise as far as
it will go.
Further information on coolant (
Ypage 293).
Windshield washer system
GWARNING
Certain component sinthe engine compart-
ment,s uch as the engine, radiator and parts
of the exhaust system, can become very hot.
Workin ginthe engine compartment poses a
risk of injury.
Where possible, let the engine cool down and touch only the componentsd escribed in the
following.
GWARNING
Windshield washer concentrate could ignite if it comes into contact with hot engine compo-
nents or the exhaust system. There is arisk of
fire and injury.
Make sure that no windshield washer con-
centrate is spilled next to the filler neck.
Example
XTo open: pull cap:upwards by the tab.
XAdd the premixed washer fluid.
XTo close: press cap :ontothe filler neck
until it engages.
If the washer fluid level drops below the recom-
mended minimum fluid level of 1USqt(1l iter),
236Engine compartment
Maintenance and care
Page 239 of 298
amessage appearsint hemultifunction display
prompting you to add washer fluid (Ypage 201).
Further informatio nonwindshield washer fluid/
antifreeze(
Ypage 294).
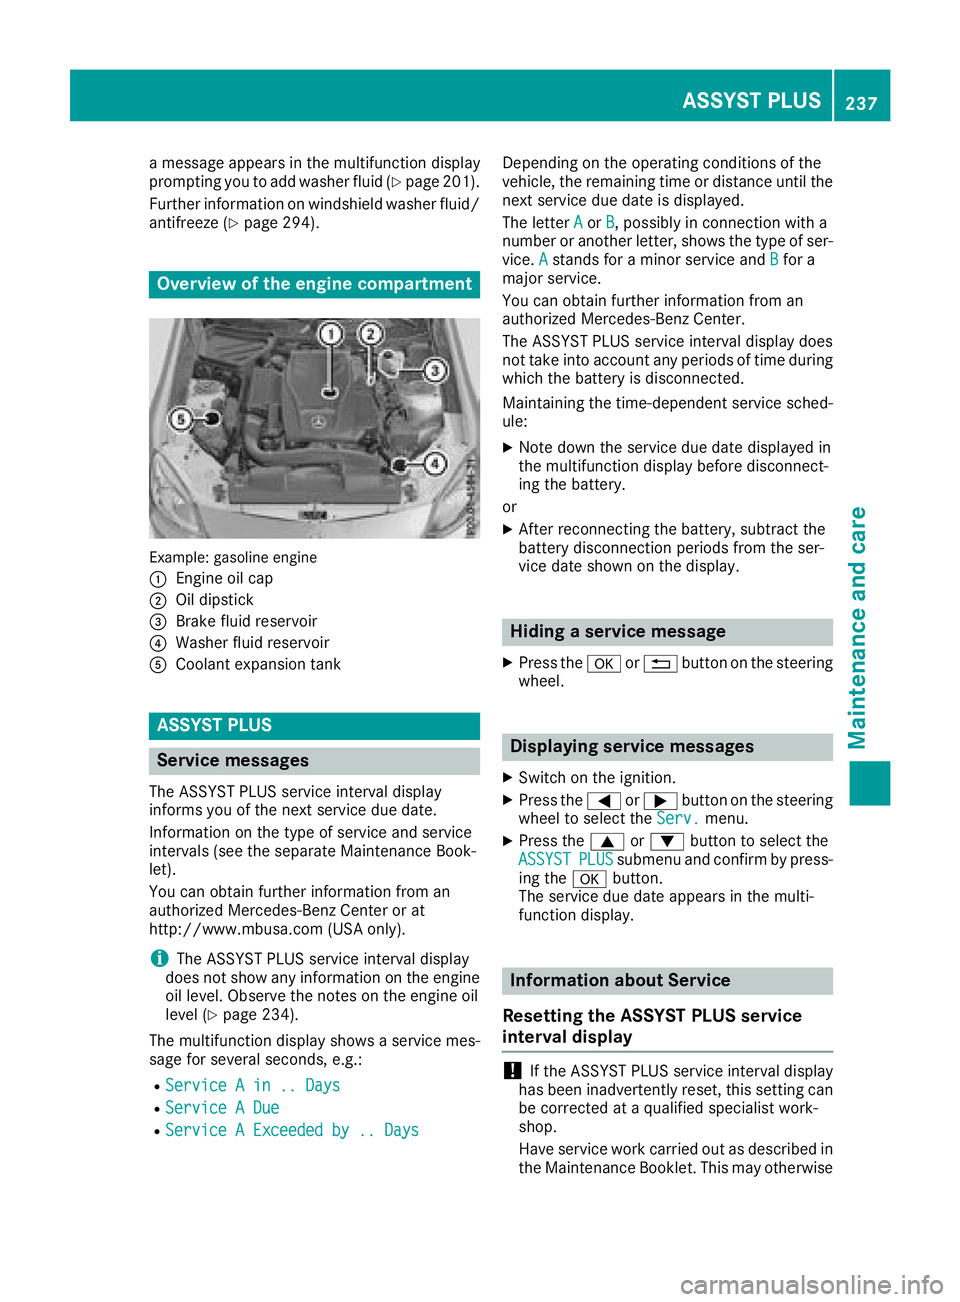
Overview of th eengine compartment
Example :gasoline engine
:
Engineo il cap
;Oil dipstick
=Brake fluid reservoir
?Washerf luid reservoir
ACoolante xpansion tank
ASSYST PLUS
Service messages
The ASSYS TPLUSs erviceinterval display
inform syou of th enexts ervic edue date.
Information on th etype of servic eand service
intervals (see th eseparate Maintenance Book-
let).
You can obtain further informatio nfroma n
authorized Mercedes-Ben zCenter or at
http://www.mbusa.com (USAo nly).
iThe ASSYS TPLUSs erviceinterval display
does no tshow any informatio nontheengine
oil level. Observ ethe note sont heengine oil
level(
Ypage 234).
The multifunction display showsas ervicemes-
sage for several seconds, e.g.:
RServiceAin..D ays
RServiceADue
RServiceAExceeded by .. Days
Dependingont heoperatin gconditionsoft he
vehicle ,the remainin gtimeord istanc euntil the
nex tservic edue dateisd isplayed.
The letter A
orB,possibly in connectio nwith a
number or another letter, showst hetype of ser-
vice. A
stands for aminor servic eand Bfor a
major service.
You can obtain further informatio nfroma n
authorized Mercedes-Ben zCenter.
The ASSYS TPLUSs erviceinterval display does
no ttak eintoa ccounta ny periods of tim eduring
whicht hebattery is disconnected.
Maintaining th etime-dependents ervicesched-
ule:
XNoted own th eservic edue dated isplayedin
th em ultifunction display before disconnect-
ing th ebattery.
or
XAfte rreconnectin gthe battery, subtrac tthe
battery disconnectio nperiods from th eser-
vic ed ates hownont hedisplay.
Hiding aservice message
XPres sthe a or% button on th esteering
wheel.
Displaying service messages
XSwitch on th eignition.
XPres sthe = or; button on th esteering
wheel to selectt heServ.menu.
XPres sthe 9 or: button to selectt he
ASSYSTPLUSsubmenu and confir mbypress-
ing the abutton.
The servic edue datea ppearsint hemulti-
function display.
Information abou tService
Resettin gthe ASSYST PLUS service
interval display
!If th eASSYSTP LUSs erviceinterval display
has been inadvertently reset,t hiss ettin gcan
be correcte dataqualified specialist work-
shop.
Hav eservic ework carried out as describe din
th eM aintenance Booklet. This may otherwise
ASSYST PLUS237
Maintenance and care
Z
Page 248 of 298
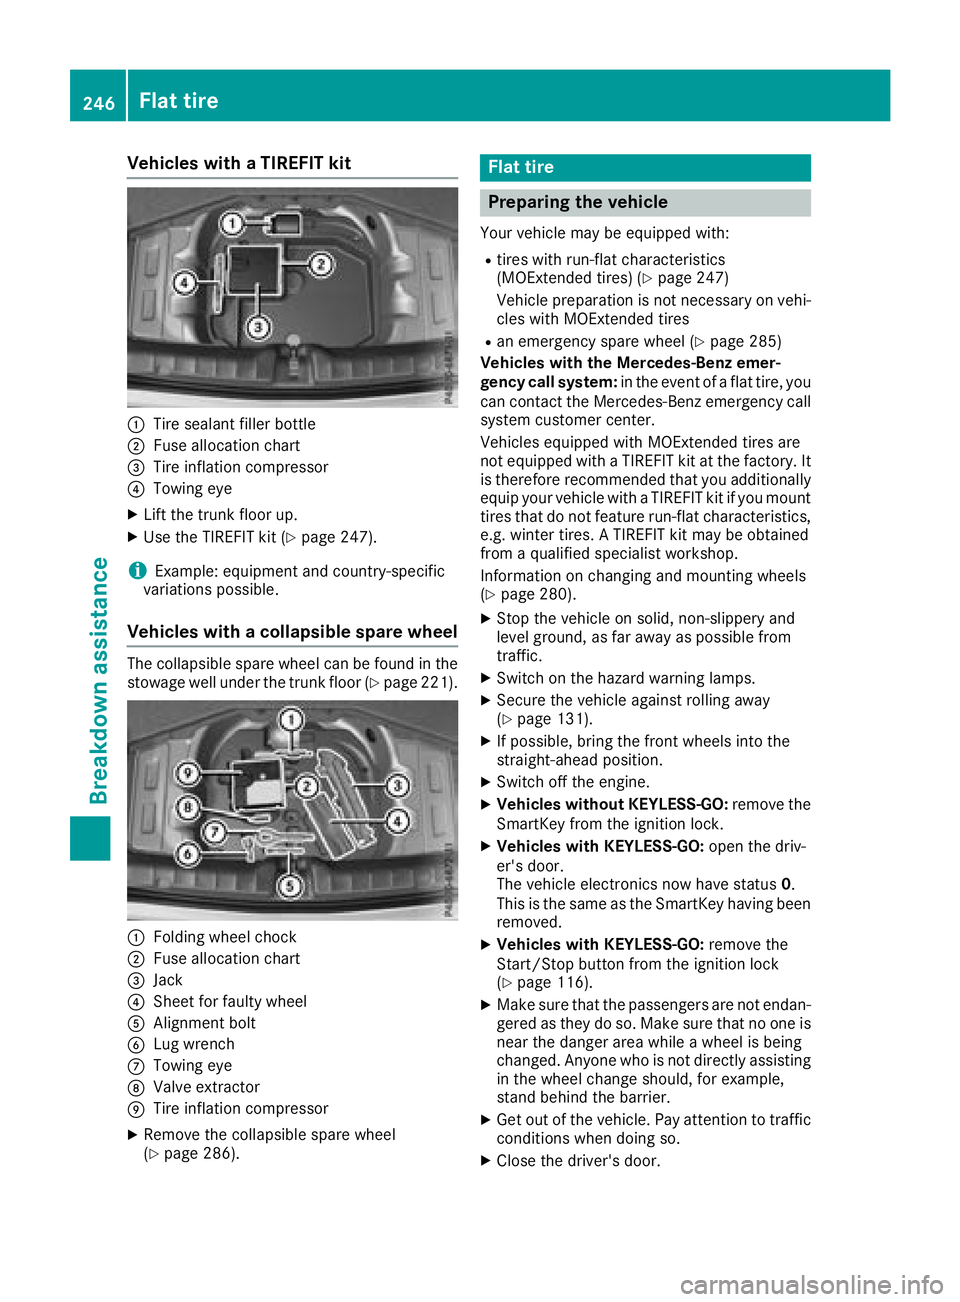
Vehicles withaTIREFI Tkit
:Tire sealant fille rbottle
;Fus ealloc ation chart
=Tire inflation compressor
?Towing eye
XLiftthe trunk floor up.
XUse the TIREFIT kit (Ypage 247).
iExample :equipment and country-specific
variations possible.
Vehicles with acolla psibl espare wheel
The collapsibl espare whee lcan be found in the
stowag ewellu nder the trunk floor (Ypage 221).
:Folding whee lchock
;Fus ealloc ation chart
=Jack
?Shee tfor faulty wheel
AAlignment bolt
BLugw rench
CTowing eye
DValve extractor
ETire inflation compressor
XRemove the collapsibl espare wheel
(Ypage 286).
Flat tire
Preparin gthe vehicle
Your vehicl emaybe equipped with:
Rtire sw ithr un-fla tcharacteristics
(MOExtended tires) (Ypage 247)
Vehicl epreparation is not necessary on vehi-
cle sw ithM OExtende dtires
Ran emergency spare whee l(Ypage 285)
Vehicles with the Mercedes-Benz emer-
genc ycalls ystem: in the event of aflatt ire ,you
can contact the Mercedes-Benz emergency call
system customerc enter.
Vehicles equipped with MOExtende dtiresa re
not equipped with aTIREFIT kit at the factory .It
is therefore recommende dthaty ouadditionally
equi pyourvehicl ewithaT IREFIT kit if yo umount
tire sthatd onot feature run-fla tcharacteristics,
e.g .winter tires. ATIREFIT kit maybeo btained
from aquali fied specialist workshop.
Informatio nonchanging and mounting wheels
(
Ypage 280).
XStop the vehicl eonsolid,non-slippery and
level ground ,asfar away as possibl efrom
traffic.
XSwitch on the hazard warning lamps.
XSecure the vehicl eagain st rolling away
(Ypage 131).
XIf possible, bring the front wheels into the
straight-ahea dposition.
XSwitch off the engine.
XVehicles withou tKEYLESS -GO:remove the
SmartKey from the ignition lock.
XVehicles with KEYLESS-GO: open the driv-
er' sd oor.
T he vehicl eelectronics now have status 0.
Thi sist he same as the SmartKey having been
removed.
XVehicles with KEYLESS-GO: remove the
Start/Stop button from the ignition lock
(
Ypage 116).
XMake sure thatt he passengersare not endan-
gered as they do so. Make sure thatnoo ne is
nea rthe danger are awhile awheel is being
changed .Anyone wh oisnot directlya ssisting
in the whee lchange should, for example,
stand behind the barrier.
XGe toutof the vehicle. Paya ttentiontotraffic
conditions when doing so.
XClose the driver'sd oor.
246Flat tire
Breakdo wn assis tance
Page 253 of 298
Battery (vehicle)
Important safety notes
Specialtool sand expert knowledg eare required
when working on the battery ,e.g.r emovala nd
installation. Yo ushoul dtherefore have al lwork
involving the battery carrie doutataq uali fied
specialist workshop.
GWARNING
Wor kcarrie doutincorrectly on the battery
can lead ,for example, to ashort circui tand
thusd amagethe vehicl eelectronics .Thisc an
lead to functio nrestrictions applying to
safety-relevant systems, e.g .the lighting sys-
tem, the ABS (anti-lock braking system )orthe
ESP
®(Electronic Stability Program). The oper-
ating safety of your vehicl emaybe restricted.
Yo uc ould lose controloft he vehicle, for
example:
Rwhen braking
Rin the event of abrupt steering maneuvers
and/or when the vehicle's speed is not
adapted to the roadc onditions
There is ariskofana ccident.
In the event of ashort circui torasimilar inci-
dent, contact aquali fied specialist workshop
immediately. Do not drive any further .You
shoul dhavea llwork involving the battery car-
rie do utataq uali fied specialist workshop.
For further informatio nabout ABS and ESP
®,
see (Ypage 57 )and (Ypage 60).
GWARNING
Electrostati cbuild -upc an lead to the creation
of sparks, which could ignite the highl yexplo-
sive gases of abattery.T here is ariskofa n
explosion.
Before handling the battery ,touch the vehicle
body to remove any existing electrostatic
build-up.
The highl yflammabl egasmixture form swhen
charging the battery as well as when jump-start-
ing. Alway
smakes uret hatn either yo unor the bat-
tery is electrostaticall ycharged. Abuild -upo f
electrostatic charge can be caused ,for exam-
ple:
Rby wearing clothing made from synthetic
fibers
Rdu etof rictionbetween clothing and seats
Rif yo upushorp ullt he battery across the car-
pe toro thersyntheti cmaterials
Rif yo uwipet he battery with acloth
GWARNING
During the charging process ,abattery produ-
ces hydrogen gas. If ashort circui toccurs or
sparks are created,t he hydrogen gascan
ignite .There is ariskofane xplosion.
RMake sure thatt he positive terminal of a
connected battery does not come into con- tact with vehicl eparts.
RNever place meta lobjects or tool sonabat-
tery.
RIt is important thaty ouobserve the descri-
be do rder of the battery terminal swhen
connecting and disconnecting abattery.
RWhe njump-starting ,makes uret hatt he
battery pole swithi de ntical polarity are
connected.
RIt is particularly important to observe the
describe dorder when connecting and dis-
connecting the jumper cables.
RNever connect or disconnect the battery
terminal swhile the engine is running.
GWARNING
Battery aci discaustic .There is ariskofi njury.
Avoidc ontact with skin, eyes or clothing. Do
not inhal eany battery gases .Donot lean over
the battery .Keepc hildren away from batter-
ies. Wash away battery aci dimmediatelyw ith
plenty of clean water and see kmedica latten-
tion.
HEnvironmental note
Batterie scontain pollu-
tants .Itisi llegalto dispose
of them with the household
Battery (vehicle)251
Breakdo wn assis tance
Z
Page 255 of 298
Charging thebattery
GWARNING
During chargin gand jump-starting, explosive
gases can escape from th ebattery. Thereisa
ris kofane xplosion.
Particularly avoid fire, open flames, creating
sparks and smoking. Ensure there is sufficient
ventilatio nwhile chargin gand jump-starting.
Do no tlean ove rabattery.
GWARNING
Battery acid is caustic .Thereisar iskofi njury.
Avoid contac twiths kin, eyes or clothing .Do
no tinhale any battery gases.Don otlean over
th eb attery. Keep childre naway from batter-
ies. Wash away battery acid immediately with
plenty of clean wate rand seek medical atten-
tion.
GWARNING
Ad ischarged battery can freezeatt empera-
tures below freezing point. When jump-start-
ing th evehicle or chargin gthe battery, gases
can escape from th ebattery. Thereisar isko f
an explosion.
Allow th efroze nbattery to thaw out before
chargin gitorjump-starting.
!Only use battery chargers witham aximum
chargin gvoltage of 14.8 V.
!Only charge th ebattery usingt hejump-
starting connection point.
The jump-startin gconnection pointisint he
enginec ompartment.
If th eindicator/warning lamps do no tlight up at
low temperatures, it is ver ylikely that th edis-
charge dbattery has frozen.Int hisc ase, you
may neither charge th ebattery no rjump-start
th ev ehicle .The servic elife of athawed-out bat-
tery may be shorter. The starting characteristics
can be impaired, particularly at low tempera-
tures. Hav ethe thawed-out battery checked at a
qualified specialist workshop.
Read th ebattery charger's operatin ginstruc-
tions before chargin gthe battery.
XOpen th ehood.
XConnect th ebattery charge rtothepositive
terminal and ground pointint hesame order
as when connecting th edonor battery in the
jump-startin gprocedure (
Ypage 253).
Jump-starting
For th ejump-startin gprocedure, use only th ejump-startin gconnection pointint heenginec om-
partment, consisting of apositiv etermi nal and aground point.
GWARNING
Battery acid is caustic .Thereisar iskofi njury.
Avoid contac twiths kin, eyes or clothing .Donotinhale any battery gases.Don otlean ove rthe
battery. Keep childre naway from batteries .Wash away battery acid immediately withp lenty of
clean wate rand seek medical attention.
GWARNING
During chargin gand jump-starting, explosive gases can escape from th ebattery. Thereisar isk
of an explosion.
Particularly avoid fire, open flames, creating sparks and smoking. Ensure there is sufficient ven-
tilatio nwhile chargin gand jump-starting. Do no tlean ove rabattery.
Jump-starting253
Breakdown assistance
Z
Page 256 of 298

GWARNING
During the charging process,ab attery produces hydrogen gas. If ashort circui toccurs or sparks
are created ,the hydrogen gas can ignite. There is arisk of an explosion.
RMake sure that the positive terminal of aconnected battery does not come into contact with
vehiclep arts.
RNever place metal objects or tools on abattery.
RIt is important that you observe the described order of the battery terminal swhen connecting
and disconnecting abattery.
RWhen jump-starting, make sure that the battery polesw ith identical polarity are connected.
RIt is particularlyimportant to observe the described order when connecting and disconnecting
the jumper cables.
RNever connect or disconnect the battery terminal swhile the engine is running.
GWARNING
Ad ischarged battery can freeze at temperatures below freezing point. When jump-starting the
vehicleorc harging the battery,g asescan escap efrom the battery.T here isarisk of an explosion.
Allow the frozen battery to thaw out before charging it or jump-starting.
!Avoid repeated and lengthy starting attempts. Otherwise, the catalytic converter coul dbe
damaged by the non-combusted fuel.
If the indicator/warning lamp sdonot light up at low temperatures, it is very likelyt hat the dis-
charge dbattery has frozen. In this case, you may neither charge the battery nor jump-start the
vehicle. The service life of athawed-out battery may be shorter. The starting characteristics can be
impaired,p articularlyatlow temperatures. Have the thawed-out battery checked at aqualified
specialist workshop.
Do not start the vehicleu singarapi dc harging device. If you rvehicle's battery is discharged, the
engine can be jump-started from another vehicleorf romasecond battery using jumper cables.
Observe the following points:
RThe battery is not accessible in all vehicles. If the other vehicle's battery is not accessible,j ump-
start the vehicleu singasecond battery or ajump-starting device.
RYou may only jump-start the vehiclew hen the engine and exhaust system are cold.
RDo not start the engine if the battery is frozen. Let the battery thaw first.
ROnly jump-start from batterieswitha12Vv oltagerating.
ROnly use jumper cables which have asufficient cross-section and insulated terminal clamps.
RIf the battery is full ydischarged, leave the battery that is being used to jump-start connected for
af ew minutes before attempting to start. This charge sthe battery slightly.
RMake sure that the two vehicles do not touch.
Make sure that:
RThe jumper cables are not damaged.
RBare parts of the terminal clamp do not come into contact with other metal parts while the jumper
cables are connected to the battery.
RThe jumper cables cannot come into contact with parts which can move when the engine is
running, such as the V-belt pulley or the fan.
XSecure the vehiclebyapplying the electric parking brake.
XShift the transmission to position j.
254Jump-starting
Breakdown assistance